21Python之rabbitMQ,redis
Posted 中国先疯队队长
tags:
篇首语:本文由小常识网(cha138.com)小编为大家整理,主要介绍了21Python之rabbitMQ,redis相关的知识,希望对你有一定的参考价值。
一、RabbitMQ队列
rabbitMQ是一个第三方工具,需要先安装Erlang,然后再安装rabbitMQ,安装方法,请自行百度。安装好后打开:http://localhost:15672即可进入rabbitMQ的管理界面,默认已有的账号和密码都为guest/guest。
在python中使用模块,pika对rabbitMQ进行操作。
1、最简单的通信。我们知道MQ就是一个消息队列,那么咱们现在就用python来实现下图的一个最简单的通信。P端负责把消息扔进队列,C端负责从队列中取消息。

P端的代码如下:

 1 import pika
 2
 3 credential = pika.PlainCredentials(\'test\',\'test123\')#认证信息
 4 #创建连接对象
 5 connection = pika.BlockingConnection(pika.ConnectionParameters(host=\'192.168.12.1\',credentials=credential))
 6 #创建渠道
 7 channel = connection.channel()
 8 #申明队列
 9 channel.queue_declare(queue="Test_Queue",durable=True)#durable=True将队列设置为持久化,否则MQ重启后队列丢失
10 message = "hi,I am sender" #要发送的数据
11 channel.basic_publish(exchange=\'\',#暂时忽略
12                       routing_key=\'Test_Queue\',
13                       body=message,
14                       properties=pika.BasicProperties(delivery_mode=2,))#delivery_mode=2将消息设置为持久化
15 connection.close()
C端的代码如下:

 1 import pika,time
 2
 3 credential = pika.PlainCredentials(\'test\',\'test123\')
 4 connection = pika.BlockingConnection(pika.ConnectionParameters(host=\'192.168.12.1\',credentials=credential))
 5
 6 channel = connection.channel()
 7 #申明队列
 8 channel.queue_declare(queue="Test_Queue",durable=True)#将队列设置为持久化
 9 channel.basic_qos(prefetch_count = 1)#每次只取一条消息
10 def callback(channel,method,property,body):
11     print("开始处理消息.....")
12     time.sleep(2)
13     print("[x] Received %r" % body)
14     print("消息处理结束......")
15     channel.basic_ack(delivery_tag=method.delivery_tag) #确认消息已经消费
16     \'\'\'处理后续逻辑\'\'\'
17 channel.basic_consume(callback,
18                       queue=\'Test_Queue\',
19                       no_ack=False)#说明消息被消费后,需要确认
20 channel.start_consuming()
2、Publish\\Subscribe(消息发布\\订阅)。有些时候你想让你的消息被所有的Queue收到,类似广播的效果,这时候就要用到exchange了,Exchange在定义的时候是有类型的,以决定到底是哪些Queue符合条件,可以接收消息。
fanout: 所有bind到此exchange的queue都可以接收消息
direct: 通过routingKey和exchange决定的那个唯一的queue可以接收消息
topic:所有符合routingKey(此时可以是一个表达式)的routingKey所bind的queue可以接收消息
图解如下,下面针对这三种类型分别演示。

python的实现如下:
exchange_type为fanout的时,表示只要绑定到exchange的队列都会收到消息。
P端代码:

 1 import pika
 2
 3 credential = pika.PlainCredentials(\'test\',\'test123\')
 4 conn = pika.BlockingConnection(pika.ConnectionParameters(host=\'192.168.12.1\',
 5                                                          credentials=credential))
 6
 7 channel = conn.channel()
 8
 9 channel.exchange_declare(exchange="logs",exchange_type=\'fanout\')#所有绑定到logs上的队列都能收到消息
10
11 message = "class is over"
12
13 channel.basic_publish(exchange=\'logs\',
14                       routing_key=\'\',
15                       body=message,)
16
17 conn.close()
C端代码

 1 import  pika,time
 2
 3 credential = pika.PlainCredentials(\'test\',\'test123\')
 4 conn = pika.BlockingConnection(pika.ConnectionParameters(host=\'192.168.12.1\',
 5                                                          credentials=credential))
 6
 7 channel = conn.channel()
 8
 9 channel.exchange_declare(exchange=\'logs\',exchange_type=\'fanout\')
10
11 result = channel.queue_declare(exclusive=True)#随机生成一个队列
12
13 queue_name = result.method.queue #获取队列的名字
14
15 channel.queue_bind(exchange=\'logs\',queue=queue_name)
16
17 def callback(conn,method,properties,body):
18     print("开始接收消息")
19     print("接收到的消息是:%s" % body)
20     print("消息接收完成")
21
22     # conn.basic_ack(delivery_tag=1)
23
24 channel.basic_consume(consumer_callback=callback,queue=queue_name,no_ack=True)#no_ack=True不需要确认消息是否收到
25 channel.start_consuming()
exchange_type为direct时,通过routing_key这个字段进行消息过滤,也就是说只有routing_key的值和发送消息的routing_key的值一样才能收到消息。
P端代码:

 1 # -*- coding:utf-8 -*-
 2 import  sys,pika
 3
 4
 5 conn = pika.BlockingConnection(pika.ConnectionParameters(host=\'localhost\'))
 6
 7 channel = conn.channel()
 8
 9 channel.exchange_declare(exchange=\'direct_logs\',
10                          exchange_type=\'direct\')
11
12 severity = sys.argv[1] if len(sys.argv)>1 else \'info\'
13 message = \'[%s]:send a logger message\' % severity
14 channel.basic_publish(exchange=\'direct_logs\',
15                       routing_key=severity,
16                       body=message)
17
18 conn.close()
C端代码:

 1 # -*- coding:utf-8 -*-
 2 import sys,pika
 3
 4 conn = pika.BlockingConnection(pika.ConnectionParameters(\'localhost\'))
 5
 6 channel = conn.channel()
 7
 8 channel.exchange_declare(exchange=\'direct_logs\',exchange_type=\'direct\')
 9
10 result = channel.queue_declare(exclusive=True)
11
12 queue_name = result.method.queue
13 def callback(conn,method,properties,body):
14     print("开始接收数据")
15     print(body.decode())
16     print("接收完毕")
17 severities = sys.argv[1:]
18 if not severities:
19     sys.stderr.write("Usage:%s[info][warning][error]\\n" % sys.argv[0])
20     sys.exit(1)
21 for severity in severities:
22     channel.queue_bind(exchange=\'direct_logs\', queue=queue_name, routing_key=severity)
23
24 channel.basic_consume(consumer_callback=callback,queue=queue_name,no_ack=True)
25
26 channel.start_consuming()
exchange_type为topic时,对routing_key进行了细分,支持其用表达式的方式进行消息过滤。消息过滤的规则如下:
To receive all the logs run:(匹配所有)
python receive_logs_topic.py "#"
To receive all logs from the facility "kern":(匹配kern开头的队列的消息)
python receive_logs_topic.py "kern.*"
Or if you want to hear only about "critical" logs:(以.critical结尾的队列消息)
python receive_logs_topic.py "*.critical"
You can create multiple bindings:(可以写多个队列名)
python receive_logs_topic.py "kern.*" "*.critical"
And to emit a log with a routing key "kern.critical" type:(使用一个精确的匹配)
python emit_log_topic.py "kern.critical" "A critical kernel error"
实现一个简单的RPC(remote procedure call)
服务端代码:

 1 import pika,time
 2 import threading
 3 class RPC_Server(threading.Thread,object):
 4     def fib(self,n):
 5         if n == 0:
 6             return 0
 7         elif n == 1:
 8             return 1
 9         else:
10             return self.fib(n-1) + self.fib(n-2)
11
12     def on_request(self,channel,method,properties,body):
13         print("收到消息.....",properties.correlation_id)
14         n = int(body)
15         try:
16             response = self.fib(n)
17         except RecursionError as e:
18             print(e)
19             response = 0
20         print("处理中........")
21         time.sleep(1)
22         print(\'发送执行结果.......\')
23         channel.basic_ack(delivery_tag=method.delivery_tag)
24         # channel.queue_declare(queue=properties.reply_to)
25         print(properties.reply_to)
26         channel.basic_publish(exchange=\'\',
27                               routing_key=properties.reply_to,
28                               properties=pika.BasicProperties(correlation_id=properties.correlation_id),
29                               body=str(response))
30
31         print("消息处理完成.......",properties.correlation_id)
32
33
34     def run(self):
35         connection = pika.BlockingConnection(pika.ConnectionParameters(host="localhost"))
36         print(connection)
37         channel = connection.channel()
38
39         channel.queue_declare(queue=\'rpc_queue\')
40
41         channel.basic_qos(prefetch_count=1)
42
43         channel.basic_consume(consumer_callback=self.on_request,queue=\'rpc_queue\',no_ack=False)
44
45         channel.start_consuming()
46 for i in range(5):
47     rpc_server = RPC_Server()
48     rpc_server.start()
客户端代码:

 1 import pika
 2 import  time
 3 import uuid #唯一识别码
 4 import selectors
 5 class FibonacciRpcClient(object):
 6     def __init__(self):
 7         self.__conn = pika.BlockingConnection(pika.ConnectionParameters(host=\'localhost\'))
 8         self.__channel = self.__conn.channel()
 9         self.__channel.queue_declare(queue=\'rpc_queue\')#申明请求消息队列
10         #
11         self.callback_queue = \'rpc_back_queue\'  # 数据返回队列
12         # result = self.__channel.queue_declare(exclusive=True)  # 随机生成一个返回队列
13         # self.callback_queue = result.method.queue #获取队列的名字
14         # print(self.callback_queue)
15         self.__channel.queue_declare(queue=self.callback_queue) #申明响应消息队列
16         #设置响应消息基本信息
17         self.__channel.basic_consume(consumer_callback=self.on_response,
18                                      no_ack=False,
19                                      queue=self.callback_queue)
20
21         self.__channel.basic_qos(prefetch_count=1)
22     def on_response(self,ch,method,props,body):
23         print(self.corr_id,props.correlation_id)
24         print(method.delivery_tag)
25         if self.corr_id == props.correlation_id:
26             self.__response = body
27             print("确认收到!",method.delivery_tag)
28             self.__channel.basic_ack(delivery_tag=method.delivery_tag)
29
30             print("确认收到!===")
31         else:
32             self.__response = None
33             print("拒绝该消息!",method.delivery_tag)
34             self.__channel.basic_nack(delivery_tag=method.delivery_tag)
35             print("拒绝该消息!====" )
36
37
38     def call(self,n):
39         self.__response = None
40         self.corr_id = str(uuid.uuid4())#生成随机码
41         print("随机id",self.corr_id)
42         self.__channel.basic_publish(exchange=\'\',
43                                     routing_key=\'rpc_queue\',
44                                     body=str(n),
45                                     properties=pika.BasicProperties(reply_to=self.callback_queue,
46                                                                     correlation_id=self.corr_id))
47         while self.__response is None:
48             time.sleep(1)
49             print("等待消费........")
50             self.__conn.process_data_events(time_limit=None)  # 开始消费,不阻塞
51
52
53         return self.__response
54
55
56
57 fibonacci_rpc = FibonacciRpcClient()
58 while True:
59     n = input(">>")
60     if n == \'exit\':
61         break
62     response = fibonacci_rpc.call(int(n))
63     print("计算结果:",response)
二、redis
1、介绍
redis是业界主流的key-value nosql 数据库之一。和Memcached类似,它支持存储的value类型相对更多,包括string(字符串)、list(链表)、set(集合)、zset(sorted set --有序集合)和hash(哈希类型)。这些数据类型都支持push/pop、add/remove及取交集并集和差集及更丰富的操作,而且这些操作都是原子性的。在此基础上,redis支持各种不同方式的排序。与memcached一样,为了保证效率,数据都是缓存在内存中。区别的是redis会周期性的把更新的数据写入磁盘或者把修改操作写入追加的记录文件,并且在此基础上实现了master-slave(主从)同步。
2、redis的安装(自行百度)
3、redis API的使用
3.1、连接方式
1、直连
redis-py提供两个类Redis和StrictRedis用于实现Redis的命令,StrictRedis用于实现大部分官方的命令,并使用官方的语法和命令,Redis是StrictRedis的子类,用于向后兼容旧版本的redis-py,在python
中连接redis的代码如下:
1 import  redis
2
3 r = redis.Redis(host=\'192.168.12.1\',port = 6379,password=123)
4
5 r.set("name",\'高文祥\')
6
7 print(r.get("name").decode())
2、连接池
redis-py使用connection pool来管理对一个redis server的所有连接,避免每次建立、释放连接的开销。默认,每个Redis实例都会维护一个自己的连接池。可以直接建立一个连接池,然后作为参数Redis, 这样就可以实现多个Redis实例共享一个连接池。代码如下:
1 import  redis
2 pool = redis.ConnectionPool(host=\'192.168.12.1\',port=6379,password=123)
3 r = redis.Redis(connection_pool=pool)
4 r.set(\'sex\',\'男\')
5 print(r.get("sex").decode())
上面是连接redis的2种方式,连接成功后,就可以开始对redis进行操作了。
3.2、操作
1、字符串操作
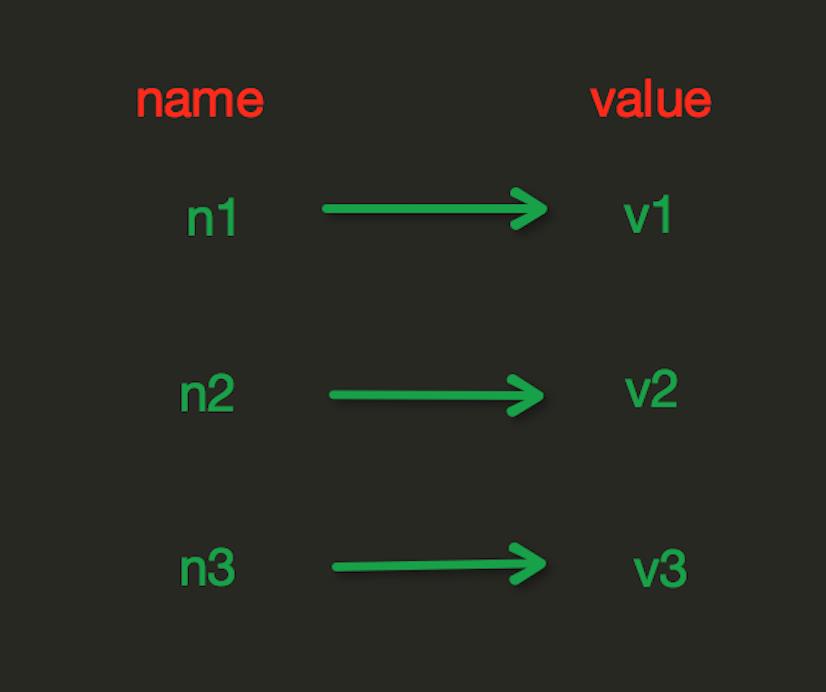
redis中的String在在内存中按照一个name对应一个value来存储。如图:


 1 import  redis
 2
 3 r = redis.Redis(host=\'192.168.12.1\',port = 6379,password=123)
 4
 5 \'\'\'set(self, name, value, ex=None, px=None, nx=False, xx=False)
 6 在Redis中设置值,默认,不存在则创建,存在则修改
 7 参数:
 8      ex,过期时间(秒)
 9      px,过期时间(毫秒)
10      nx,如果设置为True,则只有name不存在时,当前set操作才执行
11      xx,如果设置为True,则只有name存在时,岗前set操作才执行\'\'\'
12 # r.set("name",\'高文祥\')  #
13 # r.setnx("name","gaowenxiang") #设置值,只有name不存在时,执行设置操作(添加)
14 # r.setex("name","test",time=3) #设置过期时间 3s
15 # r.mset(name=\'gaowenx\',age=\'18\',sex=\'男\')  #批量设置
16 # r.mset({\'name\':\'gwx\',\'age\':\'30\',\'sex\':\'boy\'})#批量设置
17
18 # r.get("name")#获取值
19 # r.mget("name","age",\'sex\') #批量获取值
20 # r.getset("name","helen") #设置新值并获取原来的值
21 #r.getrange(\'name\',1,2)#获取子串
22 \'\'\'# 修改字符串内容,从指定字符串索引开始向后替换(新值太长时,则向后添加)
23 # 参数:
24     # offset,字符串的索引,字节(一个汉字三个字节)
25     # value,要设置的值\'\'\'
26 # r.setrange("name", 1, "cc")
27 # r.setbit("age",5,1) #将值转为二进制后,再将第5位的值设置为1
28 # r.getbit(\'age\',5) #获取对应位的2进制的值
29 # r.strlen(\'name\')# 返回name对应值的字节长度(一个汉字3个字节)
30 # r.incr(\'age\',1) #自增
31 # r.incrbyfloat(\'age\',1.0)
32 # r.decr(\'age\',2)
33 # r.append(\'name\',\'gex\')#在redis name对应的值后面追加内容
2、Hash操作
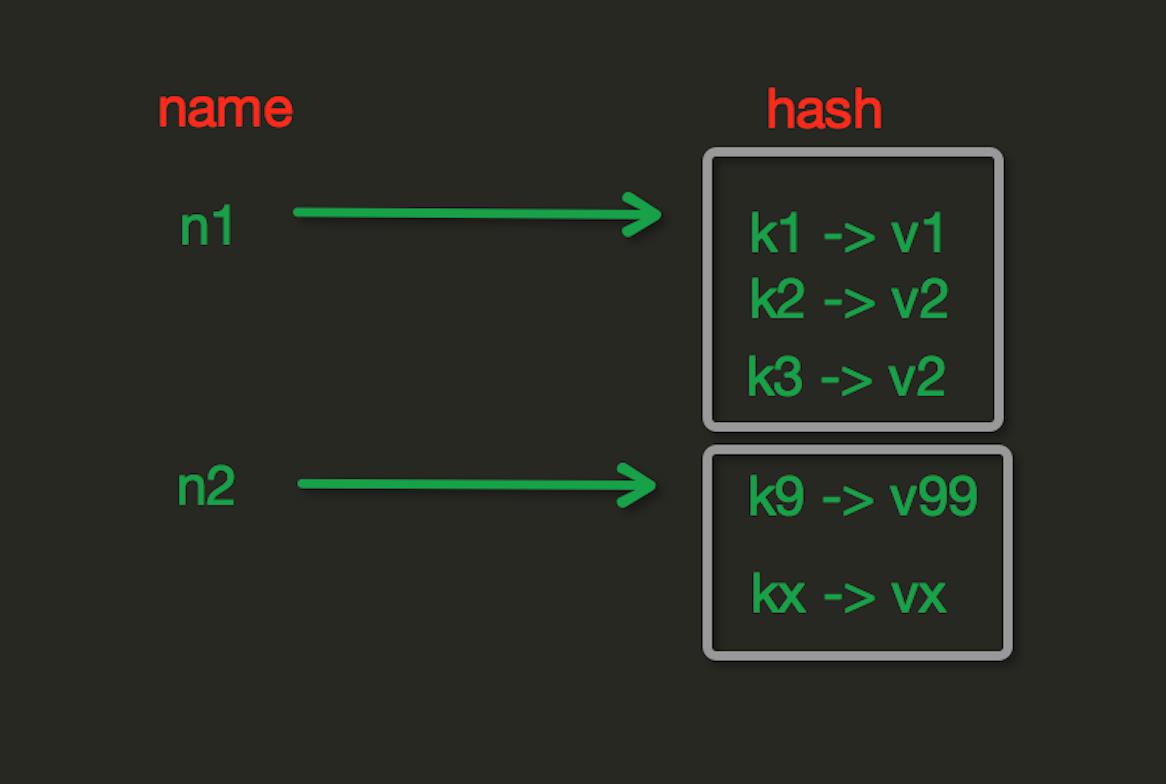
hash表现形式上有些像pyhton中的dict,可以存储一组关联性较强的数据 , redis中Hash在内存中的存储格式如下图:


 1 import  redis
 2
 3 r = redis.Redis(host=\'192.168.12.1\',port = 6379,password=123)
 4
 5 # r.hset(\'has_name\',\'name\',\'gaowenxiang\')# name对应的hash中设置一个键值对(不存在,则创建;否则,修改)
 6 # r.hsetnx("has_name", \'age\', \'21\')#当name对应的hash中不存在当前key时则创建(相当于添加)
 7 # r.hmset(\'info\',{\'id\':\'1\',\'name\':\'gwx\',\'age\':\'19\'}) #在name对应的hash中批量设置键值对 有点意思
 8 以上是关于21Python之rabbitMQ,redis的主要内容,如果未能解决你的问题,请参考以下文章
