Selenium2+python自动化20-Excel数据参数化转载
Posted 小曹
tags:
篇首语:本文由小常识网(cha138.com)小编为大家整理,主要介绍了Selenium2+python自动化20-Excel数据参数化转载相关的知识,希望对你有一定的参考价值。
前言
问: Python 获取到Excel一列值后怎么用selenium录制的脚本中参数化,比如对登录用户名和密码如何做参数化?
答:可以使用xlrd读取Excel的内容进行参数化。当然为了便于各位小伙伴们详细的了解,小编一一介绍具体的方法。
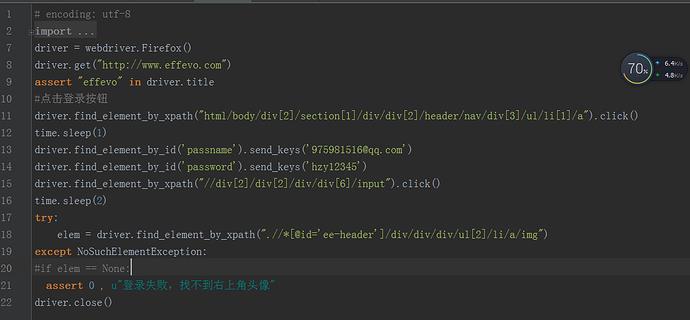
一、编写登录用例:
Step1:访问http://www.effevo.com (打个广告effevo是搜狗自研发的项目管理系统,完全免费,非常好用)
Step2:点击页面右上角的登录
Step3:输入用户名和密码后登录
Step4:检查右上角的头像是否存在
实现代码:

二、制作Excel文件:
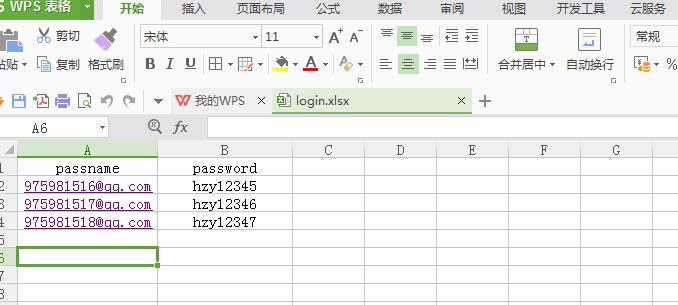
下一步,我们要对以上输入的用户名和密码进行参数化,使得这些数据读取自Excel文件。我们将Excel文件命名为data.xlsx,其中有两列数据,第一列为passname,第二列为password。

三、安装xlrd第三方库:
方法一:pip在线安装
1.打开cmd界面,输入指令:pip install xlrd
>>pip install xlrd

方法二:下载xlrd包安装
Python读取Excel文件需要使用第三方的库文件xlrd,我们到python官网下载http://pypi.python.org/pypi/xlrd模块安装。
1.下载xlrd-0.9.4.tar.gz
2.解压该文件。由于该文件是用tar命令压缩的,所以建议windows用户用7zip解压
3.cd到该解压文件的目录,命令行运行Setup.py文件:python setup.py install
4.提示安装完毕后,我们就可以在Python脚本中import xlrd了。
注:如果安装没有提示什么,可直接把安装文件里面的xlrd目录复制到D:\\Python\\Lib\\site-packages目录就可以用了
四、Excel数据参数化:
# encoding: utf-8
from selenium import webdriver
from selenium.common.exceptions import NoSuchElementException
from selenium.webdriver.common.keys import Keys
from selenium.webdriver.support.ui import WebDriverWait
import unittest,time,xlrd
#import xdrlib ,sys
def open_excel(file= \'login.xlsx\'):
try:
data = xlrd.open_workbook(file)
return data
except Exception,e:
print str(e)
#根据索引获取Excel表格中的数据 参数:file:Excel文件路径 colnameindex:表头列名所在行的所以 ,by_index:表的索引
def excel_table_byindex(file= \'login.xlsx\',colnameindex=0,by_index=0):
data = open_excel(file)
table = data.sheets()[by_index]
nrows = table.nrows #行数
colnames = table.row_values(colnameindex) #某一行数据
list =[]
for rownum in range(1,nrows):
row = table.row_values(rownum)
if row:
app = {}
for i in range(len(colnames)):
app[colnames[i]] = row[i]
list.append(app)
return list
def login():
listdata = excel_table_byindex("C:\\Users\\hzy\\Desktop\\login.xlsx" , 0)
if (len(listdata) <= 0 ):
assert 0 , u"Excel数据异常"
for i in range(0 , len(listdata) ):
driver = webdriver.Firefox()
driver.get("https://workyun.com/")
#点击登录按钮
driver.find_element_by_xpath("html/body/div[2]/section[1]/div/div[2]/header/nav/div[3]/ul/li[1]/a").click()
time.sleep(1)
driver.find_element_by_id(\'passname\').send_keys(listdata[i][\'passname\'])
driver.find_element_by_id(\'password\').send_keys(listdata[i][\'password\'])
driver.find_element_by_id("//div[2]/div[2]/div/div[6]/input").click()
time.sleep(2)
try:
elem = driver.find_element_by_xpath("//div[3]/div/div[1]/div[1]/a/img")
except NoSuchElementException:
assert 0 , u"登录失败,找不到左上角头像"
driver.close()
if __name__ == \'__main__\':
login()
excel数据读取方法封装参考Selenium2+python自动化58-读取Excel数据(xlrd)
如有错误或不合理的地方,请大家多多指教!
以上是关于Selenium2+python自动化20-Excel数据参数化转载的主要内容,如果未能解决你的问题,请参考以下文章
Selenium2+python自动化2-pip降级selenium3.0
Selenium2+python自动化2-pip降级selenium3.0
Selenium2+python自动化2-pip降级selenium3.0