Python Web框架Django学习
Posted
tags:
篇首语:本文由小常识网(cha138.com)小编为大家整理,主要介绍了Python Web框架Django学习相关的知识,希望对你有一定的参考价值。
Python Web框架Django学习(三)
目录:
五、Django生命周期
六、Django的CBV与FBV
七、字典、基于正则的URL
八、ORM
=================================================================================================
五、Django生命周期
=================================================================================================
=================================================================================================
六、Django的CBV与FBV
=================================================================================================
=================================================================================================
七、字典、基于正则的URL
=================================================================================================
1、前期准备
1) 创建一个项目test02
D:\python2.7.13\exercise> django-admin startproject test02
2)创建一个APP名为app01
D:\python2.7.13\exercise> cd test02
D:\python2.7.13\exercise> python manage.py startapp app01
3) 使用pycha打开test02项目
4)在test02目录下面创建目录static和templates
5)配置
配置项目文件test02的setting.py文件(修改三个地方)
》》》将‘django.middleware.csrf.CsrfViewMiddleware‘,这一行注释
# ‘django.middleware.csrf.CsrfViewMiddleware‘,
》》》在‘DIRS‘: [],加上templates文件的位置
‘DIRS‘: [os.path.join(BASE_DIR,‘templates‘)],
》》》在文件的末尾加上静态文件夹static的位置
STATICFILES_DIRS = (
os.path.join(BASE_DIR,‘static‘),
)
2、在app文件app01中的views.py文件中创建函数
》》》创建index函数
def index(request):
return HttpResponse(‘INDEX‘)
》》》创建login函数
def login(request):
if request.method == ‘GET‘:
return render(request,‘login.html‘)
elif request.method == ‘POST‘:
user = request.POST.get(‘user‘)
pwd = request.POST.get(‘pwd‘)
if user == ‘qiuuuu‘ and pwd == ‘123‘:
return redirect(‘http://doublelinux.blog.51cto.com‘)
else:
return render(request,‘login.html‘)
else:
return redirect(‘/index/‘)
return render(request,‘login.html‘)
3、在项目文件test01中的templates目录下创建html文件
<!DOCTYPE html>
<html lang="en">
<head>
<meta charset="UTF-8">
<title>Title</title>
</head>
<body>
<form action="/login/" method="POST">
<p>
<input type="text" name="user" placeholder="用户名"
</p>
<p>
<input type="password" name="pwd" placeholder="密码"
</p>
<p>
<input type="submit" value="提交"
</p>
</form>
</body>
</html>
4、在项目test01下的urls.py中加入对应关系
from django.conf.urls import url
from django.contrib import admin
from app01 import views
urlpatterns = [
url(r‘^admin/‘, admin.site.urls),
url(r‘^index‘,views.index),
url(r‘^login‘,views.login),
]
到此,只要输入用户名为qiuuuu,密码为123就能顺利跳转到doublelinux.blog.51cto.com。没有涉及到数据库储存用户的信息。
5、在app01的文件views.py中创建一个字典,并且实现在index.html页面读取字典中的数据----以此引出URL。
1) app01中的views.py文件修改为:
from django.shortcuts import render,HttpResponse
from django.shortcuts import HttpResponse
from django.shortcuts import redirect
USER_DICT = {
‘1‘:{‘name‘: ‘root1‘, ‘email‘: ‘[email protected]‘},
‘2‘:{‘name‘: ‘root2‘, ‘email‘: ‘[email protected]‘},
‘3‘:{‘name‘: ‘root3‘, ‘email‘: ‘[email protected]‘},
‘4‘:{‘name‘: ‘root4‘, ‘email‘: ‘[email protected]‘},
‘5‘:{‘name‘: ‘root5‘, ‘email‘: ‘[email protected]‘},
}
def index(request):
return render(request,‘index.html‘,{‘user_dict‘:USER_DICT})
def login(request):
if request.method == ‘GET‘:
return render(request,‘login.html‘)
elif request.method == ‘POST‘:
user = request.POST.get(‘user‘)
pwd = request.POST.get(‘pwd‘)
if user == ‘qiuuuu‘ and pwd == ‘123‘:
return redirect(‘http://doublelinux.blog.51cto.com‘)
else:
return render(request,‘login.html‘)
else:
return redirect(‘/index/‘)
return render(request,‘login.html‘)
2) 在目录templates中创建一个HTML文件index.html,内容为:
<!DOCTYPE html>
<html lang="en">
<head>
<meta charset="UTF-8">
<title>Title</title>
</head>
<body>
<h1>这是我的一哥django程序</h1>
<ul>
{% for k,row in user_dict.items %}
<li>{{ k}}----{{ row }}</li>
{% endfor %}
</ul>
</body>
</html>
3) 修改项目文件test02中的urls.py,修改后为:
from django.conf.urls import url
from django.contrib import admin
from app01 import views
urlpatterns = [
url(r‘^admin/‘, admin.site.urls),
url(r‘^index‘,views.index),
url(r‘^login‘,views.login),
]
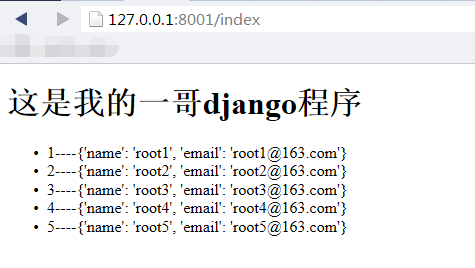
4) 浏览器访问效果为:
这里实现了早后台创建一个字段,并且在html中通过循环实现前端读取字典中的内容。
下面将实现通过点击用户,查看用户的详细信息。
6、修改html文件,修改为:
<!DOCTYPE html><html lang="en">
<head>
<meta charset="UTF-8">
<title>Title</title>
</head>
<body>
<h1>这是我的一个Django程序</h1>
<ul>
{% for row in user_dict.values %}
<li>
<a href="http://www.baidu.com">{{ row }}</a>
</li>
{% endfor %}
</ul>
<ul>
{% for k in user_dict %}
<li>
<a href="http://www.baidu.com">{{ k }}</a>
</li>
{% endfor %}
</ul>
<ul>
{% for row in user_dict.items %}
<li>
<a href="http://www.baidu.com">{{ row }}</a>
</li>
{% endfor %}
</ul>
</body>
</html>
7、修改app01的views.py文件,修改为:
8、
=================================================================================================
八、创建登录页面,实现用户交互,后台管理用户(数据库方式)
=================================================================================================
本文出自 “doublelinux” 博客,谢绝转载!
以上是关于Python Web框架Django学习的主要内容,如果未能解决你的问题,请参考以下文章
