python函数简介
Posted
tags:
篇首语:本文由小常识网(cha138.com)小编为大家整理,主要介绍了python函数简介相关的知识,希望对你有一定的参考价值。
函数的基础概念
函数是python为了代码最大程度地重用和最小代码冗余而提供的基本数据结构。 函数是一种设计工具,可能将复杂的程序,分解成可以管理的块。
在python中可以创建四种函数:
- 全局函数:定义在模块中
- 局部函数:嵌套在其他函数中
- lambda函数:表达式
- 方法:与特定数据类型关联的函数,并且只能与数据类型关联一起使用。
创建函数
语法
def functionName(parameters)
    suite
函数的调用形式:
-
语句形式:
func()
-
表达式形式:
res = func2(10)
-
函数当另一个函数的参数传入一个函数调用:
res = func3(func2(10))
函数的作用域:
python创建、改变或者查找变量名都是在名称空间进行
在代码中变量名被赋值的位置决定了其能被访问到的范围
函数定义了本地作用域,而模块定义了全局作用域
每个模块都是一个全局作用域,因此全局作用域仅限单个程序文件。
每次对函数的调用都会创建一个新的本地作用域,赋值的变量除非声明为全局变量,否则均为本地变量。
所有的变量名都可以归纳为本地、全局或者内置的变量。
内置名称空间:python解释器自带的名字,python解释器启动就会生成。
全局名称空间:文件和模块级别定义的名字都会。
局部名称空间:定义在函数内部的名字。局部名称空间只有在函数调用时才会生效,调用结束失效。
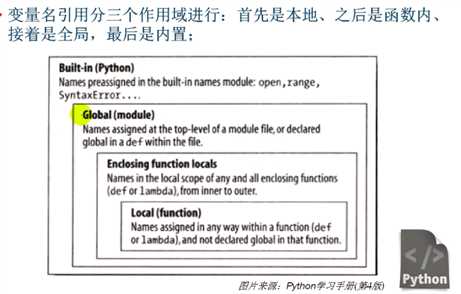
变量名解析:LEGB原则,作用域越小优先级越高,某个变量,现在本地函数找,找不到去上一层函数找,再找不到就去模块全局变量找,再找不到就去系统内置的变量找,最后还是内找不到,抛出异常。
LEGB原则:

备注:
global定义全局变量,可以在函数内部改变函数外面定义的全局变量的赋值
locals局部作用域,可以改变函数内变量赋值,无论函数内套多少层函数。
函数的嵌套
语法
函数的嵌套定义
def f1():
            def f2():
                def f3():
                    print(‘from f3‘)
                f3()
            f2()

        f1()
备注:函数嵌套可以进行多层嵌套
python参数的匹配模型
传递参数的方式:
第一种:通过位置,精确匹配参数个数进行从左至右传递参数。
In [26]: def f1(x,y):
   ....:     print(x,y)
   ....:

In [27]: f1(1,2)
1 2
第二种:通过关键字明确指定参数
In [26]: def f1(x,y):
   ....:     print(x,y)
   ....:

In [28]: f1(y=1,x=2)
2 1
混用上面两种方式时:所有位置参数先写,所有的关键字参数可以不按顺序写。
In [29]: def f1(x,y,z):
   ....:     print(x,y,z)
   ....:

In [30]: f1(1,z=3,y=2)
1 2 3
可以给个默认参数,如果不传递参数,就启用默认参数。
In [32]: def f1(x,y,z=3):
    print(x,y,z)
   ....:

In [33]: f1(1,2)
1 2 3
可变参数:
定义的时候*可以收集多个位置参数,表现形式是元组
In [34]: def f2(*x):
   ....:     print(x)
   ....:

In [35]: f2(1,2,3)
(1, 2, 3)
**可以收集多个关键字参数,表现形式是字典。
In [36]: def f2(**x):
    print(x)
   ....:

In [37]: f2(x=1,y=2,z=3)
{‘x‘: 1, ‘y‘: 2, ‘z‘: 3}
闭包函数
内部函数包含对外部作用域而非全局作用域的引用
闭包函数的特点:
- 自带作用域
- 延迟计算
闭包的意义:返回的函数对象,不仅仅是一个函数对象,在该函数外还包裹了一层作用域,这使得,该函数无论在何处调用,优先使用自己外层包裹的作用域
例子:编写下载网页内容的函数,要求功能是:用户传入一个url,函数返回下载页面的结果
from urllib.request import urlopen

def index(url):
    def get():
        return urlopen(url).read()
    return get
pa360 = index(‘https://hao.360.cn/?src=bm‘)

print(pa360())
函数装饰器
- 装饰器本身是一个函数,用于装饰其它函数
- 增强被装饰函数的功能。
- 装饰器一般接受一个函数作为参数,以对其进行增强。
语法: 被装饰函数的正上方使用@装修器名称,单独一行。
@deco1
def func1():
        pass
例子:编写装饰器,为函数加上统计时间的功能
import time
import random
from functools import wraps
def time1(func):
    def time2():
        ‘time2‘
        start_time = time.time()
        func()
        stop_time =time.time()
        print(‘run time is %s‘%(stop_time-start_time))
    return time2

@time1
def func1():
    ‘func1‘
    time.sleep(random.randrange(1,5))
    print(‘welecome to func1‘)
例子:编写装饰器,为多个函数加上认证的功能(用户的账号密码来源于文件),要求登录成功一次,后续的函数都无需再输入用户名和密码 # 注意:从文件中读出字符串形式的字典,可以用eval(‘{"name":"egon","password":"123"}‘)转成字典格式
user_d1 = {
    ‘gangdan‘:‘123‘,
    ‘laowang‘:‘123‘,
    ‘xiaoming‘:‘123‘
}

with open(‘db.txt‘,‘w‘,encoding=‘utf-8‘) as f:
    f.write(str(user_d1))
login_d1 = {‘user‘:None,‘status‘:False }
db_path =r‘db.txt‘


def fauth(func):
    def auth(*args,**kwargs):
        if login_d1[‘user‘] and login_d1[‘status‘]:  #这个地方如果没有登录成功None第一行就执行不成功。
            res = func(*args,**kwargs)
            return res
        user = input(‘input user :‘)
        passwd = input(‘input passwd :‘)
        with open(db_path, ‘r‘, encoding=‘utf-8‘) as f:
            user_d2 = eval(f.read())
        if user in user_d2 and passwd == user_d2[user]:
            print(‘login ok‘)
            login_d1[‘user‘] = user
            login_d1[‘status‘] = True
            res = func(*args,**kwargs)
            return res
        else:
            print(‘login error‘)
    return auth


@fauth
def fucn1():
    print(‘welecome to func1‘)

@fauth
def func2(name):
    print(‘welecome to func2‘)

fucn1()
func2(‘gangdan‘)
例子:编写装饰器,实现缓存网页内容的功能:
from urllib.request import urlopen
import  os
file_path = r‘url.txt‘
def cache(func):
    def wrapper(*args,**kwargs):
        if os.path.getsize(file_path):
            with open(file_path,‘rb‘) as f:
                res = f.read()
                print(‘从缓存文件下载‘)
        else:
            res = func(*args,**kwargs)()
            with open(file_path,‘wb‘) as f:
                f.write(res)
                print(‘从网站下载‘)
        return res
    return wrapper


@cache
def url1(url):
    def get(*args,**kwargs):
        return urlopen(url).read()
    return get

print(‘第一下载‘)
print(url1(‘https://www.baidu.com/‘))

print(‘第二下载‘)
print(url1(‘https://www.baidu.com/‘))

print(‘第三下载‘)
print(url1(‘https://www.baidu.com/‘))
例子:还记得我们用函数对象的概念,制作一个函数字典的操作吗,来来来,我们有更高大上的做法,
# 在文件开头声明一个空字典,然后在每个函数前加上装饰器,完成自动添加到字典的操作
func_dic = { }
def deco (key):
    def deco2(func):
        func_dic[key] = func
    return deco2

@deco(‘f1‘)  #  f1= deco2(f1)  dec2(f1)执行后就是把‘f1‘:‘f1函数内存地址加进字典‘
def f1():
    print(‘from f1‘)
@deco(‘f2‘)  #  f2= deco2(f2)  dec2(f2)执行后就是把‘f2‘:‘f2函数内存地址加进字典‘
def f2():
    print(‘from f2‘)
@deco(‘f3‘)   #  f3= deco2(f3)  dec2(f3)执行后就是把‘f3‘:‘f3函数内存地址加进字典‘
def f3():
    print(‘from f3‘)

print(func_dic)

while True:
    cmd = input(‘>>: ‘).strip()
    if cmd == ‘q‘:
        break
    if cmd in func_dic:
        func_dic[cmd]()
生成器
生成器函数:常规函数定义,但是,使用yield语句而不是return语句返回结果。yield语句一次返回一个结果,在每个结果中间,挂起函数的状态,以便下次重它离开的地方继续执行
生成器函数优点:
1.是可迭代对象
2.生成器本质和其他的数据类型一样,都是实现了迭代器协议,只不过生成器附加了一个延迟计算省内存的好处。
例子:编写实现tail -f a.txt |grep ‘error‘ |grep ‘404‘命令函数,使用生成器函数。
import time
def tail(file_path,encodimg=‘utf-8‘):
    with open(file_path,encoding=encodimg) as f:
        f.seek(0,2)
        while True:
            line = f.readline()
            if line:
                yield line
            else:
                time.sleep(0.3)

def grep(lines,pattern):
    for line in lines:
        if pattern in line:
            yield line

g1 = tail(‘a.txt‘)
g2 = grep(g1,‘error‘)
g3 = grep(g2,‘404‘)
for i in g3:
    print(i)
协程函数
除了可以使用 next()方法来获取下一个生成的值,用户还可以使用 send()方法将一个新的或者是被修改的值返回给生成器。第一个值必须初始化,才能使用send进行传值。
例子:
def init(func):   #初始化装饰器
    def wrapper(*args,**kwargs):
        res = func(*args,**kwargs)
        next(res)
        return res
    return wrapper

@init
def eater(name):
    print(‘%s ready to eat‘%name)
    food_list = [ ]
    while True:
        food = yield food_list   #使用yield 表达式模式进行传值
        food_list.append(food)
        print(‘%s start to eat %s‘%(name,food))

g = eater(‘alex‘)
print(g.send(‘饺子‘))
面向过程编程
"面向过程编程"(Procedure Oriented)是一种以过程为中心的编程思想,就是分析出解决问题所需要的步骤,然后用函数把这些步骤一步一步实现,使用的时候一个一个依次调用就可以了。整个过程就相当于一条生产的流水线。
例子:运用过程式编程:模拟grep -rl 功能:
import os
def init(func):
    def wrapper(*args,**kwargs):
        res = func(*args,**kwargs)
        next(res)
        return res
    return wrapper
#阶段一:递归地找文件的绝对路径,把路径发给阶段二
@init
def search(target):
    ‘sear file abspath‘
    while True:
        start_path = yield
        g = os.walk(start_path)
        for par_dir,_,files in g:
            for file in files:
                file_path = r‘%s\\%s‘ % (par_dir,file)
                target.send(file_path)


# 阶段二:收到文件路径,打开文件获取对象,把文件对象发给阶段三
@init
def opener(target):
    ‘get file obj: f = open(filepath)‘
    while True:
        file_path = yield
        with open(file_path,encoding=‘utf-8‘) as f:
            target.send((file_path,f))


# 阶段三:收到文件对象,for循坏读取文件的每一行内容,把每一行内容发给阶段四。
@init
def cat(target):
    ‘read file‘
    while True:
        filepath ,f = yield
        for line in f:
            res = target.send((filepath,line))
            if res:
                break


# 阶段四:收到一行内容,判断root是否在一行中,如果在,则把文件名发给阶段五
@init
def grep(target,pattern):
    ‘grep function‘
    tag = False
    while True:
        filepath,line = yield tag
        tag = False
        if pattern in line:
            target.send(filepath)
            tag = True


#阶段五:收到文件名,打印结果
@init
def printer():
    ‘print function‘
    while True:
        filepath = yield
        print(filepath)


start_path = r‘E:\\py_code\\py_s5\\py_s5\\day11\\a‘
g = search(opener(cat(grep(printer(),‘root‘))))
g.send(start_path)
以上是关于python函数简介的主要内容,如果未能解决你的问题,请参考以下文章
Android 逆向类加载器 ClassLoader ( 类加载器源码简介 | BaseDexClassLoader | DexClassLoader | PathClassLoader )(代码片段