Elasticsearch:从实例中学习 nested 数据类型的 CRUD 及搜索
Posted Elastic 中国社区官方博客
tags:
篇首语:本文由小常识网(cha138.com)小编为大家整理,主要介绍了Elasticsearch:从实例中学习 nested 数据类型的 CRUD 及搜索相关的知识,希望对你有一定的参考价值。
nested 数据类型是一个比较高级的话题。在本文中,将介绍 Elasticsearch 中针对嵌套对象的一些高级 CRUD 和搜索查询。 如果你想了解有关 Elasticsearch 基础知识的更多信息,可以查看这些文章以快速入门或复习:
在进行下面的练习之前,建议阅读上面的两篇文章中的任何一篇以建立好 laptops-demo 这个索引。在完成之后,我们可以通过如下的命令来查看 laptops-demo 的 mappings 及 settings:
GET laptops-demo上面的命令返回结果:
  "laptops-demo":
    "aliases": ,
    "mappings":
      "properties":
        "attributes":
          "type": "nested",
          "properties":
            "attribute_name":
              "type": "text"
            ,
            "attribute_value":
              "type": "text"


        ,
        "brand":
          "type": "text",
          "fields":
            "keyword":
              "type": "keyword"


        ,
        "id":
          "type": "long"
        ,
        "name":
          "type": "text",
          "fields":
            "keyword":
              "type": "keyword"
            ,
            "ngrams":
              "type": "text",
              "analyzer": "ngram_analyzer"

          ,
          "analyzer": "standard"
        ,
        "price":
          "type": "float"


    ,
    "settings":
      "index":
        "routing":
          "allocation":
            "include":
              "_tier_preference": "data_content"


        ,
        "number_of_shards": "1",
        "provided_name": "laptops-demo",
        "creation_date": "1673943360770",
        "analysis":
          "filter":
            "ngram_filter":
              "type": "edge_ngram",
              "min_gram": "2",
              "max_gram": "15"

          ,
          "analyzer":
            "ngram_analyzer":
              "filter": [
                "lowercase",
                "ngram_filter"
              ],
              "type": "custom",
              "tokenizer": "standard"


        ,
        "number_of_replicas": "1",
        "uuid": "kWCIC0tUTJKrL3gUE1fGcA",
        "version":
          "created": "8060099"
从返回的 mappings 的结果中,我们可以看出来:
      "properties":
        "attributes":
          "type": "nested",
          "properties":
            "attribute_name":
              "type": "text"
            ,
            "attribute_value":
              "type": "text"
在此示例中,attributes 字段是一个 nested 字段,包含 attribute_name 和 attribure_value 字段作为子字段。 nested 类型是 object 数据类型的特殊版本,它允许对象数组以一种可以彼此独立查询的方式进行索引。 我们应该始终为 nested 字段创建一个映射,如本示例所示,因为 Elasticsearch 没有内部对象的概念,并且会将对象层次结构扁平化为字段名称和值的简单列表,这通常不是我们想要的。更多关于 nested 数据类型的介绍,可以参考文章 “Elasticsearch: object 及 nested 数据类型”。
要创建包含 nested 对象的文档,请运行以下命令:
PUT laptops-demo/_doc/1000

  "id": 1,
  "name": "HP EliteBook Model 1",
  "price": 38842,
  "brand": "HP",
  "attributes": [

      "attribute_name": "cpu",
      "attribute_value": "Intel Core i7"
    ,

      "attribute_name": "memory",
      "attribute_value": "8GB"
    ,

      "attribute_name": "storage",
      "attribute_value": "256GB"

  ]
如上所示,我们针对 attributes 字段写入我们想要的数组。
查看刚刚创建的文档:
GET laptops-demo/_doc/1000
  "_index": "laptops-demo",
  "_id": "1000",
  "_version": 1,
  "_seq_no": 201,
  "_primary_term": 2,
  "found": true,
  "_source":
    "id": 1,
    "name": "HP EliteBook Model 1",
    "price": 38842,
    "brand": "HP",
    "attributes": [

        "attribute_name": "cpu",
        "attribute_value": "Intel Core i7"
      ,

        "attribute_name": "memory",
        "attribute_value": "8GB"
      ,

        "attribute_name": "storage",
        "attribute_value": "256GB"

    ]
有些开发者可能要问为啥需要 nested 这个数据类型呢?假如我们有另外一个文档:
PUT laptops-demo/_doc/1001

  "id": 1,
  "name": "HP EliteBook Model 2",
  "price": 40000,
  "brand": "Apple",
  "attributes": [

      "attribute_name": "cpu",
      "attribute_value": "Intel Core i7"
    ,

      "attribute_name": "memory",
      "attribute_value": "256GB"
    ,

      "attribute_name": "storage",
      "attribute_value": "8GB"

  ]
在这里,我们把 id = 1001 里的 memory 和 storage 里的内存值和之前的文档 id = 1000 的对调了一下。
如果在没有定义 nested 数据类型的情况下,写入上面的两个文档,并做如下的查询:
GET laptops-demo/_search

  "query":
    "bool":
      "must": [

          "match":
            "attributes.attribute_name": "memory"

        ,

          "match":
            "attributes.attribute_value": "8GB"


      ]
那么返回的结果将是两个文档被同时搜索到。显然这个不是我们所需要的结果,因为我们需要的结果是 memory 的内存值为 8GB,而不是 256GB 的电脑。这个是因为当 JSON 对象被 Lucene 扁平化后,我们失去了 attribute_name 和 attribute_value 之间的对应关系。取而代之的是如下的这种关系:
  ...
  "attributes.attribute_name :["memory", "storage"],
  "attributes.attribute_value": ["8GB", "256GB"]
很显然,对上面的两个文档来说,他们的搜索结果都是一样的。只有我们使用 nested 数据类型,我们可以让它们的关系变得一一对应起来。
假设我们要在attributes 字段中添加一个新的属性,应该怎么做呢? 事实证明,nested 字段属性实际上是一个数组,我们可以像这样向其中添加更多对象:
POST laptops-demo/_update/1000

  "script":
    "source": "ctx._source.attributes.add(params.attribute)",
    "params":
      "attribute":
        "attribute_name": "screen_size",
        "attribute_value": "13 inch"
正如演示的那样,nested 字段可以通过 ctx._source.attributes 访问,它作为数组返回。 我们可以通过 add 方法向这个数组中添加一个新对象。
查看文档,会发现在文档的attributes字段中增加了一个 id 为 1000 的新属性。
GET laptops-demo/_doc/1000
  "_index": "laptops-demo",
  "_id": "1000",
  "_version": 3,
  "_seq_no": 205,
  "_primary_term": 2,
  "found": true,
  "_source":
    "id": 1,
    "name": "HP EliteBook Model 1",
    "price": 38842,
    "brand": "HP",
    "attributes": [

        "attribute_name": "cpu",
        "attribute_value": "Intel Core i7"
      ,

        "attribute_name": "memory",
        "attribute_value": "8GB"
      ,

        "attribute_name": "storage",
        "attribute_value": "256GB"
      ,

        "attribute_name": "screen_size",
        "attribute_value": "13 inch"

    ]
如果我们想更新多个文档的 nested 字段,我们可以使用 _update_by_query 端点:
POST laptops-demo/_update_by_query

  "script":
    "source": "ctx._source.attributes.add(params.attribute)",
    "params":
      "attribute":
        "attribute_name": "screen_size",
        "attribute_value": "13 inch"


  ,
  "query":
    "term":
      "brand.keyword":
        "value": "Apple"
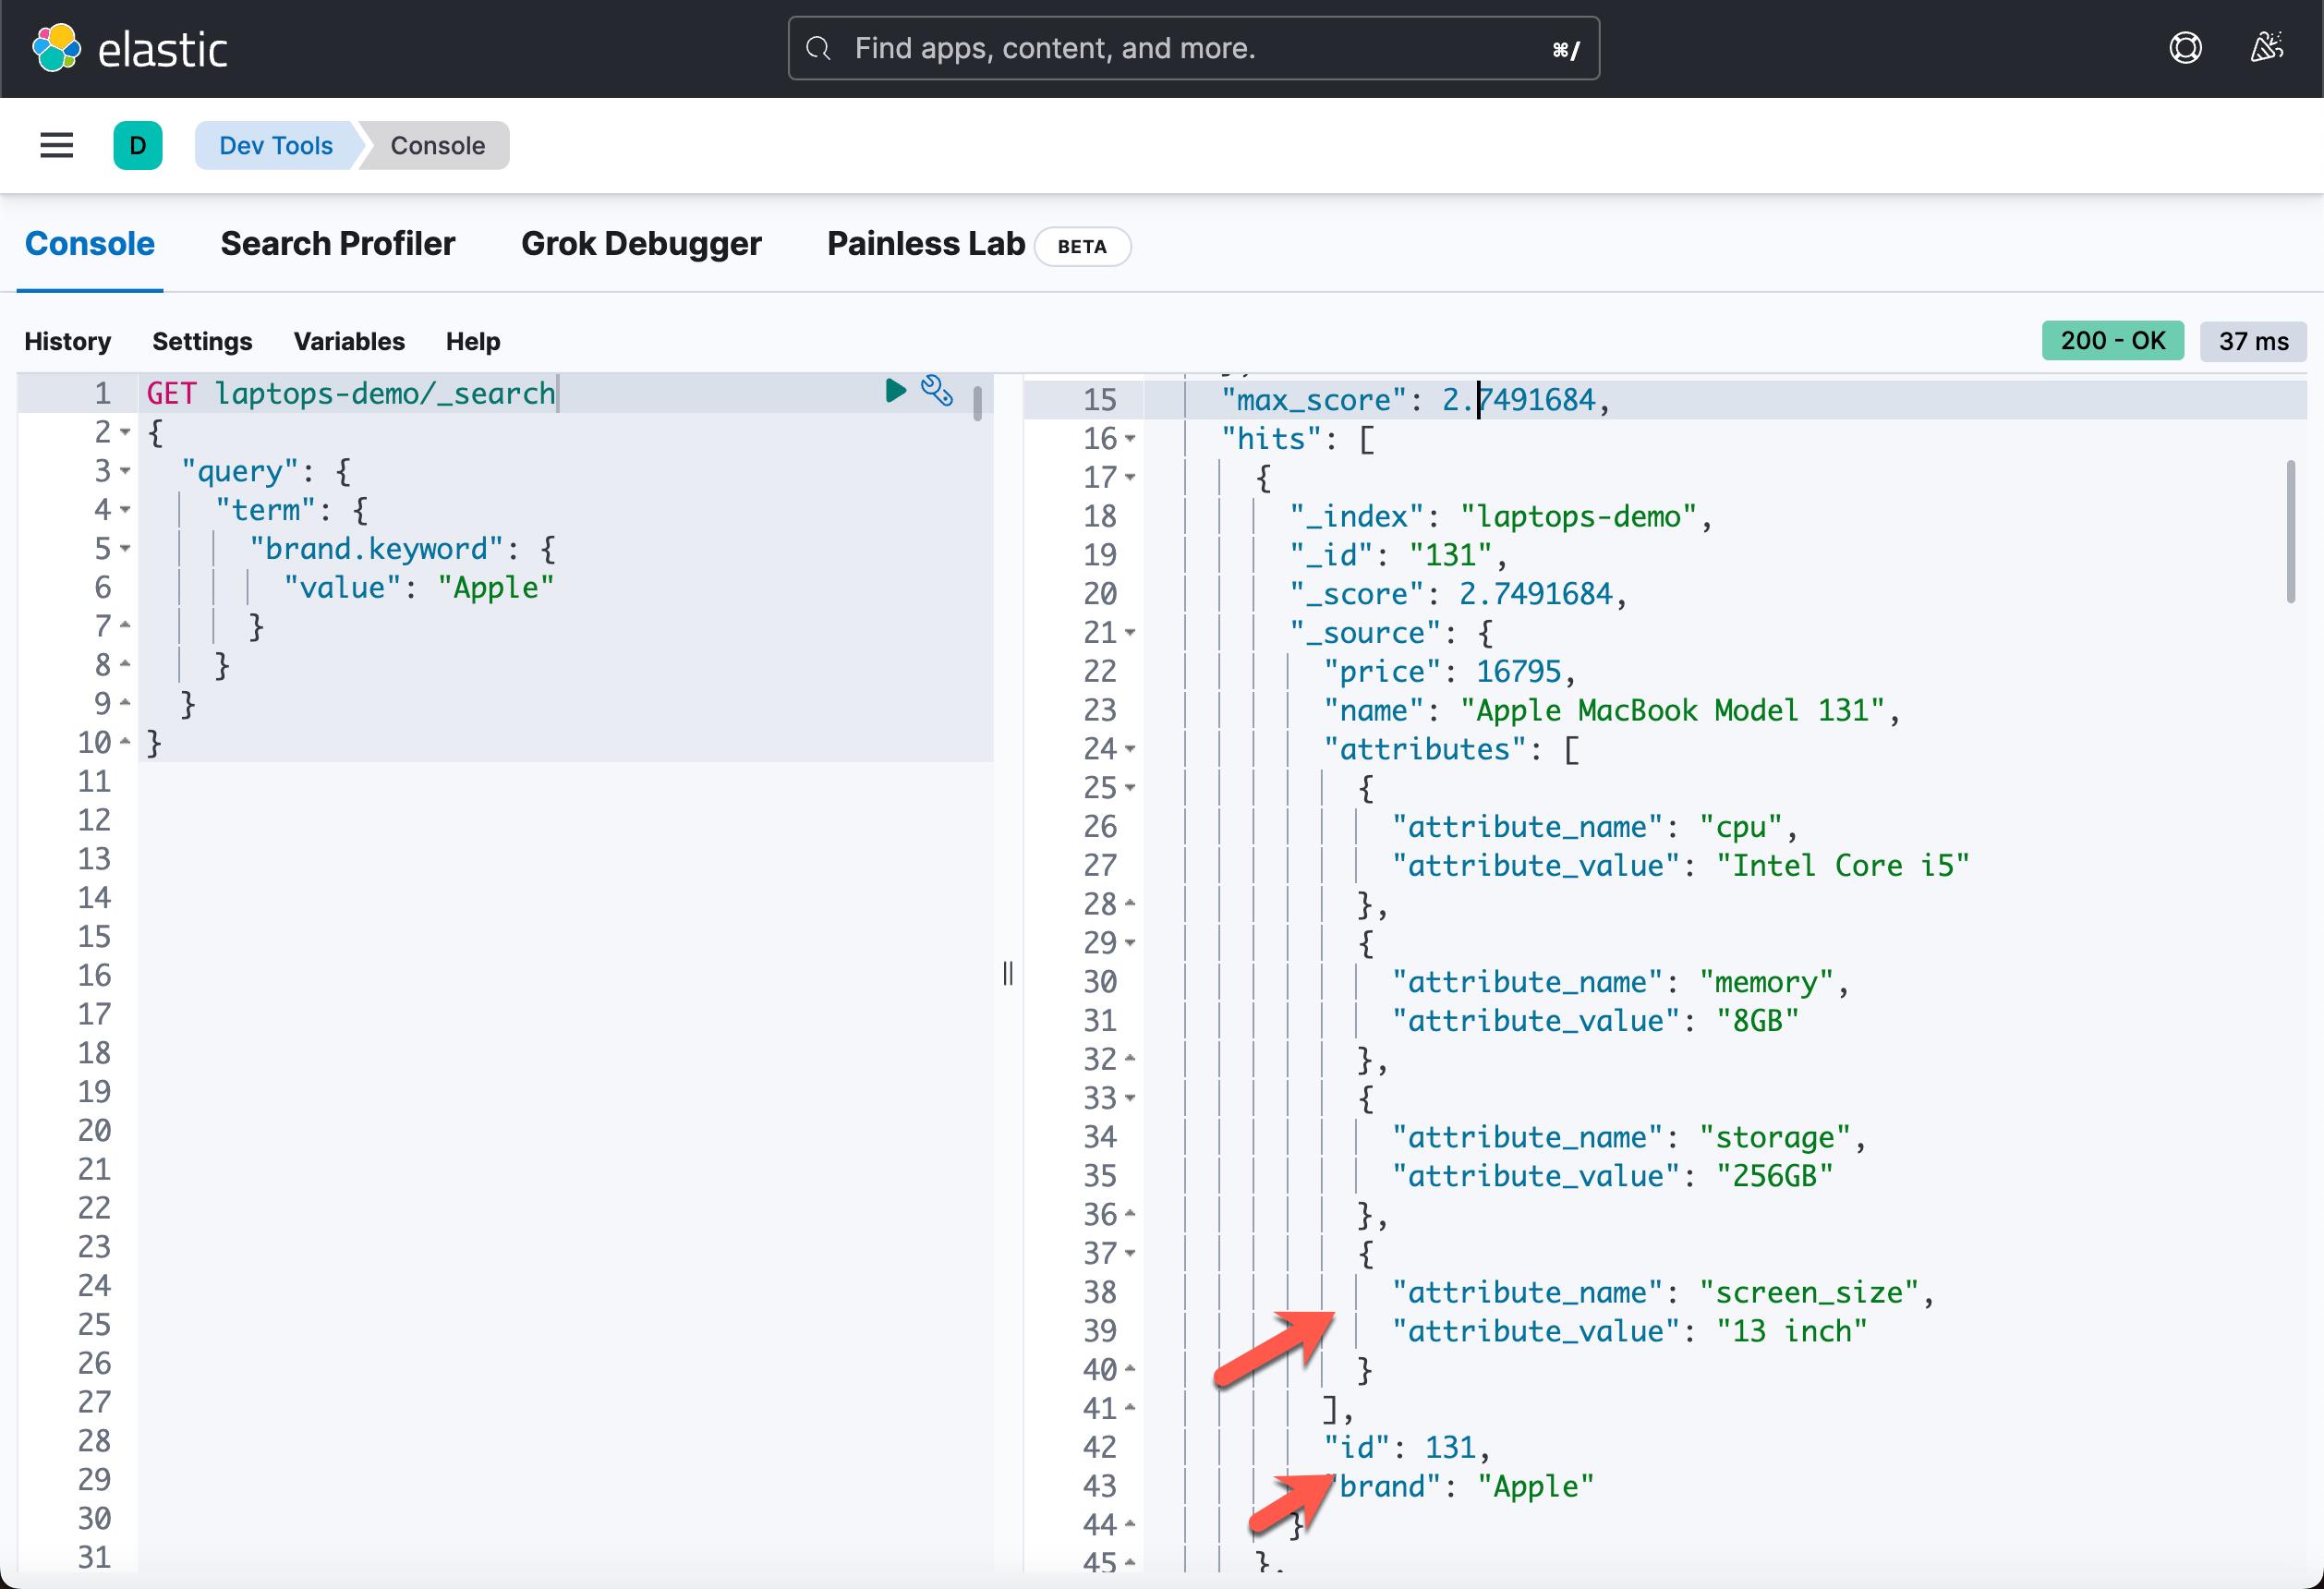
要找出所有刚刚更新的 Apple MacBooks:
GET laptops-demo/_search

  "query":
    "term":
      "brand.keyword":
        "value": "Apple"
如果想从 nested 字段中删除对象怎么办? 例如,如果我们要删除文档 1 的 screen_size 属性怎么办? 在这种情况下,我们需要一些编程逻辑。 我们需要先找到要移除的具体对象,然后将其从数组中移除。
POST laptops-demo/_update/1

  "script":
    "source": "ctx._source.attributes.removeIf(attr -> attr.attribute_name == params.attribute_name)",
    "params":
      "attribute_name": "screen_size"
removeIf 方法删除匿名函数找到的对象。
另一个用例是如何更新 nested 对象中的特定字段。 例如,当 attribute_name 为 “memory” 时,如果我们只想更新 attribute_value 怎么办? 在这种情况下,我们需要使用 painless 脚本语言的更多编程逻辑:
POST laptops-demo/_update/1

  "script":
    "source": """
      def attributes = ctx._source.attributes.findAll(
        attr -> attr.attribute_name == params.attribute_name
      );
      for (attr in attributes)
        attr.attribute_value = params.new_attribute_value

    """,
    "params":
      "attribute_name": "memory",
      "new_attribute_value": "16GB"
逻辑是先用 findAll 方法找到所有相关的 nested 对象,然后用 for 循环一个一个更新。
同样,如果你想更新满足某些条件的多个文档,你可以使用 _update_by_query 端点,如上所示。
最后,我想介绍一下如何查询 nested 字段。 当你第一次看到查询时,它可能会非常吓人。 但是,如果你掌握了模式,你就不会被它吓到,可以在工作中自由使用。
要查询 nested 字段,我们需要在 nested 查询中使用布尔查询。 让我们首先尝试找到所有 memory 为 8GB 的笔记本电脑。
GET laptops-demo/_search

  "query":
    "nested":
      "path": "attributes",
      "query":
        "bool":
          "must": [
             "match":  "attributes.attribute_name": "memory" ,
             "match":  "attributes.attribute_value":  "16GB"
          ]
关键点:
- nested 关键字指定我们正在查询 nested 字段。
- path 指定 nested 字段的名称,在本例中为 attributes。
- bool 表示我们正在使用布尔查询,因为我们希望 attribute_name 和 attribute_value 字段都满足某些条件。
- must 表示子查询必须全部出现在文档中。
- match 表示全文搜索,因为 attribute_name 和 attribute_value 字段都是 text 字段。 如果其中一些不是 text 字段,我们需要使用 term、terms 或 range 查询。
现在让我们介绍一个更复杂的。 让我们找出所有 HP 笔记本电脑,其 memory 为 8GB,storage 为 256GB:
GET laptops-demo/_search

  "query":
    "bool":
      "must": [

          "term":
            "brand.keyword":
              "value": "HP"


        ,

          "nested":
            "path": "attributes",
            "query":
              "bool":
                "must": [

                    "match":
                      "attributes.attribute_name": "memory"

                  ,

                    "match":
                      "attributes.attribute_value": "8GB"


                ]


        ,

          "nested":
            "path": "attributes",
            "query":
              "bool":
                "must": [

                    "match":
                      "attributes.attribute_name": "storage"

                  ,

                    "match":
                      "attributes.attribute_value": "256GB"


                ]


      ]
在这个大查询中,外部 bool 查询指定了三个应该满足的条件:
- 第一个条件是匹配 brand 字段,必须是 HP。
- 第二个条件是 nested 查询,它包装另一个查询以搜索 nested 属性字段。 在内部 bool 查询中,我们要求 attribute_name 必须是 “memory”,attribute_value必须是 “8G”。 两者都应该满足。
- 同样,第三个条件也是 nested 查询,要求 attribute_name 必须为 “storage”,attribute_value 必须为 “256GB”。
如果你知道模式,就不会那么复杂,不是吗? 😃通过这个查询,我们可以得到所有brand 为 HP、内存为 8GB、存储空间为 256GB 的笔记本电脑。
总结
在本文中,我们简要介绍了常见的查询以创建、读取、更新、删除和搜索嵌套查询。 对于 CRUD 操作,你需要编写一个简单的 painless 脚本。 你无需掌握整个painless 编程语言即可使用 Elasticsearch。 了解一些常用命令就足以满足日常使用。 如果你想成为 painless 达人,可以查看 painless 指南。你也可以阅读我的文章 “Elastic:开发者上手指南” 中的 “Painless 编程” 章节。
对于 nested 字段搜索,不要被看似复杂的查询吓倒。 只要你了解 bool 和 nested 查询的工作原理,就可以使用 bool 和 nested 查询作为构建块来自行构建强大的查询。
以上是关于Elasticsearch:从实例中学习 nested 数据类型的 CRUD 及搜索的主要内容,如果未能解决你的问题,请参考以下文章
NeteaseCloudWebApp模仿网易云音乐的vue自己从开源代码中学习到的
IOLI crackme分析——从应用中学习使用radare2