IDEA 插件开发
Posted LeBron_Six
tags:
篇首语:本文由小常识网(cha138.com)小编为大家整理,主要介绍了IDEA 插件开发相关的知识,希望对你有一定的参考价值。
文章目录
前言
官方开发文档:http://www.jetbrains.org/intellij/sdk/docs/welcome.html
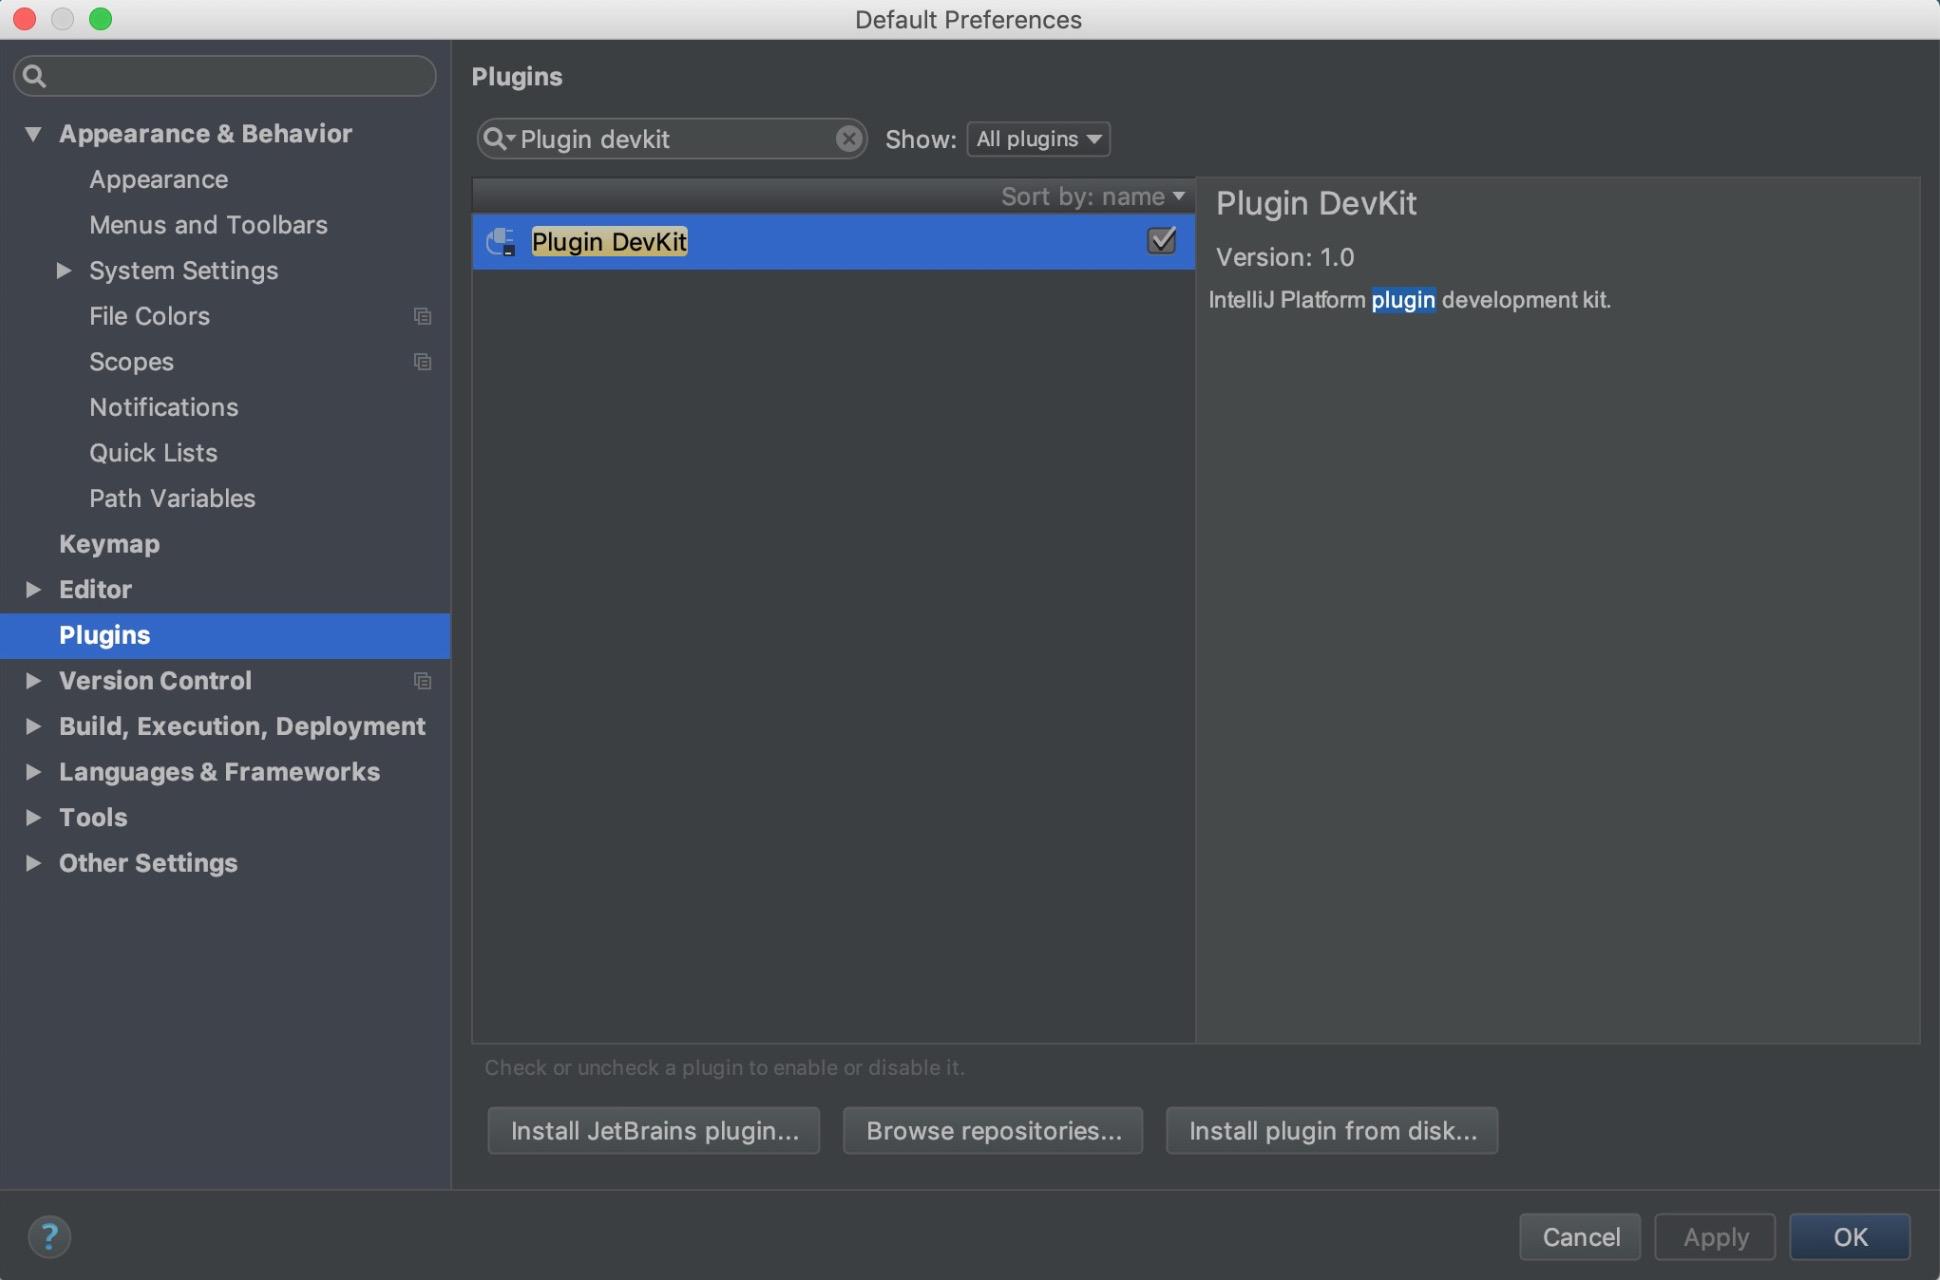
首先需要开启 Plugin Devkit , IDEA 中默认带了 Plugin Devkit插件,但是没有开启。
插件工程
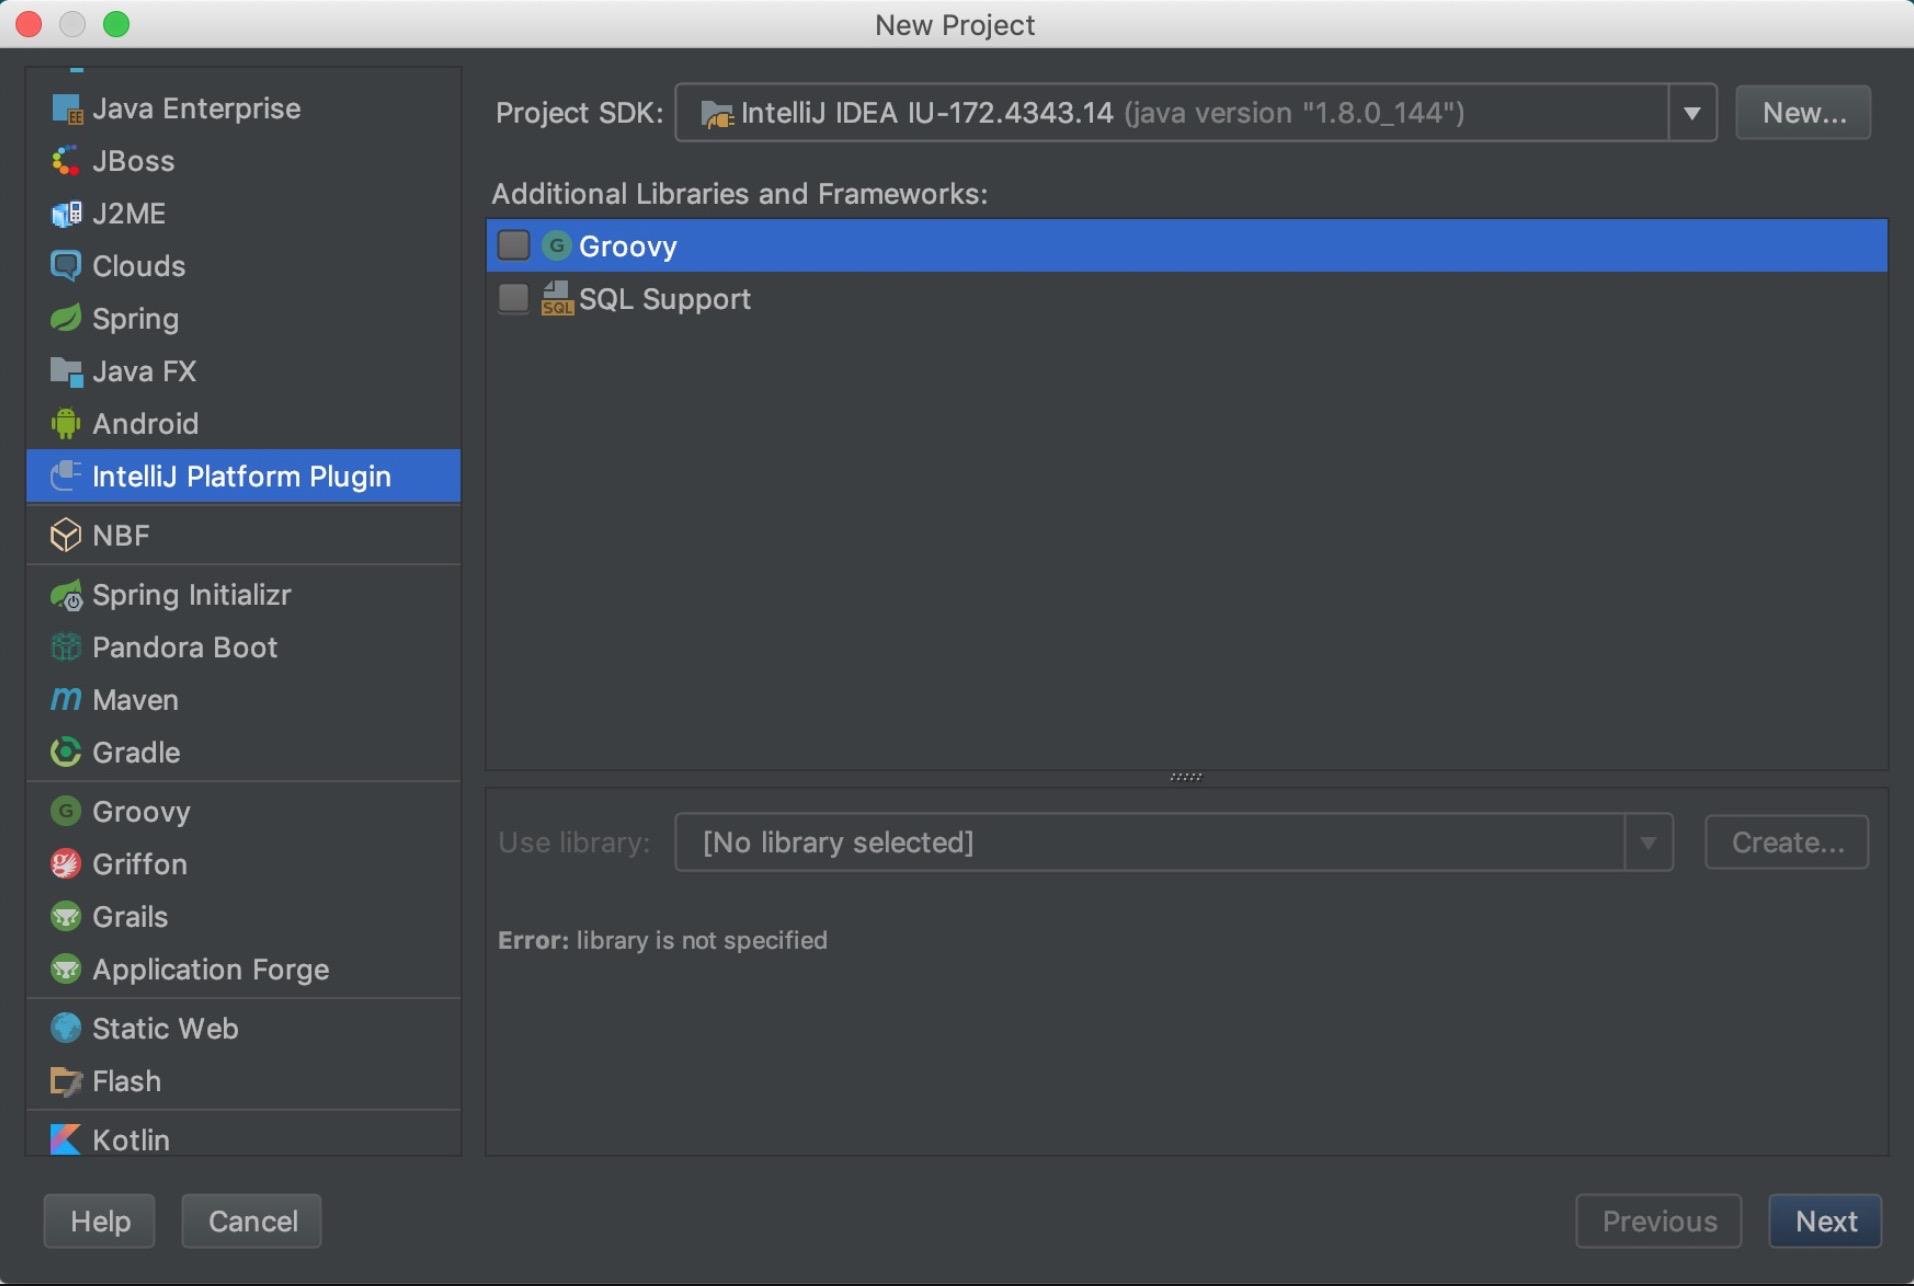
创建

插件工程结构
BundleFileFinder/
  resources/
    META-INF/
      plugin.xml
        ...
    src/
    com.yuyang.finder
        ...
- src 实现插件功能的classes
- resources 存放工程需要用到的资源文件,例如一些引用的jar包、图片资源等。
- META-INF/plugin.xml 插件的配置文件,指定插件名称、描述、版本号、支持的 IntelliJ IDEA 版本、插件的 components 和 actions 以及软件商等信息。
plugin.xml
<idea-plugin>

  <!-- 插件相关信息, 会展示在IDEA插件的描述中 -->

  <!-- 插件唯一id, 遵循使用包名的原则 -->
  <id>com.yuyang.finder</id>
  <!-- 插件名称 -->
  <name>BundleFileFinder</name>
  <!-- 插件版本 -->
  <version>1.0</version>
  <!-- 开发者信息 -->
  <vendor email="smuyyh@gmail.com" url="http://smuyyh.top">$Company|$Name</vendor>
  <!-- 插件的描述 -->
  <description>my plugin description</description>
  <!-- 插件版本变更信息 -->
  <change-notes>Initial release of the plugin.</change-notes>

  <!-- 如果该插件还依赖了其他插件,则配置对对应的插件id -->
  <depends>com.intellij.modules.all</depends>

  <!-- 插件兼容IDEA的最大和最小build号,不配置则不做限制 -->
  <idea-version since-build="94.539" until-build="192"/>

  <!-- Actions: 如添加一个文件右击菜单按钮 -->
  <actions>
    <action id="FinderAction" class="com.yuyang.finder.FinderAction" text="FileFinder" description="FileFinder">
      <add-to-group group-id="ProjectViewPopupMenu" anchor="first"/>
    </action>
  </actions>

  <!-- 插件定义的扩展点,以供其他插件扩展该插件,类似Java的抽象类的功能 -->
  <extensionPoints>
    ...
  </extensionPoints>

  <!-- 声明该插件对IDEA core或其他插件的扩展 -->
  <extensions xmlns="com.intellij">
    ...
  </extensions>
</idea-plugin>
Plugin Action
Action 是什么
Action 用于描述一个动作、行为,可以通过快捷键、点选的方式进行触发。一个 Action 是一个 class,是 AnAction 的子类,actionPerformed 方法在菜单Item或者标题栏按钮被选中的时候会被调用。
Action 允许添加到右键菜单或者Toolbar菜单上面。Action也可以成组添加到具体的一个Group下面。
创建Action
public class FinderAction extends AnAction

    private Project mProject;

    @Override
    public void actionPerformed(AnActionEvent event)
        mProject = event.getData(PlatformDataKeys.PROJECT);
        DataContext dataContext = event.getDataContext();
        if ("apk".equals(getFileExtension(dataContext)))
            //获取选中的文件
            VirtualFile file = DataKeys.VIRTUAL_FILE.getData(event.getDataContext());
            if (file != null)
                // 创建面板  java swing

                // 后面章节会有 java GUI 面板介绍

         else
            Messages.showInfoMessage("请选择.apk文件", "提示");


    @Override
    public void update(AnActionEvent event)
        String extension = getFileExtension(event.getDataContext());
        this.getTemplatePresentation().setEnabled(extension != null && "apk".equals(extension));


    public String getFileExtension(DataContext dataContext)
        VirtualFile file = DataKeys.VIRTUAL_FILE.getData(dataContext);
        return file == null ? null : file.getExtension();
注册Action
<actions>
  <!-- 添加单个Action -->
  <action
          id="FinderAction"
          class="com.yuyang.finder.FinderAction"
          text="FileFinder"
          description="当前插件菜单功能说明"
          icon="icons/garbage.png"
          keymap="未知"
          popup=""
          project-type=""
          use-shortcut-of="">

          <!-- 将菜单添加至工程的右击菜单 -->
          <add-to-group group-id="ProjectViewPopupMenu"
                        anchor="first"
                        relative-to-action="GenerateJavadoc" />

          <!-- 设置快捷键 -->
          <keyboard-shortcut keymap="Mac OS X"
                             first-keystroke="control alt G"
                             second-keystroke="C"
                             remove="true"/>
  </action>

  <!-- 添加成组的action -->
  <group id="FinderGroup" text="组名" description="描述">
    <add-to-group group-id="MainMenu" anchor="last"  />
        <action id="Action1"
               class="com.yuyang.finder.FinderAction1"
               text="名称1"
               description="描述1" />
        <!-- 添加分割线 -->
        <separator/>
        <action id="Action2"
               class="com.yuyang.finder.FinderAction2"
               text="名称2"
               description="描述2" />
        <!-- 可以添加一个已存在的action到该group -->
        <reference ref="EditorCopy"/>
  </group>
</actions>
如果 anchor 设置为 before 或者 after,则必须设置 relative-to-action。
快速创建Action
Plugin Devkit提供了快捷创建Action的方式。
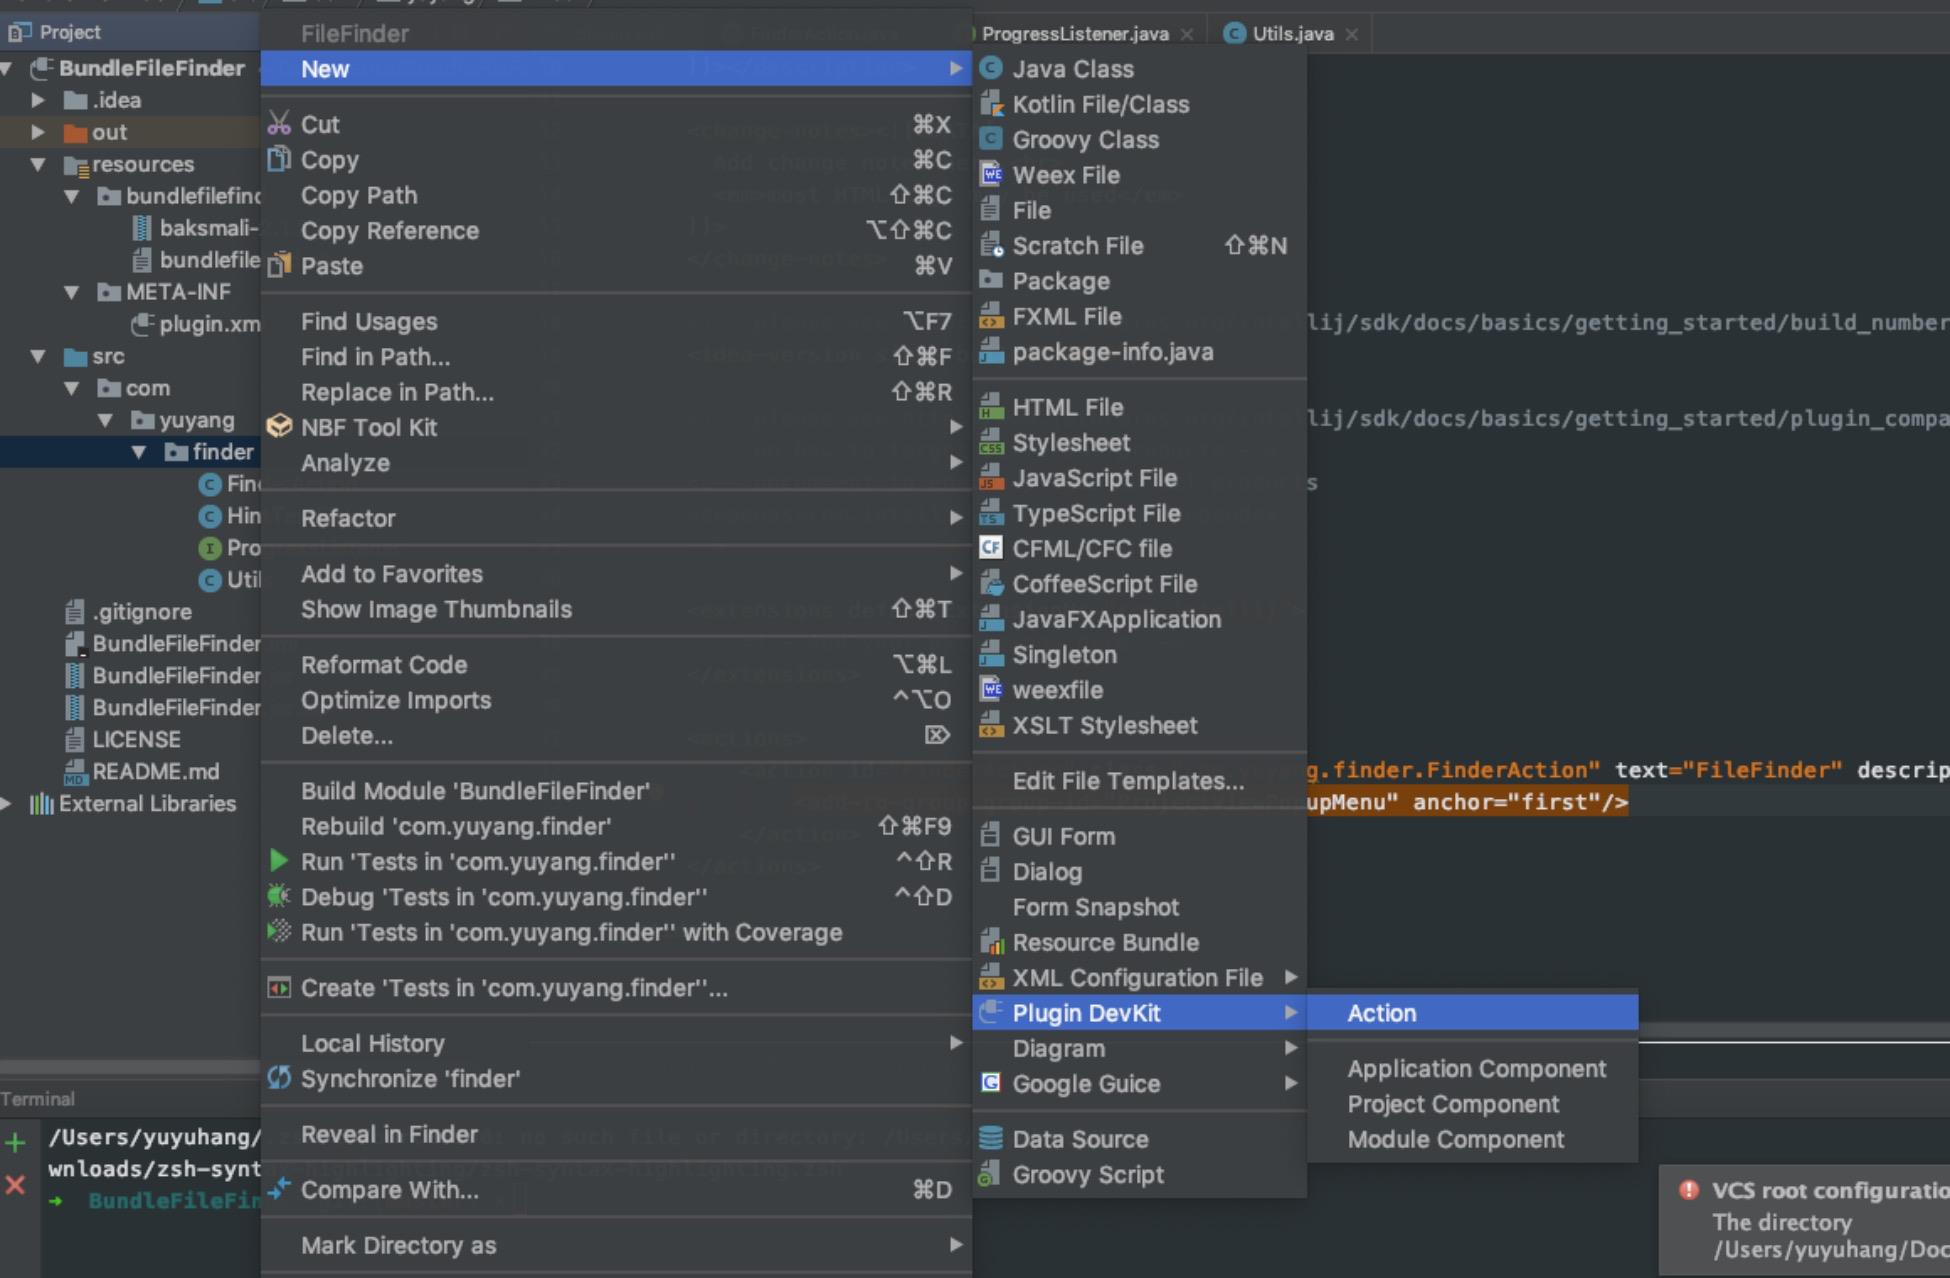
信息填写基本遵循注册Action时的字段内容。
- Action ID: action 唯一 id,推荐使用全类名
- Class Name: 要被创建的 action class 名称
- Name: menu item 的文本
- Description: action 描述,toolbar 上按钮的提示文本,可选
- Add to Group:选择新 action 要被添加到的 action group(Groups, Actions)以及相对其他 actions 的位置(Anchor),比如 EditMenu 就是顶部菜单栏的 Edit 菜单。
- Keyboard Shortcuts:指定 action 的第一和第二快捷键
运行插件
点击 Run | Edit Configurations,若无配置项,则新建一个,配置一下 Use classpath of module,选择要调试的Module。
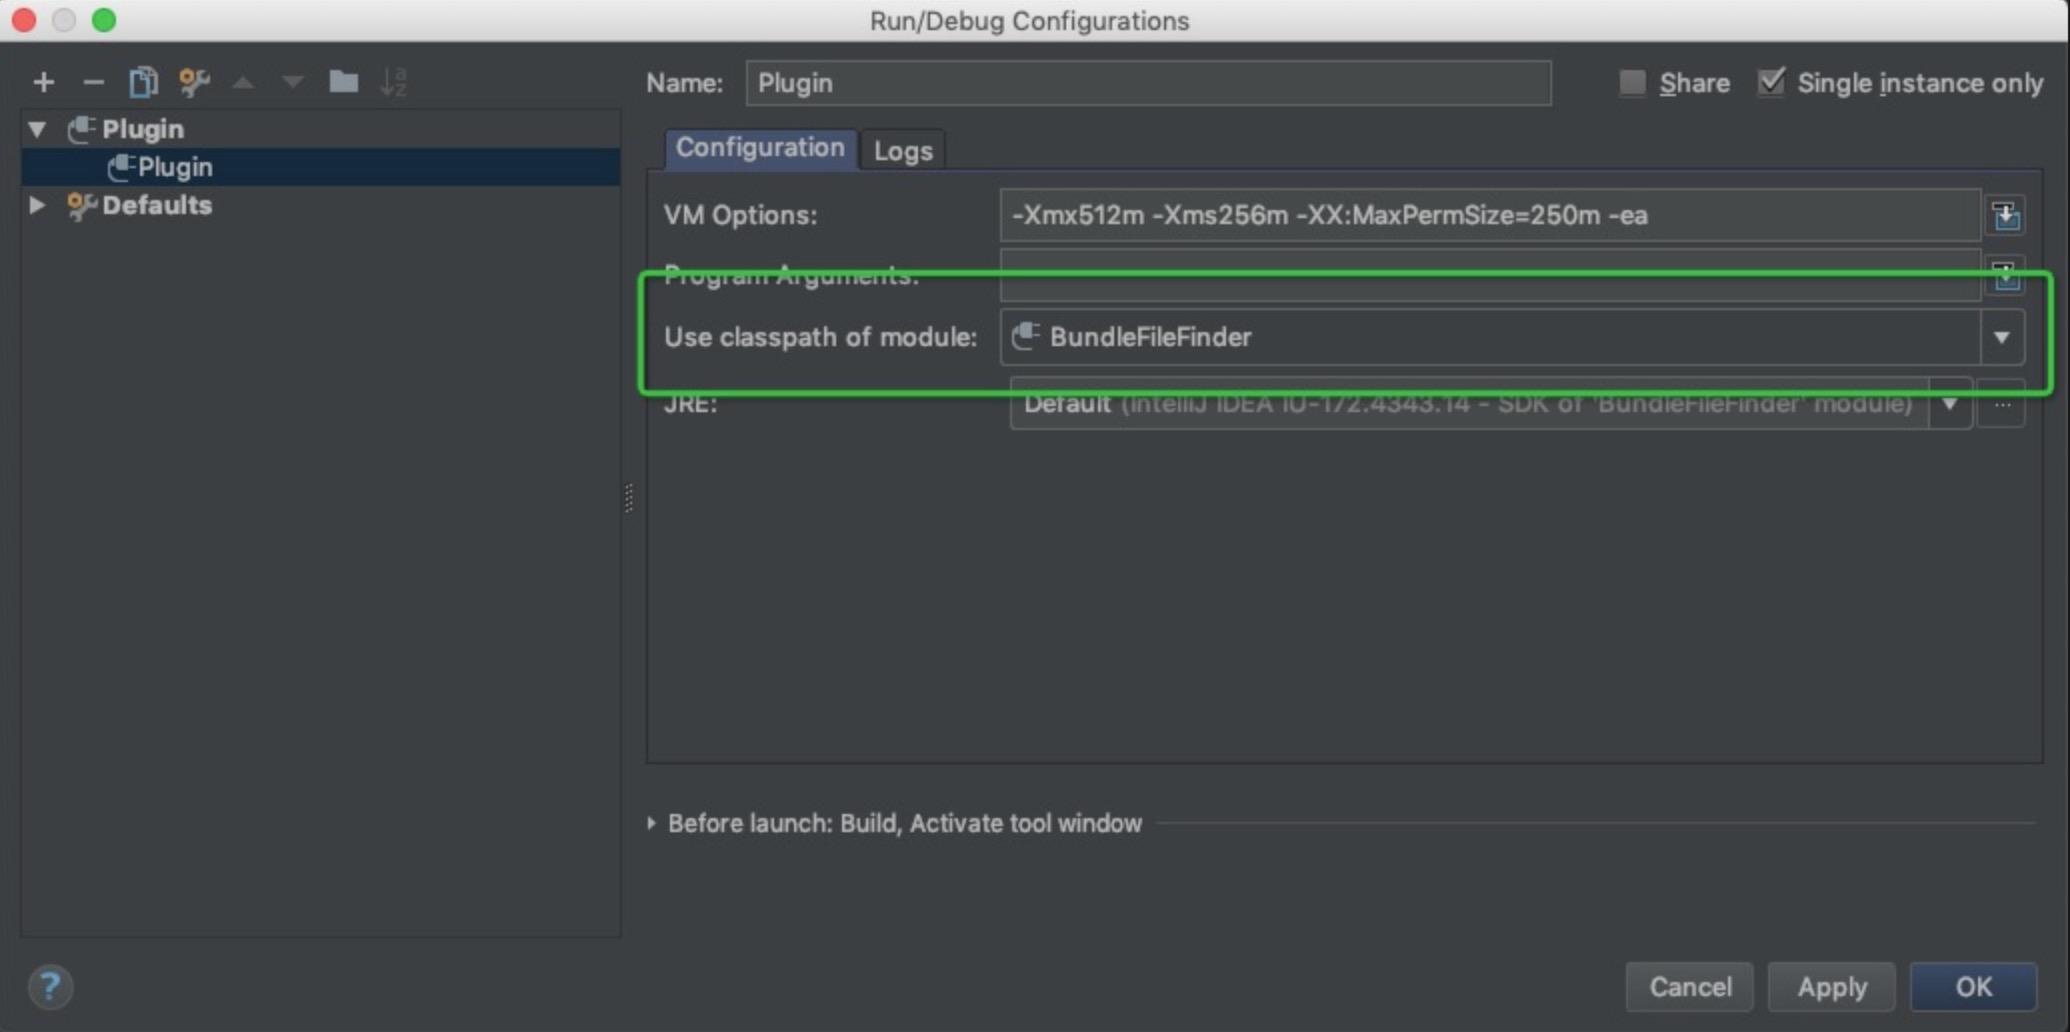
若需要查看调试日志,则需要勾选 Logs的选项。运行插件时将会输出log到console,也可以设置输出到具体文件。

打包插件
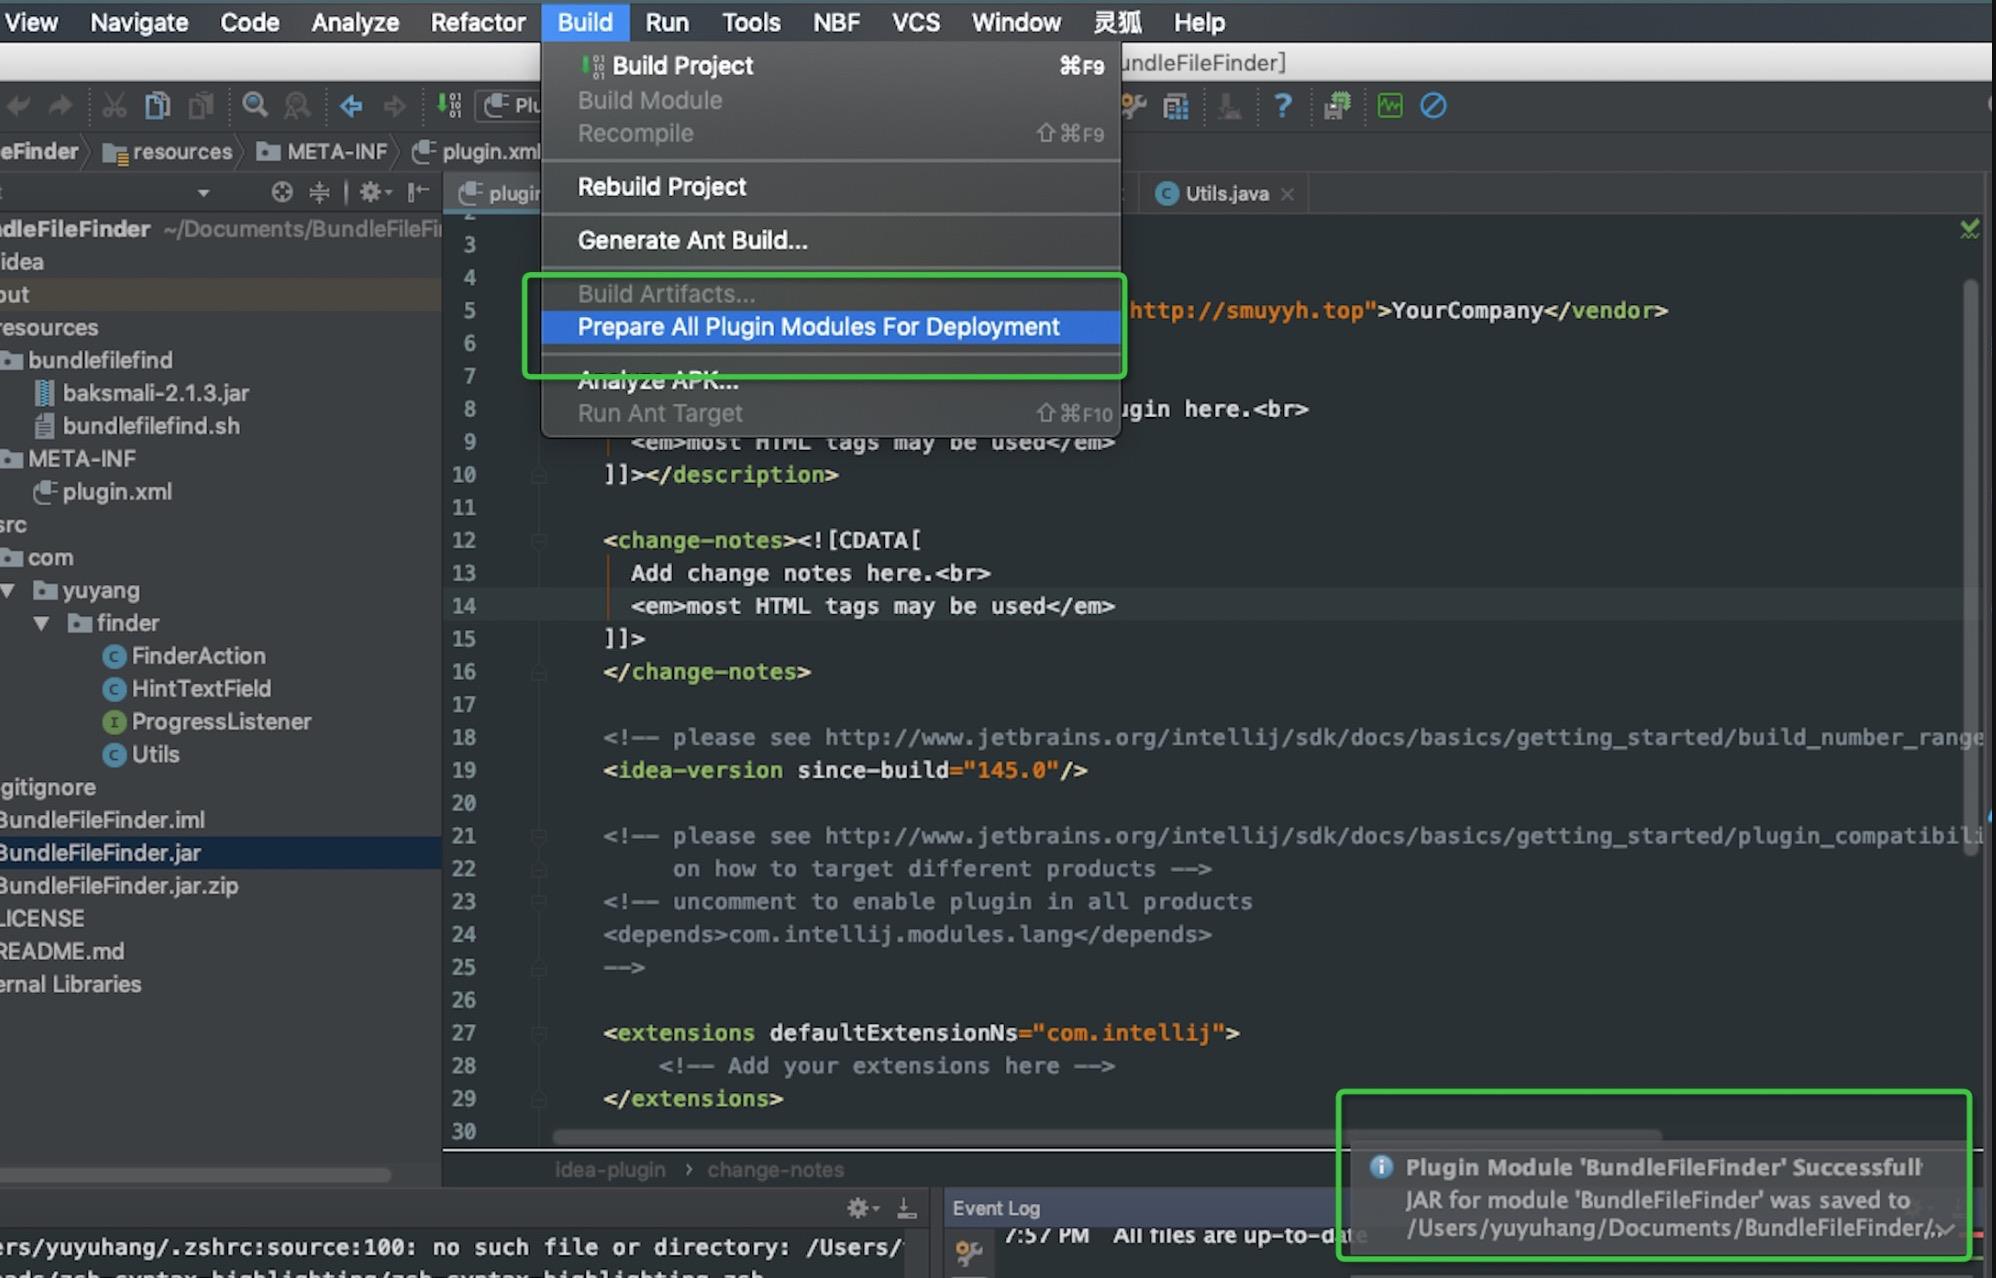
Build -> Prepare All Plugin Modules For Deployment,一般会将插件输出到工程根目录底下。
如果该插件没有依赖其他的library,则插件会被打包成.jar,否则会被打包成.zip
.jar 类型的文件内容结构
BundleFileFinder.jar/
  com/yuyang/finder/
      ...
  META-INF/
    plugin.xml

.zip 类型的文件内容结构
BundleFileFinder.zip/
  lib/
    lib1.jar
    lib2.jar
    BundleFileFinder.jar/
      com/yuyang/finder/
          ...
      META-INF/
        plugin.xml
安装插件
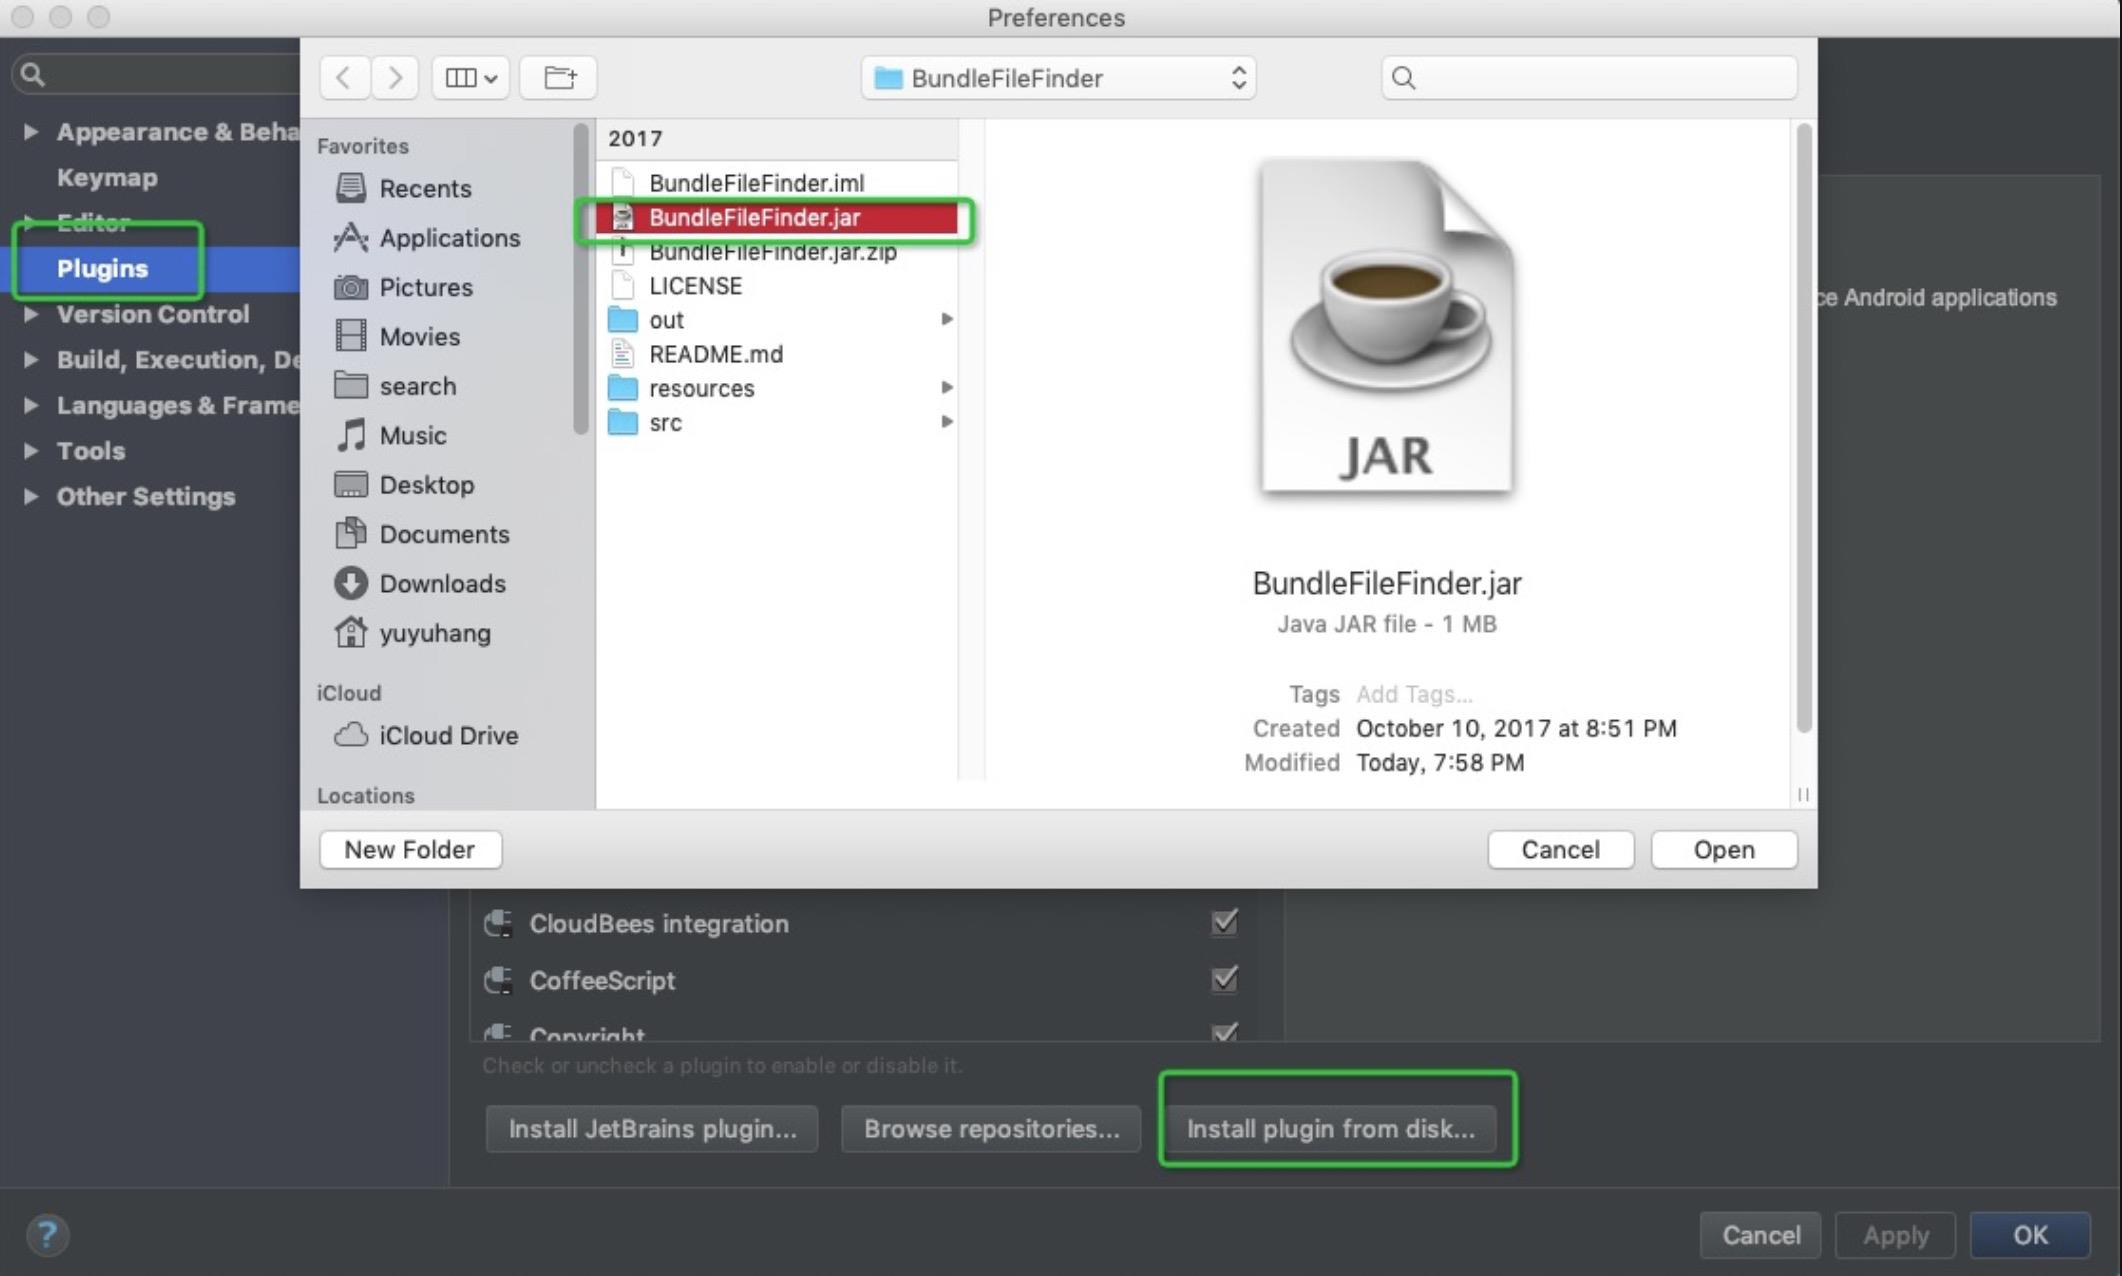
Intellij IDEA -> Preferences -> Plugins -> Install Plugin From Disk,选择打包出来的 .jar 或者 .zip 文件。
Plugin Components
Components 类型
| Components 接口类型 | 描述 |
|---|---|
| Application Component | IDEA启动时会初始化,IDEA生命周期中仅存在一个实例。 |
| Project Component | IDEA 会为每一个 Project 实例创建一个 Project 级别的component |
| Module Component | IDEA 会为每一个 Project 的加载过的Module实例Module级别的component |
创建 Component
与 Action 一样,可以通过快捷方式创建。 右击菜单 -> New -> Plugin Devkit -> Application/Project/Module Component。
例如创建 Application Component,默认会生成一个 Application 类 和 plugin.xml 的配置
public class FinderApplication implements ApplicationComponent
    public FinderApplication()


    @Override
    public void initComponent()
        // TODO: insert component initialization logic here


    @Override
    public void disposeComponent()
        // TODO: insert component disposal logic here


    @Override
    @NotNull
    public String getComponentName()
        return "FinderApplication";
<application-components>
  <component>
    <implementation-class>com.yuyang.finder.FinderApplication</implementation-class>
  </component>
</application-components>
Project Component
public class FinderProject implements ProjectComponent
    public FinderProject(Project project)


    @Override
    public void initComponent()


    @Override
    public void disposeComponent()


    @Override
    @NotNull
    public String getComponentName()
        return "FinderProject";


    @Override
    public void projectOpened()
        // called when project is opened


    @Override
    public void projectClosed()
        // called when project is being closed
<project-components>
    <component>
        <implementation-class>com.yuyang.finder.FinderProject</implementation-class>
    </component>
</project-components>
Module Component
public class FinderModule implements ModuleComponent
    public FinderModule(Module module)


    @Override
    public void initComponent()
        // TODO: insert component initialization logic here


    @Override
    public void disposeComponent()
        // TODO: insert component disposal logic here


    @Override
    @NotNull
    public String getComponentName()
        return "FinderModule";


    @Override
    public void moduleAdded()
        // Invoked when the module corresponding to this component instance has been completely
        // loaded and added to the project.
<module-components>
  <component>
    <implementation-class>com.yuyang.finder.FinderModule</implementation-class>
  </component>
</module-components>
获取 Component 实例
例如 获取定义的一个 Application Component 实例:
//获取application容器中的组件
FinderApplication finderApplication = ApplicationManager.getApplication().getComponent(FinderApplication.class);
Project 与 Module
public class FinderProject implements ProjectComponent

    private Project project;

    public FinderProject(Project project)
        this.project = project;


    @Override
    public void initComponent()
        FinderModule finderModule = project.getComponent(FinderModule.class);
也可以通过 AnAction 的事件获取。
public class FinderAction extends AnAction

    private Application mApplication;
    private Project mProject;
    private Module mModule;

    @Override
    public void actionPerformed(AnActionEvent event)

        DataContext dataContext = event.getDataContext();

        // DataConstants 被标记为 @deprecated
        mProject = (Project)dataContext.getData(DataConstants.PROJECT);
        mModule =(Module)dataContext.getData(DataConstants.MODULE);

        // OR
        mProject = event.getData(PlatformDataKeys.PROJECT);
        // mModule = ???
持久化
对于IDEA插件的一些配置,一般情况下都不会希望用户每次使用插件时都要配置一遍,所以 IntelliJ Platform 提供了一些 API,来做数据的持久化。
PropertiesComponent
对于简单的 key - value 数据结构,可以使用 PropertiesComponent,用于保存 application 和 project 级别的数据。用法如下:
//获取 application 级别的 PropertiesComponent
PropertiesComponent propertiesComponent = PropertiesComponent.getInstance();
//获取 project 级别的 PropertiesComponent,指定相应的 project
PropertiesComponent propertiesComponent = PropertiesComponent.getInstance(Project);

// set & get
propertiesComponent.setValue(name, value)
propertiesComponent.getValue(name)
所有的 PropertiesComponent设置的键值对共用同一个namespance,所以需要避免key冲突。
PersistentStateComponent
对于复杂的数据结构,可以使用 PersistentStateComponent,PersistentStateComponent 可以指定持久化的存储位置。
- 需要提供一个 PersistentStateComponent 的实现类,T代表需要持久化的数据结构类型,然后重写 getState() 和 loadState() 方法。T可以是任意的类,或者是实现类自身。
- 若需要指定存储位置,则在实现类上增加 @State 注解
- 若不希望其中的某个字段被持久化,可以在该字段上增加 @Transient 注解
@State(name = "PersistentStateComponentImpl",
       storages =
           @Storage(value = "PersistentStateComponentImpl.xml")
       )
class PersistentStateComponentImpl implements PersistentStateComponent<State>
    State myState;

    // 当组件被创建或 xml 文件被外部改变(比如git更新)时被调用
    public State getState()
        return myState;


    // 当 settings 被保存时,该方法会被调用并保存状态值。
    public void loadState(State state)
        myState = state;


class State
    public State()

    // 支持基本的数据类型、Map、Collection、enum
    public String value;

    @Transient
    public String disableSave;
- 若是 application 级别的组件
- 运行调试时 xml 文件的位置: ~/IdeaICxxxx/system/plugins-sandbox/config/options
- 正式安装时 xml 文件的位置: ~/IdeaICxxxx/config/options
- 若是 project 级别的组件
- 默认为项目的 .idea/misc.xml
- 若指定为 StoragePathMacros.WORKSPACE_FILE,则会被保存在 .idea/worksapce.xml
注册持久化组件
持久化组件可以声明为 Service,也可以声明为 Component,声明为 Component 则与前面介绍注册与获取的方法一致,声明为Service如下:
获取方式为:
<extensions defaultExtensionNs="com.intellij">
    <!-- application 级别-->
    <applicationService serviceImplementation="com.yuyh.finder.PersistentStateComponentImpl1"/>
    <!-- project 级别 -->
    <projectService serviceImplementation="com.yuyh.finder.PersistentStateComponentImpl2"/>
 </extensions>
GUI 面板
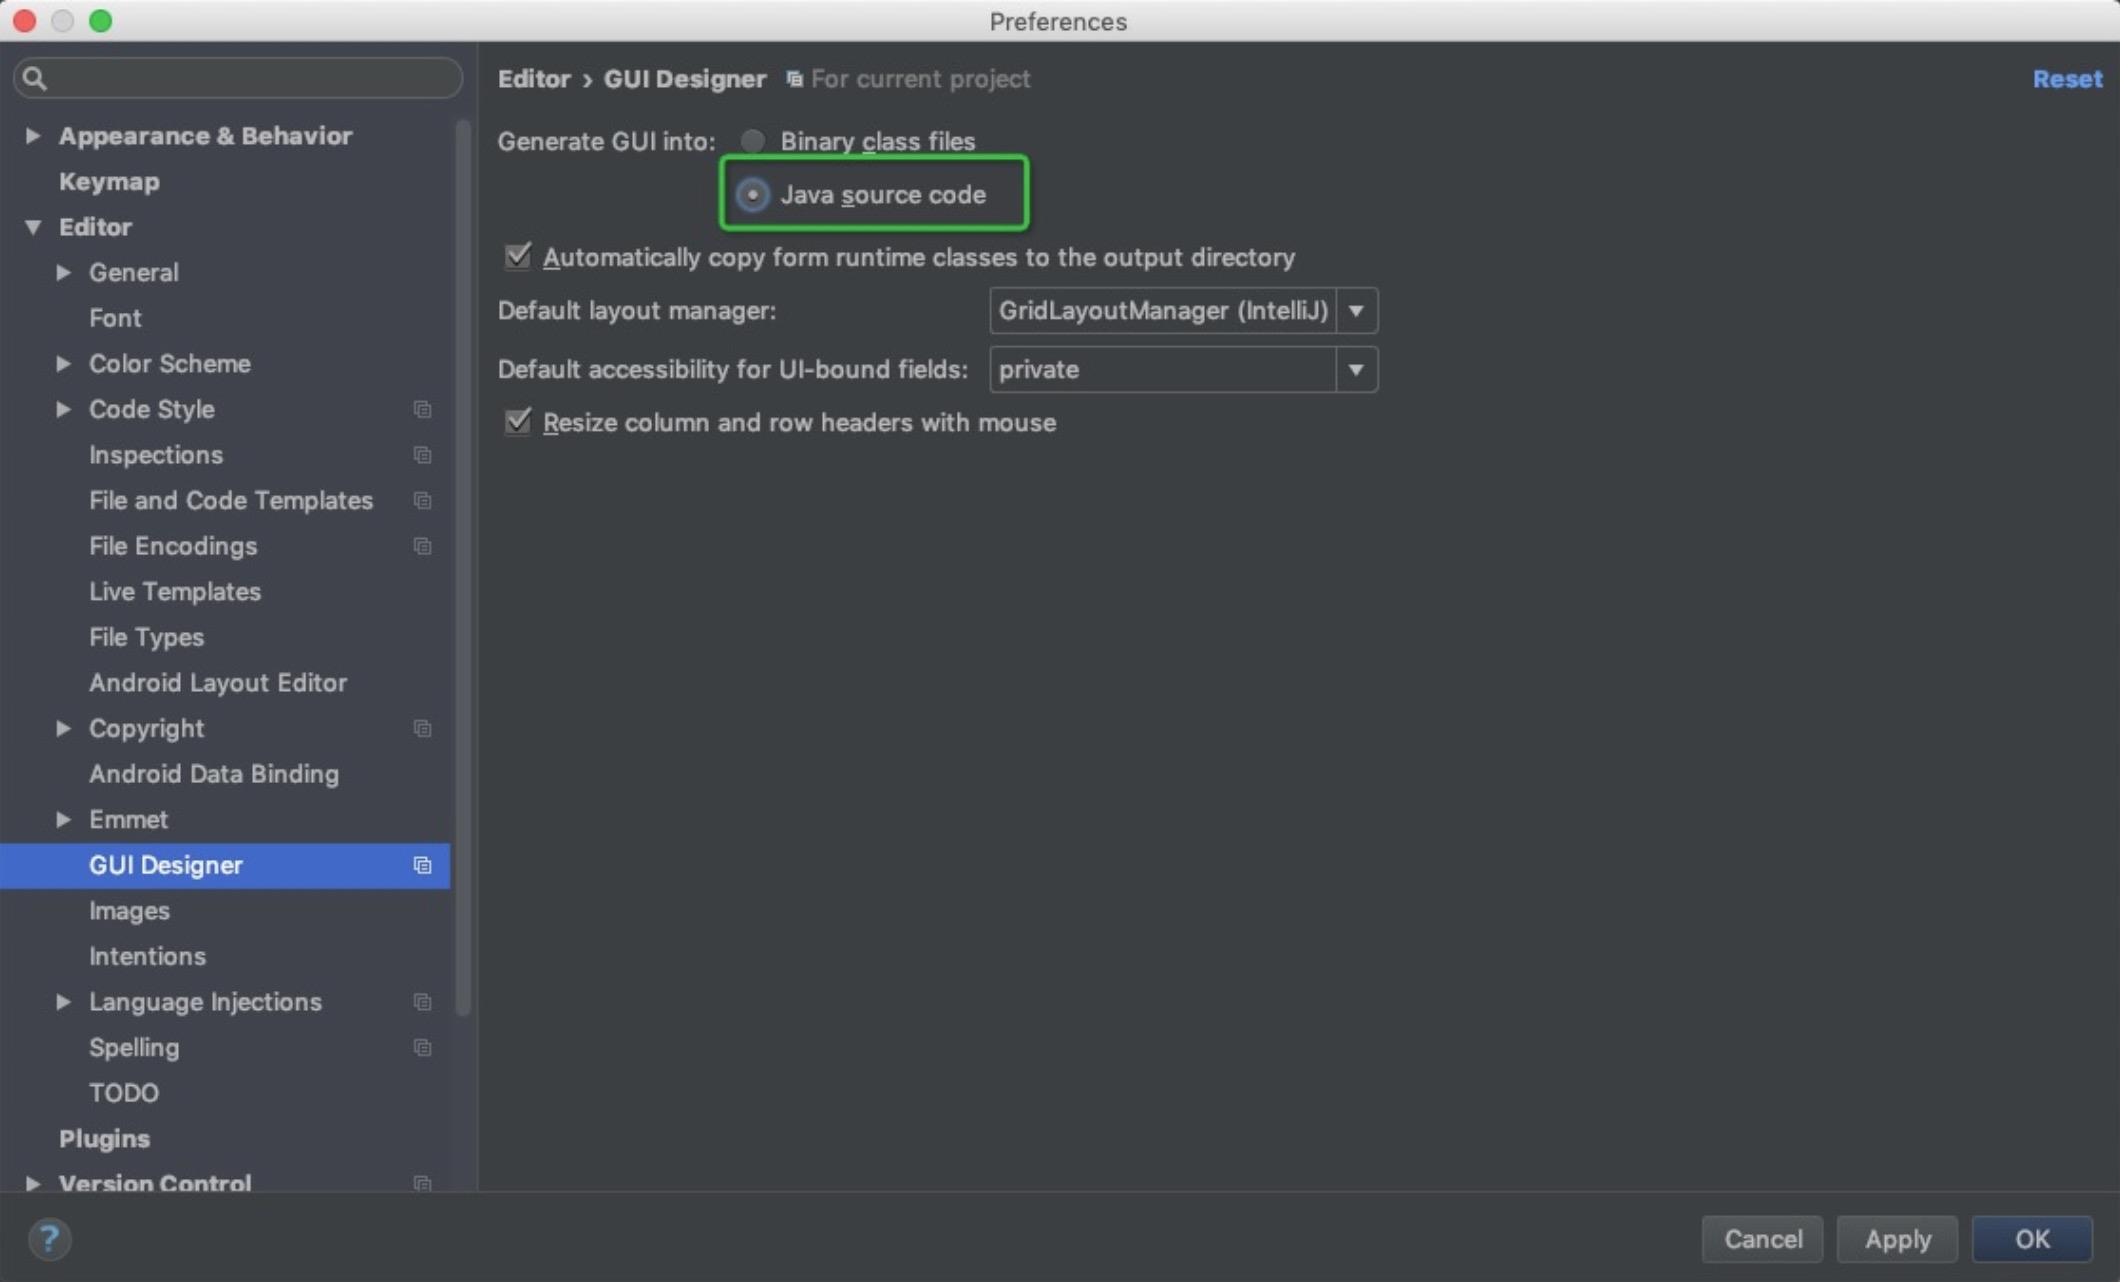
IDEA - Preference - Editor - Gui Designer,勾选 Java Source Code,表示我们通过面板编辑后可以生成 java代码。
创建GUI Form
指定位置右击 - New - GUI Form

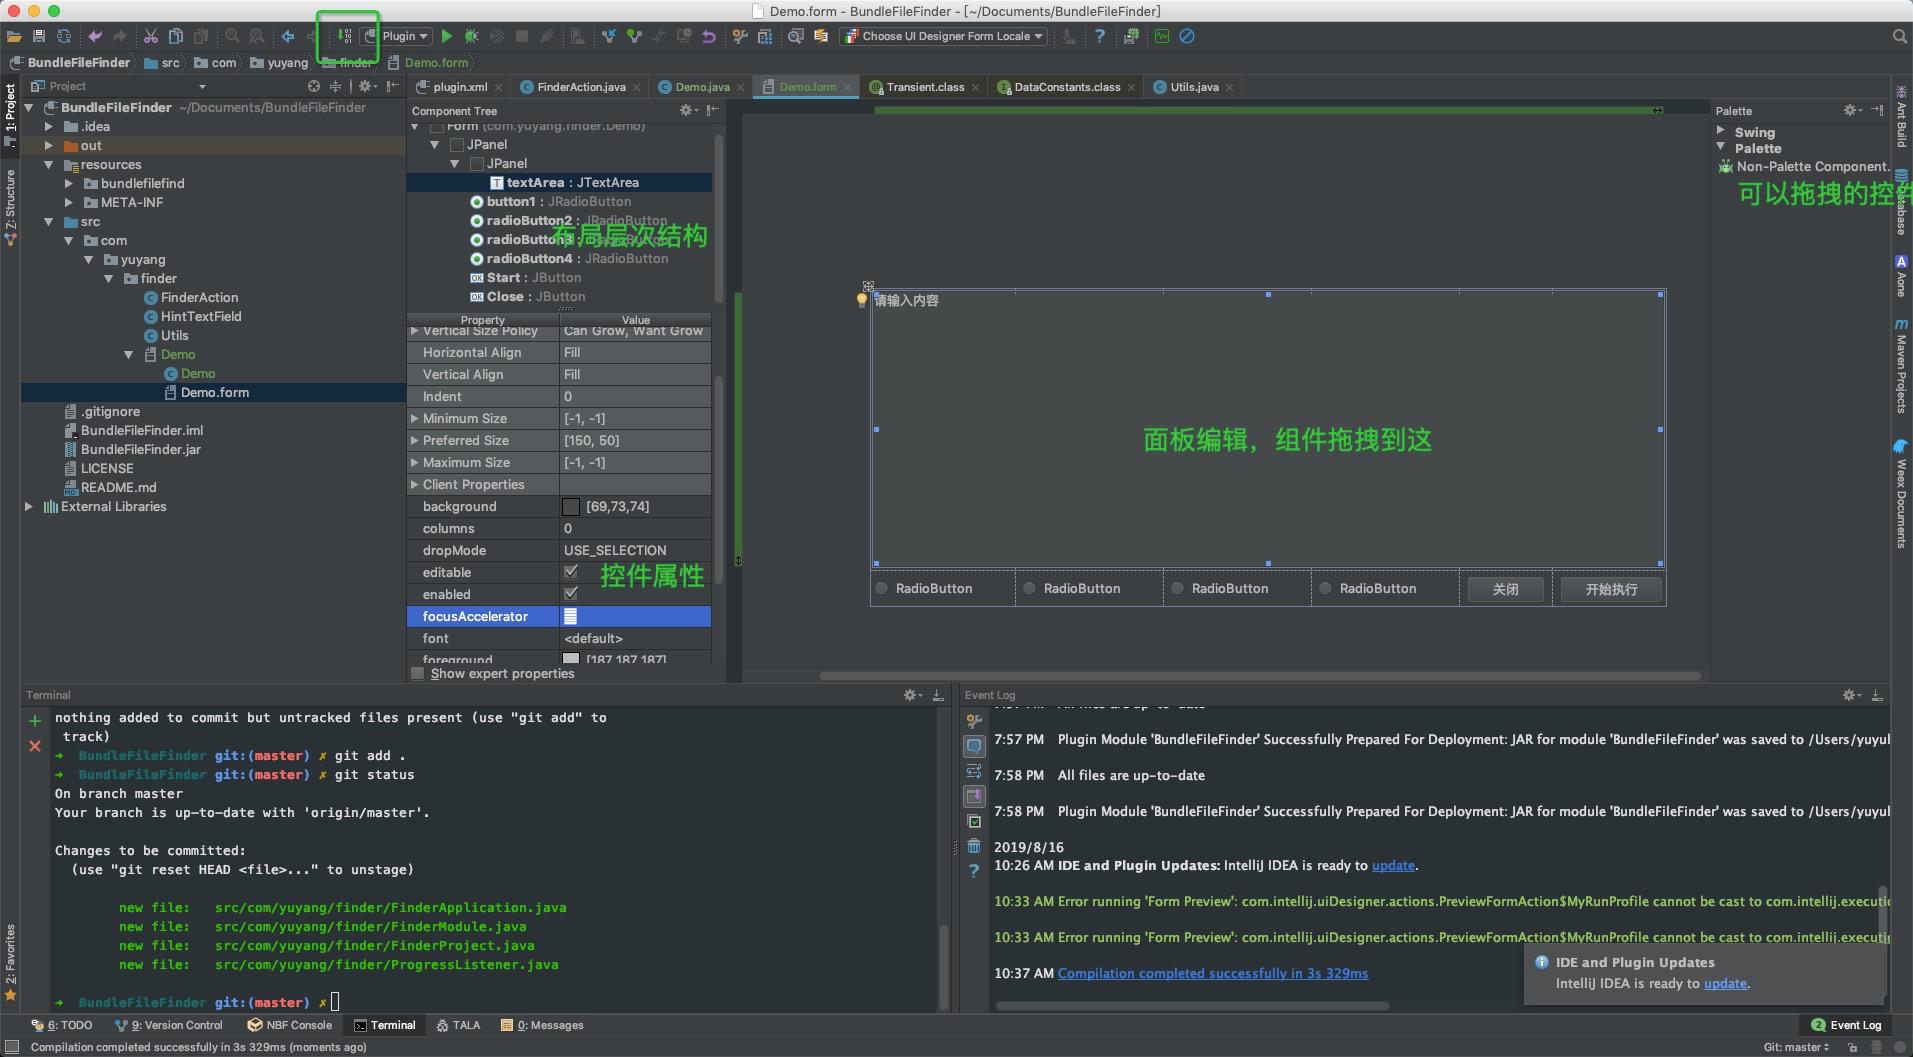
面板编辑完成之后,点击Toolbar工具条那里的 按钮,进行编译。编译完成后,GUI的代码会生成在 对应的 Java文件里面。如图是 Demo.java
文件结构
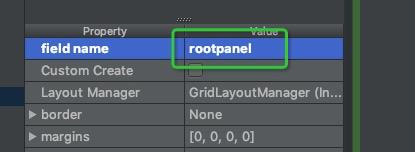
默认根JPanel是没有配置 “field name”控件属性的,所以我们需要给他配置一下。
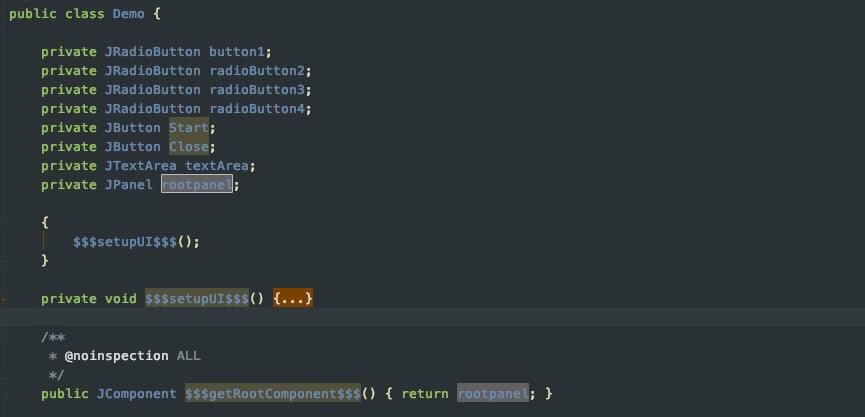
生成的java文件如图,$$$setupUI$$$() 方法里面是具体创建布局的代码。
布局预览
在需要插入main方法的地方,按下 Command + n,点击 Form main,则会生成可执行的main方法。

运行 main 方法,可以预览之前创建的布局。


插件上传
插件也支持上传到 idea 仓库,让其他人搜索到。
官方文档:http://www.jetbrains.org/intellij/sdk/docs/basics/getting_started/publishing_plugin.html
示例项目
实现反编译APK来查找是否引用了某个类;
仓库地址:BundleFileFinder
参考:https://cloud.tencent.com/developer/article/1348741
以上是关于IDEA 插件开发的主要内容,如果未能解决你的问题,请参考以下文章
技术调研,IDEA 插件怎么开发「脚手架低代码可视化编排接口生成测试」?