Blazor University (49)依赖注入 —— 比较依赖范围
Posted dotNET跨平台
tags:
篇首语:本文由小常识网(cha138.com)小编为大家整理,主要介绍了Blazor University (49)依赖注入 —— 比较依赖范围相关的知识,希望对你有一定的参考价值。
原文链接:https://blazor-university.com/dependency-injection/dependency-lifetimes-and-scopes/comparing-dependency-scopes/
比较依赖范围
源代码[1]
在本节中,我们将创建一个 Blazor 应用程序来演示各种依赖注入作用域的不同生命周期。
为此,我们将创建三个不同的服务(每个范围一个)。每个服务都将跟踪它的创建时间,以及一个递增的 InstanceNumber,以便我们可以跟踪已经创建了多少个该类型的实例。
首先,创建一个新的 Blazor 服务器端应用程序并添加一个静态类来跟踪应用程序启动的 DateTime,并计算自启动以来经过了多少时间。
public static class AppLifetime

  public static DateTime StartTimeUtc  get;  = DateTime.UtcNow;
  public static TimeSpan ElapsedTime => DateTime.UtcNow - StartTimeUtc;
服务接口
接下来,创建三个接口:IMyTransientService``、IMyScopedService 和 IMySingletonService。每个接口都是相同的。
注意:有一些方法可以编写不需要重复的代码,但为了简单起见,此示例将重复代码。
public interface IMyTransientService

  public TimeSpan DeltaCreationTime  get;
  public int InstanceNumber  get;


public interface IMyScopedService

  // As above


public interface IMySingletonService

  // As above
服务实现
同样,这些服务的代码将被复制以避免复杂性。创建后,我们的服务将从 AppLifetime 类中获取 ElapsedTime,因此我们可以判断该实例是否是最近创建的。它还将从静态字段中为自己分配一个 InstanceId。
public class MyTransientService : IMyTransientService

  public TimeSpan DeltaCreationTime  get;
  public int InstanceNumber  get;

  private static volatile int PreviousInstanceNumber;

  public MyTransientService()

    DeltaCreationTime = DateTime.UtcNow - AppLifetime.StartTimeUtc;
    InstanceNumber = System.Threading.Interlocked.Increment(ref PreviousInstanceNumber);


public class MyScopedService : IMyScopedService

  //As above


public class MySingletonService : IMySingletonService

  // As above
注册我们的服务
编辑 Startup.cs 文件,并在 ConfigureServices 方法中注册我们的服务,如下所示。
services.AddSingleton<IMySingletonService, MySingletonService>();
services.AddScoped<IMyScopedService, MyScopedService>();
services.AddTransient<IMyTransientService, MyTransientService>();
用户界面
在我们的页面中,我们想要展示实例是如何被多个组件共享的。我们将通过创建一个使用我们所有三个服务的组件来简化这一点,然后让我们的组件的两个实例同时显示在我们的页面中。
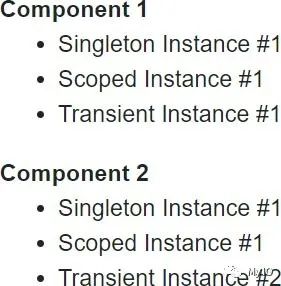
创建我们的服务消费组件
首先我们需要注入我们的服务,然后我们将显示每个实例的 InstanceNumber 以及注入的服务是否是最近创建的。为此,如果服务是在最后 500 毫秒内创建的,我们将在 UI 中包含一个 CSS 类。
@inject IMySingletonService MySingletonService
@inject IMyScopedService MyScopedService
@inject IMyTransientService MyTransientService
<dl>
  <dt>@Caption</dt>
  <dd>
    <ul>
      <li>
        <span class="scope-name">Singleton</span>
        <span class="@GetNewIndicatorCss(MySingletonService.DeltaCreationTime)">Instance #@MySingletonService.InstanceNumber</span>
      </li>
      <li>
        <span class="scope-name">Scoped</span>
        <span class="@GetNewIndicatorCss(MyScopedService.DeltaCreationTime)">Instance #@MyScopedService.InstanceNumber</span>
      </li>
      <li>
        <span class="scope-name">Transient</span>
        <span class="@GetNewIndicatorCss(MyTransientService.DeltaCreationTime)">Instance #@MyTransientService.InstanceNumber</span>
      </li>
    </ul>
  </dd>
</dl>

@code

  [Parameter]
  public string Caption  get; set;

  private string GetNewIndicatorCss(TimeSpan time)

    if (AppLifetime.ElapsedTime - time < TimeSpan.FromMilliseconds(500))

      return "instance-info new-instance";

    return "instance-info";
第 1-3 行
指示 Blazor 将我们的服务实例注入此组件。
第 10、14 和 18 行
显示每个注入依赖项的
InstanceNumber,并通过调用GetNewIndicatorCss设置 html 元素的类属性。第 31 行
如果服务的
DeltaCreationTime(应用程序启动和实例创建之间的时间)在AppLifetime.ElapsedTime(应用程序启动和当前时间之间的时间)的 500 毫秒内,则组件将使用 CSS 类instance-info new-instance呈现,否则它只有 CSS 类实例信息。这将让我们以不同的方式显示新实例的 UI。
在页面上显示我们的组件
编辑 Pages/Index.razor 并更改标记如下
@page "/"
<MyStandardComponent Caption="Component 1" />
<MyStandardComponent Caption="Component 2" />
运行应用程序,您将看到以下输出。
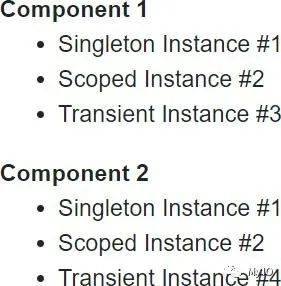
当我们的 Scoped Instance 应该是第一个实例时,它却是 #2,这可能会让人感到惊讶。这是因为在浏览器和服务器之间建立 SignalR 连接以实际启动用户会话之前,服务器端 Blazor 应用程序会预渲染我们的页面以发回完整的 HTML 响应。我们现在可以通过执行以下操作来禁用它。
编辑 /Pages/_Host.cshtml
找到文本
render-mode="ServerPrerendered"将
ServerPrerendered更改为Server
现在重新运行应用程序会给我们预期的结果。
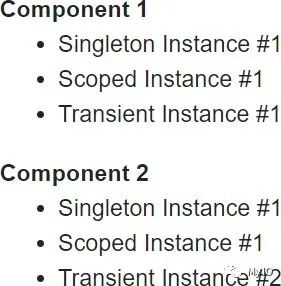
Singleton Instance 将始终为 #1,因为它由所有用户共享。Scoped Instance 将是应用程序的第一个用户的 #1,第二个用户的 #2,依此类推。Transient Instance 对于第一个组件将是 #1,对于第二个组件将是 #2,因为它们是为每个组件创建的。如果用户离开页面然后返回,唯一会改变的实例编号是 Transient 实例,它将递增到 #3 和 #4,并且在下次访问页面时将递增到 #5 和 #6。
交互式示例
为了使生命周期更加明显,我们将修改我们的 Index.razor 页面,以便它有条件地呈现我们的组件。我们还将展示实际的页面刷新如何影响我们的范围服务。
我们将通过以下步骤创建一个简单的向导式 UI
网站启动
更新的 UI – 重新创建了组件
在浏览器中重新加载页面
更新的 UI – 重新创建了组件
确保在每一步都重新创建组件
为了确保我们的组件在每个导航中创建,我们将有一个 CurrentStep 字段并根据 CurrentStep 是奇数还是偶数来显示一个或另一组组件。
@if (CurrentStep % 2 == 1)

  <MyStandardComponent Caption="Component 1" />
  <MyStandardComponent Caption="Component 2" />

else

  <MyStandardComponent Caption="Component 1" />
  <MyStandardComponent Caption="Component 2" />
强制在浏览器中刷新页面
要强制刷新页面,我们将使用 NavigationManager 进行导航,并将 true 传递给 forceLoad 参数。为了让我们知道在页面刷新后我们正在继续,我们将导航到 /continue。此请求将由同一页面提供服务,但我们知道我们应该从第 3 步而不是第 1 步开始。
@page "/"
@page "/Continue"
@inject NavigationManager NavigationManager

@code

  [Parameter]
  public string Continue  get; set;

  private void GoToNextStep()

    CurrentStep++;
    if (CurrentStep == 3)
      NavigationManager.NavigateTo("/continue", forceLoad: true);


  protected override void OnInitialized()

    base.OnInitialized();
    if (!string.IsNullOrWhiteSpace(Continue))
      CurrentStep = 3;
完成示例
以下(已完成)代码基本上是到目前为止所概述的内容,并添加了以下内容。
添加了显示当前步骤名称的文本。
添加了一个按钮以单击以进行下一步。
添加了在没有下一步时禁用按钮的代码。
添加了一些 CSS 样式,以使新实例通过脉冲来吸引我们的注意力。
@page "/"
@page "/Continue"
@inject NavigationManager NavigationManager

<h1>Step @CurrentStep: @CurrentStepName</h1>
@if (CurrentStep % 2 == 1)

  <MyStandardComponent Caption="Component 1" />
  <MyStandardComponent Caption="Component 2" />

else

  <MyStandardComponent Caption="Component 1" />
  <MyStandardComponent Caption="Component 2" />

<button @onclick=GoToNextStep disabled=@IsButtonDisabled>Next step</button>

<style>
  .scope-name
    width: 5rem;
    display: inline-block;
    font-weight: bold;


  .instance-info
    color: white;
    background-color: #888;
    padding: 0 4px;
    margin: 2px;
    display: inline-block;


    .instance-info.new-instance
      background-color: #3f8f42;
      animation: flash-green 2s;


  @@keyframes flash-green
    from
      background-color: #4cff00;


    to
      background-color: #3f8f42;


</style>

@code

  [Parameter]
  public string Continue  get; set;

  private int CurrentStep = 1;
  private string CurrentStepName => StepNames[CurrentStep - 1];
  private bool IsButtonDisabled => CurrentStep >= StepNames.Length;

  private string[] StepNames = new string[]

    "Website started",
    "Updated UI - Components recreated",
    "Reloaded page in browser",
    "Updated UI - Components recreated"
  ;

  protected override void OnInitialized()

    base.OnInitialized();
    if (!string.IsNullOrWhiteSpace(Continue))
      CurrentStep = 3;


  private void GoToNextStep()

    CurrentStep++;
    if (CurrentStep == 3)
      NavigationManager.NavigateTo("/continue", forceLoad: true);
第 6 行
根据
CurrentStep是奇数还是偶数,渲染一组或另一组组件实例。这可确保为向导的每个步骤重新创建生成 UI 的组件。第 16 行
转到向导的下一步(如果有)。
第 69 行
如果
Continue route参数不为 null,则从步骤 3 继续。第 76 行
如果单击下一步按钮并在第 3 步结束,则强制重新加载页面。
运行应用程序
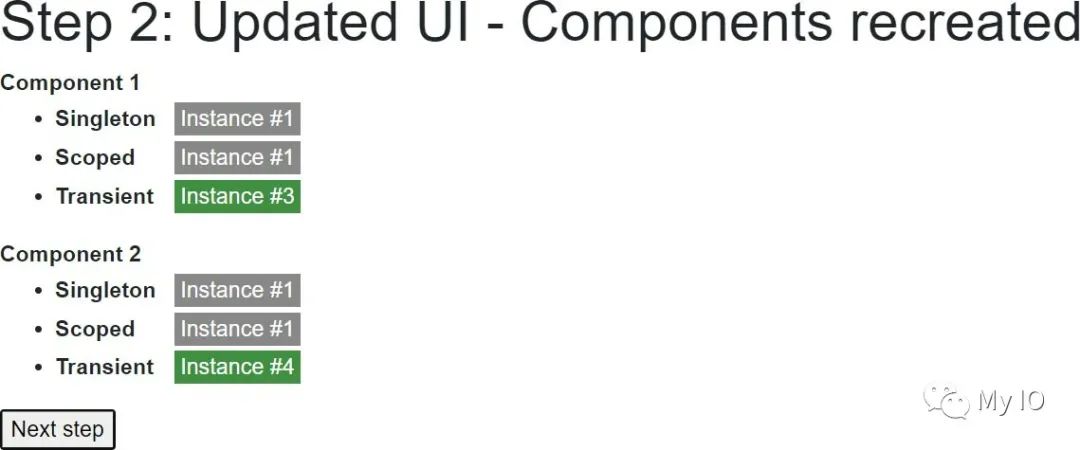
当我们的网站第一次运行时,我们获得了所有注入依赖项的第一个实例。除了 Transient 依赖,因为它们是按需创建的,而不是缓存起来以供重用,所以我们得到了实例 #1 和 #2。
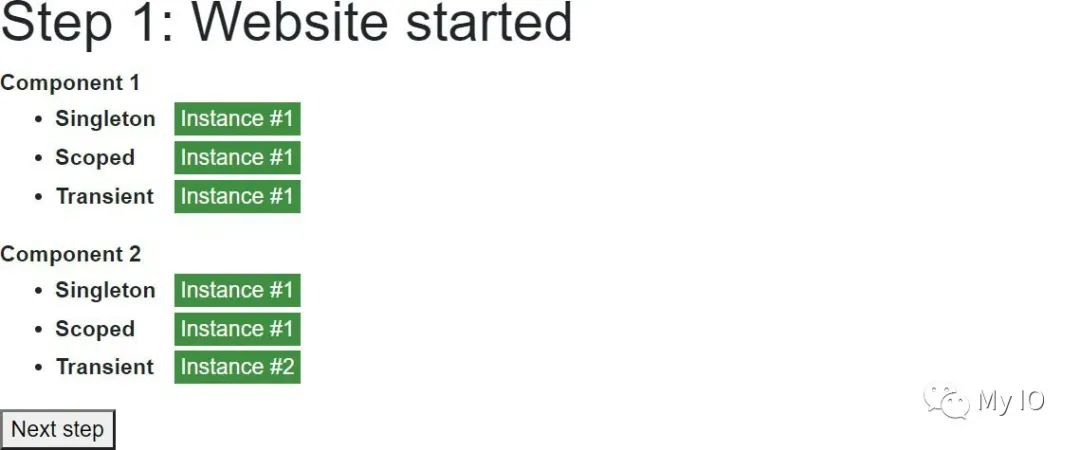
当用户单击 Next step 按钮时,CurrentStep 增加到 2,我们的第一对组件被丢弃,而第二对组件被创建用于渲染。因为这些是在同一个用户会话中运行的新实例,所以它们将收到相同的 Scoped 依赖项以及两个新的 Transient 依赖项。
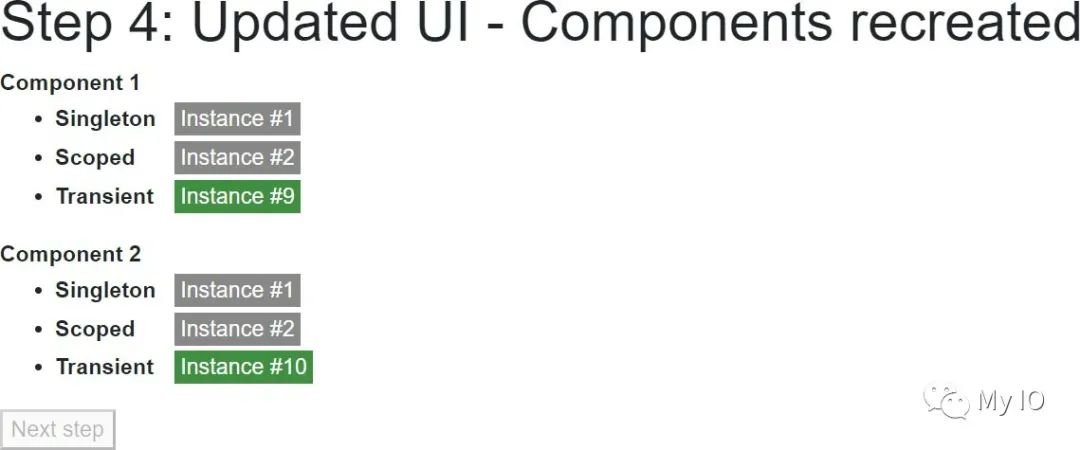
当用户再次单击 Next step 按钮时,应用程序将强制在新路径 /continue 处重新加载应用程序。由于在重新加载页面时忘记了 SignalR 连接的 ID,因此将为用户设置一个新连接,从而设置一个新范围。所以现在当前几个组件被渲染时,它们是 Scoped 实例 #2。

最后,当用户最后一次单击 Next step 按钮时,将创建第二对组件以进行渲染,并将注入由共享 Singleton 容器(实例#1)中缓存的实例缓存的 IMySingletonService,与当前用户的注入容器(实例 #2)缓存的 IMyScopedService,以及 IMyTransientService 的两个新实例。
WebAssembly 依赖范围
源代码[2]
因为 WebAssembly 在用户的浏览器中运行,并且每个选项卡都是一个完全独立的进程,所以我们的输出将与服务器端 Blazor 应用程序产生的略有不同。
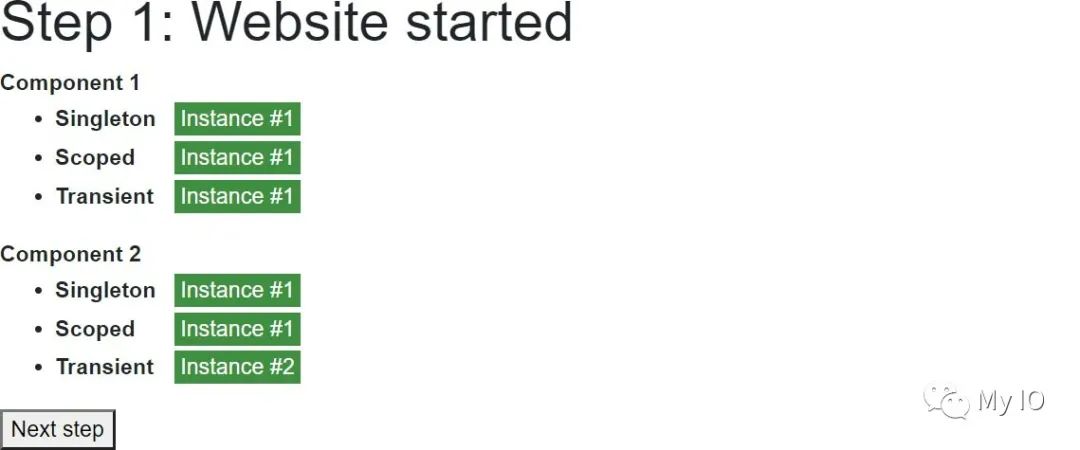
首先,应用程序在浏览器选项卡中启动,我们得到了我们期望在服务器端 Blazor 应用程序上看到的相同输出。
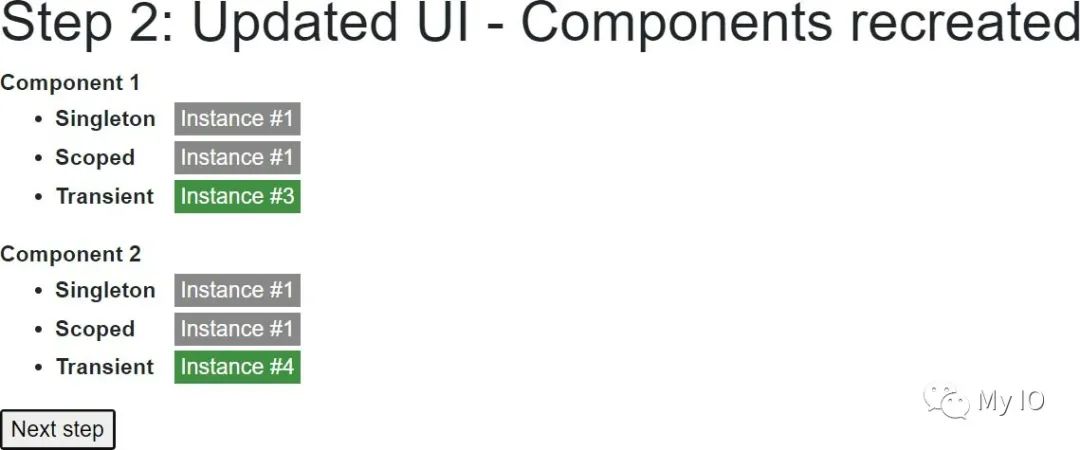
第一次单击 Next step 也向我们展示了一个与我们的服务器端 Blazor 应用程序相同的屏幕,其中 Singleton 和 Scoped 实例保持不变,因为它们都是缓存实例,并且按需创建了两个 Transient 实例。
当我们的应用程序执行强制重新加载时,情况就不同了。在服务器端应用程序中,用户获得一个新的 SignalR 连接 ID,因此在与该 ID 绑定的服务器上获得一个新的依赖注入容器。在 WebAssembly 中,页面没有可重新连接的应用程序状态。一旦页面重新加载,整个应用程序状态就会被销毁,然后重新创建。结果,我们的实例数从头开始。
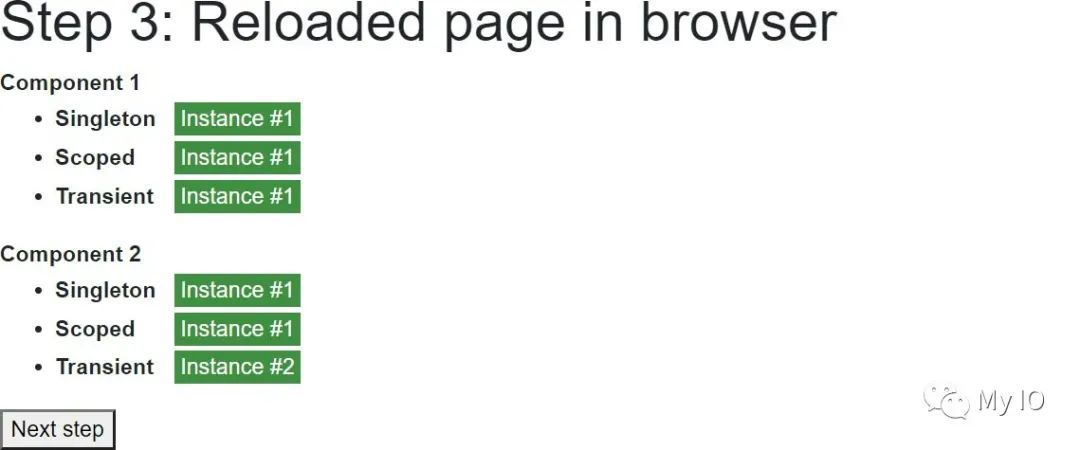
然后最后。

结论
由于用户界面和 UI 逻辑在 Blazor 应用程序中绑定在一起,因此没有每个请求的依赖注入范围。
Singleton 注册的依赖项在服务器端应用程序中的用户之间共享,但在 WebAssembly 应用程序中每个浏览器选项卡都是唯一的。
Scoped 依赖的行为与 Singleton 注册的依赖几乎相同,除了它们与其他用户/其他浏览器选项卡隔离。
Transient 依赖在服务器端和 WebAssembly 上的工作方式相同,并且与 ASP.NET MVC 中的工作方式相同——除了依赖注入容器在 ASP.NET MVC 中的页面请求之后被释放。请参阅 Transient 依赖项的避免内存泄漏[3]部分。
有一些方法可以为每个用户引入额外的范围。这种技术将在后面的部分中介绍。
参考资料
[1]
源代码: https://github.com/mrpmorris/blazor-university/tree/master/src/DependencyInjection/ServerDependencyScopes
[2]源代码: https://github.com/mrpmorris/blazor-university/tree/master/src/DependencyInjection/WebAssemblyDependencyScopes
以上是关于Blazor University (49)依赖注入 —— 比较依赖范围的主要内容,如果未能解决你的问题,请参考以下文章
Blazor University (48)依赖注入 —— Scoped 依赖
Blazor University (46)依赖注入 —— Transient 依赖
Blazor University (47)依赖注入 —— Singleton 依赖