Blazor University (51)依赖注入 —— 拥有多个依赖项:错误的方式
Posted dotNET跨平台
tags:
篇首语:本文由小常识网(cha138.com)小编为大家整理,主要介绍了Blazor University (51)依赖注入 —— 拥有多个依赖项:错误的方式相关的知识,希望对你有一定的参考价值。
原文链接:https://blazor-university.com/dependency-injection/component-scoped-dependencies/owning-multiple-dependencies-the-wrong-way/
拥有多个依赖项:错误的方式
`OwningComponentBase`[1] 类是一个合适的解决方案,当我们需要我们的组件只拥有一个独立的依赖实例(以及它所依赖的任何 Scoped/Transient 依赖)时。但是,有时我们需要我们的组件拥有多个依赖项。
本节将演示实现此目标的错误方法,然后下一节将演示如何正确实现它。
概述
源代码[2]
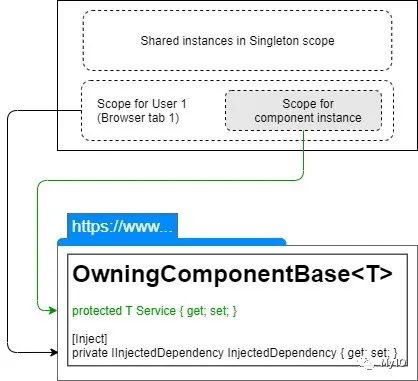
使用 OwningComponentBase<T> 时要记住的是,只有在组件拥有的注入容器中创建的 T(存储在名为 Service 的属性中)。
在 OwningComponentBase<T> 的派生类上使用 @inject 指令将不会从组件自己的注入容器中注入依赖项。
注意: 如果您还没有这样做,如果您还不熟悉此类如何创建自己的注入容器,请阅读有关 OwningComponentBase[3] 的部分。
示例
对于本练习,我们将创建一个新的 Blazor 应用程序,该应用程序将演示通过 OwningComponentBase<T> 中的 T 和 @inject 指令为我们的组件提供的服务的不同生命周期。
首先,创建一个新项目,并添加以下服务。
public interface IOwnedDependency

  public int InstanceNumber  get;


public class OwnedDependency : IDependencyOne

  private static volatile int PreviousInstanceNumber;

  public int InstanceNumber  get;
  public OwnedDependency()

    InstanceNumber =
      System.Threading.Interlocked.Increment(ref PreviousInstanceNumber);
该类只是根据增加一个静态字段为自己分配一个新的 InstanceNumber,为每个实例提供一个序号。
接下来,使用名称 InjectedDependency 创建一段相同的代码并注册服务。
// Server-side apps, edit Startup.cs
services.AddScoped<IOwnedDependency, OwnedDependency>();
services.AddScoped<IInjectedDependency, InjectedDependency>();

// WebAssembly apps, edit Program.cs
builder.Services.AddScoped<IOwnedDependency, OwnedDependency>();
builder.Services.AddScoped<IInjectedDependency, InjectedDependency>();
使用依赖
现在在 /Shared 文件夹中创建一个名为 MyOwningComponent 的组件,如下所示:
@inherits OwningComponentBase<IOwnedDependency>
@inject IInjectedDependency InjectedDependency

<div>
  Service.InstanceNumber = @Service.InstanceNumber
</div>
<div>
  InjectedDependency.InstanceNumber = @InjectedDependency.InstanceNumber
</div>
第 1 行
从
OwningComponentBase<IOwnedDependency>继承我们的组件,因此我们的组件将创建自己的注入容器并从中解析IOwnedComponent的实例。第 2 行
使用标准
@inject指令让 Blazor 将IInjectedDependency的实例注入我们的组件。
显示结果
最后,我们将编辑 Index.razor 文件。我们将创建一个布尔字段,并且仅在该字段为 true 时才渲染 MyOwnedComponent。这将告诉 Blazor 在需要时创建组件的实例,并在不需要时释放它。我们将 @bind 一个 html 复选框以允许用户切换组件。
@page "/"

<input id="show-component" type=checkbox @bind=ShowComponent/>
<label for="show-component">Show component</label>

@if (ShowComponent)

  <MyOwningComponent/>


@code

  bool ShowComponent = false;
运行应用程序并切换复选框的状态将显示以下内容。
| 步骤 | 拥有的服务 | 注入的服务 |
|---|---|---|
| 1 | 实例编号 = 1 | 实例编号 = 1 |
| 2 | 实例编号 = 2 | 实例编号 = 1 |
| 3 | 实例编号 = 3 | 实例编号 = 1 |
结论
使用 @inject 指令时,Blazor 将从与当前用户会话(当前浏览器选项卡)关联的依赖项容器中注入 Scoped 依赖项。只有 OwnedComponentBase<T> 中的 T 会从与我们的 OwningComponentBase<T> 派生组件的实例一起创建和销毁的注入容器中解析。

组件拥有多个依赖项的正确方法将在有关非泛型 OwningComponentBase[4] 类的部分中介绍。
参考资料
[2]
源代码: https://github.com/mrpmorris/blazor-university/tree/master/src/DependencyInjection/OwningMultipleDependenciesTheWrongWay
以上是关于Blazor University (51)依赖注入 —— 拥有多个依赖项:错误的方式的主要内容,如果未能解决你的问题,请参考以下文章