MyBatis-plus实现逆向生成器
Posted 中国胖子风清扬
tags:
篇首语:本文由小常识网(cha138.com)小编为大家整理,主要介绍了MyBatis-plus实现逆向生成器相关的知识,希望对你有一定的参考价值。
1、前言
在日常的Spring Boot项目开发中,我们都会建立几个固有的包,分别是Controller、entity(pojo)、dao、service、serviceimpl。
在单个Spring Boot项目中,用手动建立倒是简单,但是在Spring Cloud项目中,会建立许多的Spring Boot项目,如果此时还使用手动建立这几个固有的包,那么就有点耽误时间了。
作为程序猿的我们,怎么可能会手动做这种重复而又浪费时间的事呢!那么Mybatis-plus所提供的逆向生成器就发挥出了我们想要的效果。
2、实现逆向生成器
2.1、导入依赖
<!--Spring Boot的启动依赖-->
<dependency>
	<groupId>org.springframework.boot</groupId>
    <artifactId>spring-boot-starter</artifactId>
</dependency>

<!--Mybatis-plus启动依赖-->
<dependency>
    <groupId>com.baomidou</groupId>
    <artifactId>mybatis-plus-boot-starter</artifactId>
    <version>3.5.2</version>
</dependency>

<!--Mybatis-plus逆向生成器依赖-->
<dependency>
    <groupId>com.baomidou</groupId>
    <artifactId>mybatis-plus-generator</artifactId>
    <version>3.4.1</version>
</dependency>

<!--数据库连接依赖-->
<dependency>
    <groupId>mysql</groupId>
    <artifactId>mysql-connector-java</artifactId>
    <scope>runtime</scope>
</dependency>

<!--Lombok依赖-->
<dependency>
    <groupId>org.projectlombok</groupId>
    <artifactId>lombok</artifactId>
    <optional>true</optional>
</dependency>

<!--Mybatis-plus逆向生成器的Freemarker模板引擎-->
<dependency>
    <groupId>org.freemarker</groupId>
    <artifactId>freemarker</artifactId>
</dependency>
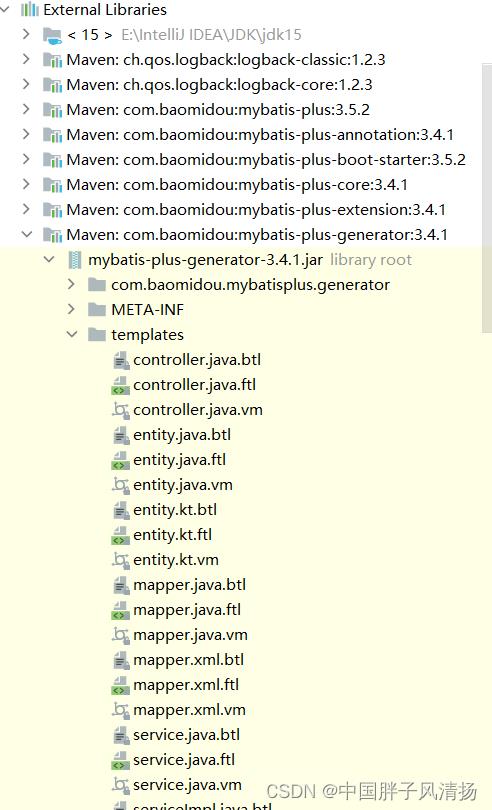
mybatis-plus-generator这个依赖要使用3.5.0版本以下的,我使用的是3.4.1版本,因为这个依赖在3.5.0以后就进行了修改,需要使用相关类的Builder类来构建对象,然后Builder类所提供的方法又不多,所以我个人觉得使用起来不太方便。
导入数据库的依赖,是因为在逆向生成的过程中,Mybatis-plus会根据指定的表来生成相应的实力类对象以及其他层的配置。
导入模板引擎依赖,可以根据模板引擎来规定初始化生成的包的模式。
2.2、项目结构

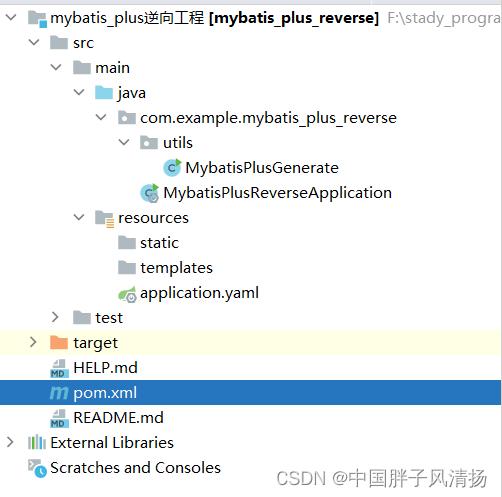
项目中只有一个Utils包用来存放相关的工具类,而我也把逆向生成器类放在了这个包里面,如上图所示的MybatisPlusGenerate类。
我习惯了使用Spring Boot项目,所以这里的演示也是使用了Spring Boot项目,对spring Boot不熟悉的猿友可以使用Maven项目。
2.3、MybatisPlusGenerate类
public class MybatisPlusGenerate

    private static Scanner scanner = new Scanner(System.in);
    // 获得当前项目的路径,如上图就是 F:stady_program/Mybatis_plus逆向工程
    private final static String PROJECT_PATH = System.getProperty("user.dir");
2.3.1、获取用户在控制台输入的表名
 public static void scannerTableName(String parentPackageName)
        List<String> tableList = new ArrayList<>(); // 使用集合来存储用户输入的多个表的名称
        System.out.println("<=================表名列表===============>");
        while(!scanner.hasNext("end")) // 当用户输入end后结束输入
            String tableName = scanner.next();
            if(tableName.equals(""))
                throw new RuntimeException("所输入的表名不合法");

            tableList.add(tableName); //将表名添加到集合中。

        // 通过表名和当前项目的目录来生成相应的包和类。
        for(String name : tableList) generateInformationByTableName(parentPackageName,name);
当前项目的目录就是指当前Spring Boot项目中启动类所在的包的名称。也就是上图所示的com.example.mybatis_plus_reverse包。
2.3.2、数据源的配置
 private static DataSourceConfig dataSourceConfig()
        DataSourceConfig dataSourceConfig = new DataSourceConfig();
        dataSourceConfig.setUrl("jdbc:mysql://localhost:3306/mybatis?useUnicode=true&useSSL=false&serverTimezone=Asia/Shanghai")
                .setUsername("root")
                .setPassword("123456")
                .setDriverName("com.mysql.cj.jdbc.Driver").setDbType(DbType.MYSQL);

        return dataSourceConfig;
数据源的配置这就不用说了吧,这个配置没什么难度。
2.3.3、全局属性的配置
 private static GlobalConfig globalConfig()
        GlobalConfig globalConfig = new GlobalConfig();
        globalConfig.setOutputDir(PROJECT_PATH + "/src/main/java")// 输出文件路径
                .setAuthor("Time Travel")// 设置作者名字
                .setOpen(false)// 是否打开资源管理器
                .setFileOverride(true)// 是否覆盖原来生成的
                .setIdType(IdType.AUTO)// 主键策略
                .setBaseResultMap(true)// 生成resultMap
                .setDateType(DateType.ONLY_DATE) // 设置时间格式,采用Date
                .setServiceName("%sService");// 生成的service接口名字首字母是否为I,这样设置就没有I
        //setBaseColumnList(true)  XML中生成基础列
        return globalConfig;
2.3.4、包属性的配置
    private static PackageConfig packageConfig(String fatherPackageName)
        PackageConfig packageConfig = new PackageConfig();
        packageConfig.setParent(fatherPackageName) // 配置指定项目中各层的名称
                .setController("controller") // Controller层
                .setEntity("entity") // 实体层(pojo层)
                .setMapper("dao") // Dao 层
                .setService("service") // service层
                .setServiceImpl("service.serviceImpl"); // ServiceImp层

        return packageConfig;
fatherPackageName就是上图所示的com.example.mybatis_plus_reverse包的名称。
2.3.5、逆向生成类的名称配置
   private static StrategyConfig strategyConfig (String tableName)
        StrategyConfig strategyConfig = new StrategyConfig();
        strategyConfig.setCapitalMode(true)// 开启全局大写命名
               .setInclude(tableName)// 设置要映射的表
               .setNaming(NamingStrategy.underline_to_camel)// 下划线到驼峰的命名方式
               .setColumnNaming(NamingStrategy.underline_to_camel)// 下划线到驼峰的命名方式
               .setEntityLombokModel(true)// 是否使用lombok
               .setRestControllerStyle(true)// 是否开启rest风格
               .setTablePrefix("t_") // 去除前缀
               .setControllerMappingHyphenStyle(true); // localhost:8080/hello_a_2

        return strategyConfig;
2.3.6、在resource目录下生成Mapper文件的配置
 private static InjectionConfig injectionConfig()
        InjectionConfig injectionConfig = new InjectionConfig()
            @Override
            public void initMap()
                this.setMap(new HashMap<>()); // 实现InjectionConfig抽象类就需要初始化一个Map集合

        ;
        List<FileOutConfig> fileOutConfigList = new ArrayList<>();
        // 根据/templates/mapper.xml.ftl规则在指定的位置生成Mapper文件,可以在多个地方生成。
        fileOutConfigList.add(new FileOutConfig("/templates/mapper.xml.ftl")
            @Override
            public String outputFile(TableInfo tableInfo)
                // 返回Mapper文件的绝对路径
                String path = PROJECT_PATH + "/src/main/resources/mapper/" +
                        tableInfo.getEntityName() + "Mapper" + StringPool.DOT_XML;
                return path;

        );
        // 将对Mapper文件的配置添加到文件输出对象中
        injectionConfig.setFileOutConfigList(fileOutConfigList);
        return injectionConfig;
2.3.7、配置生成器的生成模板
	// 最简单的配置
   private static TemplateConfig templateConfig()
        TemplateConfig templateConfig = new TemplateConfig();

        return templateConfig.setXml(null);
	// 复杂点的配置
	  private static TemplateConfig templateConfig()
        TemplateConfig templateConfig = new TemplateConfig();
        templateConfig.setController("templates/controller.java")
                .setEntity("templates/entity.java")
                .setService("templates/service.java")
                .setServiceImpl("templates/serviceImpl.java")
                .setMapper("templates/mapper.java")
                .setXml(null);
        return templateConfig;
使用第二个配置方式的前提需要在mybatis-plus-generator-3.4.1.jar这个包的templates目录中将上述的五个类的 .ftl 的文件复制到当前项目的resource目录下的templates包下。
如:controller.java.ftl

2.3.8、判断用户输入的项目包名是否存在
  // 判断输入的父项目是否存在
   private static boolean parentPackageExits(String project, String parentPackageName)
        StringBuilder path = new StringBuilder(PROJECT_PATH);
        if(!"".equals(project) && project != null)
            path.append("/" + project);

        path.append(("/src/main/java/" + parentPackageName).replace(".","/"));
        File file = new File(path.toString());
        return file.exists();
2.3.9、测试
// 执行、测试
    public static void main(String[] args)
        System.out.print("父包名称: ");
        String input = scanner.next();
        if(!parentPackageExits(null,input))
            throw new RuntimeException("输入的父包名不存在或者输入错误,请重新输入父包名");

        scannerTableName(input);
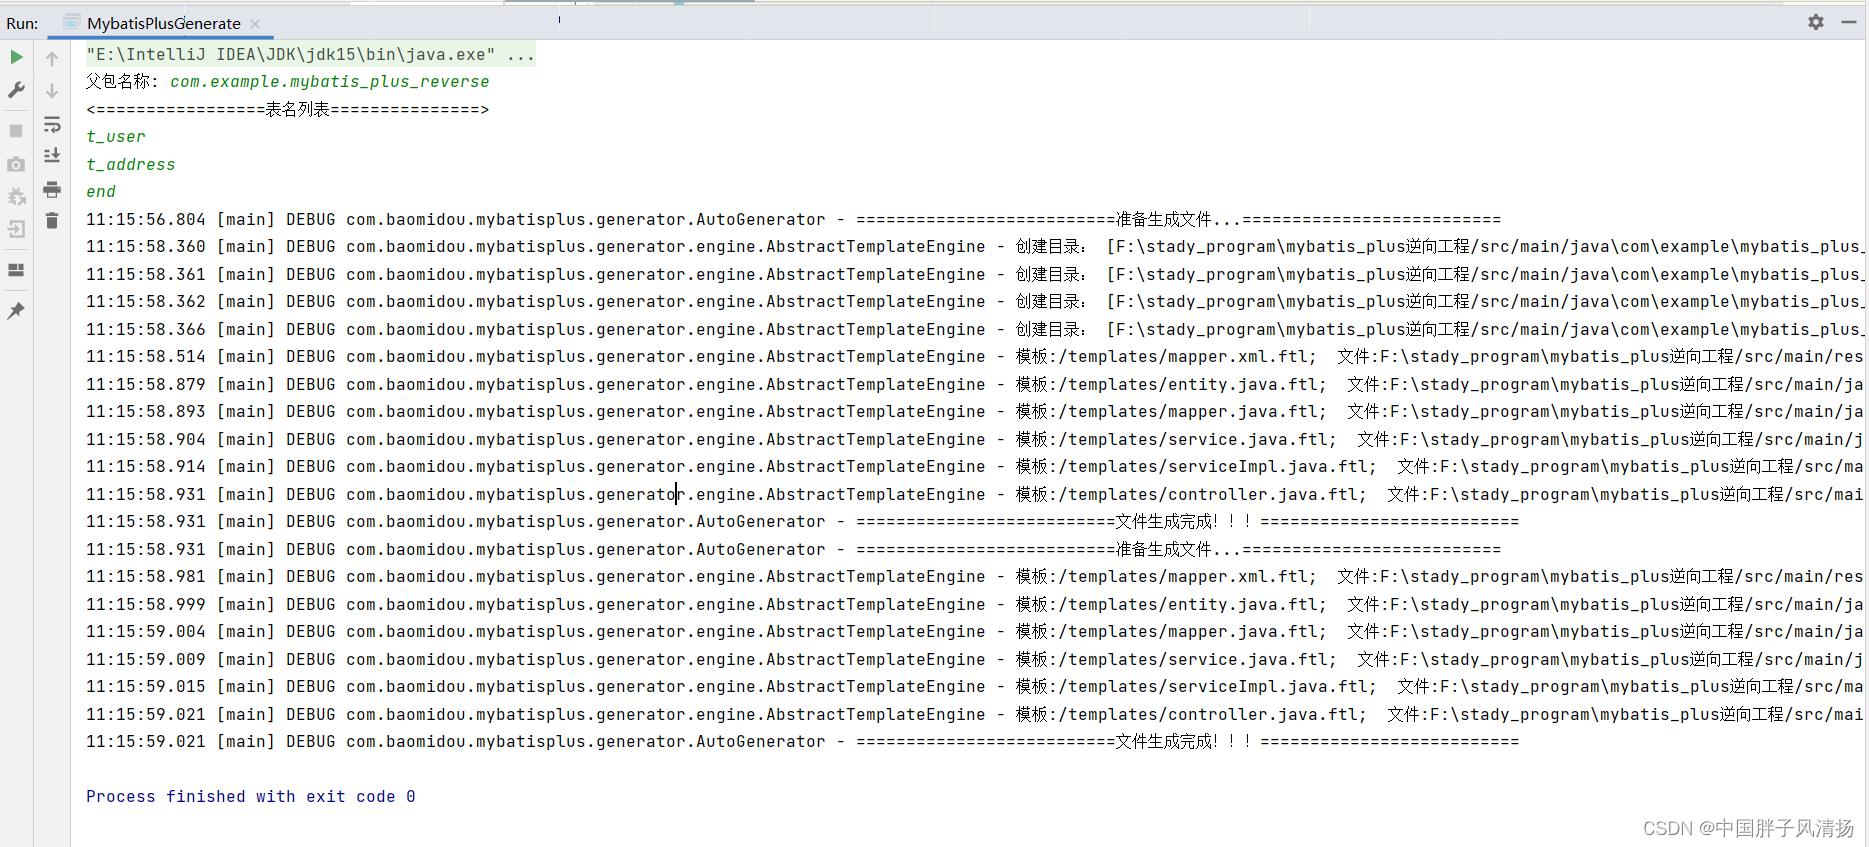
输入

输出上图内容则表示配置成功。
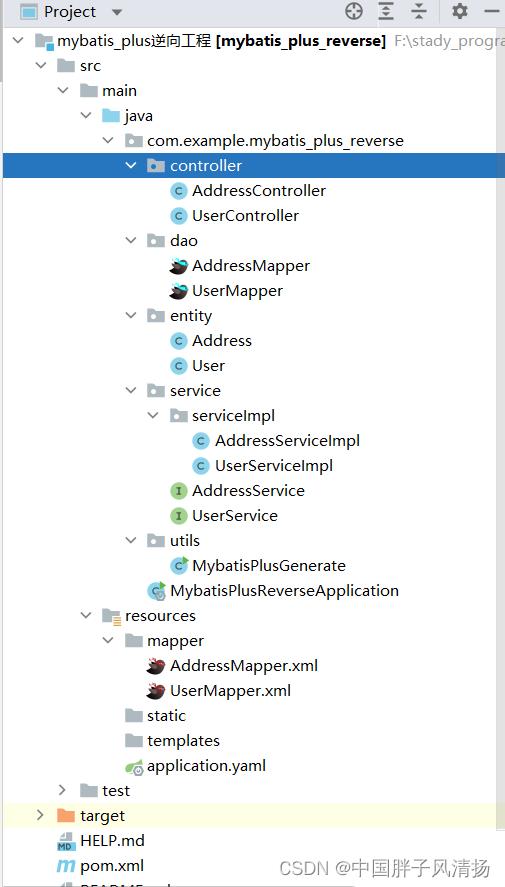
实现效果

执行完毕后就会在项目中自动生成相应的包和类,因为我们在GlobleConfig中配置的setFileOverride属性,所以会覆盖掉相同的包。
3、总结
在日常的开发中,对于重复、费时、费力的操作,作为程序猿的我们,应该都能利用程序来简化这些操作,做到事倍功半的效果。
以上是关于MyBatis-plus实现逆向生成器的主要内容,如果未能解决你的问题,请参考以下文章
MyBatis-Plus——逆向工程之AutoGenerator代码生成器
MyBatis-Plus——逆向工程之AutoGenerator代码生成器