Ubuntu 20.04下源码编译安装ROS 2 Foxy Fitzroy
Posted 其德刚健而文明,应乎天而时行。
tags:
篇首语:本文由小常识网(cha138.com)小编为大家整理,主要介绍了Ubuntu 20.04下源码编译安装ROS 2 Foxy Fitzroy相关的知识,希望对你有一定的参考价值。

1. 系统要求
在官方给出的Foxy目标系统中,Ubuntu Linux - Focal Fossa (20.04) 64位是首选,本文也选择Ubuntu 20.04 64位,其他还包括Debian Linux - Buster (10)、Fedora 32、Arch Linux、OpenEmbedded / webOS OSE,但Foxy还没有充分测试,不推荐使用。
2. 系统设置
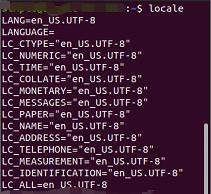
(1) 设置locale

(2) 添加ROS 2 apt仓库
问题1:ERROR: unable to process source https://raw.githubusercontent.com/ros/rosdistro/master/ros.asc 之类的错误,可能是因为raw.githubusercontent.com网站被墙了。解决方法:修改hosts文件,添加这个网站的ip地址[2]。#打开hosts文件sudo gedit /etc/hosts#在文件末尾添加151.101.84.133 raw.githubusercontent.com
(3) 安装开发工具和ROS工具
sudo apt update && sudo apt install -y \\
  build-essential \\
  cmake \\
  git \\
  libbullet-dev \\
  python3-colcon-common-extensions \\
  python3-flake8 \\
  python3-pip \\
  python3-pytest-cov \\
  python3-rosdep \\
  python3-setuptools \\
  python3-vcstool \\
  wget
# install some pip packages needed for testing
python3 -m pip install -U \\
  argcomplete \\
  flake8-blind-except \\
  flake8-builtins \\
  flake8-class-newline \\
  flake8-comprehensions \\
  flake8-deprecated \\
  flake8-docstrings \\
  flake8-import-order \\
  flake8-quotes \\
  pytest-repeat \\
  pytest-rerunfailures \\
  pytest
# install Fast-RTPS dependencies
sudo apt install --no-install-recommends -y \\
  libasio-dev \\
  libtinyxml2-dev
# install Cyclone DDS dependencies
sudo apt install --no-install-recommends -y \\
  libcunit1-dev
3. 获取ROS 2代码
mkdir -p ~/ros2_foxy/src
cd ~/ros2_foxy
wget https://raw.githubusercontent.com/ros2/ros2/foxy/ros2.repos
vcs import src < ros2.repos
如果Fast-DDS无法正常下载,自行下载解压到~/ros2_foxy/src/eProsima/Fast-DDS。
4. 使用rosdep安装依赖
sudo rosdep init
rosdep update
rosdep install --from-paths src --ignore-src --rosdistro foxy -y --skip-keys "console_bridge fastcdr fastrtps rti-connext-dds-5.3.1 urdfdom_headers"
5. 编译ROS 2
cd ~/ros2_foxy/
colcon build --symlink-install
问题2: ImportError: "from catkin_pkg.package import parse_package" failed: No module named catkin_pkg.package解决方法[3]:pip install catkin_pkg
问题3: importError: No module named em解决方法[4]:python -m pip install empy
问题4: importError: No module named lark解决方法[5]:python -m pip install lark-parser
问题5: can not locate Clang\'s built-in include directory解决方法[6]:重装shiboken2 sudo apt remove shiboken2 libshiboken2-dev libshiboken2-py3-5.14 pip3 install --user shiboken2
问题6: 几处因为ExternalProject_Add下载卡住的地方,修改对应的CMakeLists.txt。解决方法: (1) ~/ros2_foxy/src/ros2/rosbag2/shared_queues_vendor/CMakeLists.txt, 8-33行
ExternalProject_Add(ext-singleproducerconsumer
  PREFIX singleproducerconsumer
  #DOWNLOAD_DIR ${CMAKE_CURRENT_BINARY_DIR}/download
  #URL https://github.com/cameron314/readerwriterqueue/archive/ef7dfbf553288064347d51b8ac335f1ca489032a.zip
  #自行修改 `path-to-file\', zip文件见附件readerwriterqueue-ef7dfbf553288064347d51b8ac335f1ca489032a.zip
  URL /path-to-file/readerwriterqueue-ef7dfbf553288064347d51b8ac335f1ca489032a.zip
  URL_MD5 64c673dd381b8fae9254053ad7b2be4d
  #TIMEOUT 60
  INSTALL_DIR ${CMAKE_CURRENT_BINARY_DIR}
  CONFIGURE_COMMAND ""
  BUILD_COMMAND ""
  INSTALL_COMMAND ""
  )

# Concurrent and blocking concurrent queue by moodycamel - header only, don\'t build, install
ExternalProject_Add(ext-concurrentqueue
  PREFIX concurrentqueue
  #DOWNLOAD_DIR ${CMAKE_CURRENT_BINARY_DIR}/download
  #URL https://github.com/cameron314/concurrentqueue/archive/8f65a8734d77c3cc00d74c0532efca872931d3ce.zip
  # 自行修改 `path-to-file\', zip文件见附件concurrentqueue-8f65a8734d77c3cc00d74c0532efca872931d3ce.zip
  URL /path-to-file/concurrentqueue-8f65a8734d77c3cc00d74c0532efca872931d3ce.zip
  URL_MD5 71a0d932cc89150c2ade85f0d9cac9dc
  #TIMEOUT 60
  INSTALL_DIR ${CMAKE_CURRENT_BINARY_DIR}
  CONFIGURE_COMMAND ""
  BUILD_COMMAND ""
  INSTALL_COMMAND ""
  )
(2) ~/ros2_foxy/src/ros2/rviz/rviz_ogre_vendor/CMakeLists.txt 83-94行
 ExternalProject_Add(zlib-1.2.11
    #URL https://www.zlib.net/fossils/zlib-1.2.11.tar.gz
    #自行修改 `path-to-file\', zip文件见附件zlib-1.2.11.tar.gz
    URL /path-to-file/zlib-1.2.11.tar.gz
    URL_MD5 1c9f62f0778697a09d36121ead88e08e
    #TIMEOUT 600
    LOG_CONFIGURE ${should_log}
    LOG_BUILD ${should_log}
    CMAKE_ARGS
      -DCMAKE_INSTALL_PREFIX=${CMAKE_CURRENT_BINARY_DIR}/zlib-install
      ${extra_cmake_args}
      -Wno-dev
  )
156-186行
ExternalProject_Add(ogre-v1.12.1
#    URL https://github.com/OGRECave/ogre/archive/v1.12.1.zip
    #自行修改 `path-to-file\', zip文件见附件external_projects/ogre-1.12.1.zip
    URL /path-to-file/ogre-1.12.1.zip
    URL_MD5 cdbea4006d223c173e0a93864111b936
#    TIMEOUT 1200
    LOG_CONFIGURE ${should_log}
    LOG_BUILD ${should_log}
    CMAKE_ARGS
      -DOGRE_STATIC:BOOL=OFF
      -DOGRE_DEPENDENCIES_DIR=${CMAKE_CURRENT_BINARY_DIR}/ogredeps
      -DOGRE_INSTALL_PDB:BOOL=OFF
      -DOGRE_BUILD_DEPENDENCIES:BOOL=OFF
      -DOGRE_BUILD_TESTS:BOOL=OFF
      -DOGRE_BUILD_SAMPLES:BOOL=FALSE
      -DOGRE_INSTALL_SAMPLES:BOOL=FALSE
      -DOGRE_INSTALL_SAMPLES_SOURCE:BOOL=FALSE
      -DOGRE_CONFIG_THREADS:STRING=0
      -DOGRE_RESOURCEMANAGER_STRICT:STRING=2
      -DCMAKE_INSTALL_PREFIX=${CMAKE_CURRENT_BINARY_DIR}/ogre_install
      -DOGRE_BUILD_LIBS_AS_FRAMEWORKS:BOOL=OFF
      -DOGRE_BUILD_COMPONENT_PYTHON:BOOL=FALSE
      -DOGRE_BUILD_COMPONENT_JAVA:BOOL=FALSE
      -DOGRE_BUILD_COMPONENT_CSHARP:BOOL=FALSE
      -DOGRE_BUILD_COMPONENT_BITES:BOOL=FALSE
      ${extra_cmake_args}
      -Wno-dev
    PATCH_COMMAND
      ${Patch_EXECUTABLE} -p1 -N < ${CMAKE_CURRENT_SOURCE_DIR}/pragma-patch.diff
    COMMAND
      ${CMAKE_COMMAND} -E copy ${CMAKE_CURRENT_SOURCE_DIR}/FindFreetype.cmake ${CMAKE_CURRENT_BINARY_DIR}/ogre-v1.12.1-prefix/src/ogre-v1.12.1/CMake/Packages/FindFreetype.cmake
  )
(3) ~/ros2_foxy/src/eProsima/foonathan_memory_vendor/CMakeLists.txt,57-73行
externalproject_add(foo_mem-ext
  #GIT_REPOSITORY foonathan/memory
  #GIT_TAG c619113
  #TIMEOUT 600
  #自行修改 `path-to-file\', zip文件见附件memory-master.zip
  URL /path-to-file/memory-master.zip
  URL_MD5 9fcf2cf8c63d9c74bf3d0c58ca98bf71
  # Avoid the update (git pull) and so the recompilation of foonathan_memory library each time.
  UPDATE_COMMAND ""
  CMAKE_ARGS
    -DFOONATHAN_MEMORY_BUILD_EXAMPLES=OFF
    -DFOONATHAN_MEMORY_BUILD_TESTS=OFF
    -DFOONATHAN_MEMORY_BUILD_TOOLS=ON
    -DCMAKE_INSTALL_PREFIX=${CMAKE_CURRENT_BINARY_DIR}/foo_mem_ext_prj_install
    ${extra_cmake_args}
    -Wno-dev
    ${PATCH_COMMAND_STR}
  )
(4) ~/ros2_foxy/src/ros2/rosbag2/zstd_vendor/CMakeLists.txt,32-43行
ExternalProject_Add(zstd-1.4.4
    #URL https://github.com/facebook/zstd/archive/v1.4.4.zip
    #自行修改 `path-to-file\', zip文件见附件zstd-1.4.4.zip
    URL /path-to-file/zstd-1.4.4.zip
    URL_MD5 3a5c3a535280b7f4dfdbd739fcc7173f
    #TIMEOUT 60
    SOURCE_SUBDIR build/cmake
    CMAKE_ARGS
      -DCMAKE_INSTALL_PREFIX=${CMAKE_CURRENT_BINARY_DIR}/${PROJECT_NAME}_install
      -DZSTD_BUILD_STATIC=OFF
      -DZSTD_BUILD_SHARED=ON
      -DZSTD_BUILD_PROGRAMS=OFF
      ${extra_cmake_args})
6. 环境设置
source ~/ros2_foxy/install/setup.bash
7. 测试
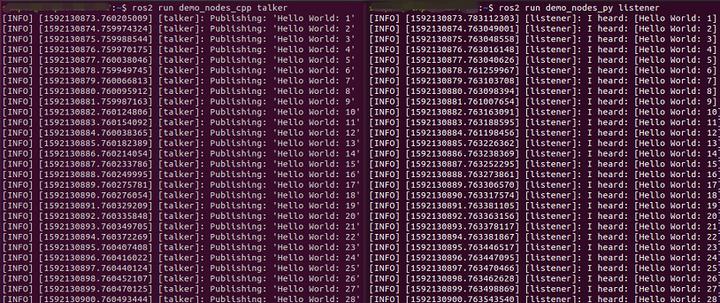
ros2 run demo_nodes_cpp talker
打开另外一个终端,运行Python编写的listener:
ros2 run demo_nodes_py listener
运行结果:

8. 附件
参考
[1] Building ROS 2 on Linux, https://index.ros.org/doc/ros2/Installation/Foxy/Linux-Development-Setup/
[2] rosdep init 或者rosdep update 连接错误的解决办法, https://community.bwbot.org/topic/811/rosdep-init-%E6%88%96%E8%80%85rosdep-update-%E8%BF%9E%E6%8E%A5%E9%94%99%E8%AF%AF%E7%9A%84%E8%A7%A3%E5%86%B3%E5%8A%9E%E6%B3%95
[3] No module named catkin_pkg.package, https://www.jianshu.com/p/e964928d6c62
[4] ros自定义消息的时候报错ImportError:Nomodulenamedem_wawayu_0的专栏-CSDN博客, https://blog.csdn.net/wawayu_0/article/details/79460043
[5] Name conflict in load grammar · Issue #361 · lark-parser/lark, https://github.com/lark-parser/lark/issues/361
[6] rosbag2 build getting fail · Issue #604 · ros2/ros2, https://github.com/ros2/ros2/issues/604
以上是关于Ubuntu 20.04下源码编译安装ROS 2 Foxy Fitzroy的主要内容,如果未能解决你的问题,请参考以下文章
Ubuntu 20.04下搭建C++ & OpenCV 4.6.0 & cmake编译