Flask框架从入门到精通之上下文(二十三)
Posted 小_源
tags:
篇首语:本文由小常识网(cha138.com)小编为大家整理,主要介绍了Flask框架从入门到精通之上下文(二十三)相关的知识,希望对你有一定的参考价值。
知识点
1、请求上下文
2、应用上下文
一、概况
Flask从客户端收到请求时,要让视图函数能访问一些对象,这样才能处理请求。请求对象是一个很好的例子,它封装了客户端发送的HTTP请求。
要想让视图函数能够访问请求对象,一个显而易见的方式是将其作为参数传入视图函数,不过这会导致程序中的每个视图函数都增加一个参数,除了访问请求对象,如果视图函数在处理请求时还要访问其他对象,情况会变得更糟。为了避免大量可有可无的参数把视图函数弄得一团糟,Flask使用上下文临时把某些对象变为全局可访问。
- request 和 session 都属于请求上下文对象。
- request:封装了HTTP请求的内容,针对的是http请求。举例:user = request.args.get(‘user’),获取的是get请求的参数。
- session:用来记录请求会话中的信息,针对的是用户信息。举例:session[‘name’] = user.id,可以记录用户信息。还可以通过session.get(‘name’)获取用户信息。
二、问题
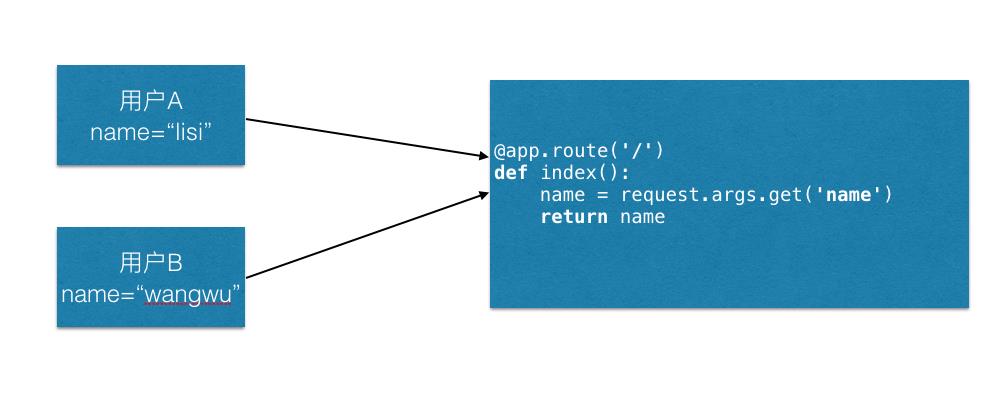
request作为全局对象就会出现一个问题,我们都知道后端会开启很多个线程去同时处理用户的请求,当多线程去访问全局对象的时候就会出现资源争夺的情况。也会出现用户A的请求参数被用户B请求接受到,那怎么解决每个线程只处理自己的request呢?

解决这个问题就是用到threading.local对象,称之为线程局部变量。用于为每个线程开辟一个空间来保存它独有的值。它的内部是如何实现的呢?解决这个问题可以考虑使用使用一个字典,key线程的id,val为对应线程的变量。下面是自己实现Local。
import threading
import time

try:
    from greenlet import getcurrent as get_ident  # 协程
except ImportError:
    try:
        from thread import get_ident
    except ImportError:
        from _thread import get_ident  # 线程

class Local(object):

    def __init__(self):
        object.__setattr__(self, '__storage__', )
        object.__setattr__(self, '__ident_func__', get_ident)
        # 上面等价于self.__storage__ = ;self.__ident_func__ = get_ident;
        # 但是如果直接赋值的话,会触发__setattr__造成无限递归

    def __getattr__(self, name):
        try:
            return self.__storage__[self.__ident_func__()][name]
        except KeyError:
            raise AttributeError(name)

    def __setattr__(self, name, value):
        ident = self.__ident_func__()
        storage = self.__storage__
        try:
            storage[ident][name] = value
        except KeyError:
            storage[ident] = name: value

    def __delattr__(self, name):
        try:
            del self.__storage__[self.__ident_func__()][name]
        except KeyError:
            raise AttributeError(name)

local_values = Local()

def func(num):
    local_values.name = num
    time.sleep(0.1)
    print(local_values.name,threading.current_thread().name)

for i in range(1,20):
    t = threading.Thread(target=func,args=(i,))
    t.start()

print(local_values.__storage__)
三、请求上下文
一、请求到来时:
- 将初始的初始request封装RequestContext对象ctx
 def request_context(self, environ):
        return RequestContext(self, environ)
- 借助LocalStack对象将ctx放到Local对象中
_request_ctx_stack = LocalStack()
_request_ctx_stack.push(self)
二、执行视图时:
- 导入from flask import request,其中request对象是LocalProxy类的实例化对象
request = LocalProxy(partial(_lookup_req_object, 'request'))
- 当我们取request的值时,request.mehod -->执行LocalProxy的__getattr__
 def __getattr__(self, name):
        if name == '__members__':
            return dir(self._get_current_object())
        return getattr(self._get_current_object(), name)
- 当我们设置request的值时request.header = ‘xxx’ -->执行LocalProxy的__setattr__
__setattr__ = lambda x, n, v: setattr(x._get_current_object(), n, v)
说道底,这些方法的内部都是调用_lookup_req_object函数:去local中将ctx获取到,再去获取其中的method或header
三、请求结束:
- ctx.auto_pop,链式调用LocalStack的pop,将ctx从Local中pop
 def pop(self, exc=_sentinel):
        """Pops the request context and unbinds it by doing that.  This will
        also trigger the execution of functions registered by the
        :meth:`~flask.Flask.teardown_request` decorator.

        .. versionchanged:: 0.9
           Added the `exc` argument.
        """
        app_ctx = self._implicit_app_ctx_stack.pop()

        try:
            clear_request = False
            if not self._implicit_app_ctx_stack:
                self.preserved = False
                self._preserved_exc = None
                if exc is _sentinel:
                    exc = sys.exc_info()[1]
                self.app.do_teardown_request(exc)

                # If this interpreter supports clearing the exception information
                # we do that now.  This will only go into effect on Python 2.x,
                # on 3.x it disappears automatically at the end of the exception
                # stack.
                if hasattr(sys, 'exc_clear'):
                    sys.exc_clear()

                request_close = getattr(self.request, 'close', None)
                if request_close is not None:
                    request_close()
                clear_request = True
        finally:
            rv = _request_ctx_stack.pop()

            # get rid of circular dependencies at the end of the request
            # so that we don't require the GC to be active.
            if clear_request:
                rv.request.environ['werkzeug.request'] = None

            # Get rid of the app as well if necessary.
            if app_ctx is not None:
                app_ctx.pop(exc)

            assert rv is self, 'Popped wrong request context.  ' \\
                '(%r instead of %r)' % (rv, self)
四、 应用上下文
from flask import g:在一次请求周期里,用于存储的变量,便于程序员传递变量的时候使用。
四个全局变量原理都是一样的
# globals.py
_request_ctx_stack = LocalStack()
_app_ctx_stack = LocalStack()
current_app = LocalProxy(_find_app)
request = LocalProxy(partial(_lookup_req_object, 'request'))
session = LocalProxy(partial(_lookup_req_object, 'session'))
g = LocalProxy(partial(_lookup_app_object, 'g'))
当我们request.xxx和session.xxx的时候,会从_request_ctx_stack._local取对应的值
当我们current_app.xxx和g.xxx的时候,会从_app_ctx_stack._local取对应的值
- current_app就是flask的应用实例对象
- g变量是解决我们在一次请求过程传递参数的问题,我们可以往g变量塞很多属性,在同一次请求中,可以从另一个函数中取出。当然也可以用函数参数这种方法解决,g变量适用于参数多的情况。
from flask import Flask, request, g

app = Flask(__name__)


@app.route('/')
def index():
    name = request.args.get('name')
    g.name = name
    g.age = 12
    get_g()
    return name


# 在一起请求中,可以用g变量传递参数
def get_g():
    print(g.name)
    print(g.age)


if __name__ == '__main__':
    # 0.0.0.0代表任何能代表这台机器的地址都可以访问
    app.run(host='0.0.0.0', port=5000)  # 运行程序
五、多线程下的请求
当程序开始运行,并且请求没到来的时候,就已经生成了两个空的Local,即:
_request_ctx_stack = LocalStack()  ->LocalStack类中的__init__定义了Local对象
_app_ctx_stack = LocalStack()
当同时有线程处理请求的时候,两个上下文对应的Local对象变成如下:
_request_ctx_stack._local =
    线程id1:‘stack’;[ctx1],  # 只放一个为什么用list,其实是模拟栈
    线程id1:‘stack’;[ctx2],
   ...


_app_ctx_stack._local =
    线程id1:‘stack’;[app_ctx1],
    线程id1:‘stack’;[app_ctx2],
   ...
以上是关于Flask框架从入门到精通之上下文(二十三)的主要内容,如果未能解决你的问题,请参考以下文章