Nginx 企业级优化
Posted zhiyuan-yu
tags:
篇首语:本文由小常识网(cha138.com)小编为大家整理,主要介绍了Nginx 企业级优化相关的知识,希望对你有一定的参考价值。
一.配置nginx隐藏版本号
[root@localhost ~]# curl -I 192.168.200.111
HTTP/1.1 200 OK
Server: nginx/1.16.1 //Nginx版本号
Date: Fri, 13 Sep 2019 02:20:55 GMT
Content-Type: text/html; charset=utf-8
Content-Length: 612
Last-Modified: Fri, 13 Sep 2019 01:54:04 GMT
Connection: keep-alive
ETag: "5d7af6bc-264"
Accept-Ranges: bytes
隐藏方法
1.修改源码包(安装之前)
[root@localhost ~]# tar xf nginx-1.16.1.tar.gz -C /usr/src/
[root@localhost ~]# useradd -M -s /sbin/nologin nginx
[root@localhost ~]# vim /usr/src/nginx-1.16.1/src/core/nginx.h
13 #define NGINX_VERSION "8.15.45"
14 #define NGINX_VER "chenyu/" NGINX_VERSION 这两个位置改成你想要的名字和版本号
[root@localhost ~]# yum -y install pcre-devel zlib-devel openssl-devel gcc gcc-c++ make
[root@localhost ~]# cd /usr/src/nginx-1.16.1/
[root@localhost nginx-1.16.1]./configure --prefix=/usr/local/nginx --user=nginx --group=nginx --with-http_stub_status_module --with-http_ssl_module --with-http_flv_module --with-http_gzip_static_module && make && make install
[root@localhost nginx-1.16.1]# ln -s /usr/local/nginx/sbin/nginx /usr/local/bin/
[root@localhost nginx-1.16.1]# nginx
[root@localhost nginx-1.16.1]# curl -I 192.168.200.111
HTTP/1.1 200 OK
Server: chenyu/8.15.45 //修改成功
Date: Fri, 13 Sep 2019 02:32:11 GMT
Content-Type: text/html
Content-Length: 612
Last-Modified: Fri, 13 Sep 2019 02:30:34 GMT
Connection: keep-alive
ETag: "5d7aff4a-264"
Accept-Ranges: bytes
2.修改配置文件(安装完成后)
[root@localhost ~]# vim /usr/local/nginx/conf/nginx.conf
在http{ }中添加 sever_tokens off;
[root@localhost ~]# nginx -t
nginx: the configuration file /usr/local/nginx/conf/nginx.conf syntax is ok
nginx: configuration file /usr/local/nginx/conf/nginx.conf test is successful
[root@localhost ~]# killall -HUP nginx
[root@localhost ~]# curl -I 192.168.200.111
HTTP/1.1 200 OK
Server: nginx //安装完成后的修改无法修改版本号
Date: Fri, 13 Sep 2019 02:35:53 GMT
Content-Type: text/html
Content-Length: 612
Last-Modified: Fri, 13 Sep 2019 02:30:34 GMT
Connection: keep-alive
ETag: "5d7aff4a-264"
Accept-Ranges: bytes
二. 修改Nginx用户与组
1.编译安装时指定
[root@localhost ~]# useradd -M -s /sbin/nologin nginx
[root@localhost nginx-1.16.1]./configure --prefix=/usr/local/nginx --user=nginx --group=nginx --with-http_stub_status_module --with-http_ssl_module --with-http_flv_module --with-http_gzip_static_module && make && make install
2.修改配置文件
[root@localhost ~]# vim /usr/local/nginx/conf/nginx.conf
2 user nginx nginx;
[root@localhost ~]# ps aux |grep nginx
root 4715 0.0 0.1 46100 1952 ? Ss 10:32 0:00 nginx: master process nginx
nginx 4803 0.0 0.2 48624 2340 ? S 10:35 0:00 nginx: worker process
root 4975 0.0 0.0 112724 996 pts/0 R+ 10:54 0:00 grep --color=auto nginx
三.配置Nginx网页缓存时间
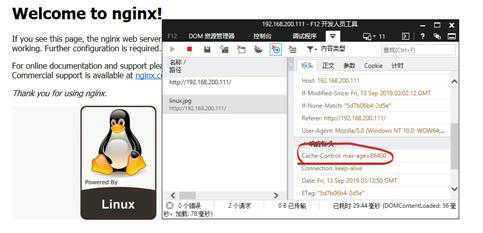
当Nginx将网页数据返回给客户端后,可以设置缓存时间,以方便在日后进行相同内容的请求时直接返回
可修改配置文件,在http段,或server段,或者location段加入对特定内容的过期参数
以图片为例
[root@localhost html]# ln -s /usr/local/nginx/conf/nginx.conf /etc/nginx.conf 主配置文件太长,所以我创建了条连接
[root@localhost html]# vim /etc/nginx.conf
location ~ .(jpg|jpeg|gif)$ {
expires 1d;
}
[root@localhost html]# nginx -t
nginx: the configuration file /usr/local/nginx/conf/nginx.conf syntax is ok
nginx: configuration file /usr/local/nginx/conf/nginx.conf test is successful
[root@localhost html]# killall -HUP nginx
[root@localhost html]# vim /usr/local/nginx/html/index.html //在/body> 前加下面的句子引用图片
<img src="linux.jpg"/>

设置成功,缓存时间为1天
四. 实现Nginx的日志切割
[root@localhost ~]# vim fenge.sh
#!/bin/bash
data=$(date -d "-1 day" "+%Y%m%d") //前一天的时间
logs_path="/usr/local/nginx/logs" //日志存放位置
pid_path="/usr/local/nginx/logs/nginx.pid" //pid文件
[ -d $logs_path/bak ] || mkdir -p $logs_path/bak //判断是否存在备份目录
if [ -f $pid_path ];then //判断
mv $logs_path/access.log $logs_path/bak/access.log-$data //将日志文件打包放在bak中以前一天的时间为名
kill -USR1 $(cat $pid_path) //生成新的日志
find $logs_path -mtime +30 | xargs rm -f //删除30天前的命令
else
echo "Error,Nginx is not working!" | tee -a /var/log/messages //如果未运行或失败则输出并加入到系统日志中
fi
[root@localhost ~]# tail -f /usr/local/nginx/logs/access.log
192.168.200.111 - - [13/Sep/2019:10:32:11 +0800] "HEAD / HTTP/1.1" 200 0 "-" "curl/7.29.0"
192.168.200.111 - - [13/Sep/2019:10:35:53 +0800] "HEAD / HTTP/1.1" 200 0 "-" "curl/7.29.0" //之前测试产生的日志
[root@localhost ~]# bash fenge.sh
[root@localhost ~]# cat /usr/local/nginx/logs/access.log //运行脚本后日志为空
[root@localhost ~]# cd /usr/local/nginx/logs/
[root@localhost logs]# ls
access.log bak error.log nginx.pid //生成了备份目录
[root@localhost logs]# cd bak
[root@localhost bak]# ls
access.log-20190912 //生成了备份文件
[root@localhost bak]# cat access.log-20190912
192.168.200.111 - - [13/Sep/2019:10:32:11 +0800] "HEAD / HTTP/1.1" 200 0 "-" "curl/7.29.0"
192.168.200.111 - - [13/Sep/2019:10:35:53 +0800] "HEAD / HTTP/1.1" 200 0 "-" "curl/7.29.0"//备份日志为之前产生的日志
[root@localhost bak]# cd
[root@localhost ~]# chmod +x fenge.sh 给脚本加执行权限放在每天0点执行
[root@localhost ~]# crontab -e
0 0 * * * /root/fenge.sh
五.配置Nginx实现链接超时
六.更改Nginx运行进程数
七.配置Nginx实现网页压缩功能
八.配置Nginx实现防盗链功能
九.对FPM模块进行参数优化
十.Nginx为目录添加访问控制
十一.自定义错误页面
十二.自动索引
十三. 通过UA实现手机端和电脑端的分离
十四.Nginx平滑升级版本
以上是关于Nginx 企业级优化的主要内容,如果未能解决你的问题,请参考以下文章