transformations
? mapPartitionWithIndex
类似于mapPartitions,除此之外还会携带分区的索引值。


? repartition
增加或减少分区。会产生shuffle。(多个分区分到一个分区不会产生shuffle)
多用于增多分区. 底层调用的是coalesce
? coalesce(合并)
coalesce常用来减少分区,第二个参数是减少分区的过程中是否产生shuffle。
true为产生shuffle,false不产生shuffle。默认是false。
如果coalesce设置的分区数比原来的RDD的分区数还多的话,第二个参数设置为false不会起作用(不会产生shuffle , 分区个数不变),如果设置成true,效果和repartition一样。即repartition(numPartitions) = coalesce(numPartitions,true)
? groupByKey
作用在K,V格式的RDD上。根据Key进行分组。作用在(K,V),返回(K,Iterable <V>)。
groupByKey与reduceByKey的区别:
reduceByKey(func, numPartitions=None) : reduceByKey用于对每个key对应的多个value进行merge操作,最重要的是它能够在本地先进行merge操作,并且merge操作可以通过函数自定义。
groupByKey(numPartitions=None) : groupByKey也是对每个key进行操作,但只生成一个sequence。需要特别注意“Note”中的话,它告诉我们:如果需要对sequence进行aggregation操作(注意,groupByKey本身不能自定义操作函数),那么,选择reduceByKey/aggregateByKey更好。这是因为groupByKey不能自定义函数,我们需要先用groupByKey生成RDD,然后才能对此RDD通过map进行自定义函数操作。
? zip
将两个RDD中的元素(KV格式/非KV格式)变成一个KV格式的RDD,两个RDD的元素个数必须相同。

? zipWithIndex
该函数将RDD中的元素和这个元素在RDD中的索引号(从0开始)组合成(K,V)对。

Action
? countByKey
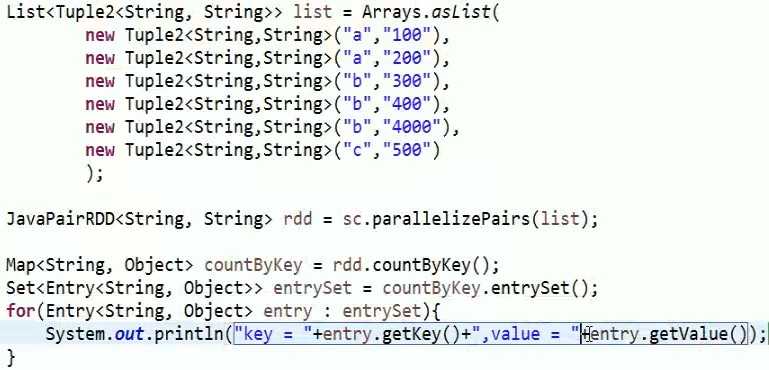
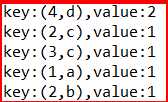
作用到K,V格式的RDD上,根据Key计数相同Key的数据集元素。


? countByValue
根据数据集每个元素相同的内容(元素的整体算作一个value)来计数。返回相同内容的元素对应的条数。


? reduce
根据聚合逻辑聚合数据集中的每个元素。

输出 : 15
2.PV&UV
3.Spark-Submit提交参数
Options:
? --master
MASTER_URL, 可以是spark://host:port, mesos://host:port, yarn, yarn-cluster,yarn-client, local
? --deploy-mode
DEPLOY_MODE, Driver程序运行的地方,client或者cluster,默认是client。
? --class
CLASS_NAME, 主类名称,含包名
? --jars
逗号分隔的本地JARS, Driver和executor依赖的第三方jar包. 例如在task的算子之内用到了mysql的依赖包,这个时候需要用jars指定mysql的驱动包
? --files
用逗号隔开的文件列表,会放置在每个executor工作目录中. 在 executor端如果一来到了一些文件,列入配置文件和一些properties文件,需要用--files指定文件带过去
? --conf
spark的配置属性, 相当于代码中的conf.set(K, V)
? --driver-memory
Driver程序使用内存大小(例如:1000M,5G),默认1024M
? --executor-memory
每个executor内存大小(如:1000M,2G),默认1G
Spark standalone with cluster deploy mode only:
? --driver-cores
Driver程序的使用core个数(默认为1),仅限于Spark standalone模式
Spark standalone or Mesos with cluster deploy mode only:
? --supervise
失败后是否重启Driver,仅限于Spark alone或者Mesos模式
Spark standalone and Mesos only:
? --total-executor-cores
executor使用的总核数,仅限于SparkStandalone、Spark on Mesos模式
Spark standalone and YARN only:
? --executor-cores
每个executor使用的core数,Spark on Yarn默认为1,standalone默认为worker上所有可用的core。
YARN-only:
? --driver-cores
driver使用的core,仅在cluster模式下,默认为1。
? --queue
QUEUE_NAME 指定资源队列的名称,默认:default
? --num-executors
一共启动的executor数量,默认是2个。
4.资源调度源码分析
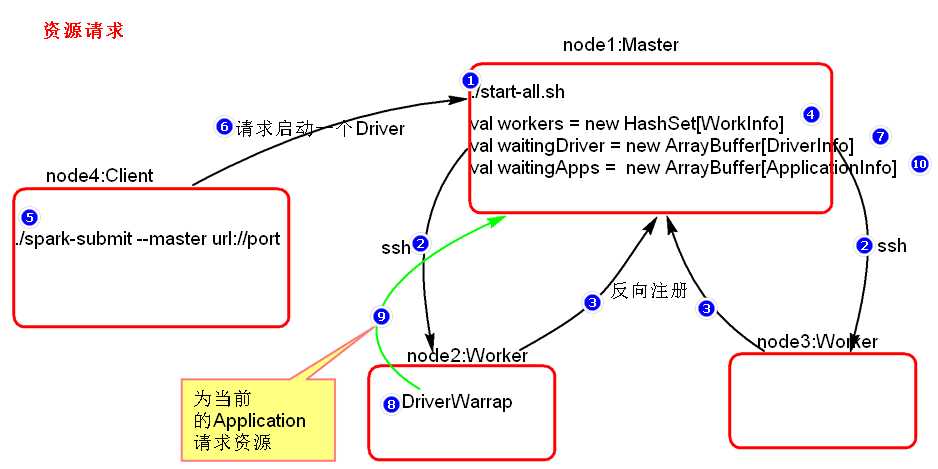
? 资源请求简单图

? 资源调度Master路径:

|
路径:spark-1.6.0/core/src/main/scala/org.apache.spark/deploy/Master/Master.scala |
? 提交应用程序,submit的路径:

|
路径:spark-1.6.0/core/src/main/scala/org.apache.spark/ deploy/SparkSubmit.scala |
? 总结:
1.Executor在集群中分散启动,有利于task计算的数据本地化。
2.默认情况下(提交任务的时候没有设置--executor-cores选项),每一个Worker为当前的Application启动一个Executor,这个Executor会使用这个Worker的所有的cores和1G内存。
3.如果想在Worker上启动多个Executor,提交Application的时候要加--executor-cores这个选项。
4.默认情况下没有设置--total-executor-cores,一个Application会使用Spark集群中所有的cores。
? 结论演示
使用Spark-submit提交任务演示。也可以使用spark-shell
1.默认情况每个worker为当前的Application启动一个Executor,这个Executor使用集群中所有的cores和1G内存。
|
./spark-submit --master spark://node1:7077 --class org.apache.spark.examples.SparkPi ../lib/spark-examples-1.6.0-hadoop2.6.0.jar 10000 |
2.在workr上启动多个Executor,设置--executor-cores参数指定每个executor使用的core数量。
|
./spark-submit --masterspark://node1:7077 --executor-cores 1 --class org.apache.spark.examples.SparkPi ../lib/spark-examples-1.6.0-hadoop2.6.0.jar 10000 |
3.内存不足的情况下启动core的情况。Spark启动是不仅看core配置参数,也要看配置的core的内存是否够用。
|
./spark-submit --masterspark://node1:7077 --executor-cores 1 --executor-memory 3g --class org.apache.spark.examples.SparkPi ../lib/spark-examples-1.6.0-hadoop2.6.0.jar 10000 |
4.--total-executor-cores集群中共使用多少cores
注意:一个进程不能让集群多个节点共同启动。
|
./spark-submit --masterspark://node1:7077 --executor-cores 1 --executor-memory 2g --total-executor-cores 3 --class org.apache.spark.examples.SparkPi ../lib/spark-examples-1.6.0-hadoop2.6.0.jar 10000 |
5.任务调度源码分析
? Action算子开始分析
任务调度可以从一个Action类算子开始。因为Action类算子会触发一个job的执行。
? 划分stage,以taskSet形式提交任务
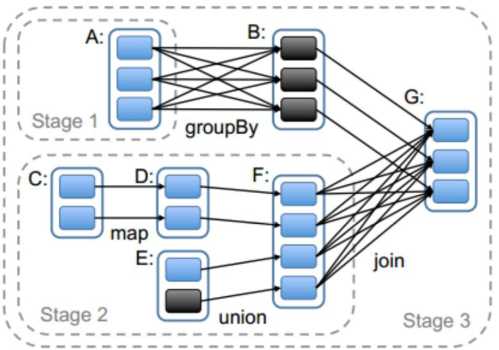
DAGScheduler 类中getMessingParentStages()方法是切割job划分stage。可以结合以下这张图来分析:

6.二次排序
|
SparkConf sparkConf = new SparkConf() .setMaster("local") .setAppName("SecondarySortTest"); final JavaSparkContext sc = new JavaSparkContext(sparkConf);
JavaRDD<String> secondRDD = sc.textFile("secondSort.txt");
JavaPairRDD<SecondSortKey, String> pairSecondRDD = secondRDD.mapToPair(new PairFunction<String, SecondSortKey, String>() {
privatestaticfinallongserialVersionUID = 1L;
@Override public Tuple2<SecondSortKey, String> call(String line) throws Exception { String[] splited = line.split(" "); intfirst = Integer.valueOf(splited[0]); intsecond = Integer.valueOf(splited[1]); SecondSortKey secondSortKey = new SecondSortKey(first,second); returnnew Tuple2<SecondSortKey, String>(secondSortKey,line); } });
pairSecondRDD.sortByKey(false).foreach(new VoidFunction<Tuple2<SecondSortKey,String>>() {
privatestaticfinallong serialVersionUID = 1L;
@Override publicvoid call(Tuple2<SecondSortKey, String> tuple) throws Exception { System.out.println(tuple._2); } });
|
|
publicclass SecondSortKey implements Serializable,Comparable<SecondSortKey>{ /** * */ privatestaticfinallongserialVersionUID = 1L; privateintfirst; privateintsecond; publicint getFirst() { returnfirst; } publicvoid setFirst(intfirst) { this.first = first; } publicint getSecond() { returnsecond; } publicvoid setSecond(intsecond) { this.second = second; } public SecondSortKey(intfirst, intsecond) { super(); this.first = first; this.second = second; } @Override publicint compareTo(SecondSortKey o1) { if(getFirst() - o1.getFirst() ==0 ){ return getSecond() - o1.getSecond(); }else{ return getFirst() - o1.getFirst(); } } }
|
7.分组取topN和topN
|
SparkConf conf = new SparkConf() .setMaster("local") .setAppName("TopOps"); JavaSparkContext sc = new JavaSparkContext(conf); JavaRDD<String> linesRDD = sc.textFile("scores.txt");
JavaPairRDD<String, Integer> pairRDD = linesRDD.mapToPair(new PairFunction<String, String, Integer>() {
/** * */ privatestaticfinallongserialVersionUID = 1L;
@Override public Tuple2<String, Integer> call(String str) throws Exception { String[] splited = str.split("\\t"); String clazzName = splited[0]; Integer score = Integer.valueOf(splited[1]); returnnew Tuple2<String, Integer> (clazzName,score); } });
pairRDD.groupByKey().foreach(new VoidFunction<Tuple2<String,Iterable<Integer>>>() {
/** * */ privatestaticfinallongserialVersionUID = 1L;
@Override publicvoid call(Tuple2<String, Iterable<Integer>> tuple) throws Exception { String clazzName = tuple._1; Iterator<Integer> iterator = tuple._2.iterator();
Integer[] top3 = new Integer[3];
while (iterator.hasNext()) { Integer score = iterator.next();
for (inti = 0; i < top3.length; i++) { if(top3[i] == null){ top3[i] = score; break; }elseif(score > top3[i]){ for (intj = 2; j > i; j--) { top3[j] = top3[j-1]; } top3[i] = score; break; } } } System.out.println("class Name:"+clazzName); for(Integer sscore : top3){ System.out.println(sscore); } } }); |
8.SparkShell的使用
? 概念:
SparkShell是Spark自带的一个快速原型开发工具,也可以说是Spark的scala REPL(Read-Eval-Print-Loop),即交互式shell。支持使用scala语言来进行Spark的交互式编程。
? 使用:
启动Standalone集群,./start-all.sh
在客户端上启动spark-shell:
|
./spark-shell --master spark://node1:7077 |
启动hdfs,创建目录spark/test,上传文件wc.txt
运行wordcount
|
sc.textFile("hdfs://node1:9000/spark/test/wc.txt") .flatMap(_.split(" ")).map((_,1)).reduceByKey(_+_).foreach(println) |
<wiz_tmp_tag id="wiz-table-range-border" contenteditable="false" style="display: none;">
附件列表

