将v8变成工具
Posted Jtag特工
tags:
篇首语:本文由小常识网(cha138.com)小编为大家整理,主要介绍了将v8变成工具相关的知识,希望对你有一定的参考价值。
将v8变成工具
如何嵌入一个v8引擎到你的应用中
v8除了可以作为一个独立的js引擎之外,还可以通过库的方式嵌入到我们的应用中,它以V8 API的方式服务我们。
我们来看一个老一点的例子来看看v8 API是如何使用的:
#include <stdio.h>
#include <stdlib.h>
#include <string.h>
#include "include/libplatform/libplatform.h"
#include "include/v8.h"
int main(int argc, char* argv[])
  v8::V8::InitializeICUDefaultLocation(argv[0]);
  v8::V8::InitializeExternalStartupData(argv[0]);
  std::unique_ptr<v8::Platform> platform = v8::platform::NewDefaultPlatform();
  v8::V8::InitializePlatform(platform.get());
  v8::V8::Initialize();
  v8::Isolate::CreateParams create_params;
  create_params.array_buffer_allocator =
      v8::ArrayBuffer::Allocator::NewDefaultAllocator();
  v8::Isolate* isolate = v8::Isolate::New(create_params);

    v8::Isolate::Scope isolate_scope(isolate);
    v8::HandleScope handle_scope(isolate);
    v8::Local<v8::Context> context = v8::Context::New(isolate);
    v8::Context::Scope context_scope(context);
    v8::Local<v8::String> source =
        v8::String::NewFromUtf8(isolate, "let a = 2 ** 8; a++;",
                                v8::NewStringType::kNormal)
            .ToLocalChecked();
    v8::Local<v8::Script> script =
        v8::Script::Compile(context, source).ToLocalChecked();
    v8::Local<v8::Value> result = script->Run(context).ToLocalChecked();
    v8::String::Utf8Value utf8(isolate, result);
    printf("%s\\n", *utf8);

  isolate->Dispose();
  v8::V8::Dispose();
  v8::V8::ShutdownPlatform();
  delete create_params.array_buffer_allocator;
  return 0;
官方的例子是输出一个"Hello,World"字符串。我觉得这完全没有展示出这个例子的强大之处,因为能拼接字符串是个非常常规的操作,而我们引进来的是可以解析js代码的引擎。不写几条js语句,真对不起这个例子。
我们将刚才的例子存为hello2.cpp, 编译:
g++ -I. -Iinclude ./hello2.cc -o hello_world2 -lv8_monolith -Lout.gn/x64.release.sample/obj/ -lpthread -std=c++14 -DV8_COMPRESS_POINTERS
v8_monolith这个库怎么编译出来的,我们后面讲编译v8源代码的时候会讲。
然后运行生成的hello_world2,输出:
256
总体流程就是:
- 初始化ICU
- 初始化v8平台
- 创建分配器
- 创建Isolate
- 创建Scope
- 创建Context
- 创建脚本
- 编译脚本
- 运行脚本
- 清理Isolate
- 清理v8
- 清理分配器
其中,Isolate代表一个线程不安全的v8运行实例。其它概念大家基本都可以理解。
新一点的API结构上有一些变化,我们来看下:
#include <stdio.h>
#include <stdlib.h>
#include <string.h>
#include "include/libplatform/libplatform.h"
#include "include/v8-context.h"
#include "include/v8-initialization.h"
#include "include/v8-isolate.h"
#include "include/v8-local-handle.h"
#include "include/v8-primitive.h"
#include "include/v8-script.h"

int main(int argc, char* argv[])
  v8::V8::InitializeICUDefaultLocation(argv[0]);
  v8::V8::InitializeExternalStartupData(argv[0]);
  std::unique_ptr<v8::Platform> platform = v8::platform::NewDefaultPlatform();
  v8::V8::InitializePlatform(platform.get());
  v8::V8::Initialize();
  v8::Isolate::CreateParams create_params;
  create_params.array_buffer_allocator =
      v8::ArrayBuffer::Allocator::NewDefaultAllocator();
  v8::Isolate* isolate = v8::Isolate::New(create_params);

    v8::Isolate::Scope isolate_scope(isolate);
    v8::HandleScope handle_scope(isolate);
    v8::Local<v8::Context> context = v8::Context::New(isolate);
    v8::Context::Scope context_scope(context);

      v8::Local<v8::String> source =
          v8::String::NewFromUtf8Literal(isolate, "let f1 = (x) => x*x; f1(1.2);");
      v8::Local<v8::Script> script =
          v8::Script::Compile(context, source).ToLocalChecked();
      v8::Local<v8::Value> result = script->Run(context).ToLocalChecked();
      v8::String::Utf8Value utf8(isolate, result);
      printf("%s\\n", *utf8);


  isolate->Dispose();
  v8::V8::Dispose();
  v8::V8::ShutdownPlatform();
  delete create_params.array_buffer_allocator;
  return 0;
换个文件名存,用刚才一样的参数去编译:
g++ -I. -Iinclude ./hello3.cc -o hello_world3 -lv8_monolith -Lout.gn/x64.release.sample/obj/ -lpthread -std=c++14 -DV8_COMPRESS_POINTERS
虽然API变化了,但是都还是被支持的。
总体上,我们发现流程上基本没有太大变化。只是API拆解得更细了。原来只要包含一个v8.h就够了,现在context, isolate, primitive, script等都拆分成独立的API了。
上面的版本是经过我加工过的,其实还有wasm的部分被我删除掉了。在2021年末的这个时刻,wasm的知识对于很多前端同学还不是必备的基础。后面我们有专文讨论wasm基础加上v8的实现。
本地句柄
作为一个javascript引擎,v8自然是拥有一个运行时的垃圾回收器。垃圾回收器会回收一切没有句柄持有的对象。
最简单的句柄叫做本地句柄,它是跟栈绑定的。当退出一个作用域时,本地局柄所持有的对象也将都被释放掉。
本地句柄的用法是v8::Local<类型>。
上面例子中我们基本上使用的都是本地句柄,代码字符吕、脚本、值都是保存在本地句柄中:
      v8::Local<v8::String> source =
          v8::String::NewFromUtf8Literal(isolate, "let f1 = (x) => x*x; f1(1.2);");
      v8::Local<v8::Script> script =
          v8::Script::Compile(context, source).ToLocalChecked();
      v8::Local<v8::Value> result = script->Run(context).ToLocalChecked();
      v8::String::Utf8Value utf8(isolate, result);
针对于可能失败,为空或者出现异常的情况,我们可以使用MaybeLocal,例如:v8::MaybeLocal<v8::String>.
从utf-8字符串构造v8 String的v8::String::NewFromUtf8函数,默认生成的就是v8::MaybeLocal<v8::String>类型。
从MaybeLocal转换到Local,可以调用ToLocalChecked函数。其原型为:
  V8_INLINE Local<T> ToLocalChecked()
    if (V8_UNLIKELY(val_ == nullptr)) api_internal::ToLocalEmpty();
    return Local<T>(val_);
v8字符串
v8::String所表示的就是JavaScript的字符串。
上节我们说了,要生成v8 String, 需要使用v8::String::NewFromUtf8方法。NewStringType就用kNormal就好:
      char *str1 = "hello,v8";
      v8::MaybeLocal<v8::String> v8str1 =
          v8::String::NewFromUtf8(isolate, str1, v8::NewStringType::kNormal, strlen(str1));
要将v8字符串转换成C字符串,需要通过v8::String::Utf8Value类型来转换。
      v8::String::Utf8Value v8str2(isolate, v8str1.ToLocalChecked());
      printf("%s\\n", *v8str2);
我们来看个将文件读到v8字符串的例子:
v8::MaybeLocal<v8::String> ReadFile(v8::Isolate* isolate, const char* name)
  FILE* file = fopen(name, "rb");
  if (file == NULL) return v8::MaybeLocal<v8::String>();

  fseek(file, 0, SEEK_END);
  size_t size = ftell(file);
  rewind(file);

  char* chars = new char[size + 1];
  chars[size] = '\\0';
  for (size_t i = 0; i < size;)
    i += fread(&chars[i], 1, size - i, file);
    if (ferror(file))
      fclose(file);
      return v8::MaybeLocal<v8::String>();


  fclose(file);
  v8::MaybeLocal<v8::String> result = v8::String::NewFromUtf8(
      isolate, chars, v8::NewStringType::kNormal, static_cast<int>(size));
  delete[] chars;
  return result;
我们使用上面的ReadFile函数,就可以改成运行文件上的js脚本了:
      v8::Local<v8::String> source;
      if (!ReadFile(isolate, filename).ToLocal(&source))
        printf("Cannot read from %s\\n", filename);

      v8::Local<v8::Script> script =
          v8::Script::Compile(context, source).ToLocalChecked();
      v8::Local<v8::Value> result = script->Run(context).ToLocalChecked();
      v8::String::Utf8Value utf8(isolate, result);
      printf("%s\\n", *utf8);
不过要注意,非Javascript字符串就不要来凑热闹了。
比如要获取v8的版本号,没有这么麻烦,直接就是const char*:
printf("%s\\n", v8::V8::GetVersion());
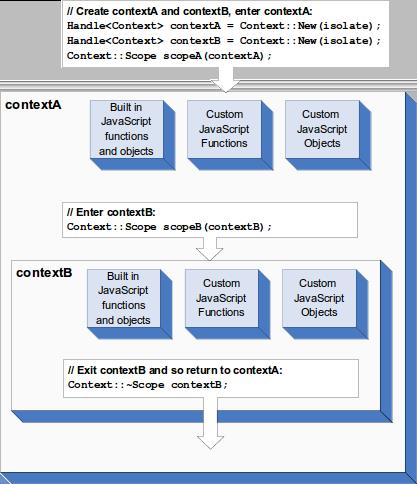
Context
除了内存管理之外,另外一个很重要的事情就是运行上下文Context. 我们可以看到,在代码中,编译需要上下文,运行需要上下文。
我们知道,js默认是提供很多全局变量和全局函数,这些都存储于上下文中。脚本中的对象、函数也都是跟上下文绑定在一起的。
我们来看一下官方的图:
编译v8
下面我们就再说下如何编译v8.
下载v8源代码
v8是个比较复杂的工程,只从github上下载 https://github.com/v8/v8 的代码是没法编译的。
我们以mac和Linux为例。
首先我们需要下载depot_tools工具包:
git clone https://chromium.googlesource.com/chromium/tools/depot_tools.git
然后将这个工具包加到path中,后面下载所用的fetch, 编译所用的gn等工具都在这里。
export PATH=/path/to/depot_tools:$PATH
第三步,我们都过fetch工具下载v8:
fetch v8
如果不想用fetch工具,想直接手动下载的话,需要下载以下的库到相应的目录下。
比如我把v8的路径换成github上的了。
entries =
  'v8': 'https://github.com/v8/v8.git',
  'v8/base/trace_event/common': 'https://chromium.googlesource.com/chromium/src/base/trace_event/common.git@68d816952258c9d817bba656ee2664b35507f01b',
  'v8/build': 'https://chromium.googlesource.com/chromium/src/build.git@f78b0bd09847b94e9ec9cb520855d6785fd082ab',
  'v8/buildtools': 'https://chromium.googlesource.com/chromium/src/buildtools.git@a9bc3e283182a586998338a665c7eae17406ec54',
  'v8/buildtools/clang_format/script': 'https://chromium.googlesource.com/external/github.com/llvm/llvm-project/clang/tools/clang-format.git@99876cacf78329e5f99c244dbe42ccd1654517a0',
  'v8/buildtools/mac:gn/gn/mac-$arch': 'https://chrome-infra-packages.appspot.com/gn/gn/mac-$arch@git_revision:693f9fb87e4febdd4299db9f73d8d2c958e63148',
  'v8/buildtools/third_party/libc++/trunk': 'https://chromium.googlesource.com/external/github.com/llvm/llvm-project/libcxx.git@79a2e924d96e2fc1e4b937c42efd08898fa472d7',
  'v8/buildtools/third_party/libc++abi/trunk': 'https://chromium.googlesource.com/external/github.com/llvm/llvm-project/libcxxabi.git@9eb0245224c2d7f6b20f76d4d24eab1d60a2b281',
  'v8/buildtools/third_party/libunwind/trunk': 'https://chromium.googlesource.com/external/github.com/llvm/llvm-project/libunwind.git@557b51a0ccab9b3dbce61bdd57aa5f7d5c7c6206',
  'v8/test/benchmarks/data': 'https://chromium.googlesource.com/v8/deps/third_party/benchmarks.git@05d7188267b4560491ff9155c5ee13e207ecd65f',
  'v8/test/mozilla/data': 'https://chromium.googlesource.com/v8/deps/third_party/mozilla-tests.git@f6c578a10ea707b1a8ab0b88943fe5115ce2b9be',
  'v8/test/test262/data': 'https://chromium.googlesource.com/external/github.com/tc39/test262.git@8d420cef415f3501cb24d674b8c032d1f09402a0',
  'v8/test/test262/harness': 'https://chromium.googlesource.com/external/github.com/test262-utils/test262-harness-py.git@278bcfaed0dcaa13936831fb1769d15e7c1e3b2b',
  'v8/third_party/depot_tools': 'https://chromium.googlesource.com/chromium/tools/depot_tools.git@756e98f5aac7fb163e558a5a5cc5f3dc0098b1d7',
  'v8/third_party/google_benchmark/src': 'https://chromium.googlesource.com/external/github.com/google/benchmark.git@1e3ab7fa434d1b4aebdd22b760dbf99c498ae7cd',
  'v8/third_party/googletest/src': 'https://chromium.googlesource.com/external/github.com/google/googletest.git@075810f7a20405ea09a93f68847d6e963212fa62',
  'v8/third_party/icu': 'https://chromium.googlesource.com/chromium/deps/icu.git@4df07a2d158218b77369b82f9fe3190725beb815',
  'v8/third_party/instrumented_libraries': 'https://chromium.googlesource.com/chromium/src/third_party/instrumented_libraries.git@6527a4e98a746f5324e21e813a41af25419bfae7',
  'v8/third_party/jinja2': 'https://chromium.googlesource.com/chromium/src/third_party/jinja2.git@ee69aa00ee8536f61db6a451f3858745cf587de6',
  'v8/third_party/jsoncpp/source': 'https://chromium.googlesource.com/external/github.com/open-source-parsers/jsoncpp.git@9059f5cad030ba11d37818847443a53918c327b1',
  'v8/third_party/logdog/logdog': 'https://chromium.googlesource.com/infra/luci/luci-py/client/libs/logdog@17ec234f823f7bff6ada6584fdbbee9d54b8fc58',
  'v8/third_party/markupsafe': 'https://chromium.googlesource.com/chromium/src/third_party/markupsafe.git@1b882ef6372b58bfd55a3285f37ed801be9137cd',
  'v8/third_party/perfetto': 'https://android.googlesource.com/platform/external/perfetto.git@aa4385bc5997ecad4c633885e1b331b1115012fb',
  'v8/third_party/protobuf': 'https://chromium.googlesource.com/external/github.com/google/protobuf@6a59a2ad1f61d9696092f79b6d74368b4d7970a3',
  'v8/third_party/zlib': 'https://chromium.googlesource.com/chromium/src/third_party/zlib.git@6da1d53b97c89b07e47714d88cab61f1ce003c68',
  'v8/tools/clang': 'https://chromium.googlesource.com/chromium/src/tools/clang.git@c00aa10009548ad073810d810cc4a71d2965f75b',
  'v8/tools/clang/dsymutil:chromium/llvm-build-tools/dsymutil': 'https://chrome-infra-packages.appspot.com/chromium/llvm-build-tools/dsymutil@M56jPzDv1620Rnm__jTMYS62Zi8rxHVq7yw0qeBFEgkC',
  'v8/tools/luci-go:infra/tools/luci/isolate/$platform': 'https://chrome-infra-packages.appspot.com/infra/tools/luci/isolate/$platform@git_revision:d1c03082ecda0148d8096f1fd8bf5491eafc7323',
  'v8/tools/luci-go:infra/tools/luci/isolated/$platform': 'https://chrome-infra-packages.appspot.com/infra/tools/luci/isolated/$platform@git_revision:d1c03082ecda0148d8096f1fd8bf5491eafc7323',
  'v8/tools/luci-go:infra/tools/luci/swarming/$platform': 'https://chrome-infra-packages.appspot.com/infra/tools/luci/swarming/$platform@git_revision:d1c03082ecda0148d8096f1fd8bf5491eafc7323',
以后,就可以在v8的目录下运行gclient sync去同步这些工具。
编译d8
我们是做工具用,所以我们需要的是d8和libv8_monolith.
d8在前面讲字节码的时候介绍过。
我们看下如何编译d8.
以x64 release版为例:
python3 tools/dev/gm.py x64.release
如果要编译debug版,就是
python3 tools/dev/gm.py x64.debug
编译成功之后,就会在out/x64.release或者out/x64.debug下面出现d8.
我们就可以应用./d8 --print-bytecode查看字节码啦。
将v8作为库使用
第一步,我们先生成v8库对应的gn文件:
python3 ./tools/dev/v8gen.py x64.release.sample
在out.gn/x64.release.sample中会生成一堆ninja文件,比如下面是v8_monolith.ninja文件:
defines = -D_LIBCPP_HAS_NO_ALIGNED_ALLOCATION -DCR_XCODE_VERSION=1310 -DCR_CLANG_REVISION=\\"llvmorg-14-init-6355-gb2217b36-2\\" -D__STDC_CONSTANT_MACROS -D__STDC_FORMAT_MACROS -D_FORTIFY_SOURCE=2 -D__ASSERT_MACROS_DEFINE_VERSIONS_WITHOUT_UNDERSCORES=0 -DNDEBUG -DNVALGRIND -DDYNAMIC_ANNOTATIONS_ENABLED=0 -DV8_TYPED_ARRAY_MAX_SIZE_IN_HEAP=64 -DENABLE_GDB_JIT_INTERFACE -DENABLE_MINOR_MC -DV8_INTL_SUPPORT -DENABLE_HANDLE_ZAPPING -DV8_ATOMIC_OBJECT_FIELD_WRITES -DV8_ATOMIC_MARKING_STATE -DV8_ENABLE_LAZY_SOURCE_POSITIONS -DV8_SHARED_RO_HEAP -DV8_WIN64_UNWINDING_INFO -DV8_ENABLE_REGEXP_INTERPRETER_THREADED_DISPATCH -DV8_SNAPSHOT_COMPRESSION -DV8_SHORT_BUILTIN_CALLS -DV8_ENABLE_SYSTEM_INSTRUMENTATION -DV8_ENABLE_WEBASSEMBLY -DV8_ALLOCATION_FOLDING -DV8_ALLOCATION_SITE_TRACKING -DV8_ADVANCED_BIGINT_ALGORITHMS -DV8_INCLUDE_RECEIVER_IN_ARGC -DV8_COMPRESS_POINTERS -DV8_COMPRESS_POINTERS_IN_SHARED_CAGE -DV8_31BIT_SMIS_ON_64BIT_ARCH -DV8_DEPRECATION_WARNINGS -DV8_IMMINENT_DEPRECATION_WARNINGS -DCPPGC_CAGED_HEAP -DV8_TARGET_ARCH_X64 -DV8_HAVE_TARGET_OS -DV8_TARGET_OS_MACOSX -DV8_RUNTIME_CALL_STATS -DU_USING_ICU_NAMESPACE=0 -DU_ENABLE_DYLOAD=0 -DUSE_CHROMIUM_ICU=1 -DU_ENABLE_TRACING=1 -DU_ENABLE_RESOURCE_TRACING=0 -DU_STATIC_IMPLEMENTATION -DICU_UTIL_DATA_IMPL=ICU_UTIL_DATA_FILE
framework_dirs =
include_dirs = -I../.. -Igen -I../../include -Igen/include -I../../third_party/icu/source/common -I../../third_party/icu/source/i18n
label_name = v8_monolith
target_out_dir = obj
target_output_name = libv8_monolith

build obj/v8_monolith.inputdeps.stamp: stamp obj/generate_bytecode_builtins_list.stamp obj/run_gen-regexp-special-case.stamp obj/run_torque.stamp obj/src/inspector/protocol_generated_sources.stamp obj/third_party/icu/icudata.stamp
也可以直接使用gn命令达到和v8gen.py同样的效果:
gn args out.gn/x64.release.sample
如果看v8gen.py的源码的话我们会发现,基本上都是在操作生成gn的参数。
第二步,我们就可以用ninja来编译libv8_monolith了:
ninja -C out.gn/x64.release.sample v8_monolith
同样,如果想要编译d8,将目标改成d8即可:
ninja -C out.gn/x64.release.sample d8
第三步,编译前面写的使用V8 API的C++程序:
g++ -I. -Iinclude ./hello3.cc -o hello_world3 -lv8_monolith -Lout.gn/x64.release.sample/obj/ -lpthread -std=c++14 -DV8_COMPRESS_POINTERS
小结
本文中我们学习了编译v8和将v8当成库引入到你自己的应用程序中的方法。并且通过简单的例子就实现了执行字符串脚本和从文件中读取js脚本的功能。
这为我们进一步学习js细节打好了坚实的基础。
以上是关于将v8变成工具的主要内容,如果未能解决你的问题,请参考以下文章
图解 Google V8 # 05:函数表达式的底层工作机制
《安富莱嵌入式周报》第279期:强劲的代码片段搜索工具,卡内基梅隆大学安全可靠C编码标准,Nordic发布双频WiFi6 nRF7002芯片
音频处理Melodyne 选择工具使用 ( 主工具简介 | 修改音高 | 自动吸附 | 音符长度修改 | 长度自动吸附 | 设置音符分离线 | 设置片段分离线 )