WPF开发登录窗口之——窗口布局
Posted dotNET跨平台
tags:
篇首语:本文由小常识网(cha138.com)小编为大家整理,主要介绍了WPF开发登录窗口之——窗口布局相关的知识,希望对你有一定的参考价值。

WPF开发者QQ群: 340500857 | 微信群 -> 进入公众号主页 加入组织

01
—
代码如下
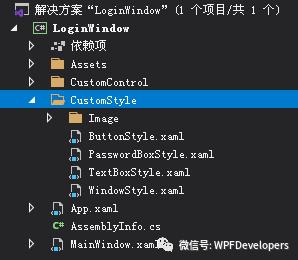
一、创建项目,命名为LoginWindow,然后创建以下目录结构:

二、导入图片

三、创建资源字典。一共创建四个:ButtonStyle、WindowStyle、
TextBoxStyle、PasswordBoxStyle:
四、引用资源。打开“App.xaml”,添加资源引用:
<Application.Resources>
    <ResourceDictionary>
        <ResourceDictionary.MergedDictionaries>
            <!-- 按钮样式 -->
            <ResourceDictionary Source="CustomStyle/ButtonStyle.xaml"/>
            <!-- 窗口样式 -->
            <ResourceDictionary Source="CustomStyle/WindowStyle.xaml"/>
            <!-- 文本框样式 -->
            <ResourceDictionary Source="CustomStyle/TextBoxStyle.xaml"/>
            <!-- 密码框样式 -->
            <ResourceDictionary Source="CustomStyle/PasswordBoxStyle.xaml"/>
        </ResourceDictionary.MergedDictionaries>
    </ResourceDictionary>
</Application.Resources>
五、添加按钮样式本项目只需要两个按钮样式:关闭按钮与登录/注册按钮。打开“ButtonStyle.xaml”,添加以下样式:
<!-- 关闭按钮 -->
<Style x:Key="CloseButtonStyle" TargetType="Button">
    <Setter Property="Opacity" Value="0.5"/>
    <Setter Property="Cursor" Value="Hand"/>
    <Setter Property="Template">
        <Setter.Value>
            <ControlTemplate TargetType="Button">
                <Border Name="Border" Background="Transparent">
                    <Canvas Width="10" Height="10" ClipToBounds="True">
                        <Line x:Name="Line01" Stroke="White" X1="0" Y1="0" X2="10" Y2="10"/>
                        <Line x:Name="Line02" Stroke="White" X1="10" Y1="0" X2="0" Y2="10"/>
                    </Canvas>
                </Border>
                <!-- 触发器 -->
                <ControlTemplate.Triggers>
                    <Trigger Property="IsMouseOver" Value="True">
                        <Setter Property="Opacity" Value="0.75"/>
                    </Trigger>
                    <Trigger Property="IsPressed" Value="True">
                        <Setter Property="Opacity" Value="1"/>
                    </Trigger>
                </ControlTemplate.Triggers>
            </ControlTemplate>
        </Setter.Value>
    </Setter>
</Style>
<!-- 登录/注册按钮 -->
<Style TargetType="Button">
    <Setter Property="Foreground" Value="White"/>
    <Setter Property="Cursor" Value="Hand"/>
    <Setter Property="Template">
        <Setter.Value>
            <ControlTemplate TargetType="Button">
                <Border x:Name="Border" Background="#4370F5">
                    <ContentPresenter HorizontalAlignment="Center" VerticalAlignment="Center"/>
                </Border>
                <!-- 触发器 -->
                <ControlTemplate.Triggers>
                    <!-- 鼠标悬停时 -->
                    <Trigger Property="IsMouseOver" Value="True">
                        <Setter TargetName="Border" Property="Background" Value="#5B84FE"/>
                    </Trigger>
                    <!-- 鼠标按下时 -->
                    <Trigger Property="IsPressed" Value="True">
                        <Setter TargetName="Border" Property="Background" Value="#3761DF"/>
                    </Trigger>
                    <!-- 禁用时 -->
                    <Trigger Property="IsEnabled" Value="False">
                        <Setter Property="Opacity" Value="0.3"/>
                    </Trigger>
                </ControlTemplate.Triggers>
            </ControlTemplate>
        </Setter.Value>
    </Setter>
</Style>
六、添加窗口样式打开“WindowStyle.xaml”,添加以下样式:
<Style x:Key="NormalWindow" TargetType="Window">
    <Setter Property="Background" Value="#80222324"/>
    <Setter Property="FontFamily" Value="NSimSun"/>
    <Setter Property="FontSize" Value="12"/>
    <Setter Property="TextOptions.TextFormattingMode" Value="Display"/>
    <Setter Property="SnapsToDevicePixels" Value="True"/>
    <Setter Property="WindowChrome.WindowChrome">
        <Setter.Value>
            <WindowChrome GlassFrameThickness="1" UseAeroCaptionButtons="False" ResizeBorderThickness="0" CaptionHeight="100" CornerRadius="0"/>
        </Setter.Value>
    </Setter>
    <!-- 模板 -->
    <Setter Property="Template">
        <Setter.Value>
            <ControlTemplate TargetType="Window">
                <!-- 外观 -->
                <Grid>
                    <!-- 分区 -->
                    <Grid.RowDefinitions>
                        <!-- 标题栏 -->
                        <RowDefinition Height="100"/>
                        <!-- 客户区 -->
                        <RowDefinition />
                    </Grid.RowDefinitions>
                    <!-- 第一块:标题栏 -->
                    <Grid>
                        <!-- 背景色 -->
                        <Grid Height="200" VerticalAlignment="Center" Opacity="0.9">
                            <Grid.Background>
                                <LinearGradientBrush StartPoint="0,0" EndPoint="1,1">
                                    <GradientStop Offset="0" Color="#4370F5"/>
                                    <GradientStop Offset="1" Color="#AE088D"/>
                                </LinearGradientBrush>
                            </Grid.Background>
                        </Grid>
                        <!-- 背景图 -->
                        <Image Source="Image/Background.png" Width="360" VerticalAlignment="Bottom"/>
                        <!-- 标识 -->
                        <Image Source="Image/Logo.png" Width="114" HorizontalAlignment="Left" VerticalAlignment="Top" Margin="20,20,0,0"/>
                        <!-- 关闭按钮 -->
                        <Button x:Name="CloseButton" Width="30" Height="30" HorizontalAlignment="Right" VerticalAlignment="Top"
                                Style="{StaticResource CloseButtonStyle}" WindowChrome.IsHitTestVisibleInChrome="True"/>
                    </Grid>
                    <!-- 第二块:客户区 -->
                    <Grid Grid.Row="1" Background="White">
                        <AdornerDecorator>
                            <ContentPresenter/>
                        </AdornerDecorator>
                    </Grid>
                </Grid>
            </ControlTemplate>
        </Setter.Value>
    </Setter>
</Style>
七、这个模板结构很简单,就是普通的上下结构,唯一需要解释的布局是“背景色”,标题栏高度是100,背景色的高度是200,且垂直居中,这种布局的效果如下图:
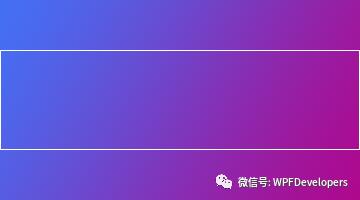
渐变上下部分都被裁剪掉了
八、应用窗口样式打开“MainWindow.xaml”,设置以下属性:
<Window x:Class="LoginWindow.MainWindow"
        xmlns="http://schemas.microsoft.com/winfx/2006/xaml/presentation"
        xmlns:x="http://schemas.microsoft.com/winfx/2006/xaml"
        xmlns:d="http://schemas.microsoft.com/expression/blend/2008"
        xmlns:mc="http://schemas.openxmlformats.org/markup-compatibility/2006"
        xmlns:local="clr-namespace:LoginWindow"
        mc:Ignorable="d"
        Title="登录" Height="372" Width="360" ResizeMode="NoResize"
        FontFamily="NSimSun" FontSize="13px" WindowStartupLocation="CenterScreen"
        Style="{StaticResource NormalWindow}">
    <Grid>


    </Grid>
</Window>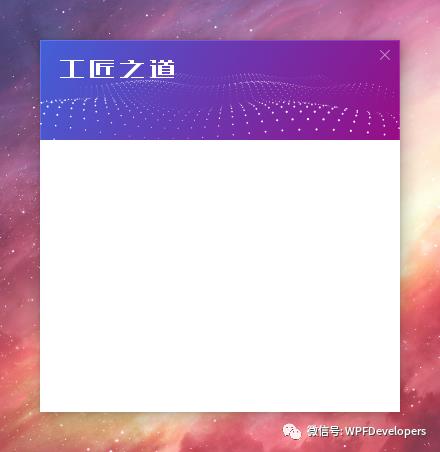
源码地址如下
http://www.gjiang.club/article?ID=6157079391ee9e52232fddcf
github:https://github.com/yanjinhuagood/WPFDevelopers.git
gitee:https://gitee.com/yanjinhua/WPFDevelopers.git
WPF开发者QQ群: 340500857
blogs: https://www.cnblogs.com/yanjinhua
Github:https://github.com/yanjinhuagood
出处:https://www.cnblogs.com/yanjinhua
版权:本作品采用「署名-非商业性使用-相同方式共享 4.0 国际」许可协议进行许可。
转载请著名作者 出处 https://github.com/yanjinhuagood

扫一扫关注我们,

更多技能早知道!

点击阅读原文可跳转至源代码
以上是关于WPF开发登录窗口之——窗口布局的主要内容,如果未能解决你的问题,请参考以下文章
2021-09-02 WPF上位机通用框架平台实战-登录窗口