以太坊搭建私链
Posted 张句号。
tags:
篇首语:本文由小常识网(cha138.com)小编为大家整理,主要介绍了以太坊搭建私链相关的知识,希望对你有一定的参考价值。
Windows系统---打开cmd命令行
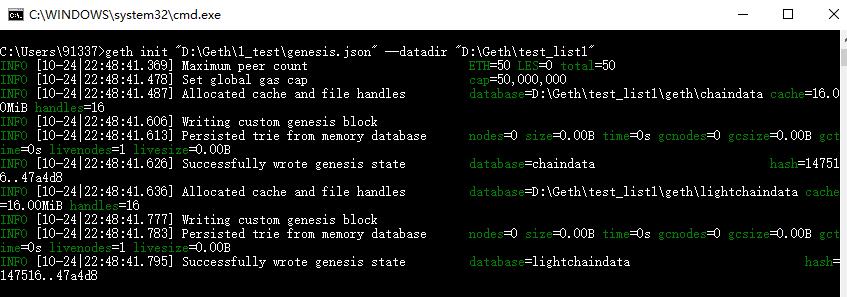
1.初始化(首先有创世文件)
geth init "D:\\Geth\\1_test\\genesis.json" --datadir "D:\\test1"文件内容可自己创建(使用puppeth)
{
  "config": {
        "chainId": 18,
        "homesteadBlock": 0,
        "eip150Block": 0,
        "eip155Block": 0,
        "eip158Block": 0
    },
  "alloc"      : {},
  "coinbase"   : "0x0000000000000000000000000000000000000000",
  "difficulty" : "0x2",
  "extraData"  : "",
  "gasLimit"   : "0xffffffff",
  "nonce"      : "0x0000000000000042",
  "mixhash"    : "0x0000000000000000000000000000000000000000000000000000000000000000",
  "parentHash" : "0x0000000000000000000000000000000000000000000000000000000000000000",
  "timestamp"  : "0x00"
}
以上结构体中变量的意义为
- coinbase 挖矿后获得奖励的账户地址
- difficulty 挖矿难度
- gasLimit 一个区块所能容纳gas的上限
- nonce 随机值
- mixhash 一个256位的哈希证明,与nonce相结合,验证本块的有效性
- extraData 附加信息,随意填写
- parentHash 前一块的hash值,由于是创世块,所以为0
运行截图为
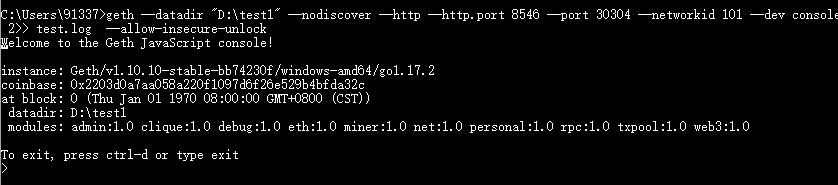
2.启动Geth
geth --datadir "D:\\test1" --nodiscover --http --http.port 8546 --port 30304 --networkid 101 console 2>> test.log --allow-insecure-unlock- --datadir 表示工作目录,第一次输入命令时会自动新建一个testNet目录来存放数据(私钥公钥)
- --nodiscover用于新手练习时自主连接节点,否则可能会自动连接
- --http 连接http rpc (旧版命令参数为--rpc)
- --http 默认公有链http rpc端口为8545,私有链建立时避免重复使用其他数字
- --port (30303) --network(单数多为公链,尽量使用大一点的数) 同--http
- 2>>test.log 表示把控制日志输出到test.log文件
- --allow-insecure-unlock 新版Geth需要设定账户解锁权利(有输入密码的权利)
- 开发者模式--dev(默认账户的密码怎么看?)
开发者的好处有几点:
- 自动挖矿
- 无需初始化
- 出块速度快
- 默认初始化了一个账户,金钱无限
- 默认账户无需解锁,也可以部署合约
运行截图如下
3.准备账户
01:查看当前存在的账户
eth.accounts默认不会有账户信息,需要创建后才能有
02:创建账户,注意传入的123456是密码
personal.newAccount("123456")>eth.accounts
//查看已有账户信息
>eth.defaultAccount='eth.accounts[0]'
//设置默认账户,默认账户将运行挖矿命令时自动挖矿03:启动挖矿,start内的1是代表1个线程挖矿,null并非代表错误
miner.start(1)04:查看账户余额,都是挖矿所得
eth.getBalance(eth.accounts[0])05:再创建一个账户,密码7878
personal.newAccount("7878")06:给两个账户起别名acc0,acc1
>acc0=eth.accounts[0]
>acc1=eth.accounts[1]
07:解锁账户1
personal.unlockAccount(acc0)08:转账给账户2,10个ether,返回值为本次交易哈希值
eth.sendTransaction({from:acc0,to:acc1,value:web3.toWei(10)})
//web3.toWei(10)是将10ether转换成Wei的格式1 ether=10^8Wei
09:查看账户2余额
eth.getBalance(acc1)10:退出geth
exit运行截图如下
> eth.accounts
[]
> eth.blockNumber
0
> personal.newAccount('123456')
"0x0a11acf50a1c73c7ec688c86c34b8ae383e335a1"
> personal.newAccount('7878')
"0x323118b34c4dfdeb32fc7ebd5b69238a7fab603d"
> eth.defaultAccount='eth.accounts[0]'
"eth.accounts[0]"
> miner.start()
null
> web3.fromWei(eth.getBalance(eth.accounts[0]),'ether')
0
> eth.blockNumber
22
> web3.fromWei(eth.getBalance(eth.accounts[0]),'ether')
120
> web3.fromWei(eth.getBalance(eth.accounts[0]),'ether')
140
>eth.sendTransaction({from:eth.accounts[0],to:eth.accounts[1],value:1000000000000000000})
Error: authentication needed: password or unlock
        at web3.js:6357:37(47)
        at send (web3.js:5091:62(35))
        at <eval>:1:20(16)
//错误原因是交易的上一条命令必须是解锁转出以太币账户的命令
> personal.unlockAccount(eth.accounts[0])
Unlock account 0x0a11acf50a1c73c7ec688c86c34b8ae383e335a1
Passphrase:
true
>eth.sendTransaction({from:eth.accounts[0],to:eth.accounts[1],value:1000000000000000000})
"0x21cd774bd1ca30fb9f7279c1b09d924a515c569b074056f37d8f2d95a97c02d9"
//交易返回值为本次交易对应的哈希值
>eth.getTransaction("0x21cd774bd1ca30fb9f7279c1b09d924a515c569b074056f37d8f2d95a97c02d9")//查看交易内容
{
  blockHash: "0xa45679b63a9289054f7a8da4f9af24a25272e3ae3373590425141ae15251046d",
  blockNumber: 201,
  from: "0x0a11acf50a1c73c7ec688c86c34b8ae383e335a1",
  gas: 21000,
  gasPrice: 1000000000,
  hash: "0x21cd774bd1ca30fb9f7279c1b09d924a515c569b074056f37d8f2d95a97c02d9",
  input: "0x",
  nonce: 0,
  r: "0x7b569cfd1ca028b5d6ffd39d493f402bdeed1e90477ae6efe5d4508139e51980",
  s: "0x45d18d464e8119391bf4ede13839982221ade78e21862fd8ca01cf29f93e1e5d",
  to: "0x323118b34c4dfdeb32fc7ebd5b69238a7fab603d",
  transactionIndex: 0,
  type: "0x0",
  v: "0x48",
  value: 1000000000000000000
}
> web3.fromWei(eth.getBalance(eth.accounts[1]),'ether')
1
4.建立第二个节点
a.同一局域网下两个电脑进行连接
b.同一电脑下安装虚拟机,设置节点进行连接
c.再打开一个cmd命令行,更改工作目录和端口号,再进行两个节点的连接
注意:旧版可以同一电脑,新版不可以,因此在一台电脑上,需要安装一个虚拟机,并且却要同一个networkid和同一个创世区块json文件。且新建节点不能挖矿否则将产生分叉。
原节点(接上)
> net.peerCount
0
> admin.peers
[]
> admin.nodeInfo.enode
"enode://7277d340a2f83c6846e37f01431b140f5218e280f032e9fec234b65c95a29b3889aa2bbdd4b84f73c6564e6a2b08f61e5c206c9ce228d77a15eae78cdc2e51f0@127.0.0.1:30304?discport=0"
新建节点(新建一个cmd)
C:\\Users\\91337>geth --datadir "D:\\test2" --nodiscover --http --http.port 8547 --port 30305 --networkid 101  console 2>> test2.log  --allow-insecure-unlock --ipcdisable
Welcome to the Geth javascript console!

instance: Geth/v1.10.10-stable-bb74230f/windows-amd64/go1.17.2
at block: 0 (Thu Jan 01 1970 08:00:00 GMT+0800 (CST))
 datadir: D:\\test2
 modules: admin:1.0 debug:1.0 eth:1.0 ethash:1.0 miner:1.0 net:1.0 personal:1.0 rpc:1.0 txpool:1.0 web3:1.0

To exit, press ctrl-d or type exit
> eth.blockNumber
0
> net.peerCount
0
> admin.peers
[]
> admin.addPeer("enode://7277d340a2f83c6846e37f01431b140f5218e280f032e9fec234b65c95a29b3889aa2bbdd4b84f73c6564e6a2b08f61e5c206c9ce228d77a15eae78cdc2e51f0@127.0.0.1:30304?discport=0")
true
再次验证是否连接成功
> net.peerCount

> admin.peers
也可以在新建cmd命令行下再次查看区块链高度,如果同步则成功。
以上是关于以太坊搭建私链的主要内容,如果未能解决你的问题,请参考以下文章