记录基于腾讯云服务器的Typecho博客迁移
Posted luoz_python
tags:
篇首语:本文由小常识网(cha138.com)小编为大家整理,主要介绍了记录基于腾讯云服务器的Typecho博客迁移相关的知识,希望对你有一定的参考价值。
前段时间腾讯云的三年服务器提示还有7天到期,于是便到腾讯云上选购服务器了。有直接续费的,我的最低配1200+三年,直接续费是最简单的,但是后来在活动页面购买了3年的服务器500+RMB。我这次迁移的是基于PHP Typecho框架的Pinghsu主题博客系统。
旧服务器数据迁出
登录旧服务器,针对Typecho框架博客我们需要备份的数据有:
- mysql对应的数据库数据:使用命令mysqldump -uroot -p --all-databases > db.sql(或者--all-databases改成对应的数据库名即可),将导出的sql文件存到本地;
- 主程序:复制/home/wwwroot下,也就是Typecho所在的主目录,复制出来(里面包含了typecho的程序、配置,Pinghsu主题,以及百度爬虫)

- nginx的配置:到/usr/local/nginx/conf,备份nginx.conf、SSL证书(如果有的话)。
购买腾讯云服务器
活动页面:云产品回馈专场_云产品特惠_云产品活动-腾讯云,这种活动一般常年都有的。
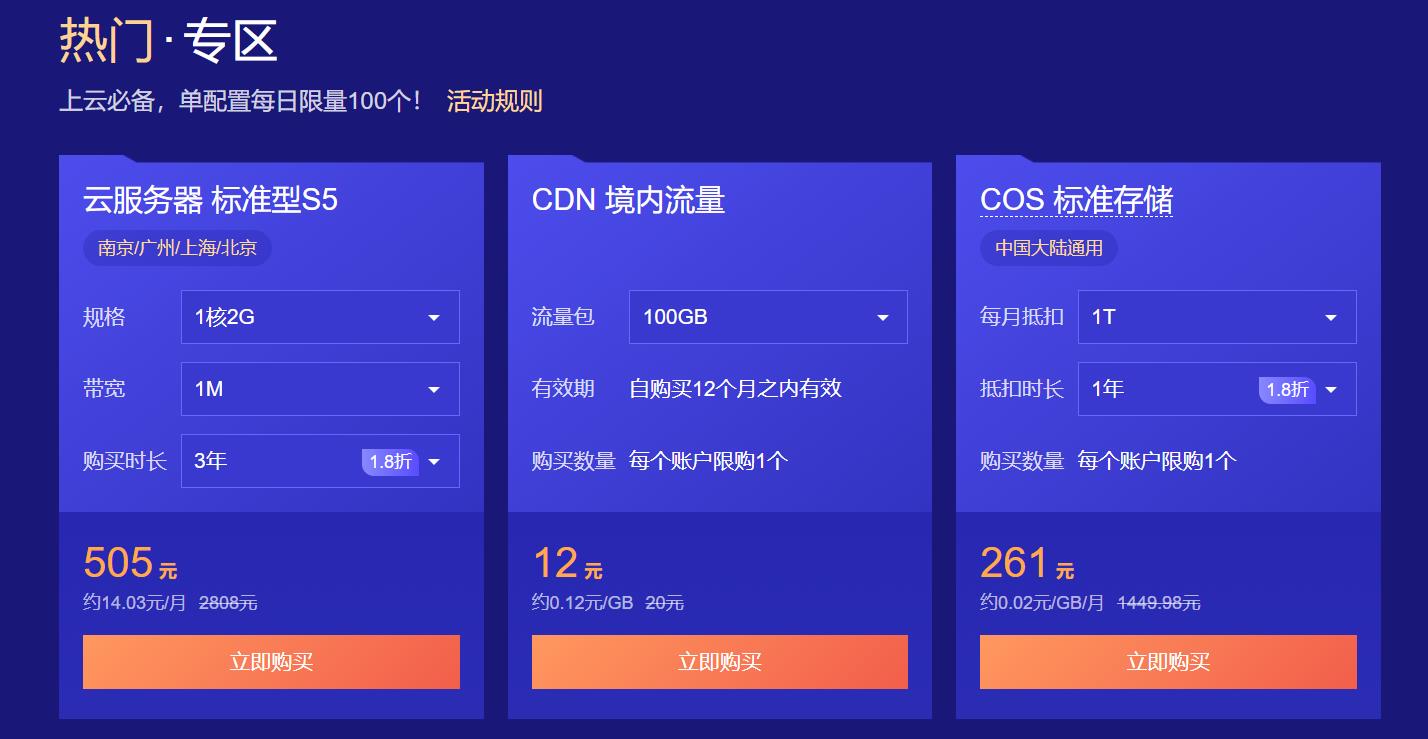
购买后,我直接选择了预装好的LNMP镜像,这样就不用自己安装php、MySQL、Nginx。

旧数据迁移到新服务器
nginx ssl配置
打开新服务器,将nginx的配置以及SSL证书(两个),复制到新服务的/usr/local/nginx/conf下,然后重启nginx即可。
我这里加上了80端口转发到443,也就是都是https访问,如果没有SSL证书,可以直接到腾讯云进行一年有效期的SSL证书申请(到期也直接申请替换原SSL证书即可),我的nginx的配置文件如下:
user  www www;

worker_processes auto;

error_log  /home/wwwlogs/nginx_error.log  crit;

pid        /usr/local/nginx/logs/nginx.pid;

# Specifies the value for maximum file descriptors that can be opened by this process.
worker_rlimit_nofile 51200;

events
    {
        use epoll;
        worker_connections 51200;
        multi_accept on;
    }

http
    {
        include       mime.types;
        default_type  application/octet-stream;

        server_names_hash_bucket_size 128;
        client_header_buffer_size 32k;
        large_client_header_buffers 4 32k;
        client_max_body_size 50m;

        sendfile   on;
        tcp_nopush on;

        keepalive_timeout 60;

        tcp_nodelay on;

        fastcgi_connect_timeout 300;
        fastcgi_send_timeout 300;
        fastcgi_read_timeout 300;
        fastcgi_buffer_size 64k;
        fastcgi_buffers 4 64k;
        fastcgi_busy_buffers_size 128k;
        fastcgi_temp_file_write_size 256k;

        gzip on;
        gzip_min_length  1k;
        gzip_buffers     4 16k;
        gzip_http_version 1.1;
        gzip_comp_level 2;
        gzip_types     text/plain application/javascript application/x-javascript text/javascript text/css application/xml application/xml+rss;
        gzip_vary on;
        gzip_proxied   expired no-cache no-store private auth;
        gzip_disable   "MSIE [1-6]\\.";

        # limit_conn_zone $binary_remote_addr zone=perip:10m;
        # # If enable limit_conn_zone,add "limit_conn perip 10;" to server section.

        server_tokens off;
        access_log off;
        # rewrite ^(.*) https://$host$1 permanent;

        server
        {
            listen 443 default_server;
            ssl on;
            # listen [::]:80 default_server ipv6only=on;
            server_name richule.com www.richule.com;
            ssl_certificate 1_www.richule.com_bundle.crt;
            ssl_certificate_key 2_www.richule.com.key;
            ssl_session_timeout 5m;
            ssl_protocols TLSv1 TLSv1.1 TLSv1.2; # 按照这个协议配置
            ssl_ciphers ECDHE-RSA-AES128-GCM-SHA256:HIGH:!aNULL:!MD5:!RC4:!DHE;# 按照这个套件配置
            ssl_prefer_server_ciphers on;
            index index.html index.htm index.php;
            root  /home/wwwroot/richule;
            # error_page   404   /404.html;

            # Deny access to PHP files in specific directory
            # location ~ /(wp-content|uploads|wp-includes|images)/.*\\.php$ { deny all; }

            include enable-php-pathinfo.conf;


            location ~ .*\\.(gif|jpg|jpeg|png|bmp|swf)$
            {
                expires      30d;
            }

            location ~ .*\\.(js|css)?$
            {
                expires      12h;
            }

            location ~ /.well-known {
                allow all;
            }

            location ~ /\\.
            {
                deny all;
            }

            access_log  /home/wwwlogs/access.log;
        }
        server {
            listen 80;
            server_name www.richule.com richule.com;
            rewrite ^(.*)$  https://$host$1 permanent;
        }
        server {
            listen 80;
            server_name v.richule.com;
            index admin.php;
            root  /home/wwwroot/richule/usr/admin/;
            # error_page   404   /404.html;

            # Deny access to PHP files in specific directory
            # location ~ /(wp-content|uploads|wp-includes|images)/.*\\.php$ { deny all; }

            include enable-php-pathinfo.conf;

            location ~ .*\\.(gif|jpg|jpeg|png|bmp|swf)$
            {
                expires      30d;
            }

            location ~ .*\\.(js|css)?$
            {
                expires      12h;
            }

            location ~ /.well-known {
                allow all;
            }

            location ~ /\\.
            {
                deny all;
            }

            access_log  /home/wwwlogs/access.log;
        }
include vhost/*.conf;
}
恢复MySQL数据
将第一步导出的sql文件上传到新服务器,直接进入到数据库,source恢复。
mysql -u root -p
mysql>use 数据库
然后使用source命令,后面参数为脚本文件(如这里用到的.sql)
mysql>source /home/wwwroot/bushu/db.sql
恢复主程序
将第一步备份的程序复制到新服务器的/home/wwwroot/下,此时直接访问新服务器的IP,会出现typecho第一次运行的安装部署界面,一步步操作设置即可,可以参照博客:Typecho博客转移服务器,数据备份. - 简书 (jianshu.com)


最后点击使用原有数据即可。
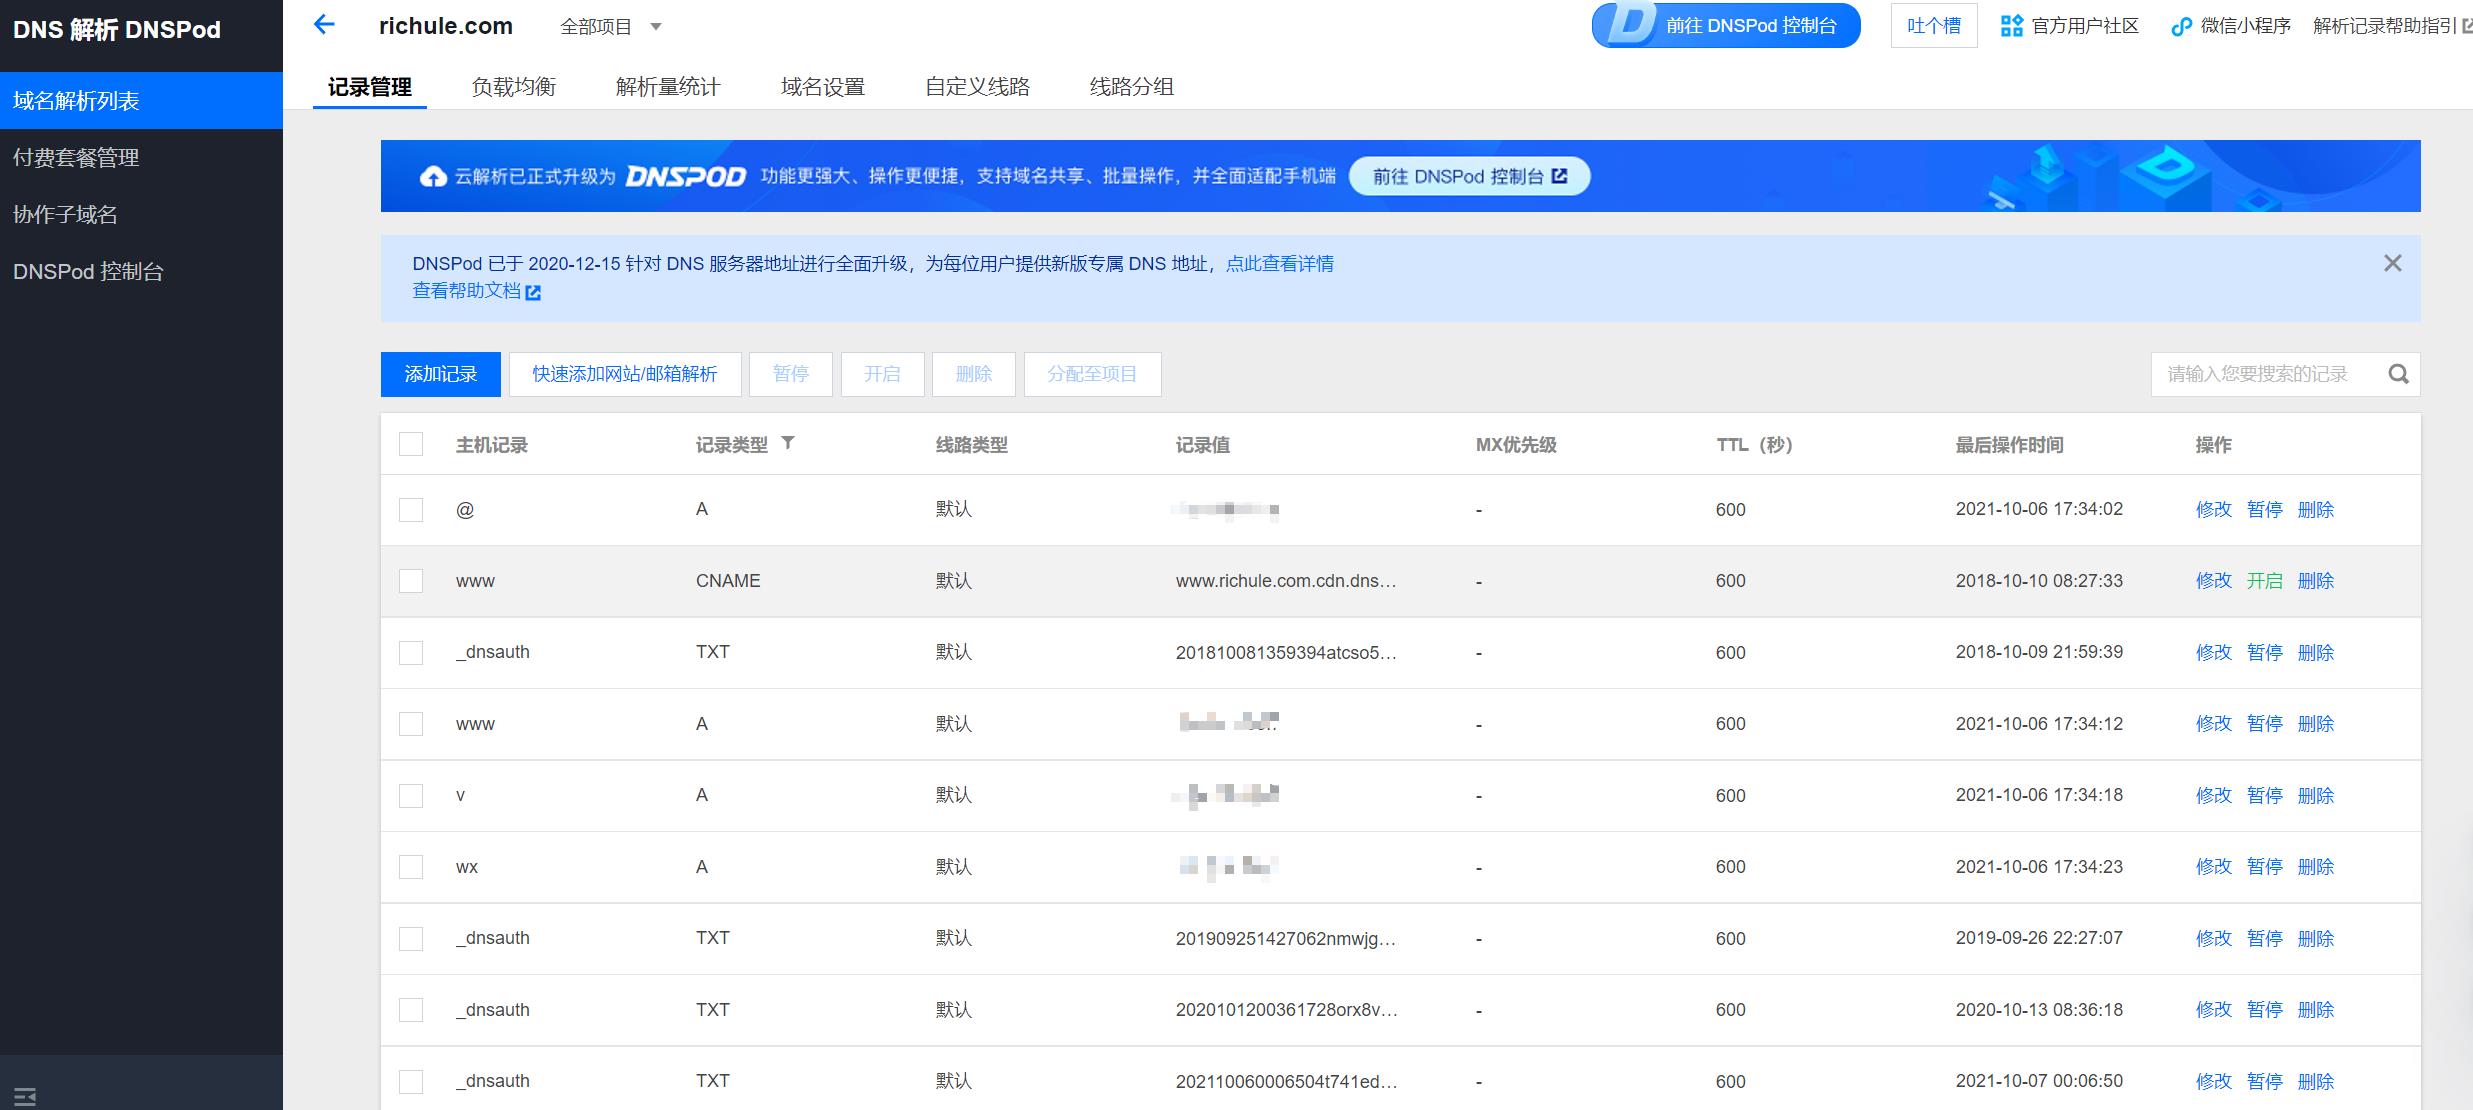
修改域名指向
到这里,已经可以使用域名访问新的服务器的博客,如果有域名,记得到域名解析处,修改指向,修改保存后,过几分钟即可通过域名访问到新的服务器。
个人博客:Loak 正 - 关注人工智能及互联网的个人博客
文章地址:记录基于腾讯云服务器的Typecho博客迁移 - L0zh
以上是关于记录基于腾讯云服务器的Typecho博客迁移的主要内容,如果未能解决你的问题,请参考以下文章