B站视频教程笔记基于VSCode和CMake实现C/C++开发 | Linux篇(gcc/g++)(安装配置使用详细教程)(VSCode教程)(CMake教程)(精!)
Posted Dontla
tags:
篇首语:本文由小常识网(cha138.com)小编为大家整理,主要介绍了B站视频教程笔记基于VSCode和CMake实现C/C++开发 | Linux篇(gcc/g++)(安装配置使用详细教程)(VSCode教程)(CMake教程)(精!)相关的知识,希望对你有一定的参考价值。
基于VSCode和CMake实现C/C++开发 | Linux篇
文章目录
- 目录结构
- 文件编辑
- 安装GCC和GDB
- 实战:g++命令行编译
- GDB调试器(GNU Debugger)
- VSCode在linux16.04下的安装及使用(以及插件,比如CMake)
- CMake的使用
- 语法特性
- CMake重要指令
- cmake_minimum_required(指定CMake最小版本)
- project(定义工程名称)
- set(定义变量)
- include_directories(头文件搜索路径)
- link_directories(库搜索路径)
- add_library(生成库文件)
- add_compile_options(添加编译参数)
- add_executable(生成可执行文件)
- target_link_libraries(为target添加需要链接的库文件)
- add_subdirectory(添加存放源文件子目录)(子目录中必须有CMakeLists.txt文件)
- aux_source_directory(临时构建源文件列表)(跟add_executable搭配使用?)
- CMake常用变量
- CMake编译工程
- 【CMake代码实践】(士兵与枪)
- CMake调试
- 总结
- 附录:cmake 常用变量和常用环境变量查表手册---整理 .
目录结构
Bin:全称binary,含义是二进制。该目录中存储的都是一些二进制文件,文件都是可以被运行的。
Dev:该目录中主要存放的是外接设备,例如盘、其他的光盘等。在其中的外接设备是不能直接被使用的,需要挂载(类似window下的分配盘符)。
Etc:该目录主要存储一些配置文件。
Home:表示“家”,表示除了root用户以外其他用户的家目录,类似于windows下的User/用户目录。
Proc:全称process,表示进程,该目录中存储的是Linux运行时候的进程。
Root:该目录是root用户自己的家目录。
Sbin:全称super binary,该目录也是存储一些可以被执行的二进制文件,但是必须得有super权限的用户才能执行。
Tmp:表示“临时”的,当系统运行时候产生的临时文件会在这个目录存着。
Usr:存放的是用户自己安装的软件。类似于windows下的program files。(应该说错啦!!这是unix系统资源目录)
Var:存放的程序/系统的日志文件的目录。
Mnt:当外接设备需要挂载的时候,就需要挂载到mnt目录下。
d表示文件夹,- 表示文件
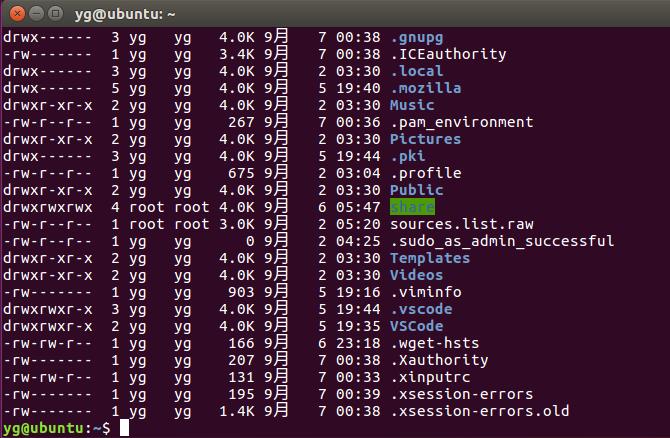
树工具
sudo apt install tree
文件编辑
vim(编辑器之神,linux里可以畅通无阻,必学,但不是现在!)
还介绍了gedit、nano编辑器,,鸡肋
安装GCC和GDB
每次安装新的程序之前都要运行下这个:
sudo apt-get update
安装gdb
sudo apt install build-essential gdb
查看版本
gcc --version
g++ --version
gdb --version
安装CMake
– sudo apt-get update –
sudo apt-get install cmake
查看cmake版本
cmake --version
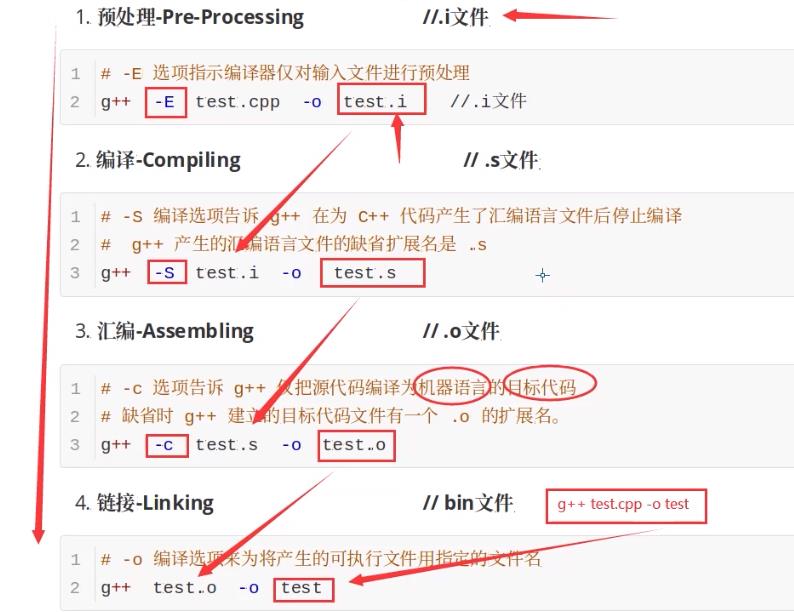
g++编译过程
动手操作
安装vim
新建testcpp文件夹
新建test.cpp文件
vim里设置制表符空格为4个(默认为8个)
:set ts=4
键入如下代码:
#include <iostream>
using namespace std;

int main()
{
        cout << "This is easy!" << endl;
        return 0;
}
g++编译
g++ test.cpp -o test
生成了可执行文件并运行,结果:
yg@ubuntu:~/arnold_test/testcpp$ ls
test  test.cpp
yg@ubuntu:~/arnold_test/testcpp$ ./test
This is easy!
yg@ubuntu:~/arnold_test/testcpp$
根据上面预处理、编译、汇编、链接那几个步骤,生成四个文件:
yg@ubuntu:~/arnold_test/testcpp$ ls
test  test.cpp  test.i  test.o  test.s
yg@ubuntu:~/arnold_test/testcpp$
g++编译参数
编译带调试信息的可执行文件 -g

优化源代码 -O[n]

案例:优化等级
vim创建test_opt.cpp
#include <iostream>
using namespace std;

int main(){
        unsigned long int counter;
        unsigned long int result;
        unsigned long int temp;
        unsigned int five;
        int i;

        for (counter = 0; counter < 2009*2009*100/4 + 2010; counter +=(10 - 6)/4)
        {
                temp = counter/1979;
                for(i = 0; i < 20; i++)
                //每一次for循环都会进行复杂的计算
                        five = 200 * 200 / 8000;
                        result = counter;
        }

        cout << "result = " << result << endl;

        return 0;
}
生成不同等级的优化代码:
g++ test_opt.cpp -o test_opt_o
g++ test_opt.cpp -O2 -o test_opt_o2
g++ test_opt.cpp -O3 -o test_opt_o3
…
用time命令测试生成的每个可执行文件的的运行时间
yg@ubuntu:~/arnold_test/test_g++_optimize$ time ./test_opt_o
result = 100904034

real	0m1.390s
user	0m1.384s
sys	0m0.000s
yg@ubuntu:~/arnold_test/test_g++_optimize$ time ./test_opt_o2
result = 100904034

real	0m0.001s
user	0m0.000s
sys	0m0.000s
yg@ubuntu:~/arnold_test/test_g++_optimize$ time ./test_opt_o3
result = 100904034

real	0m0.001s
user	0m0.000s
sys	0m0.000s
-l (小写L)指定库文件和 -L 指定库文件路径
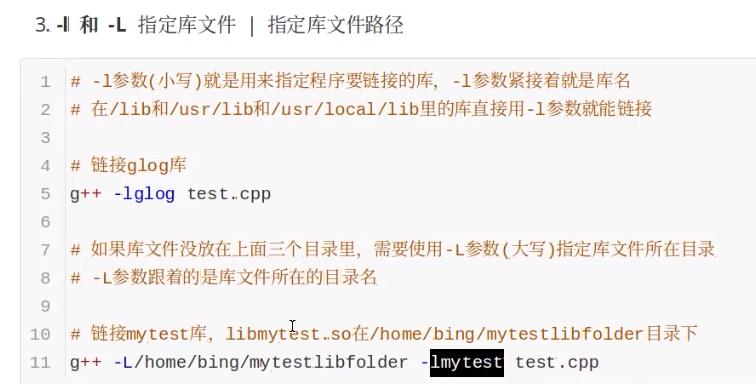
-I (大写i)指定头文件搜索目录

打印警告信息 -Wall 和关闭警告信息 -w
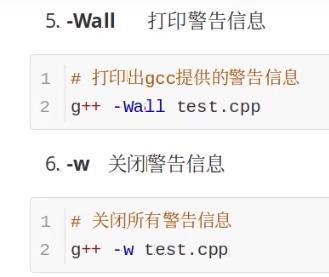
设置编译标准 -std=c++xx

指定输出文件名 -o

-D定义宏(选择开启宏或关闭宏)

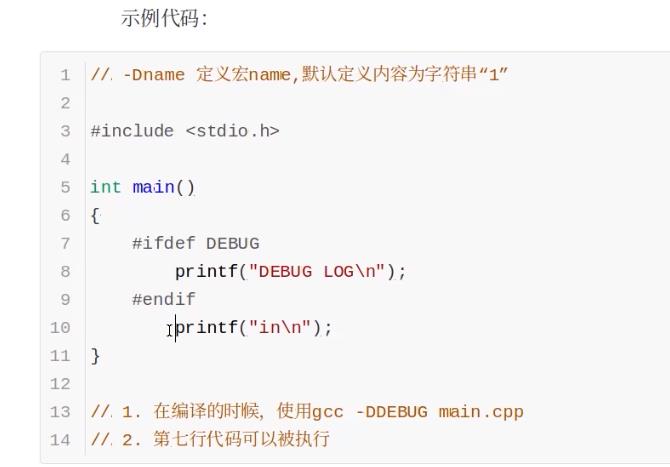
使用 man gcc 或 man g++ 查看手册
man gcc
实战:g++命令行编译
编译生成可执行文件
建立如下目录:
yg@ubuntu:~/arnold_test/GCC_demo_swap$ tree
.
├── include
│   └── swap.h
├── main.cpp
└── src
    └── swap.cpp
- main.cpp
#include <iostream>
#include "swap.h"

using namespace std;

int main()
{
	int a = 1;
	int b = 2;
	cout << "交换前:a = " << a << ", " << "b = " << b << endl;
	swap(a, b);
	cout << "交换后:a = " << a << ", " << "b = " << b << endl;
	cout << "success!" << endl;
	return 0;
}
- swap.cpp(里面不用包含swap.h也行吧?作者写多了?没写多,就是要这样写,详情见我另一篇博文)
#include "swap.h"

void swap(int &a, int &b)
{
	int temp;
	temp = a;
	a = b;
	b =temp;
}
- swap.h
#pragma once
extern void swap(int &a, int &b);
执行编译:(由于swap.h与main.cpp不在同一目录,要用-I参数指定其路径)
g++ main.cpp ./src/swap.cpp -Iinclude
结果:
yg@ubuntu:~/arnold_test/GCC_demo_swap$ ls
a.out  include  main.cpp  src
yg@ubuntu:~/arnold_test/GCC_demo_swap$ ./a.out
交换前:a = 1, b = 2
交换后:a = 2, b = 1
success!
yg@ubuntu:~/arnold_test/GCC_demo_swap$
当然编译也能增加其他一些需要的参数:
g++ -O2 main.cpp ./src/swap.cpp -Iinclude -Wall -o main
结果:
yg@ubuntu:~/arnold_test/GCC_demo_swap$ g++ -O2 main.cpp ./src/swap.cpp -Iinclude -Wall -o main
yg@ubuntu:~/arnold_test/GCC_demo_swap$ ls
a.out  include  main  main.cpp  src
yg@ubuntu:~/arnold_test/GCC_demo_swap$ ./main
交换前:a = 1, b = 2
交换后:a = 2, b = 1
success!
编译生成静态库(扩展名.a),并链接生成可执行文件
用的还是之前的代码
yg@ubuntu:~/arnold_test/GCC_demo_swap$ tree
.
├── include
│?? └── swap.h
├── main.cpp
└── src
    └── swap.cpp
ar归档?
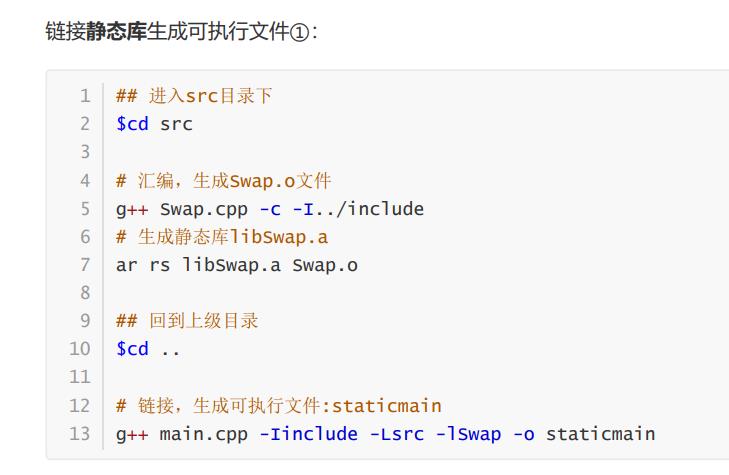
我没在swap.cpp加include "swap.h"这句代码,编译时也没加-I../include,也能成功生成
yg@ubuntu:~/arnold_test/GCC_demo_swap$ tree
.
├── include
│?? └── swap.h
├── main.cpp
├── src
│?? ├── libswap.a
│?? ├── swap.cpp
│?? └── swap.o
└── staticmain
staticmain能直接运行
编译生成动态库(扩展名.so),并链接生成可执行文件
删除上面生成的swap.o和libswap.a
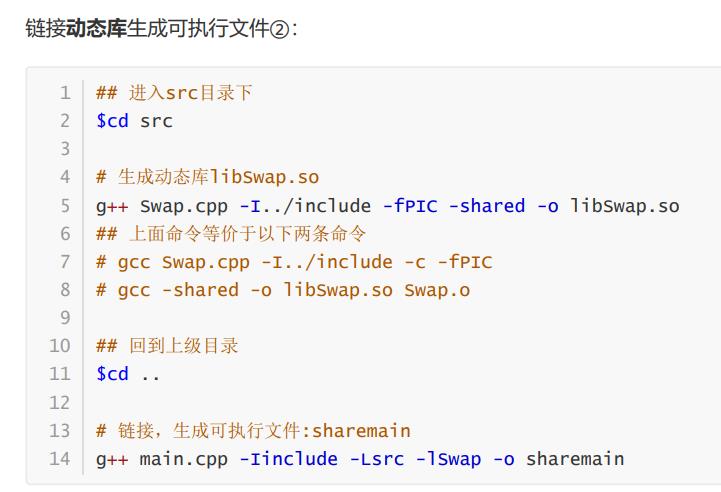
yg@ubuntu:~/arnold_test/GCC_demo_swap$ tree
.
├── include
│   └── swap.h
├── main.cpp
├── sharemain
├── src
│   ├── libswap.so
│   ├── swap.cpp
│   └── swap.o
└── staticmain
sharemain不能直接运行,要在运行时加载(调用)动态库libswap.so才行
你可以设置它运行时去找动态库的目录,
# 运行可执行文件(等号左右不能有空格!!!!)
LD_LIBRARY_PATH=src ./sharemain
当然你也可以直接把libswap.so拷贝到sharemain的目录下(不行哎!linux下同目录也搜索不到!)
GDB调试器(GNU Debugger)


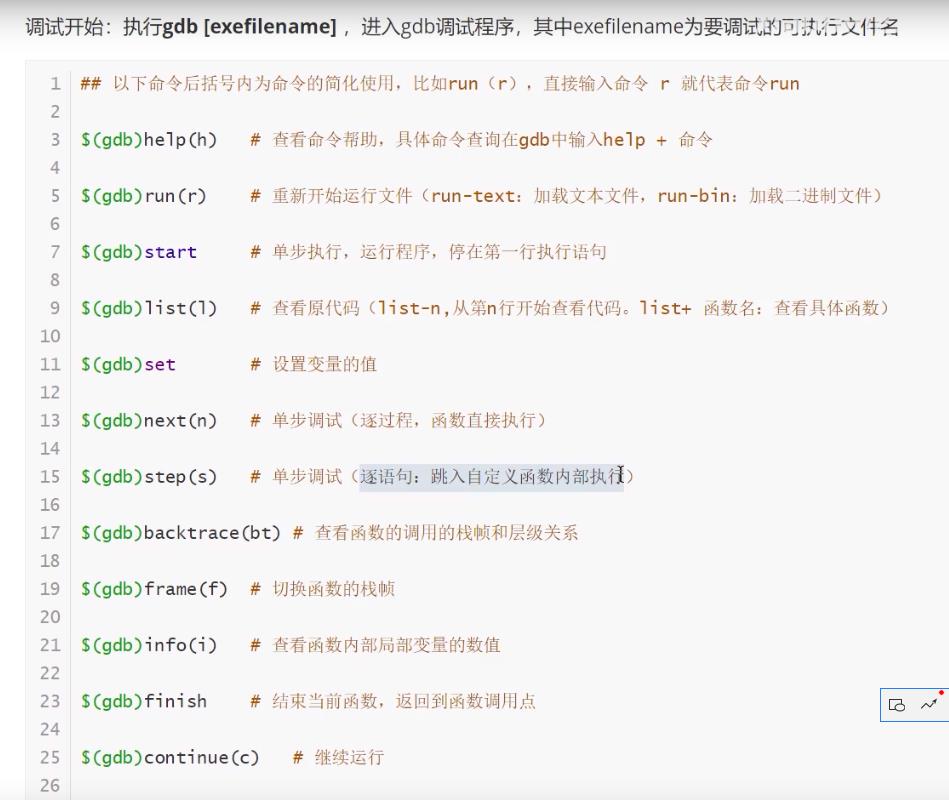

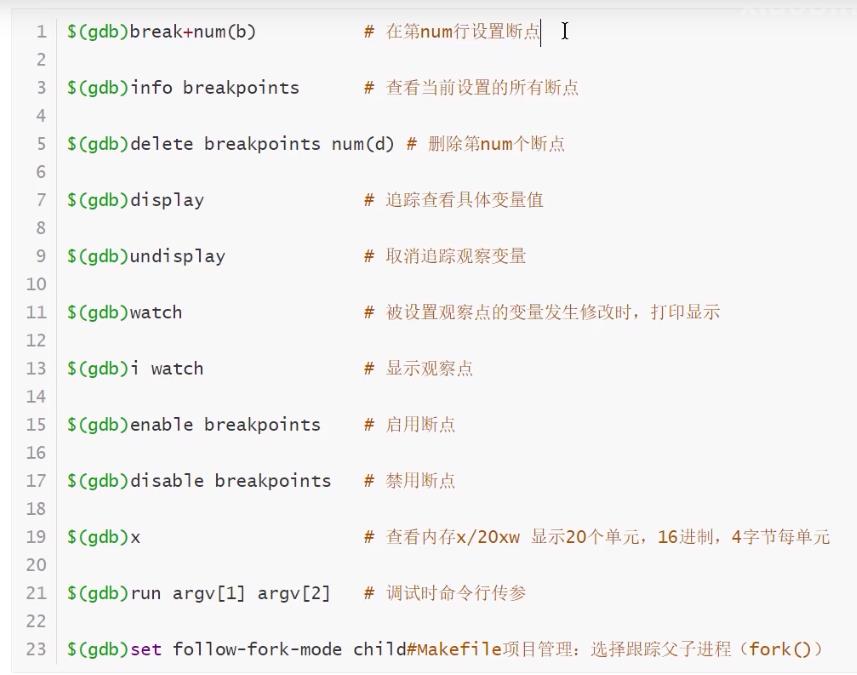

【实战】命令行调试
调试代码:sum.cpp
#include <iostream>
using namespace std;

int main(int argc, char **argv)
{
        int N = 100;
        int sum = 0;
        int i = 1;
// calculate sum from 1 to 100
        while(i <= N)
        {
                sum = sum + i;
                i = i + 1;
        }

        cout << "sum = " << sum << endl;
        cout << "The program is over." << endl;

        return 0;
}
编译生成两个文件,一个带调试功能,一个不带调试功能
g++ sum.cpp -o sum_no_gdb
g++ -g sum.cpp -o sum_yes_gdb
yg@ubuntu:~/arnold_test/gdb_test$ ls -lh
总用量 36K
-rw-rw-r-- 1 yg yg  289 Sep  8 02:32 sum.cpp
-rwxrwxr-x 1 yg yg 9.1K Sep  8 04:39 sum_no_gdb
-rwxrwxr-x 1 yg yg  20K Sep  8 04:39 sum_yes_gdb
yg@ubuntu:~/arnold_test/gdb_test$
可以看到,sum_yes_gdb要大一些
执行:
gdb sum_yes_gdb
开始调试
gdb sum_yes_gdb
进入调试器:ctrl + x,a
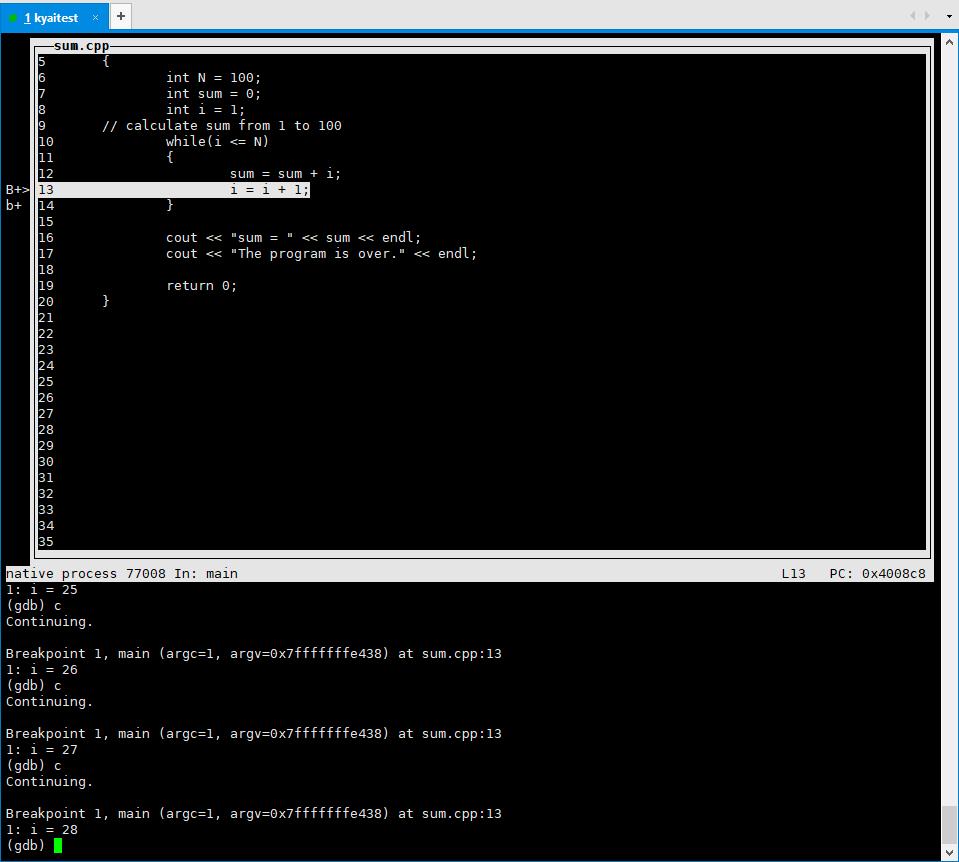
相应快捷指令
打断点:b + 行数
查看断点信息:i
运行程序:r
下一句代码(不进入代码):n
下一句代码(进入代码):s
打印变量:p + 变量名
跳到下一个断点:c
监视变量值:display + 变量名
执行上次执行的命令:回车键(Enter)
显示断点附近代码(调试器模式时无效):list
退出调试:q
VSCode在linux16.04下的安装及使用(以及插件,比如CMake)
安装
Linux下VSCode的安装和使用(VScode C/C++配置 CMake的使用)(GCC、GDB)(各类插件 Snippets、Code Runner、Include Autocomplete)
使用,自己看视频吧
https://www.bilibili.com/video/BV1fy4y1b7TC?p=12
插件安装
C/C++插件
CMake
CMake Tools
安装(可选):C/C++ Snippets、Code Runner、Include Autocomplete
作者安装插件参考:

高频使用快捷键或操作
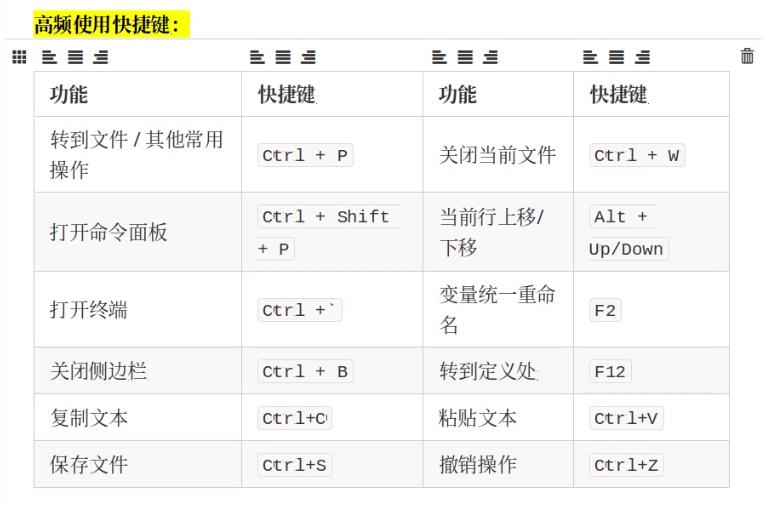
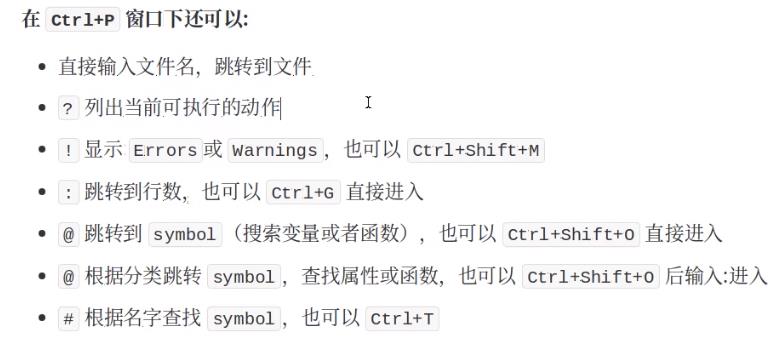

CMake的使用
用CMake,比你写makefile方便的多
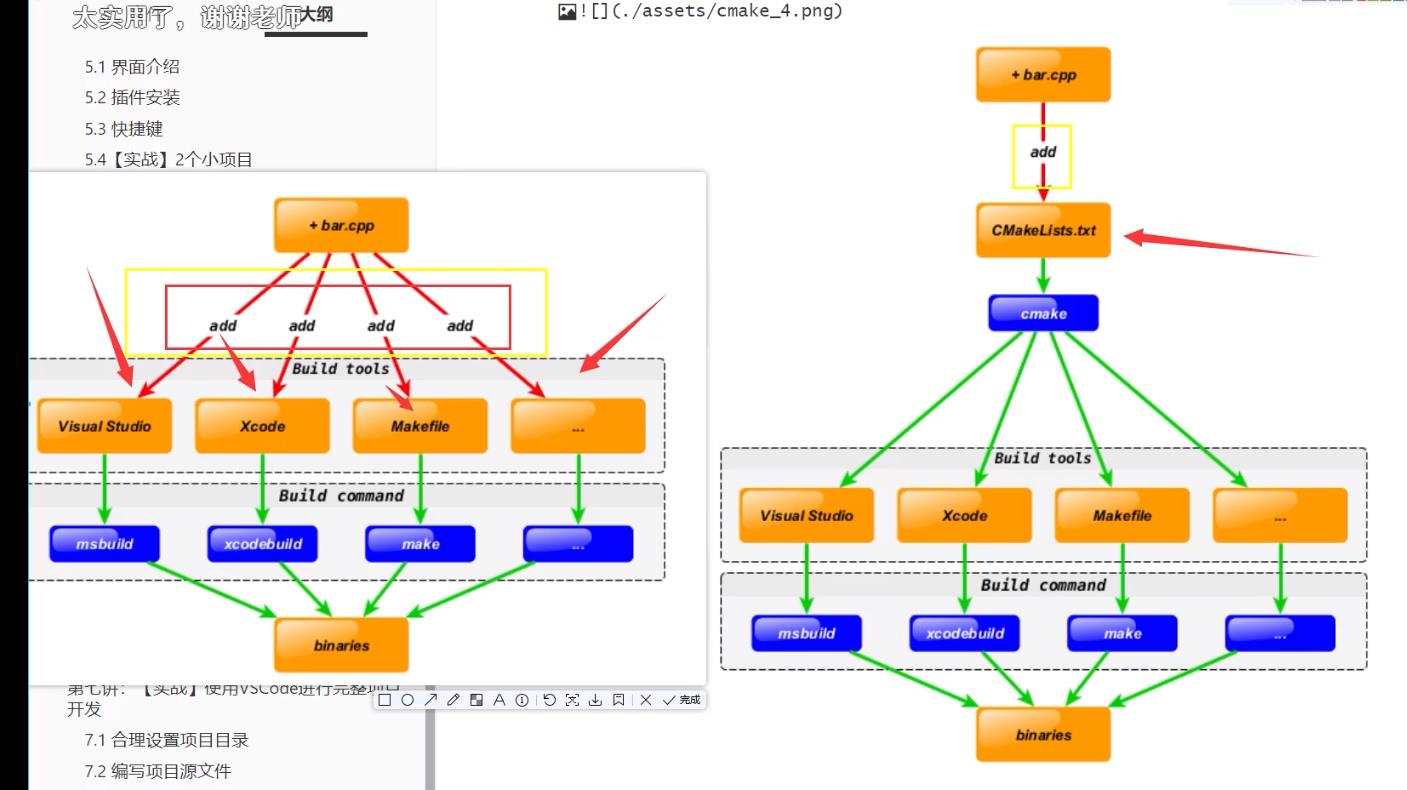
比如增加了一个bar.cpp文件,我们只需要修改CMakeLists.txt文件就可以了
语法特性
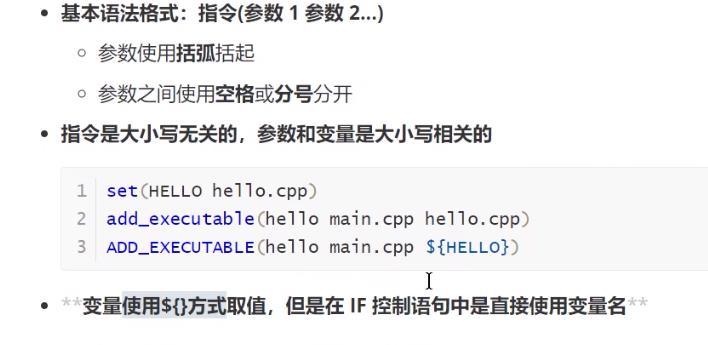
CMake重要指令
cmake_minimum_required(指定CMake最小版本)

project(定义工程名称)

set(定义变量)

include_directories(头文件搜索路径)

link_directories(库搜索路径)

add_library(生成库文件)

add_compile_options(添加编译参数)

add_executable(生成可执行文件)

target_link_libraries(为target添加需要链接的库文件)

add_subdirectory(添加存放源文件子目录)(子目录中必须有CMakeLists.txt文件)

aux_source_directory(临时构建源文件列表)(跟add_executable搭配使用?)

CMake常用变量
CMAKE_C_FLAGS gcc编译选项
CMAKE_CXX_FLAGS g++编译选项
(只会在原先的编译状态下追加或修改)

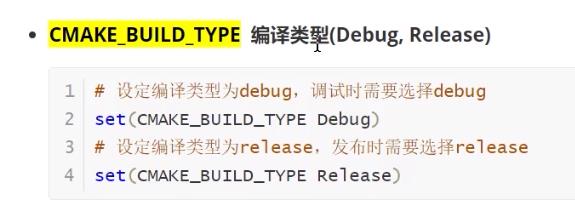
CMAKE_BUILD_TYPE 编译类型(Debug,Release)
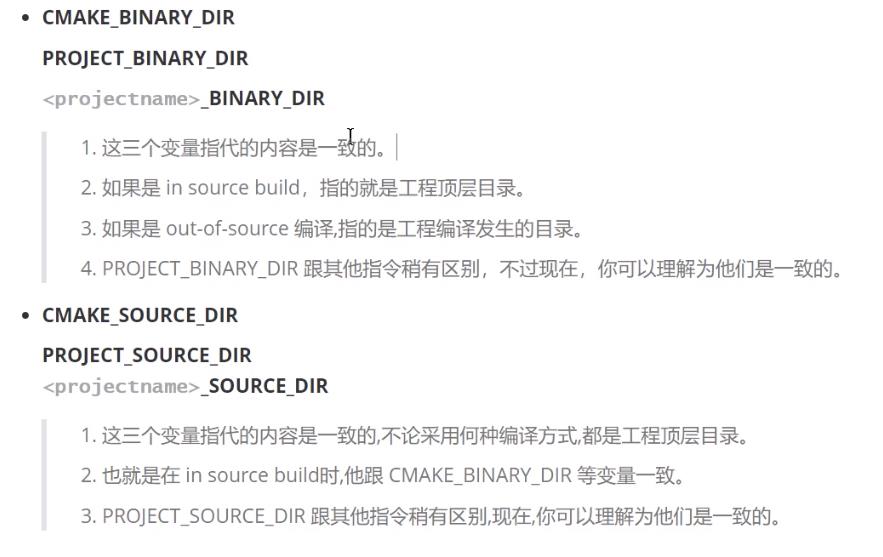
CMAKE_BINARY_DIR、PROJECT_BINARY_DIR、<projectname>_BINARY_DIR
CMAKE_SOURCE_DIR、PROJECT_SOURCE_DIR、<projectname>_SOURCE_DIR
呀,老总不让看这个,让先看rtsp了,那就先看rtsp吧
基于VSCode和CMake实现C/C++开发 | Linux篇
20210923,继续!
CMAKE_C_COMPILER(指定C编译器)
CMAKE_CXX_COMPILER(指定C++编译器)
EXECUTABLE_OUTPUT_PATH(可执行文件输出的存放路径)
LIBRARY_OUTPUT_PATH(库文件输出的存放路径)

CMake编译工程
CMake目录结构:项目主目录存在一个CMakeLists.txt文件
两种方式设置编译规则:
- 包含源文件的子文件夹包含CMakeLists.txt文件,主目录的CMakeLists.txt通过add_subdirectory
添加子目录即可; - 包含源文件的子文件夹未包含CMakeLists.txt文件,子目录编译规则体现在主目录的
CMakeLists.txt中;
编译流程
(CMake可以帮助我们生成makefile)
在 linux 平台下使用 CMake 构建C/C++工程的流程如下:
- 手动编写 CMakeLists.txt。
- 执行命令 cmake PATH 生成 Makefile ( PATH 是顶层CMakeLists.txt 所在的目录 )。
- 执行命令 make 进行编译。
# important tips
. # 表示当前目录
./ # 表示当前目录
.. # 表示上级目录
../ # 表示上级目录
两种构建方式
内部构建(in-source build):不推荐使用
内部构建会在同级目录下产生一大堆中间文件,这些中间文件并不是我们最终所需要的,和工程源
文件放在一起会显得杂乱无章。
## 内部构建
# 在当前目录下,编译本目录的CMakeLists.txt,生成Makefile和其他文件
cmake .
# 执行make命令,生成target
make
外部构建(out-of-source build):推荐使用
将编译输出文件与源文件放到不同目录中
## 外部构建
# 1. 在当前目录下,创建build文件夹
mkdir build
# 2. 进入到build文件夹
cd build
# 3. 编译上级目录的CMakeLists.txt,生成Makefile和其他文件
cmake ..
# 4. 执行make命令,生成target
make
【实战】外部构建示例
yg@ubuntu:~/arnold_test/20210922_swap_test$ tree
.
├── build
├── CMakeLists.txt
├── include
│   └── swap.h
├── main.cpp
└── src
    └── swap.cpp

3 directories, 4 files
main.cpp
#include <iostream>
#include "swap.h"

using namespace std;

int main()
{
	int a = 1;
	int b = 2;
	cout << "交换前:a = " << a << ", " << "b = " << b << endl;
	swap(a, b);
	cout << "交换后:a = " << a << ", " << "b = " << b << endl;
	cout << "success!" << endl;
	return 0;
}
swap.cpp
#include "swap.h"

void swap(int &a, int &b)
{
	int temp;
	temp = a;
	a = b;
	b =temp;
}
swap.h
#pragma once
extern void swap(int &a, int &b);
CMakeLists.txt
cmake_minimum_required(VERSION 3.5.1)

project(SWAP)

include_directories(include)

# 不能写在add_executable后面,宏定义要写前面
aux_source_directory(src SRC)

add_executable(main_cmake main.cpp ${SRC})
运行cmake指令生成makefile文件,并执行make指令:
yg@ubuntu:~/arnold_test/20210922_swap_test$ cd build
yg@ubuntu:~/arnold_test/20210922_swap_test/build$ cmake ..
-- The C compiler identification is GNU 5.4.0
-- The CXX compiler identification is GNU 5.4.0
-- Check for working C compiler: /usr/bin/cc
-- Check for working C compiler: /usr/bin/cc -- works
-- Detecting C compiler ABI info
-- Detecting C compiler ABI info - done
-- Detecting C compile features
-- Detecting C compile features - done
-- Check for working CXX compiler: /usr/bin/c++
-- Check for working CXX compiler: /usr/bin/c++ -- works
-- Detecting CXX compiler ABI info
-- Detecting CXX compiler ABI info - done
-- Detecting CXX compile features
-- Detecting CXX compile features - done
-- Configuring done
-- Generating done
-- Build files have been written to: /home/yg/arnold_test/20210922_swap_test/build
yg@ubuntu:~/arnold_test/20210922_swap_test/build$ make
Scanning dependencies of target main_cmake
[ 33%] Building CXX object CMakeFiles/main_cmake.dir/main.cpp.o
[ 66%] Building CXX object CMakeFiles/main_cmake.dir/src/swap.cpp.o
[100%] Linking CXX executable main_cmake
[100%] Built target main_cmake
yg@ubuntu:~/arnold_test/20210922_swap_test/build$ ls
CMakeCache.txt  CMakeFiles  cmake_install.cmake  main_cmake  Makefile
yg@ubuntu:~/arnold_test/20210922_swap_test/build$ ./main_cmake
交换前:a = 1, b = 2
交换后:a = 2, b = 1
success!
yg@ubuntu:~/arnold_test/20210922_swap_test/build$
【CMake代码实践】(士兵与枪)
一个士兵对象,一个枪对象,士兵对象里有枪属性,并且有装填子弹和发射子弹方法,枪对象里也有装填子弹和发射子弹方法
yg@ubuntu:~/arnold_test/20210923_vscode_soldier_gun$ tree
.
├── build
├── CMakeLists.txt
├── include
│   ├── Gun.h
│   └── Soldier.h
├── main.cpp
└── src
    ├── Gun.cpp
    └── Soldier.cpp

3 directories, 6 files
main.cpp
#include "Gun.h"
#include "Soldier.h"

using namespace std;

void test()
{
    Soldier sanduo("xusanduo");
    sanduo.addGun(new Gun("AK47"));
    sanduo.addBulletToGun(20);
    sanduo.fire();
}

int main()
{
    test();
    return 0;
}
Soldier.cpp
#include "Soldier.h"
using namespace std;
Soldier::Soldier(string name)
{
this->_name = name;
this->_ptr_gun = nullptr;
}
void Soldier::addGun(Gun *ptr_gun){
this->_ptr_gun = ptr_gun;
}
void Soldier::addBulletToGun(int num)
{
this->_ptr_gun->addBullet(num);
}
bool Soldier::fire()
{
return(this->_ptr_gun->shoot());
}
Soldier::~Soldier()
{
if (this->_ptr_gun==nullptr)
{
return;
}
delete this->_ptr_gunC++学习笔记IDE配置的学习笔记