Blazor WebAssembly身份认证与授权
Posted JimCarter
tags:
篇首语:本文由小常识网(cha138.com)小编为大家整理,主要介绍了Blazor WebAssembly身份认证与授权相关的知识,希望对你有一定的参考价值。
文章目录
1.简介
Blazor Server基于SignalR,建立连接之后可以通过cookie进行验证,配合Asp.Net Core Identity使用。
Blazor WebAssembly 应用的保护方式与单页应用 (SPA) 相同。 可通过多种方式向 SPA 进行用户身份验证,但最常用、最全面的方式是使用基于 OAuth 2.0 协议的实现,例如 OpenID Connect (OIDC)。
如果需要使用OIDC对应用进行身份验证和授权,需要安装在wasm里安装Nuget包Microsoft.AspNetCore.Components.WebAssembly.Authentication。
(安装的前提是你的blazor项目需要用aps.net core 作为host。这个包用于处理基础身份验证协议,建立在oidc-client.js库基础之上。)
当然除了使用OIDC进行验证和授权之外,还可以使用SameSite cookie等。但是blazor wasm的设计上就决定了使用OAuth和OIDC是进行身份验证过的最佳选择。出于以下几个原因,我们这里使用JWT(Json Web Token)进行身份验证而不是使用cookie:
- 可以减小攻击面,因为并非所有请求中都会发送令牌
- 服务器终结点不要求针对跨站点请求伪造 (CSRF) 进行保护,因为会显式发送令牌。所以可将 Blazor WebAssembly 应用与 MVC 或 Razor Pages 应用一起托管
- 令牌的权限比 cookie 窄。例如,令牌不能用于管理用户帐户或更改用户密码
- 令牌的生命周期更短(默认为一小时),这限制了攻击时间窗口。还可随时撤销令牌。
JWT分为三部分{header}.{payload}.{signature}, 解码之后各部分格式和含义如下:
{
  "typ": "JWT",
  "alg": "RS256",
  "kid": "X5eXk4xyojNFum1kl2Ytv8dlNP4-c57dO6QGTVBwaNk"
}.{
  "exp": 1610059429,
  "nbf": 1610055829,
  "ver": "1.0",
  "iss": "https://mysiteb2c.b2clogin.com/5cc15ea8-a296-4aa3-97e4-226dcc9ad298/v2.0/",
  "sub": "5ee963fb-24d6-4d72-a1b6-889c6e2c7438",
  "aud": "70bde375-fce3-4b82-984a-b247d823a03f",
  "nonce": "b2641f54-8dc4-42ca-97ea-7f12ff4af871",
  "iat": 1610055829,
  "auth_time": 1610055822,
  "idp": "idp.com",
  "tfp": "B2C_1_signupsignin",
  //还可以 自定义字段
}.[Signature]
| 字段 | 说明 |
|---|---|
| typ | token的类型:jwt |
| alg | 所使用的加密算法 |
| kid | 秘钥序,开发人员可以用它标识认证token的某一秘钥 |
| exp | 过期时间 |
| nbf | 在这个时间点之前,jwt都是不可用的 |
| ver | 版本 |
| iss | jwt的签发者 |
| sub | jwt所面向的用户 |
| aud | 接收jwt的一方 |
| nonce | |
| iat | jwt签发时间 |
| auth_time | |
| idp | |
| tfp | |
| jti | jwt的唯一身份标识,主要用来作为一次性token,回避重放攻击 |
2. 使用OIDC进行身份验证的流程
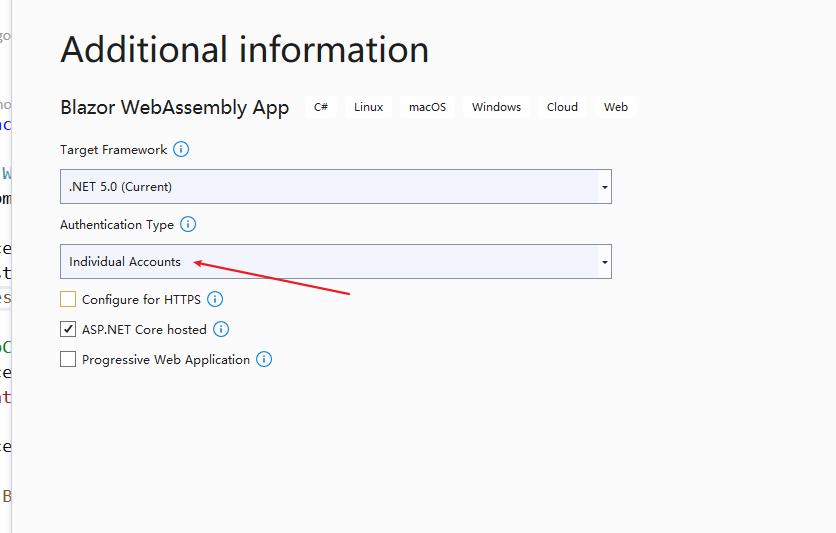
请先新建一个带有认证功能的Blazor WebAssembly项目便于接下来的理解,该模板的host项目已经添加了IdentityServer服务

验证流程:
- 当未登陆的用户点击了登陆按钮或者请求到应用了
[Authorize]特性的页面上时,就会将该用户重定向到/authentication/login。 - 在登陆页上,身份验证库
Microsoft.AspNetCore.Components.WebAssembly.Authentication将会把请求重定向到授权服务上(接下来的文章中会介绍如何使用IdentityServer搭建授权服务)。该授权服务负责确定用户是否通过身份验证,并发送token作为响应。- 如果用户未通过身份验证,则会提示让用户进行登录。此处可以配合
ASP.NET Core Identity使用 - 如果用户已通过身份验证,则授权服务生成相应的token,并将浏览器重定向到
/authentication/login-callback。
- 如果用户未通过身份验证,则会提示让用户进行登录。此处可以配合
- 当Blazor应用加载
/authentication/login-callback时,就处理了身份验证相应。- 如果身份验证成功,则可以选择将用户重定向到原始访问的url上。
- 如果因为任何原因验证失败,则会将用户重定向到
authentication/login-failed,并显示错误。
总结:整个工作流程涉及到三个url,这三个其实都在
Shared/Authentication.razor里。:
/authentication/login页/authentication/login-callback/authentication/login-failed
该nuget包用下表中显示的路由表示不同的身份验证状态。
| 路由 | 目标 |
|---|---|
authentication/login | 触发登录操作。 |
authentication/login-callback | 处理任何登录操作的结果。 |
authentication/login-failed | 当登录操作由于某种原因失败时显示错误消息。 |
authentication/logout | 触发注销操作。 |
authentication/logout-callback | 处理注销操作的结果。 |
authentication/logout-failed | 当注销操作由于某种原因失败时显示错误消息。 |
authentication/logged-out | 指示用户已成功注销。 |
authentication/profile | 触发操作以编辑用户配置文件。 |
authentication/register | 触发操作以注册新用户。 |
3. 授权
对用户验证通过之后,就需要验证授权规则来控制用户可以具体执行哪些操作。常见的授权规则有以下几种:
- 只要用户通过验证就授权
- 基于角色的授权
- 基于用户claim的授权
- 基于策略的授权
4. 验证库的使用
4.1 配置依赖注入
使用Microsoft.AspNetCore.Components.WebAssembly.Authentication包提供的 AddOidcAuthentication方法在服务容器中注册用户身份验证支持。这里以Google的OIDC服务为例进行配置:
builder.Services.AddOidcAuthentication(options =>
{
    //从appsettings.json里读取Local配置项并进行设置
    builder.Configuration.Bind("Local", options.ProviderOptions);
});
appsettings.json Local配置项:
{
  "Local": {
    "Authority": "https://accounts.google.com/",
    "ClientId": "2.......7-e.....................q.apps.googleusercontent.com",
    "PostLogoutRedirectUri": "https://localhost:5001/authentication/logout-callback",
    "RedirectUri": "https://localhost:5001/authentication/login-callback",
    "ResponseType": "id_token"
  }
}
4.2 添加命令空间和js
-
在
_Imports.razor里添加@using Microsoft.AspNetCore.Components.Authorization。 -
在
wwwroot/index.html里添加<script src="_content/Microsoft.AspNetCore.Components.WebAssembly.Authentication/ AuthenticationService.js"></script>。这个js用来处理OIDC的细节,应用内部会调用这个服务。
4.3 添加组件
4.3.1 配置
CascadingAuthenticationState组件:用来提供经过验证的用户的信息。AuthorizaRouteView组件:用来确保用户是否可以访问给定的页面,如果未被授权则渲染RedirectToLogin组件。RedirectToLogin组件:用来将用户重定向到登录页。
整体代码如下:
<CascadingAuthenticationState>
    <Router AppAssembly="@typeof(Program).Assembly">
        <Found Context="routeData">
            <AuthorizeRouteView RouteData="@routeData"
                DefaultLayout="@typeof(MainLayout)">
                <NotAuthorized>
                    @if (!context.User.Identity.IsAuthenticated)
                    {
                        <RedirectToLogin />
                    }
                    else
                    {
                        <p>
                            You are not authorized to access
                            this resource.
                        </p>
                    }
                </NotAuthorized>
            </AuthorizeRouteView>
        </Found>
        <NotFound>
            <LayoutView Layout="@typeof(MainLayout)">
                <p>Sorry, there's nothing at this address.</p>
            </LayoutView>
        </NotFound>
    </Router>
</CascadingAuthenticationState>
4.3.2 RedirectToLogin组件
Shared/RedirectToLogin.razor组件,用来引导用户进行登录,传入验证成功之后的跳转页。
@inject NavigationManager Navigation
@using Microsoft.AspNetCore.Components.WebAssembly.Authentication
@code {
    protected override void OnInitialized()
    {
        Navigation.NavigateTo(
            $"authentication/login?returnUrl={Uri.EscapeDataString(Navigation.Uri)}");
    }
}
4.3.3 LoginDisplay组件
Shared/LoginDisplay.razor组件。对于验证过的用户来说显示用户名等信息,并提供注销功能。对于未验证的用户则提供登录功能。
@using Microsoft.AspNetCore.Components.Authorization
@using Microsoft.AspNetCore.Components.WebAssembly.Authentication
@inject NavigationManager Navigation
@inject SignOutSessionStateManager SignOutManager

<AuthorizeView>
    <Authorized>
        Hello, @context.User.Identity.Name!
        <button class="nav-link btn btn-link" @onclick="BeginSignOut">
            Log out
        </button>
    </Authorized>
    <NotAuthorized>
        <a href="authentication/login">Log in</a>
    </NotAuthorized>
</AuthorizeView>

@code {
    private async Task BeginSignOut(MouseEventArgs args)
    {
        await SignOutManager.SetSignOutState();
        Navigation.NavigateTo("authentication/logout");
    }
}
5.常见组件和服务
5.1 Authentication组件
Pages/Authentication.razor下的RemoteAuthenticatorView(属于nuget包),用来处理不同的验证步骤。
@page "/authentication/{action}"
@using Microsoft.AspNetCore.Components.WebAssembly.Authentication

<RemoteAuthenticatorView Action="@Action" />

@code {
    [Parameter]
    public string Action { get; set; }
}
5.2 AuthorizeView 组件
该组件可以根据用户是否经过授权来显示不同的UI,常用来设置页面内某个部分是否可见。该组件公开了一个AuthenticationState类型的变量context,可以使用该变量获取已登录的用户信息。
<AuthorizeView>
    <Authorized>
        <h1>Hello, @context.User.Identity.Name!</h1>
        <p>You can only see this content if you're authorized.</p>
        <button @onclick="SecureMethod">Authorized Only Button</button>
    </Authorized>
    <NotAuthorized>
        <h1>Authentication Failure!</h1>
        <p>You're not signed in.</p>
    </NotAuthorized>
    <Authorizing>
        <h1>Authentication in progress</h1>
        <p>You can only see this content while authentication is in progress.</p>
    </Authorizing>
</AuthorizeView>

@code {
    private void SecureMethod() { ... }
}
如果未指定授权规则,则表示用户验证通过就表示已授权。
AuthorizeView支持基于角色或基于策略的授权。配置如下:
<AuthorizeView Roles="admin, superuser">
    <p>You can only see this if you're an admin or superuser.</p>
</AuthorizeView>

<AuthorizeView Policy="content-editor">
    <p>You can only see this if you satisfy the "content-editor" policy.</p>
</AuthorizeView>
基于策略的授权包含一个特例,即基于claim的授权。例如,可以定义一个要求用户具有某种claim的策略
5.3 AuthenticationStateProvider 服务
AuthenticationStateProvider是AuthorizeView和CascadingAuthenticationState组件用于获取身份验证状态的基础服务。我们一般不直接使用这个,主要是因为当基础身份验证状态发生改变时不会自动通知UI组件。
可以通过AuthenticationStateProvider服务来获取用户的Claim数据:
@page "/"
@using System.Security.Claims
@using Microsoft.AspNetCore.Components.Authorization
@inject AuthenticationStateProvider AuthenticationStateProvider

<h3>ClaimsPrincipal Data</h3>

<button @onclick="GetClaimsPrincipalData">Get ClaimsPrincipal Data</button>

<p>@_authMessage</p>

@if (_claims.Count() > 0)
{
    <ul>
        @foreach (var claim in _claims)
        {
            <li>@claim.Type: @claim.Value</li>
        }
    </ul>
}

<p>@_surnameMessage</p>

@code {
    private string _authMessage;
    private string _surnameMessage;
    private IEnumerable<Claim> _claims = Enumerable.Empty<Claim>();

    private async Task GetClaimsPrincipalData()
    {
        var authState = await AuthenticationStateProvider.GetAuthenticationStateAsync();
        var user = authState.User;

        if (user.Identity.IsAuthenticated)
        {
            _authMessage = $"{user.Identity.Name} is authenticated.";
            _claims = user.Claims;
            _surnameMessage =
                $"Surname: {user.FindFirst(c => c.Type == ClaimTypes.Surname)?.Value}";
        }
        else
        {
            _authMessage = "The user is NOT authenticated.";
        }
    }
}
刚才我们说了一般不要直接使用AuthenticationStateProvider,但是如果真要在页面中获取验证状态该怎么办?
答案就是定义一个Task<AuthenticationState>类型的级联参数,父级的AuthorizeRouteView或CascadingAuthenticationState组件,会给这个参数赋值。反过来CascadingAuthenticationState会从AuthenticationStateProvider服务接收这个参数 。
@page "/"

<button @onclick="LogUsername">Log username</button>

<p>@_authMessage</p>

@code {
    [CascadingParameter]
    private Task<AuthenticationState> authenticationStateTask { get; set; }

    private string _authMessage;

    private async Task LogUsername()
    {
        var authState = await authenticationStateTask;
        var user = authState.User;

        if (user.Identity.IsAuthenticated)
        {
            _authMessage = $"{user.Identity.Name} is authenticated.";
        }
        else
        {
            _authMessage = "The user is NOT authenticated.";
        }
    }
}
然后在配置依赖注入:
builder.Services.AddOptions();
builder.Services.AddAuthorizationCore();
5.3.1 自定义AuthenticationStateProvider服务
重写GetAuthenticationStateAsync方法即可:
using System.Security.Claims;
using System.Threading.Tasks;
using Microsoft.AspNetCore.Components.Authorization;

public class CustomAuthStateProvider : AuthenticationStateProvider
{
    public override Task<AuthenticationState> GetAuthenticationStateAsync()
    {
        var identity = new ClaimsIdentity(new[]
        {
            new Claim(ClaimTypes.Name, "mrfibuli"),
        }, "Fake authentication type");

        var user = new ClaimsPrincipal(identity);

        return Task.FromResult(new AuthenticationState(user));
    }
}
然后配置依赖注入
builder.Services.AddScoped<AuthenticationStateProvider, CustomAuthStateProvider>();
6. [Authorize]特性
表示用户经过授权之后才可以访问页面,与AuthorizeView区别是一个属于页面级,一个属于UI块。
- 对所有的页面都需要进行授权:在
_Imports.razor文件中使用Authorize特性。
@using Microsoft.AspNetCore.Authorization
@attribute [Authorize]
- 对某个页面进行授权:在页面上添加
@attribute [Authorize]。
基于角色和策略的授权:
@attribute [Authorize(Roles = "admin, superuser")]

@attribute [Authorize(Policy = "content-editor")]
7. 其它说明
- 不可以在Blaozr WASM应用中保存刷新令牌。只能在托管的host里保存。
Access Token的作用域:验证库默认会添加openid和profile这两个scope。如果需要添加其它的scope可以调用:
builder.Services.AddOidcAuthentication(options =>
{
    ...
    options.ProviderOptions.DefaultScopes.Add("ScopeXXXXX");//输入scope
});
下一篇将会介绍如何与IdentityServer集成。
参考:
- https://docs.microsoft.com/zh-cn/aspnet/core/blazor/security/webassembly/?view=aspnetcore-5.0#authentication-component
- https://docs.microsoft.com/zh-cn/aspnet/core/blazor/security/webassembly/standalone-with-authentication-library?view=aspnetcore-5.0&tabs=visual-studio
- https://docs.microsoft.com/zh-cn/aspnet/core/blazor/security/?view=aspnetcore-5.0#authorizeview-component
以上是关于Blazor WebAssembly身份认证与授权的主要内容,如果未能解决你的问题,请参考以下文章
Blazor WebAssembly+Duende.IdentityServer+EF Core认证授权企业级实战
Blazor WebAssembly+Duende.IdentityServer+EF Core认证授权企业级实战
当用户在 Blazor Webassembly 身份验证和授权中具有多个角色时出现问题?