MLOps- 吴恩达Andrew Ng Data Definition and Baseline Week3 实验作业
Posted 架构师易筋
tags:
篇首语:本文由小常识网(cha138.com)小编为大家整理,主要介绍了MLOps- 吴恩达Andrew Ng Data Definition and Baseline Week3 实验作业相关的知识,希望对你有一定的参考价值。
第 3 周 - 实验室:数据标记
欢迎来到生产机器学习工程第 3 周的实验室。在本实验中,您将看到数据标记过程如何影响分类模型的性能。标记数据通常是一项劳动密集型且成本高昂的任务,但它非常重要。
正如您在讲座中看到的,标记数据的方法有很多种,这取决于所使用的策略。回想一下鬣蜥的例子,以下所有标签都是有效的标签替代方案,但它们显然遵循不同的标准。

您可以将每种标签策略视为不同标签者遵循不同标签规则的结果。如果您的数据由使用不同标准的人标记,这将对您的学习算法产生负面影响。希望在整个数据集上具有一致的标签。
本实验将从稍微不同的角度探讨标记策略的影响。您将通过模拟让不同的标记器标记数据的过程来探索不同的策略如何影响机器学习模型的性能。这是通过定义一组规则并根据这些规则执行自动标记来实现的。
这个未分级实验室的主要目标是比较不同标签选项的性能,以了解良好的标签对机器学习模型性能的影响,这些选项是:
- 随机生成的标签(性能下限)
- 基于三种不同标签策略的自动生成标签
- 真实标签(性能上限)
尽管 iguanas蜥蜴 的示例是一项计算机视觉任务,但有关标记的相同概念可以应用于其他类型的数据。在本实验中,您将使用文本数据,具体而言,您将使用包含来自 2015 年最受欢迎的 5 个 YouTube 视频评论的数据集。每条评论都被标记为spam或not_spam取决于其内容。
import os
import numpy as np
import pandas as pd
import matplotlib.pyplot as plt
1. 加载数据集
数据集由 5 个 CSV 文件组成,每个视频一个。PandasDataFrame在处理 CSV 格式的数据方面非常强大。以下辅助函数将使用 Pandas 加载数据:
def load_labeled_spam_dataset():
    """Load labeled spam dataset."""

    # Path where csv files are located
    base_path = "./data/"

    # List of csv files with full path
    csv_files = [os.path.join(base_path, csv) for csv in os.listdir(base_path)]

    # List of dataframes for each file
    dfs = [pd.read_csv(filename) for filename in csv_files]

    # Concatenate dataframes into a single one
    df = pd.concat(dfs)

    # Rename columns
    df = df.rename(columns={"CONTENT": "text", "CLASS": "label"})

    # Set a seed for the order of rows
    df = df.sample(frac=1, random_state=824)

    return df.reset_index()


# Save the dataframe into the df_labeled variable
df_labeled = load_labeled_spam_dataset()
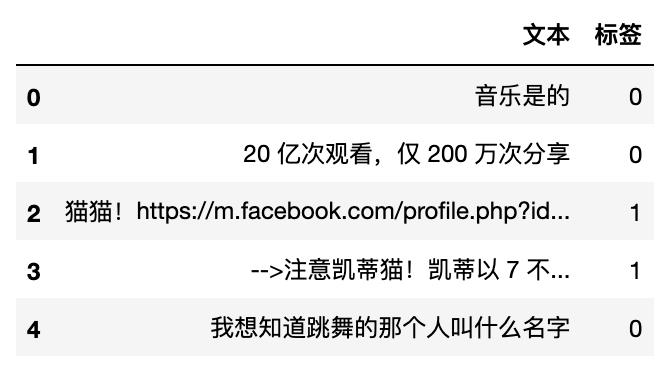
为了了解数据的组织方式,让我们检查数据的前 5 行:
# Take a look at the first 5 rows
df_labeled.head()

2. 进一步检查和预处理
2.1 检查数据不平衡
假设您正在处理的数据是平衡的,这是相当普遍的。这意味着数据集包含所有类的示例比例相似。在继续之前,让我们实际测试一下这个假设:
# Print actual value count
print(f"Value counts for each class:\\n\\n{df_labeled.label.value_counts()}\\n")

# Display pie chart to visually check the proportion
df_labeled.label.value_counts().plot.pie(y='label', title='Proportion of each class')
plt.show()

每个类的数据点数量大致相同,因此对于该特定数据集而言,类不平衡不是问题。
2.2 清理数据集
如果您滚动回检查数据的单元格,您将意识到数据框包含与手头任务无关的信息。目前,你只对评论和相应的标签感兴趣(后面会用到每条评论所属的视频)。让我们删除剩余的列。
# Drop unused columns
df_labeled = df_labeled.drop(['index', 'COMMENT_ID', 'AUTHOR', 'DATE'], axis=1)

# Look at the cleaned dataset
df_labeled.head()

现在数据集只包含您将要使用的信息。
2.3 拆分数据集
在跳转到数据标记部分之前,让我们将数据分为训练集和测试集,以便您可以使用后者来衡量使用通过不同方法标记的数据训练的模型的性能。作为进行此拆分时的安全措施,请记住使用分层,以便在每个拆分中保持类的比例。
from sklearn.model_selection import train_test_split

# Save the text into the X variable
X = df_labeled.drop("label", axis=1)

# Save the true labels into the y variable
y = df_labeled["label"]

# Use 1/5 of the data for testing later
X_train, X_test, y_train, y_test = train_test_split(X, y, test_size=0.2, random_state=42, stratify=y)

# Print number of comments for each set
print(f"There are {X_train.shape[0]} comments for training.")
print(f"There are {X_test.shape[0]} comments for testing")
有 1564 条评论用于培训。
有 392 条评论供测试
让我们做一个视觉检查来检查分层是否确实有效:
plt.subplot(1, 3, 1)
y_train.value_counts().plot.pie(y='label', title='Proportion of each class for train set', figsize=(10, 6))

plt.subplot(1, 3, 3)
y_test.value_counts().plot.pie(y='label', title='Proportion of each class for test set', figsize=(10, 6))

plt.tight_layout()
plt.show()

训练和测试都设置了每类示例的平衡比例。所以,代码成功地实现了分层。
我们走吧!
3. 数据标记
3.1 建立性能上下限供参考
为了正确比较不同的标记策略,您需要建立模型准确性的基线,在这种情况下,您将建立一个下限和上限进行比较。
3.2 计算标签策略的准确率
CountVectorizer是 sklearn 生态系统中包含的一个方便的工具,用于对基于文本的数据进行编码。
有关如何使用 sklearn 处理文本数据的更多信息,请查看此资源。
from sklearn.feature_extraction.text import CountVectorizer

# Allow unigrams and bigrams
vectorizer = CountVectorizer(ngram_range=(1, 5))
现在定义了文本编码,您需要选择一个模型来进行预测。为简单起见,您将使用多项朴素贝叶斯分类器。该模型非常适合文本分类,并且训练速度相当快。
让我们定义一个函数来处理模型拟合并打印出测试数据的准确性:
from sklearn.metrics import accuracy_score
from sklearn.naive_bayes import MultinomialNB


def calculate_accuracy(X_tr, y_tr, X_te=X_test, y_te=y_test,
                       clf=MultinomialNB(), vectorizer=vectorizer):

    # Encode train text
    X_train_vect = vectorizer.fit_transform(X_tr.text.tolist())

    # Fit model
    clf.fit(X=X_train_vect, y=y_tr)

    # Vectorize test text
    X_test_vect = vectorizer.transform(X_te.text.tolist())

    # Make predictions for the test set
    preds = clf.predict(X_test_vect)

    # Return accuracy score
    return accuracy_score(preds, y_te)
现在让我们创建一个字典来存储每种标记方法的准确性:
# Empty dictionary
accs = dict()
3.3 随机标记
生成随机标签是建立下界的一种自然方式。您会期望任何成功的替代标签模型都优于随机生成的标签。
现在让我们计算随机标记方法的准确度
# Calculate random labels
rnd_labels = np.random.randint(0, 2, X_train.shape[0])

# Feed them alongside X_train to calculate_accuracy function
rnd_acc = calculate_accuracy(X_train, rnd_labels)

rnd_acc
0.5331632653061225
每次运行前一个单元时,您都会看到不同的准确度。这是因为标记是随机完成的。请记住,这是一个二元分类问题,两个类都是平衡的,因此您可以期望看到大约 50% 的准确率。
为了进一步直观,让我们看一下 10 次运行的平均准确度:
# Empty list to save accuracies
rnd_accs = []

for _ in range(10):
    # Add every accuracy to the list
    rnd_accs.append(calculate_accuracy(X_train, np.random.randint(0, 2, X_train.shape[0])))

# Save result in accs dictionary
accs['random-labels'] = sum(rnd_accs)/len(rnd_accs)

# Print result
print(f"The random labelling method achieved and accuracy of {accs['random-labels']*100:.2f}%")
实现的随机标记方法,准确率为 47.88%
随机标记完全无视您正在处理的解决方案空间中的信息,而只是猜测正确的标签。你不可能做得比这更糟(或者你可以)。为此,此方法可作为比较其他标记方法的参考
3.4 用真值标记
现在让我们看看光谱的另一端,即为您的数据点使用正确的标签。让我们用实际标签重新训练多项朴素贝叶斯分类器
# Calculate accuracy when using the true labels
true_acc = calculate_accuracy(X_train, y_train)

# Save the result
accs['true-labels'] = true_acc

print(f"The true labelling method achieved and accuracy of {accs['true-labels']*100:.2f}%")
实现了真正的标记方法,准确率达到了 91.58%
使用真实标签进行训练显着提高了准确性。这是预期的,因为分类器现在能够正确识别训练数据中缺少随机生成标签的模式。
通过微调模型或什至选择不同的模型,可以实现更高的准确度。目前,您将保持模型原样,并使用这种准确性作为我们在接下来将看到的自动标记算法应争取的目标。
4. 自动标记 - 尝试不同的标记策略
假设由于某种原因,您无法访问与此数据集中每个数据点关联的真实标签。认为数据中存在模式可以提供正确标签的线索是一个很自然的想法。这当然非常依赖于您正在使用的数据类型,甚至假设存在哪些模式需要大量的领域知识。
出于这个原因,使用了本实验室中使用的数据集。许多人提出可能有助于从非垃圾邮件评论中识别 YouTube 视频的垃圾评论的规则是合理的。在下一节中,您将使用此类规则执行自动标记。您可以将此过程的每次迭代视为具有不同标记标准的贴标员,您的工作是聘请最有前途的一位。
注意规则这个词。为了执行自动标记,您将定义一些规则,例如“如果评论包含“免费”一词,则将其归类为垃圾邮件”。
先说第一件事。让我们定义我们将如何对标签进行编码:
- SPAM 由 1 表示
- NOT_SPAM 由 0
- NO_LABEL 作为-1
您可能想知道NO_LABEL关键字。根据您提出的规则,这些可能不适用于某些数据点。对于这种情况,最好拒绝给出标签而不是猜测,因为你已经看到这种猜测会产生很差的结果。
4.1 第一次迭代 - 定义一些规则
对于第一次迭代,您将根据垃圾评论中常见模式的直觉创建三个规则。规则很简单,如果评论中出现以下任何一种模式,则归类为垃圾邮件,否则归类为 NO_LABEL:
- free - 垃圾评论通常通过宣传免费内容来吸引用户
- subs - 垃圾评论往往会要求用户订阅某个网站或频道
- http - 垃圾评论包含非常频繁的链接
def labeling_rules_1(x):

    # Convert text to lowercase
    x = x.lower()

    # Define list of rules
    rules = [
        "free" in x,
        "subs" in x,
        "http" in x
    ]

    # If the comment falls under any of the rules classify as SPAM
    if any(rules):
        return 1

    # Otherwise, NO_LABEL
    return -1
# Apply the rules the comments in the train set
labels = [labeling_rules_1(label) for label in X_train.text]

# Convert to a numpy array
labels = np.asarray(labels)

# Take a look at the automatic labels
labels
数组([-1, -1, -1, ..., -1, -1, 1])
对于很多点,自动标记算法决定不满足于标签,鉴于定义的规则的性质,这是意料之中的。这些点应该被删除,因为它们不提供有关分类过程的信息并且往往会损害性能。
# Create the automatic labeled version of X_train by removing points with NO_LABEL label
X_train_al = X_train[labels != -1]

# Remove predictions with NO_LABEL label
labels_al = labels[labels != -1]

print(f"Predictions with concrete label have shape: {labels_al.shape}")

print(f"Proportion of data points kept: {labels_al.shape[0]/labels.shape[0]*100:.2f}%")
具有具体标签的预测具有形状:(379,)
保留的数据点比例:24.23%
请注意,原始的 1564 个数据点中只剩下 379 个数据点。定义的规则没有为标记算法提供足够的上下文来确定标签,因此大约 75% 的数据已被修剪。
让我们在使用这些自动生成的标签时测试模型的准确性:
# Compute accuracy when using these labels
iter_1_acc = calculate_accuracy(X_train_al, labels_al)

# Display accuracy
print(f"First iteration of automatic labeling has an accuracy of {iter_1_acc*100:.2f}%")

# Save the result
accs['first-iteration'] = iter_1_acc
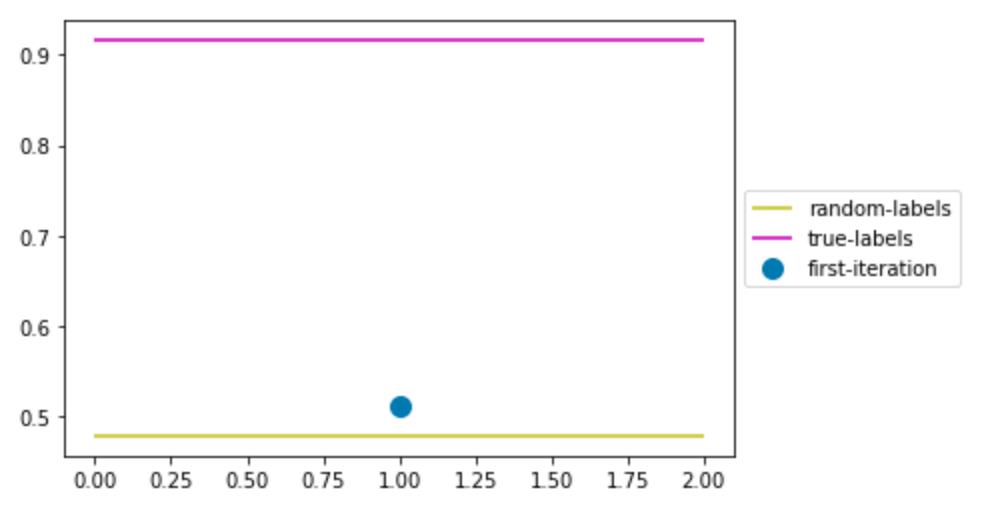
自动标注第一次迭代准确率为51.28%
让我们通过绘图将这个精度与基线进行比较:
def plot_accuracies(accs=accs):
    colors = list("rgbcmy")
    items_num = len(accs)
    cont = 1

    for x, y in accs.items():
        if x in ['true-labels', 'random-labels', 'true-labels-best-clf']:
            plt.hlines(y, 0, (items_num-2)*2, colors=colors.pop())
        else:
            plt.scatter(cont, y, s=100)
            cont+=2
    plt.legend(accs.keys(), loc="center left",bbox_to_anchor=(1, 0.5))
    plt.show()

plot_accuracies()

第一次迭代的精度非常接近随机标记,我们应该努力做得比这更好。
在继续之前,让我们定义label_given_rules执行您刚刚看到的所有步骤的函数,它们是:
- 将规则应用于评论数据框
- 将结果标签转换为一个 numpy 数组
- 删除所有以 NO_LABEL 为标签的数据点
- 使用自动标签计算模型的准确性
- 保存绘图精度
- 打印一些有用的过程指标
def label_given_rules(df, rules_function, name,
                      accs_dict=accs, verbose=True):

    # Apply labeling rules to the comments
    labels = [rules_function(label) for label in df.text]

    # Convert to a numpy array
    labels = np.asarray(labels)

    # Save initial number of data points
    initial_size = labels.shape[0]

    # Trim points with NO_LABEL label
    X_train_al = df[labels != -1]
    labels = labels[labels != -1]

    # Save number of data points after trimming
    final_size = labels.shape[0]

    # Compute accuracy
    acc = calculate_accuracy(X_train_al, labels)

    # Print useful information
    if verbose:
        print(f"Proportion of data points kept: {final_size/initial_size*100:.2f}%\\n")
        print(f"{name} labeling has an accuracy of {acc*100:.2f}%\\n")

    # Save accuracy to accuracies dictionary
    accs_dict[name] = acc

    return X_train_al, labels, acc
展望未来,我们应该提出更好地覆盖训练数据的规则,从而使模式发现变得更容易。还要注意规则如何只能标记为 SPAM 或 NO_LABEL,我们还应该创建一些规则来帮助识别 NOT_SPAM 评论。
4.2 第二次迭代 - 提出更好的规则
如果您检查数据集中的评论,您可能一眼就能分辨出某些模式。例如,非垃圾评论通常会提及观看次数(因为这些是 2015 年观看次数最多的视频)或视频中的歌曲及其内容。至于垃圾评论,其他常见的模式是宣传礼物或要求关注某个频道或网站。
让我们创建一些包含这些模式的新规则:
def labeling_rules_2(x):

    # Convert text to lowercase
    x = x.lower()

    # Define list of rules to classify as NOT_SPAM
    not_spam_rules = [
        "view" in x,
        "song" in x
    ]

    # Define list of rules to classify as SPAM
    spam_rules = [
        "free" in x,
        "subs" in x,
        "gift" in x,
        "follow" in x,
        "http" in x
    ]

    # Classify depending on the rules
    if any(not_spam_rules):
        return 0

    if any(spam_rules):
        return 1

    return -1
这组新规则看起来更有前景,因为它包含更多分类为垃圾邮件的模式以及一些分类为 NOT_SPAM 的模式。这应该会导致更多数据点的标签与 NO_LABEL 不同。
让我们检查一下是否是这种情况。
label_given_rules(X_train, labeling_rules_2, "second-iteration")

plot_accuracies()
保留的数据点比例:44.12%

第二次迭代标注的准确率为 70.92%

这一次,原始数据集的 44% 被赋予了决定性标签,并且两个标签都有数据点,这有助于模型与第一次迭代相比达到更高的准确度。现在准确率远高于随机标记,但距离上限仍然很远。
看看我们能不能做得更好!
4.3 第三次迭代 - 更多规则
到目前为止,我们定义的规则做得很好。让我们添加两个额外的规则,一个用于对垃圾评论进行分类,另一个用于相反的任务。
乍一看,NOT_SPAM 评论通常较短。这可能是因为它们不包含超链接,但总的来说,它们往往更具体,例如“我喜欢这首歌!”。
让我们来看看 SPAM 评论与 NOT_SPAM 的平均字符数:
from statistics import mean

print(f"NOT_SPAM comments have an average of {mean([len(t) for t in df_labeled[df_labeled.label==0].text]):.2f} characters.")
print(f"SPAM comments have an average of {mean([len(t) for t in df_labeled[df_labeled.label==1].text]):.2f} characters.")
NOT_SPAM 评论平均有 49.64 个字符。
垃圾评论平均有 137.34 个字符。
看起来这两种类型的评论的字符数确实存在很大差异。
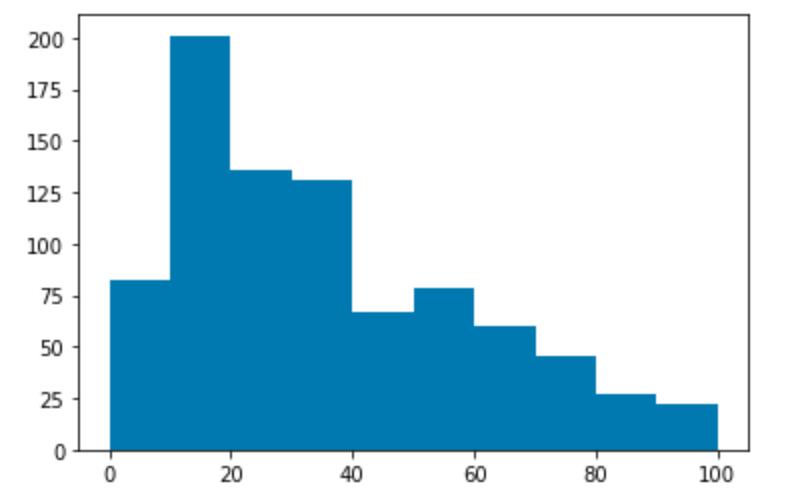
为了确定分类为 NOT_SPAM 的阈值,让我们绘制 NOT_SPAM 评论的字符数直方图:
plt.hist([len(t) for t in df_labeled[df_labeled.label==0].text], range=(0,100))
plt.show()

大多数 NOT_SPAM 评论包含 30 个或更少的字符,因此我们将使用它作为阈值。
垃圾评论中的另一个普遍模式是要求用户“查看”频道、网站或链接。
让我们添加这两个新规则:
def labeling_rules_3(x):

    # Convert text to lowercase
    x = x.lower()

    # Define list of rules to classify as NOT_SPAM
    not_spam_rules = [
        "view" in x,
        "song" in x,
        len(x) < 30
    ]


    # Define list of rules to classify as SPAM
    spam_rules = [
        "free" in x,
        "subs" in x,
        "gift" in x,
        "follow" in x,
        "http" in x,
        "check out" in x
    ]

    # Classify depending on the rules
    if any(not_spam_rules):
        return 0

    if any(spam_rules):
        return 1

    return -1
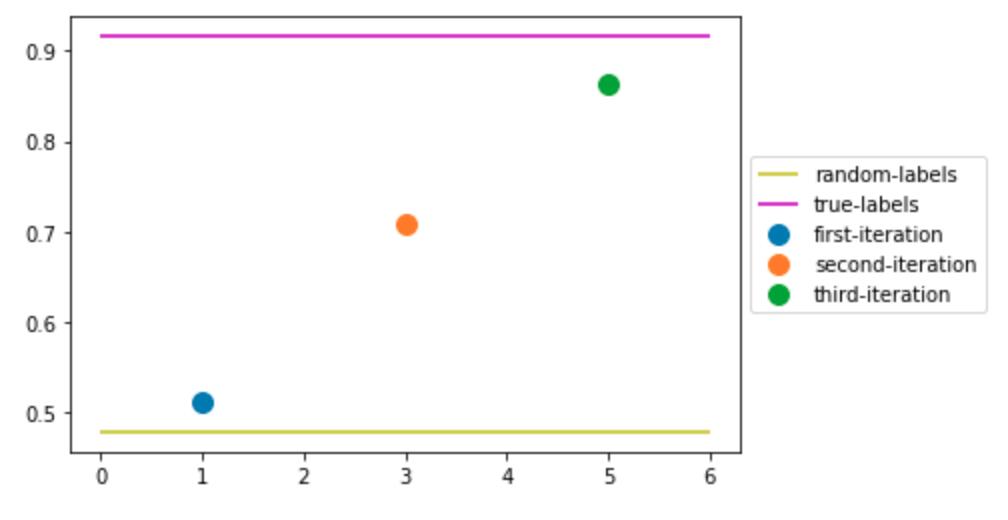
label_given_rules(X_train, labeling_rules_3, "third-iteration")

plot_accuracies()
保留的数据点比例:78.26%

第三次迭代标注的准确率为 86.22%

这些新规则在这两个方面都做得很好,覆盖了数据集并具有良好的模型准确性。更具体地说,这种标记策略的准确率达到了~86%!我们越来越接近使用真实标签定义的上限。
我们可以继续添加更多规则以提高准确性,我们鼓励您自己尝试一下!
4.4 提出你自己的规则
以下单元格包含一些代码,可帮助您检查数据集的模式并测试这些模式。如果您想从头开始或重新使用它们,则已注释掉之前使用的那些。
# Configure pandas to print out all rows to check the complete dataset
pd.set_option('display.max_rows', None)

# Check NOT_SPAM comments
df_labeled[df_labeled.label==0]

# Check SPAM comments
df_labeled[df_labeled.label==1]
def your_labeling_rules(x): # Convert text to lowercase x = x.lower() # Define your rules for classifying as NOT_SPAM not_spam_rules = [ "view" in x, "song" in x, len(x) < 30 ] # Define your rules for classifying as SPAM spam_rules = [ "free" in x, "subs" in x, "gift" in x, "follow" in x, "http" in x, "check out" in x ] # Classify depending on your rules if any(not_spam_rules): return 0 if any(spam_rules): return 1 return -1 try: label_given_rules(X_train, your_labeling_rules, "your-iteration") plot_accuracies() except ValueError: print("You have not defined any rules.")<以上是关于MLOps- 吴恩达Andrew Ng Data Definition and Baseline Week3 实验作业的主要内容,如果未能解决你的问题,请参考以下文章
MLOps- 吴恩达Andrew Ng Data Definition and Baseline Week3 实验作业
MLOps- 吴恩达Andrew Ng Selecting and Training a Model Week2 论文等资料汇总
MLOps- 吴恩达Andrew Ng Overview of the ML Lifecycle and Deployment Week1 论文等资料汇总
MLOps- 吴恩达Andrew Ng Selecting and Training a Model Week2 实验作业
MLOps- 吴恩达Andrew Ng Overview of the ML Lifecycle and Deployment Week1 部署深度学习模型model 实现