Vagrant Box 镜像准备:Packer 打包 Oracle Linux 6.10 系统
Posted Lucifer三思而后行
tags:
篇首语:本文由小常识网(cha138.com)小编为大家整理,主要介绍了Vagrant Box 镜像准备:Packer 打包 Oracle Linux 6.10 系统相关的知识,希望对你有一定的参考价值。
目录
前言
使用 vagrant 的前提是要有 box 镜像盒子来初始化系统,网上有很多 box 可以下载,但是用自己的不是更香吗?自己动手,丰衣足食!
环境准备
软件准备
首先需要安装 vagrant + virtualbox + packer ,具体安装教程,请参考文章:☀️ 福利向:⚡️万字图文⚡️ 带你 Vagrant 从入门到超神!❤️
下载系统镜像
下载 Oracle Linux 6.10 安装包,下载地址:精心整理Linux各版本安装包(包括Centos、Redhat、Oracle Linux),附下载链接🔗

这里的校验码记录一下: 625044388ee60a031965a42a32f4c1de0c029268975edcd542fd14160e0dadcb
下载打包源码
下载打包模板源码:
git clone https://hub.fastgit.org/chef/bento.git

将系统镜像文件拷贝至 bento/packer_templates/oraclelinux 目录下:

确认环境准备好之后,可以开始进行打包。
开始打包
自定义json文件
使用目录中的 oracle-6.10-x86_64.json 文件,复制为 oraclelinux610.json ,进行自定义修改:
{
  "builders": [
    {
      "boot_command": [
        "<tab> text ks=http://{{ .HTTPIP }}:{{ .HTTPPort }}/{{user `ks_path`}}<enter><wait>"
      ],
      "boot_wait": "5s",
      "cpus": "{{ user `cpus` }}",
      "disk_size": "{{user `disk_size`}}",
      "guest_additions_path": "VBoxGuestAdditions_{{.Version}}.iso",
      "guest_additions_url": "{{ user `guest_additions_url` }}",
      "guest_os_type": "Oracle_64",
      "hard_drive_interface": "sata",
      "headless": "{{ user `headless` }}",
      "http_directory": "{{user `http_directory`}}",
      "iso_checksum": "{{user `iso_checksum`}}",
      "iso_url": "{{user `mirror`}}/{{user `mirror_directory`}}/{{user `iso_name`}}",
      "memory": "{{ user `memory` }}",
      "output_directory": "{{ user `build_directory` }}/packer-{{user `template`}}-virtualbox",
      "shutdown_command": "echo 'vagrant' | sudo -S /sbin/halt -h -p",
      "ssh_password": "vagrant",
      "ssh_port": 22,
      "ssh_timeout": "10000s",
      "ssh_username": "vagrant",
      "type": "virtualbox-iso",
      "virtualbox_version_file": ".vbox_version",
      "vm_name": "{{ user `template` }}"
    }
  ],
  "post-processors": [
    {
      "output": "{{ user `build_directory` }}/{{user `box_basename`}}.{{.Provider}}.box",
      "type": "vagrant"
    }
  ],
  "provisioners": [
    {
      "environment_vars": [
        "HOME_DIR=/home/vagrant",
        "http_proxy={{user `http_proxy`}}",
        "https_proxy={{user `https_proxy`}}",
        "no_proxy={{user `no_proxy`}}"
      ],
      "execute_command": "echo 'vagrant' | {{.Vars}} sudo -S -E sh -eux '{{.Path}}'",
      "expect_disconnect": true,
      "scripts": [
        "{{template_dir}}/../centos/scripts/update.sh",
        "{{template_dir}}/../centos/scripts/networking.sh",
        "{{template_dir}}/../_common/motd.sh",
        "{{template_dir}}/../_common/sshd.sh",
        "{{template_dir}}/../_common/vagrant.sh",
        "{{template_dir}}/../_common/virtualbox.sh",
        "{{template_dir}}/../_common/vmware.sh",
        "{{template_dir}}/../_common/parallels.sh",
        "{{template_dir}}/../centos/scripts/cleanup.sh",
        "{{template_dir}}/../_common/minimize.sh"
      ],
      "type": "shell"
    }
  ],
  "variables": {
    "arch": "64",
    "box_basename": "oraclelinux6.10",
    "build_directory": "../../builds",
    "build_timestamp": "{{isotime \\"20210819132100\\"}}",
    "cpus": "2",
    "disk_size": "65536",
    "git_revision": "__unknown_git_revision__",
    "guest_additions_url": "",
    "headless": "",
    "http_directory": "{{template_dir}}/../centos/http",
    "http_proxy": "{{env `http_proxy`}}",
    "https_proxy": "{{env `https_proxy`}}",
    "hyperv_generation": "1",
    "hyperv_switch": "bento",
    "iso_checksum": "625044388ee60a031965a42a32f4c1de0c029268975edcd542fd14160e0dadcb",
    "iso_name": "OracleLinux-R6-U10-Server-x86_64-dvd.iso",
    "ks_path": "6/ks.cfg",
    "memory": "2048",
    "mirror": "",
    "mirror_directory": "Volumes/DBA/voracle/bento/packer_templates/oraclelinux",
    "name": "oraclelinux6.10",
    "no_proxy": "{{env `no_proxy`}}",
    "template": "oracle-6.10-x86_64",
    "version": "TIMESTAMP"
  }
}
📢 注意:以下修改两个脚本,提前排坑。
修改 networking.sh 脚本
脚本位于 centos 中,../centos/scripts/networking.sh,由于无法访问 github ,因此 /etc/hosts 需要增加 github ip:
# modify by luciferliu for github raw.githubusercontent.com:443; Connection refused
echo '185.199.108.133 raw.githubusercontent.com' >>/etc/hosts;
echo '185.199.109.133 raw.githubusercontent.com' >>/etc/hosts;
echo '185.199.110.133 raw.githubusercontent.com' >>/etc/hosts;
echo '185.199.111.133 raw.githubusercontent.com' >>/etc/hosts;

ping raw.githubusercontent.com -c 5

修改 vagrant.sh 脚本
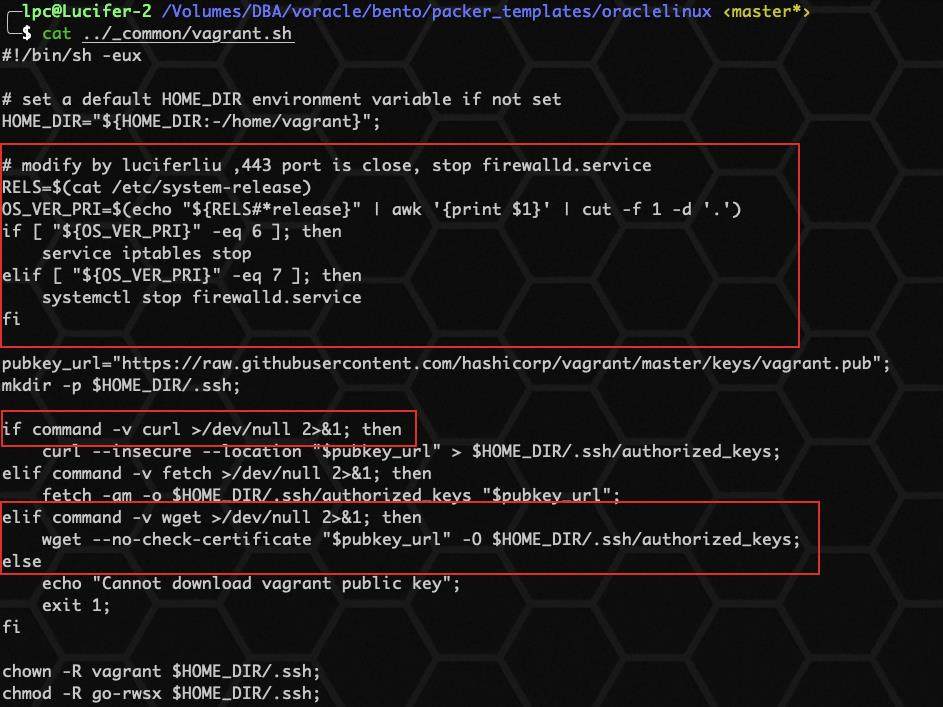
脚本位于 bento/packer_templates/_common 目录下,由于未关闭防火墙,443端口无法访问,因此一直报错,手动关闭防火墙:
# modify by luciferliu ,443 port is close, stop firewalld.service
RELS=$(cat /etc/system-release)
OS_VER_PRI=$(echo "${RELS#*release}" | awk '{print $1}' | cut -f 1 -d '.')
if [ "${OS_VER_PRI}" -eq 6 ]; then
    service iptables stop
elif [ "${OS_VER_PRI}" -eq 7 ]; then
    systemctl stop firewalld.service
fi

pubkey_url="https://raw.githubusercontent.com/hashicorp/vagrant/master/keys/vagrant.pub";
mkdir -p $HOME_DIR/.ssh;

if command -v curl >/dev/null 2>&1; then
    curl --insecure --location "$pubkey_url" > $HOME_DIR/.ssh/authorized_keys;
elif command -v fetch >/dev/null 2>&1; then
    fetch -am -o $HOME_DIR/.ssh/authorized_keys "$pubkey_url";
elif command -v wget >/dev/null 2>&1; then
    wget --no-check-certificate "$pubkey_url" -O $HOME_DIR/.ssh/authorized_keys;
else
    echo "Cannot download vagrant public key";
    exit 1;
fi

启动 packer 进行打包
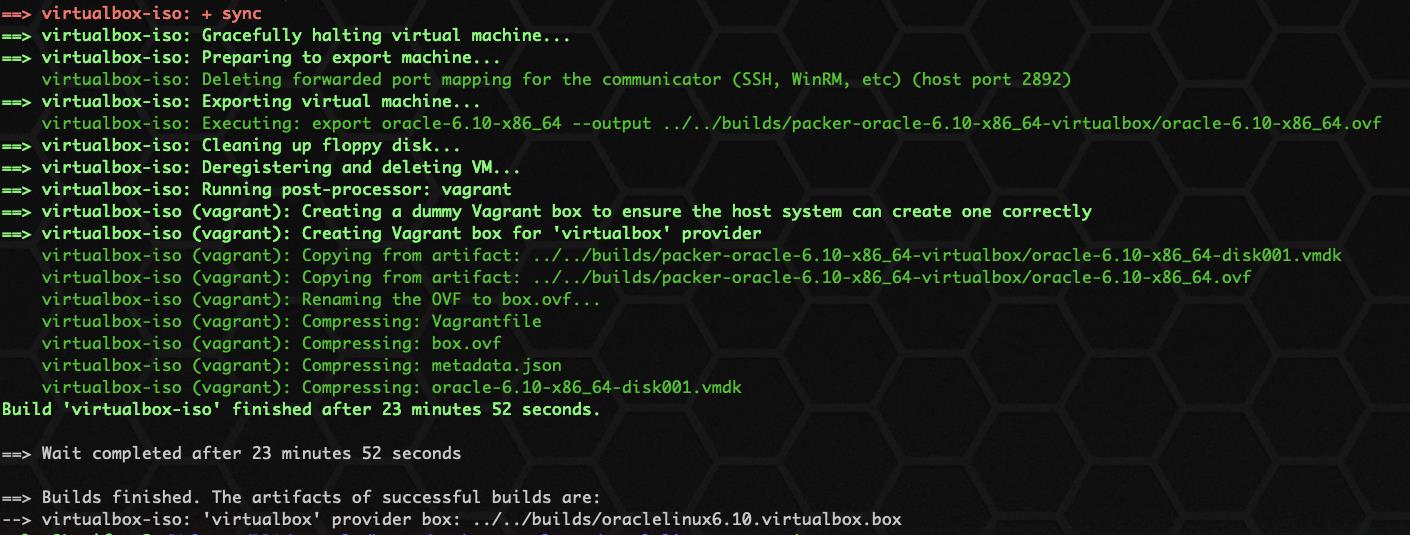
packer build -only=virtualbox-iso oraclelinux610.json


显示如上,即已经打包成功,box 位置存放在:../../builds/oraclelinux6.10.virtualbox.box 。

上传 box 镜像
不做演示,比较简单。

box镜像下载地址:luciferliu/oraclelinux6.10
写在最后
为什么要打包 box 镜像盒子? 以后可以使用 vagrant 直接初始化创建 linux 系统,不需要再一步步创建,为自动化奠定基础。
本次分享到此结束啦~
如果觉得文章对你有帮助,点赞、收藏、关注、评论,一键四连支持,你的支持就是我创作最大的动力。
以上是关于Vagrant Box 镜像准备:Packer 打包 Oracle Linux 6.10 系统的主要内容,如果未能解决你的问题,请参考以下文章
Vagrant Box 镜像准备:Packer 打包 Centos 6.10 系统
Vagrant Box 镜像准备:Packer 打包 Oracle Linux 8.3 系统
Vagrant Box 镜像准备:Packer 打包 Oracle Linux 7.9 系统
Vagrant Box 镜像准备:Packer 打包 Centos 8.3 系统