l2tp ipsec centos7
Posted
tags:
篇首语:本文由小常识网(cha138.com)小编为大家整理,主要介绍了l2tp ipsec centos7相关的知识,希望对你有一定的参考价值。
PPTP、L2TP和IPsec的区别及优缺点
1、PPTP协议是点对点隧道协议:
其将控制包与数据包分开,控制包采用TCP控制,用于严格的状态查询及信令信息;数据包部分先封装在PPP协议中,然后封装到GRE V2协议中。
2、L2TP是国际标准隧道协议:
它结合了PPTP协议以及第二层转发L2F协议的优点,能以隧道方式使PPP包通过各种网络协议,包括ATM、SONET和帧中继。但是 L2TP没有任何加密措施,更多是和IPSec协议结合使用,提供隧道验证。
3、两者的联系与区别:
联系:PPTP和L2TP都使用PPP协议对数据进行封装,然后添加附加包头用于数据在互联网络上的传输。尽管两个协议非常相似,但是仍存在以 下几方面的不同
区别:
1)PPTP要求互联网络为IP网络。L2TP只要求隧道媒介提供面向数据包的点对点的连接。L2TP可以在IP(使用UDP),桢中继永久虚 拟电路(PVCs),X.25虚拟电路(VCs)或ATM VCs网络上使用。
2)PPTP只能在两端点间建立单一隧道。L2TP支持在两端点间使用多隧道。使用L2TP,用户可以针对不同的服务质量创建不同的隧道。
3)L2TP可以提供包头压缩。当压缩包头时,系统开销(overhead)占用4个字节,而PPTP协议下要占用6个字节。
4)L2TP可以提供隧道验证,而PPTP不支持隧道验证。但当L2TP或PPTP与IPSEC共同使用时,可由IPSEC提供隧道验证,不需 在第2层协议上验证隧道。
IPSec的优点
如果在路由器或防火墙上执行了IPSec,它就会为周边的通信提供强有力的安全保障。一个公司或工作组内部的通信将不涉及与安全相关的费用。下文叙 述了IPSec的一些优点:
IPSec在传输层之下,对于应用程序来说是透明的。当在路由器或防火墙上安装IPSec时,无需更改用户或服务器系统中的软件设置。即使在终端系 统中执行IPSec,应用程序一类的上层软件也不会被影响。
IPSec对终端用户来说是透明的,因此不必对用户进行安全机制的培训。
如果需要的话,IPSec可以为个体用户提供安全保障,这样做就可以保护企业内部的敏感信息。
IPSec正向Internet靠拢。已经有一些机构部分或全部执行了IPSec。IAB的前任总裁Christian Huitema认为,关于如何保证Internet安全的讨论是他所见过的最激烈的讨论之一。讨论的话题之一就是安全是否在恰当的协议层上被使用。想要提 供IP级的安全,IPSec必须成为配置在所有相关平台(包括Windows NT,Unix和Macintosh系统)的网络代码中的一部分。
实际上,现在发行的许多Internet应用软件中已包含了安全特征。例如,Netscape Navigator和Microsoft Internet Explorer支持保护互联网通信的安全套层协议(SSL),还有一部分产品支持保护Internet上信用卡交易的安全电子交易协议(SET)。然 而,VPN需要的是网络级的功能,这也正是IPSec所提供的。
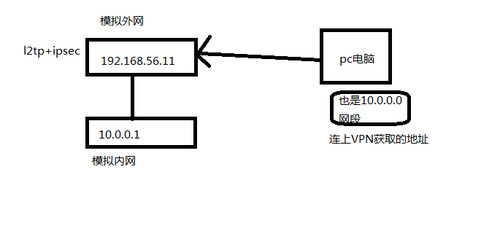
本文部署基于ipsec 的l2tp
1.基础环境
[[email protected] tmp]# cat  /etc/redhat-release
CentOS Linux release 7.3.1611 (Core)
[[email protected] tmp]# ifconfig
eth0: flags=4163<UP,BROADCAST,RUNNING,MULTICAST>  mtu 1500
        inet 192.168.56.11  netmask 255.255.255.0  broadcast 192.168.56.255
        inet6 fe80::20c:29ff:fe19:7f25  prefixlen 64  scopeid 0x20<link>
        ether 00:0c:29:19:7f:25  txqueuelen 1000  (Ethernet)
        RX packets 655392  bytes 86779661 (82.7 MiB)
        RX errors 0  dropped 0  overruns 0  frame 0
        TX packets 853465  bytes 156410883 (149.1 MiB)
        TX errors 0  dropped 0 overruns 0  carrier 0  collisions 0

eth1: flags=4163<UP,BROADCAST,RUNNING,MULTICAST>  mtu 1500
        inet 10.0.0.1  netmask 255.0.0.0  broadcast 10.255.255.255
        inet6 fe80::20c:29ff:fe19:7f2f  prefixlen 64  scopeid 0x20<link>
        ether 00:0c:29:19:7f:2f  txqueuelen 1000  (Ethernet)
        RX packets 222  bytes 22794 (22.2 KiB)
        RX errors 0  dropped 0  overruns 0  frame 0
        TX packets 215  bytes 26245 (25.6 KiB)
        TX errors 0  dropped 0 overruns 0  carrier 0  collisions 0

lo: flags=73<UP,LOOPBACK,RUNNING>  mtu 65536
        inet 127.0.0.1  netmask 255.0.0.0
        inet6 ::1  prefixlen 128  scopeid 0x10<host>
        loop  txqueuelen 1  (Local Loopback)
        RX packets 0  bytes 0 (0.0 B)
        RX errors 0  dropped 0  overruns 0  frame 0
        TX packets 0  bytes 0 (0.0 B)
        TX errors 0  dropped 0 overruns 0  carrier 0  collisions 0

[[email protected] tmp]#
2.安装软件
在centos7 版本后, 提供ipsec 服务包由libreswan替代了openswan
yum install xl2tpd
yum install libreswan
3.修改ipsec的配置文件(在配置文件里加入这一行,充许传透nat建立l2tp连接)
[[email protected] tmp]# vim /etc/ipsec.conf  #其余的不变
 nat_traversal=yes   #新加的
    virtual_private=%v4:10.0.0.0/8,%v4:192.168.0.0/16,%v4:172.16.0.0/12,%v4:25.0.0.0/8,%v4:100.64.0.0/10,
     %v6:fd00::/8,%v6:fe80::/10
4.建立ipsec 与 l2tp 服务关联的配置文件
cd /etc/ipsec.d/
[[email protected] ipsec.d]# cat l2tp_psk.conf   #此文件不存在 需要手动创建
conn L2TP-PSK-NAT
    rightsubnet=vhost:%priv
    also=L2TP-PSK-noNAT
conn L2TP-PSK-noNAT
    authby=secret
    pfs=no
    auto=add
    keyingtries=3
    dpddelay=30
    dpdtimeout=120
    dpdaction=clear
    rekey=no
    ikelifetime=8h
    keylife=1h
    type=transport
    left=192.168.56.11
    leftprotoport=17/1701
    right=%any
    rightprotoport=17/%any
[[email protected] ipsec.d]#
5.当建立l2tp连接时,需要输入预共享密匙,以下为预共享密匙的配置文件
[[email protected] ipsec.d]# cat  /etc/ipsec.secrets
include /etc/ipsec.d/*.secrets
[[email protected] ipsec.d]# cd  /etc/ipsec.d/
[[email protected] ipsec.d]# ll
total 40
-rw------- 1 root root  9216 Apr 11 01:50 cert9.db
-rw------- 1 root root 11264 Apr 11 01:50 key4.db
-rw-r--r-- 1 root root   362 Apr 11 01:47 l2tp_psk.conf
-rw-r--r-- 1 root root    33 Apr 11 01:49 linuxcc_l2tp.secrets
-rw------- 1 root root   419 Apr 11 01:50 pkcs11.txt
drwx------ 2 root root    90 Apr 11 01:44 policies
-rw-r--r-- 1 root root  1338 Nov 12 09:58 v6neighbor-hole.conf
[[email protected] ipsec.d]# cat  linuxcc_l2tp.secrets   #没有的话自己创建
192.168.56.11 %any: PSK "123456"
[[email protected] ipsec.d]#
6.修改内核支持,可以对照以下配置修改,或者直接复制,修改完后运行sysctl -p 使配置生效
vim  /etc/sysctl.conf  添加进去 sysctl -p 生效
vm.swappiness = 0
net.ipv4.neigh.default.gc_stale_time=120
net.ipv4.conf.all.rp_filter=0
net.ipv4.conf.default.rp_filter=0
net.ipv4.conf.default.arp_announce = 2
net.ipv4.conf.all.arp_announce=2
net.ipv4.tcp_max_tw_buckets = 5000
net.ipv4.tcp_syncookies = 1
net.ipv4.tcp_max_syn_backlog = 1024
net.ipv4.tcp_synack_retries = 2
net.ipv4.conf.lo.arp_announce=2
net.ipv4.ip_forward = 1
net.ipv4.conf.default.accept_redirects = 0
net.ipv4.conf.default.send_redirects = 0
net.ipv4.conf.default.accept_source_route = 0
7.检验ipsec服务配置:
ipsec setup start
ipsec verify 此处出错 以及解决办法
[[email protected] ipsec.d]# ipsec verify
Verifying installed system and configuration files

Version check and ipsec on-path                   	[OK]
Libreswan 3.15 (netkey) on 3.10.0-514.10.2.el7.x86_64
Checking for IPsec support in kernel              	[OK]
 NETKEY: Testing XFRM related proc values
         ICMP default/send_redirects              	[OK]
         ICMP default/accept_redirects            	[OK]
         XFRM larval drop                         	[OK]
Pluto ipsec.conf syntax                           	[OK]
Hardware random device                            	[N/A]
Two or more interfaces found, checking IP forwarding	[OK]
Checking rp_filter                                	[ENABLED]
 /proc/sys/net/ipv4/conf/eth0/rp_filter           	[ENABLED]
  rp_filter is not fully aware of IPsec and should be disabled
Checking that pluto is running                    	[OK]
 Pluto listening for IKE on udp 500               	[OK]
 Pluto listening for IKE/NAT-T on udp 4500        	[OK]
 Pluto ipsec.secret syntax                        	[OK]
Checking ‘ip‘ command                             	[OK]
Checking ‘iptables‘ command                       	[OK]
Checking ‘prelink‘ command does not interfere with FIPSChecking for obsolete ipsec.conf options          	[OK]
Opportunistic Encryption                          	[DISABLED]

ipsec verify: encountered 3 errors - see ‘man ipsec_verify‘ for help
[[email protected] ipsec.d]# echo  0 >/proc/sys/net/ipv4/conf/eth0/rp_filter  #解决办法
[[email protected] ipsec.d]# ipsec verify
Verifying installed system and configuration files

Version check and ipsec on-path                   	[OK]
Libreswan 3.15 (netkey) on 3.10.0-514.10.2.el7.x86_64
Checking for IPsec support in kernel              	[OK]
 NETKEY: Testing XFRM related proc values
         ICMP default/send_redirects              	[OK]
         ICMP default/accept_redirects            	[OK]
         XFRM larval drop                         	[OK]
Pluto ipsec.conf syntax                           	[OK]
Hardware random device                            	[N/A]
Two or more interfaces found, checking IP forwarding	[OK]
Checking rp_filter                                	[OK]
Checking that pluto is running                    	[OK]
 Pluto listening for IKE on udp 500               	[OK]
 Pluto listening for IKE/NAT-T on udp 4500        	[OK]
 Pluto ipsec.secret syntax                        	[OK]
Checking ‘ip‘ command                             	[OK]
Checking ‘iptables‘ command                       	[OK]
Checking ‘prelink‘ command does not interfere with FIPSChecking for obsolete ipsec.conf options          	[OK]
Opportunistic Encryption                          	[DISABLED]
[[email protected] ipsec.d]#
8.启动服务
systemctl start ipsec
systemctl enable ipsec
9.安装配置xl2tpd服务
yum install xl2tpd
vi /etc/xl2tpd/xl2tpd.conf #修改l2tp的配置文件
[[email protected] xl2tpd]# cat xl2tpd.conf
;
; This is a minimal sample xl2tpd configuration file for use
; with L2TP over IPsec.
;
; The idea is to provide an L2TP daemon to which remote Windows L2TP/IPsec
; clients connect. In this example, the internal (protected) network
; is 192.168.1.0/24.  A special IP range within this network is reserved
; for the remote clients: 192.168.1.128/25
; (i.e. 192.168.1.128 ... 192.168.1.254)
;
; The listen-addr parameter can be used if you want to bind the L2TP daemon
; to a specific IP address instead of to all interfaces. For instance,
; you could bind it to the interface of the internal LAN (e.g. 192.168.1.98
; in the example below). Yet another IP address (local ip, e.g. 192.168.1.99)
; will be used by xl2tpd as its address on pppX interfaces.

[global]
ipsec saref = yes  #此处添加上去
listen-addr = 192.168.56.11 #外网
;
; requires openswan-2.5.18 or higher - Also does not yet work in combination
; with kernel mode l2tp as present in linux 2.6.23+
; ipsec saref = yes
; Use refinfo of 22 if using an SAref kernel patch based on openswan 2.6.35 or
;  when using any of the SAref kernel patches for kernels up to 2.6.35.
; saref refinfo = 30
;
; force userspace = yes
;
; debug tunnel = yes
[lns default]
ip range = 10.0.0.100-10.0.0.200  #要和自己的内网一直 分配给客户端的IP地址
local ip = 192.168.56.11
require chap = yes
refuse pap = yes
require authentication = yes
name = LinuxVPNserver
ppp debug = yes
pppoptfile = /etc/ppp/options.xl2tpd
length bit = yes
10.修改xl2tpd属性配置文件
vi /etc/ppp/options.xl2tpd
[[email protected] xl2tpd]# cat /etc/ppp/options.xl2tpd
ipcp-accept-local
ipcp-accept-remote
ms-dns  8.8.8.8  #只修改DNS 建议改成网关的IP
# ms-dns  192.168.1.1
# ms-dns  192.168.1.3
# ms-wins 192.168.1.2
# ms-wins 192.168.1.4
noccp
auth
crtscts
idle 1800
mtu 1410
mru 1410
nodefaultroute
debug
lock
proxyarp
connect-delay 5000
# To allow authentication against a Windows domain EXAMPLE, and require the
# user to be in a group "VPN Users". Requires the samba-winbind package
require-mschap-v2
# plugin winbind.so
# ntlm_auth-helper ‘/usr/bin/ntlm_auth --helper-protocol=ntlm-server-1 --require-membership-of="EXAMPLE\\VPN Users"‘
# You need to join the domain on the server, for example using samba:
# http://rootmanager.com/ubuntu-ipsec-l2tp-windows-domain-auth/setting-up-openswan-xl2tpd-with-native-windows-clients-lucid.html

[[email protected] xl2tpd]#
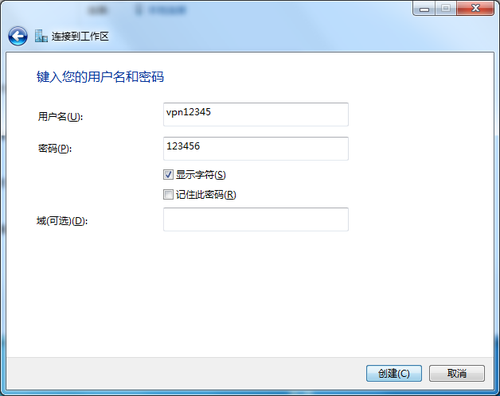
11.添加用户名密码
[[email protected]on xl2tpd]# cat /etc/ppp/chap-secrets
# Secrets for authentication using CHAP
# client	server	secret			IP addresses
vpn12345	*	123456	*
[[email protected] xl2tpd]#
12.启动l2tp服务
 systemctl start xl2tpd
  systemctl enable xl2tpd
 systemctl status xl2tpd
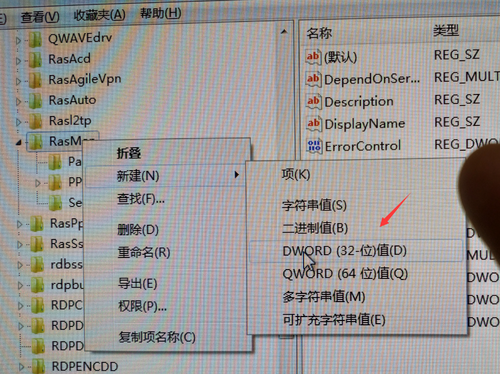
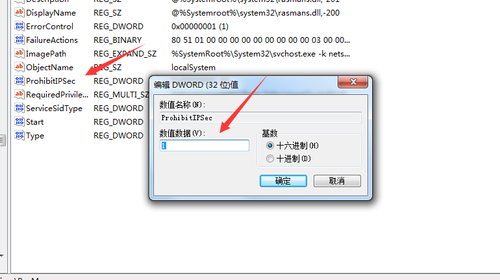
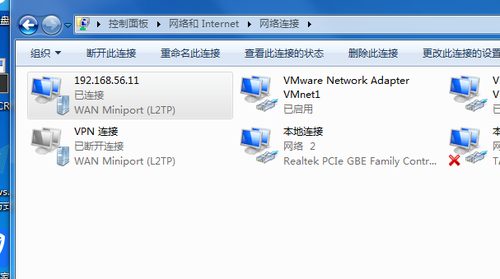
13.客户端连接windows
windows+R
输入 regedit 找到此路径
HKEY_LOCAL_MACHINE\System\CurrentControlSet\Services\Rasman\
然后重启电脑
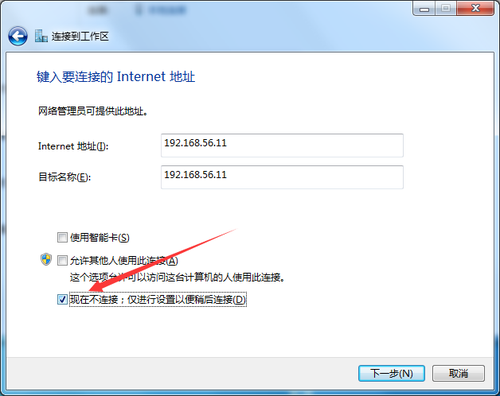
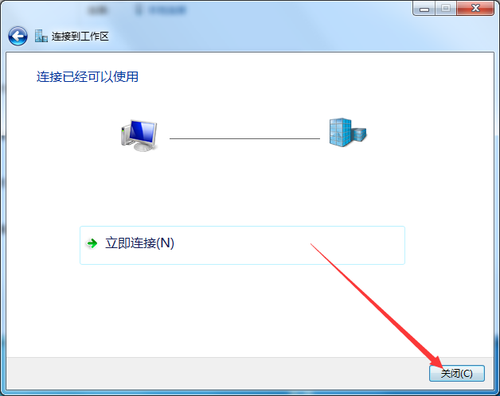
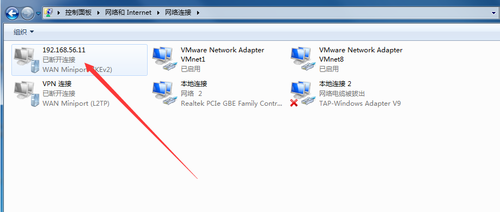
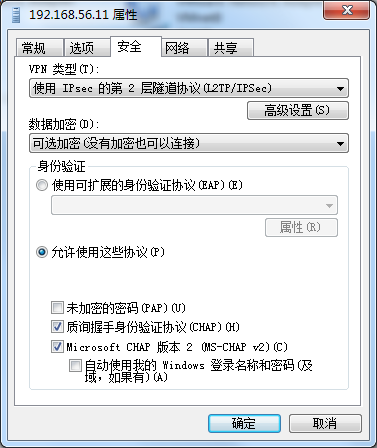
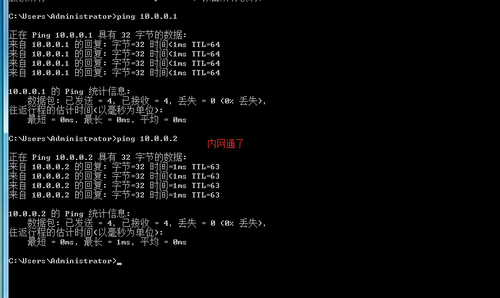
14.开启连接 切记按照顺序
到此完毕
本文出自 “砖家博客” 博客,请务必保留此出处http://wsxxsl.blog.51cto.com/9085838/1914678
以上是关于l2tp ipsec centos7的主要内容,如果未能解决你的问题,请参考以下文章
