CentOS8服务器搭建L2TP服务器(over IPsec)操作指南
Posted 铁军哥
tags:
篇首语:本文由小常识网(cha138.com)小编为大家整理,主要介绍了CentOS8服务器搭建L2TP服务器(over IPsec)操作指南相关的知识,希望对你有一定的参考价值。
正文共:2081字 14图,预估阅读时间:7 分钟
上次发了服务器上公网的文章(),当时L2TP拨号用的是网络上的解决方案,也就是现成的脚本,一跑就OK了。像这样:
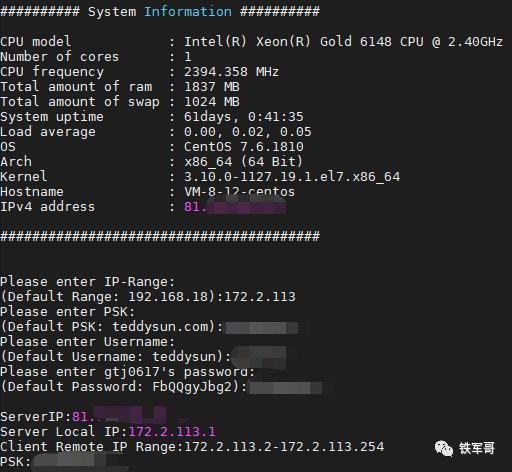
输入几个关键信息,脚本就自动执行完成了。我看了一下,脚本一共810行,功能很强大,系统方面支持CentOS 6+、Debian 7+、Ubuntu 12+。

但实际上有个隐藏的问题。上次部署用的是CentOS 7的系统,一切正常,重新部署之后腾讯云的CentOS仅支持8.3的镜像,安装频繁报错。
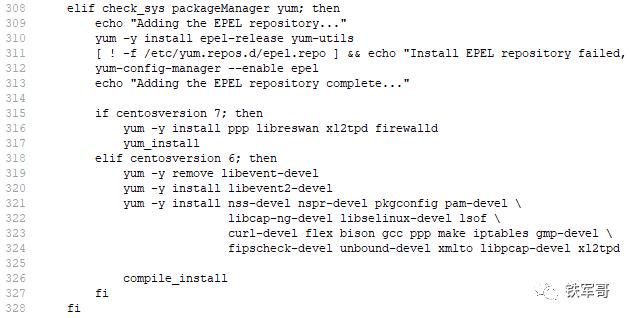
查看脚本内容发现,此脚本仅支持CentOS的6和7两个版本(所谓的6+),在8上,因为软件名称和操作命令变更,无法正常安装。
既然这样,那就只能拆解代码,自己安装了。
首先找到脚本中需要的软件,或者找到执行脚本时不能正常使用的命令,用yum provides来查找命令,最后整理一下,需要安装以下软件:
yum install -y make gcc gmp-devel xmlto bison flex libpcap lsof vim man xl2tpd libreswan
修改ipsec配置文件
vim /etc/ipsec.conf
在config setup中添加以下命令,充许传透nat建立l2tp连接。
nat_traversal=yes
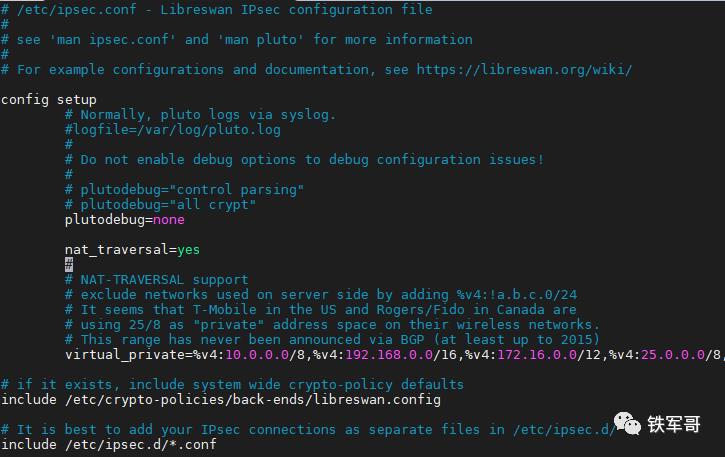
上图中最后一行可以看到include /etc/ipsec.d/*.conf这行代码,所以需要在/etc/ipsec.d/目录下创建IPsec与L2TP服务关联的配置文件。
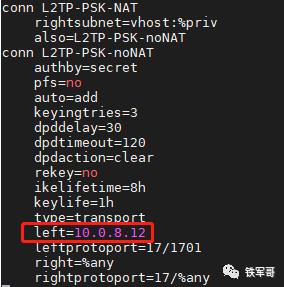
vim /etc/ipsec.d/l2tp_psk.conf
conn L2TP-PSK-NAT
rightsubnet=vhost:%priv
also=L2TP-PSK-noNAT
conn L2TP-PSK-noNAT
authby=secret
pfs=no
auto=add
keyingtries=3
dpddelay=30
dpdtimeout=120
dpdaction=clear
rekey=no
ikelifetime=8h
keylife=1h
type=transport
left=10.0.8.12
leftprotoport=17/1701
right=%any
rightprotoport=17/%any
在/etc/ipsec.d/目录下创建保存预共享密钥的文件,名字可自定义,扩展名为.secrets。
vim /etc/ipsec.d/ipsec.secrets
10.0.8.12 %any: PSK "test123"
修改sysctl的内核支持文件。
vim /etc/sysctl.conf
可以直接用下面的内容替换掉原来的文件。
vm.swappiness = 0
net.ipv4.ip_forward = 1
net.ipv4.conf.all.arp_announce=2
net.ipv4.conf.all.promote_secondaries = 1
net.ipv4.conf.all.rp_filter=0
net.ipv4.conf.default.accept_redirects = 0
net.ipv4.conf.default.accept_source_route = 0
net.ipv4.conf.default.arp_announce = 2
net.ipv4.conf.default.promote_secondaries = 1
net.ipv4.conf.default.rp_filter=0
net.ipv4.conf.default.send_redirects = 0
net.ipv4.conf.lo.arp_announce=2
net.ipv4.neigh.default.gc_thresh3 = 4096
net.ipv6.neigh.default.gc_thresh3 = 4096
net.ipv4.neigh.default.gc_stale_time=120
net.ipv4.tcp_max_syn_backlog = 1024
net.ipv4.tcp_max_tw_buckets = 5000
net.ipv4.tcp_synack_retries = 2
net.ipv4.tcp_syncookies = 1
net.ipv6.conf.all.disable_ipv6=0
net.ipv6.conf.default.disable_ipv6=0
net.ipv6.conf.lo.disable_ipv6=0
kernel.core_uses_pid = 1
kernel.msgmnb = 65536
kernel.msgmax = 65536
kernel.printk = 5
kernel.shmmax = 68719476736
kernel.softlockup_panic = 1
kernel.sysrq = 1
修改完保存退出,执行以下命令重新加载配置文件使配置生效。
sysctl -p
重启IPsec服务,并检验ipsec服务配置。
systemctl restart ipsec
ipsec verify
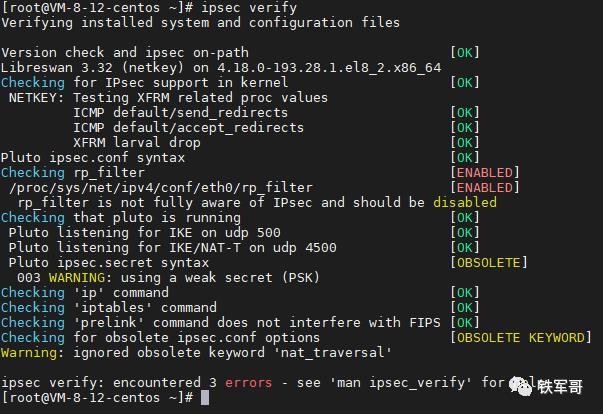
就是图里面/proc/sys/net/ipv4/conf/eth0/rp_filter这个文件很奇怪,使用vim无法编辑,修改权限也不行,但是可以用echo。那就用echo命令把里面的1换成0吧。
echo 0 > /proc/sys/net/ipv4/conf/eth0/rp_filter
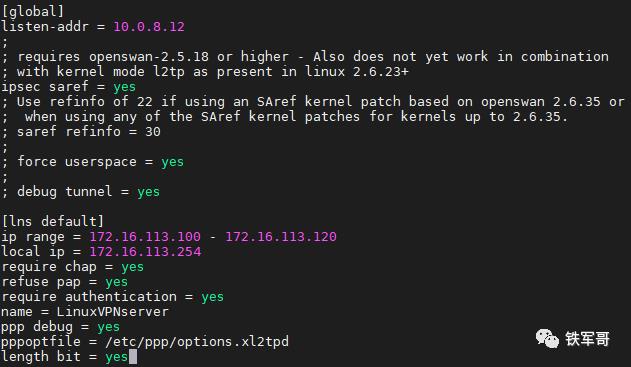
vim /etc/xl2tpd/xl2tpd.conf
主要修改4个地方配置:
2、[global]模块中,取消ipsec saref = yes的注释;
如下图:
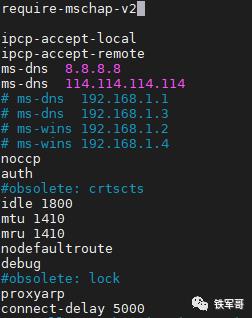
修改xl2tpd配置文件中的安全配置。
vim /etc/ppp/options.xl2tpd
文本中增加验证字段的算法要求,DNS视具体情况进行调整。
require-mschap-v2
将L2TP服务器的账户与密码写入/etc/ppp/chap-secrets文件。
vim /etc/ppp/chap-secrets

然后就是防火墙的规则调整了,首先停止firewalld服务并禁用。
systemctl stop firewalld
systemctl mask firewalld
安装iptables服务。
yum install -y iptables iptables-services
清空iptables规则。
iptables -P INPUT ACCEPT
iptables -F
iptables -X
iptables -Z
iptables -t nat -A POSTROUTING -j MASQUERADE
iptables -I FORWARD -s 172.16.113.0/24 -j ACCEPT
iptables -I FORWARD -d 172.16.113.0/24 -j ACCEPT
iptables -A INPUT -p udp -m policy --dir in --pol ipsec -m udp --dport 1701 -j ACCEPT
iptables -A INPUT -p udp -m udp --dport 1701 -j ACCEPT
iptables -A INPUT -p udp -m udp --dport 500 -j ACCEPT
iptables -A INPUT -p udp -m udp --dport 4500 -j ACCEPT
iptables -A INPUT -p esp -j ACCEPT
iptables -A INPUT -m policy --dir in --pol ipsec -j ACCEPT
iptables -A FORWARD -i ppp+ -m state --state NEW,RELATED,ESTABLISHED -j ACCEPT
iptables -A FORWARD -m state --state RELATED,ESTABLISHED -j ACCEPT
上述命令执行完后,保存iptables规则并重启服务。
service iptables save
systemctl restart iptables
走完上面的流程,现在就需要检查iptables、ipsec、xl2tpd三个服务是否是正常运行了。
systemctl status iptables
systemctl status ipsec
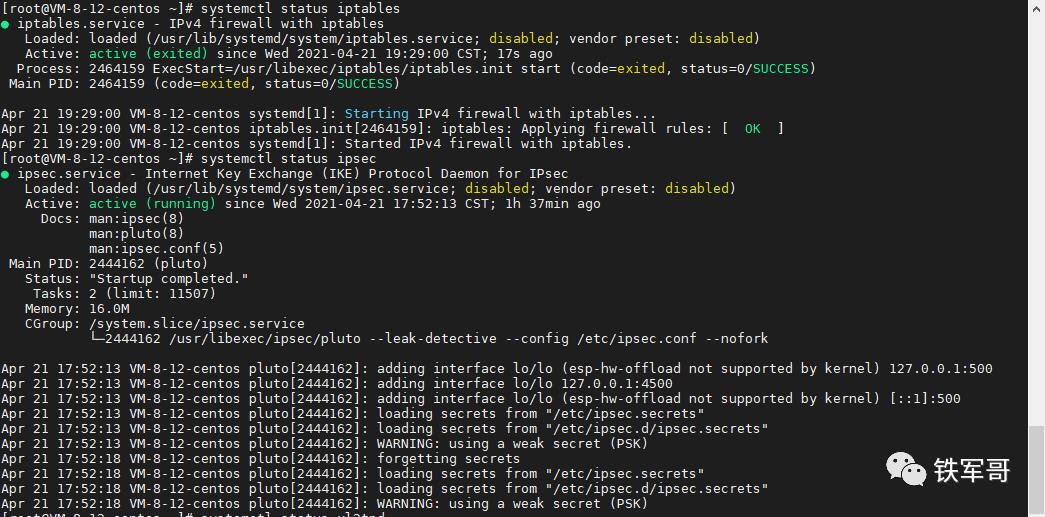
systemctl status xl2tpd
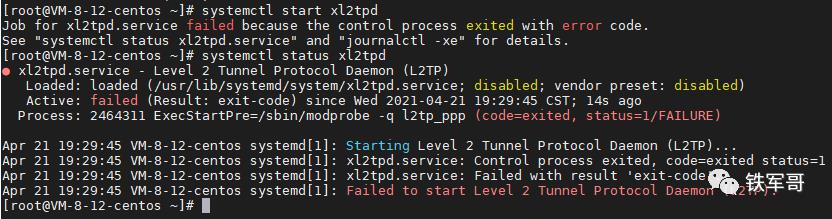
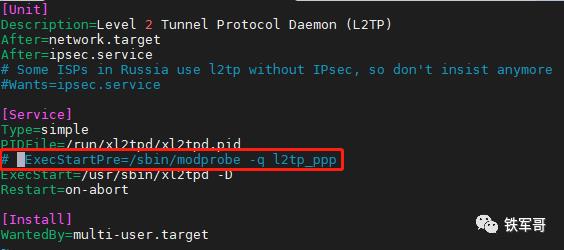
这个地方出了两次错误,第一次启动失败是内核重新挂载l2tp_ppp失败,需要修改/usr/lib/systemd/system/xl2tpd.service配置文件,注释掉相关配置。
ExecStartPre=/sbin/modprobe -q l2tp_ppp
然后执行以下命令重启服务。
systenctl daemon-reload
systemctl restart xl2tpd
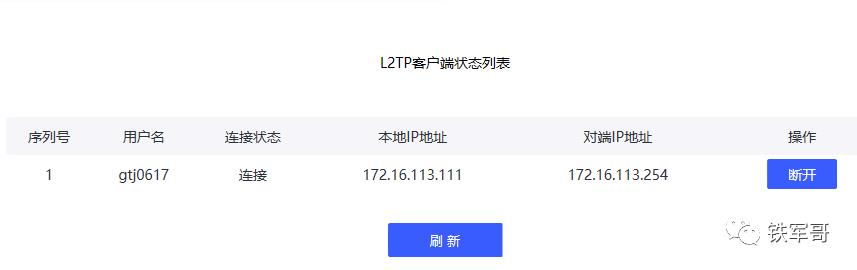
最后再看一下连接成功的页面。
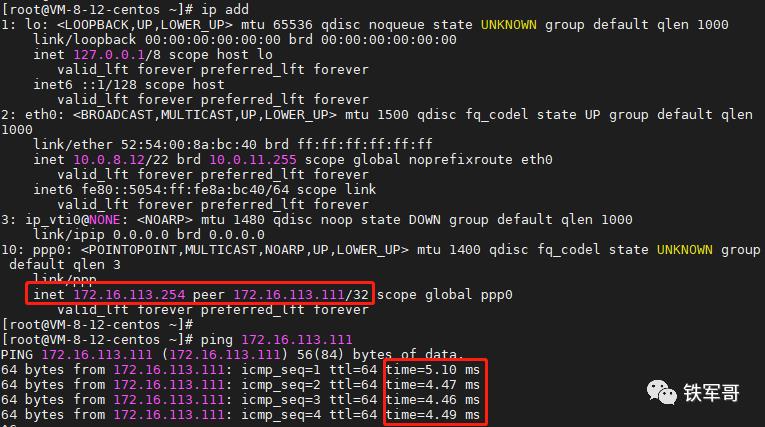
得益于高链路质量,延迟只有5ms左右。
今天,你学废了吗?

后台回复“l2tp”获取老版本的自动化部署脚本。
以上是关于CentOS8服务器搭建L2TP服务器(over IPsec)操作指南的主要内容,如果未能解决你的问题,请参考以下文章