☀️手把手教你Camel 环境搭建☀️《❤️记得收藏❤️》
Posted 苏州程序大白
tags:
篇首语:本文由小常识网(cha138.com)小编为大家整理,主要介绍了☀️手把手教你Camel 环境搭建☀️《❤️记得收藏❤️》相关的知识,希望对你有一定的参考价值。
☀️手把手教你Camel 环境搭建☀️《❤️记得收藏❤️》
目录
| 😊开讲啦!!!!🏳️🌈 |

🤺1、Vagrant 环境
😀1.1、Vagrant 是什么

Vagrant是一款用来构建虚拟开发环境的工具,它底层支持 VirtualBox、VMware 甚至 AWS 作为虚拟机系统,提供易于配置,重复性好,便携式的工作环境。也可以和 puppet,chef 结合,实现虚拟机管理的自动化。
😃1.2、Vagrant 能做什么
统一开发环境。一次配置打包,统一分发给团队成员,统一团队开发环境,解决诸如“编码问题”,“缺少模块”,“配置文件不同”带来的问题;
避免重复搭建开发环境。新员工加入,不用浪费时间搭建开发环境,快速加入开发,减少时间成本的浪费;
多个相互隔离开发环境。可以在不用box里跑不同的语言,或者编译安装同一语言不同版本,搭建多个相互隔离的开发环境,卸载清除时也很快捷轻松。
😄 1.3、Vagrant 相关软件下载
-
下载 vagrant
-
下载 VirtualBox
注意:以下以安装在 Windows 上为例,VirtualBox 和 Vagrant 不要装在同一分区里,Vagrant 默认选项安装到C盘。
😁1.4、Vagrant 配置环境变量(Windows)
🍇1.4.1、VirtualBox
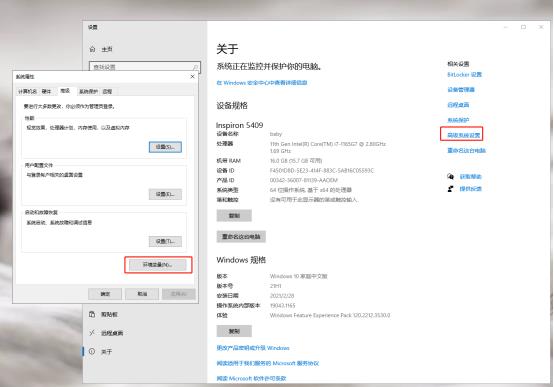
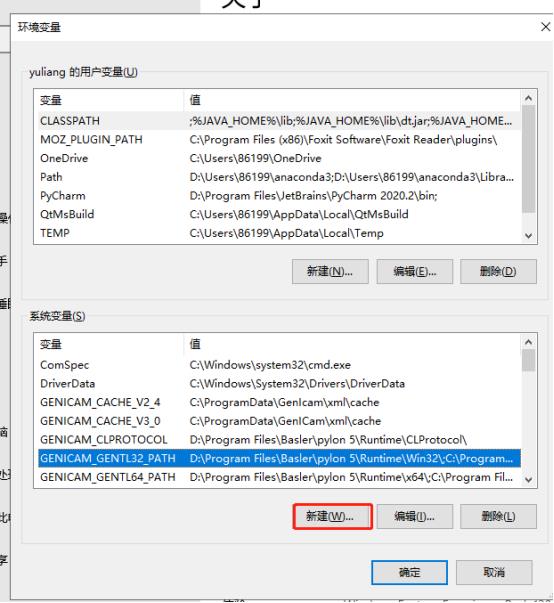
VirtualBox:将 %VirtualBox_homt% 添加到 Path 中,这样 Vagrant 才能被识别:
-
变量名:VBOX_MSI_INSTALL_PATH
-
变量值:D:\\软件\\VirtualBox(根据自己安装目录)


🍈1.4.2、Vagrant
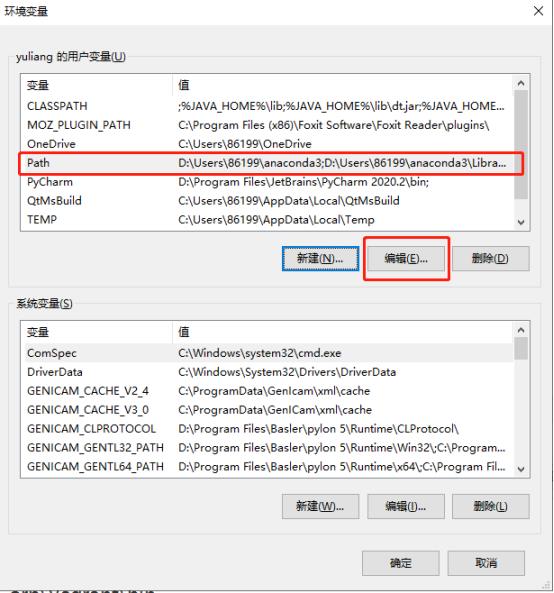
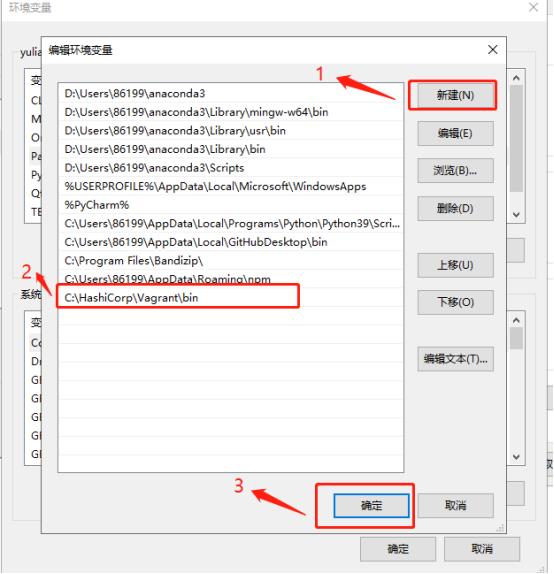
Vagrant:安装成功后,自动在 Path 中添加 %Vagrant_home%/bin,检查一下。
-
变量名:Path
-
变量值:…;C:\\HashiCorp\\Vagrant\\bin

😆1.5、启动 Vagrant
🍇1.5.1、创建 vagrant 环境目录
进入运行命令模式,创建测试文件夹(vagrant 环境所在目录)

进创建 vagrantdemo 目录
C:\\Users\\Administrator>md vagrantdemo
C:\\Users\\Administrator>cd vagrantdemo
🍈1.5.2、vagrant box 下载
box 是一个zip包,包含了 vagrant 的配置信息和 VirtualBox 的虚拟机镜像文件。
下载 box
🍉1.5.3、使用 box 方式安装系统
命令格式
vagrant box add "box_name" remoteUrl or localFile
box_name 可以是任意字符,用于标识 box。
使用 remoteUrl(远程地址)添加 box。
vagrant box add "centos7" https://github.com/holms/vagrant-centos7-box/releases/download/7.1.1503.001/CentOS-7.1.1503-x86_64-netboot.box
这种方式需要即时下载,较慢,建议下载下来 box,在本地添加。
或是使用 localFile(本地 box 文件)添加 box。
后面加绝对路径或进入同层目录。
agrant box add "centos7" CentOS-7.1.1503-x86_64-netboot.box
🍊1.5.4、初始化和 Vagrantfile
vagrant init "box_name"
初始化后会在当前目录(C:\\Users\\Administrator\\vagrantdemo)生成以一个 Vagrantfile 文件

Vagrantfile 详细使用请自行查阅资料或官方文档。
这里环境使用的 Vagrantfile,可以复制使用。
# -*- mode: ruby -*-
# vi: set ft=ruby :
Vagrant.configure("2") do |config|
config.vm.define :admin do |admin|
admin.vm.provider "virtualbox" do |v|
v.customize ["modifyvm", :id, "--name", "admin", "--memory", "1024"]
end
admin.vm.box = "centos7"
admin.vm.hostname = "camel-admin"
admin.vm.network "public_network"
end
config.vm.define :agent1 do |agent1|
agent1.vm.provider "virtualbox" do |v|
v.customize ["modifyvm", :id, "--name", "agent1", "--memory", "512"]
end
agent1.vm.box = "centos7"
agent1.vm.hostname = "agent1"
agent1.vm.network "public_network"
end
config.vm.define :agent2 do |agent2|
agent2.vm.provider "virtualbox" do |v|
v.customize ["modifyvm", :id, "--name", "agent2", "--memory", "512"]
end
agent2.vm.box = "centos7"
agent2.vm.hostname = "agent2"
agent2.vm.network "public_network"
end
end
🍋1.5.5、public_network 配置
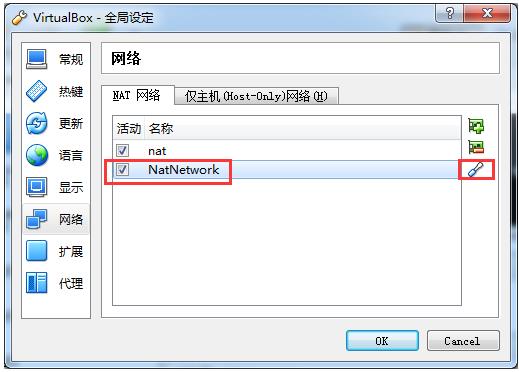
配置 Virtualbox 网络,使 vagrant 虚拟机获得本地 dhcp 分发的 ip。
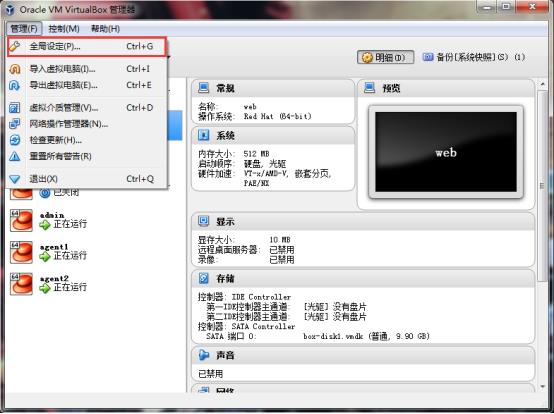
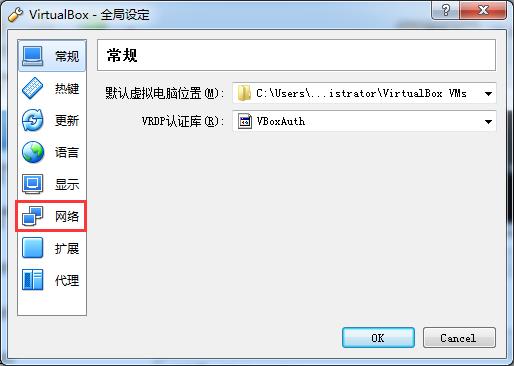
添加 nat 网络

编辑 nat 网络
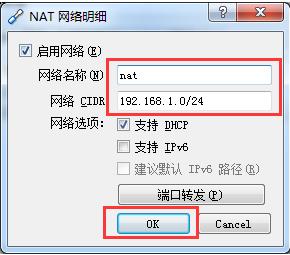
🍌1.5.6、启动虚拟机
vagrant up
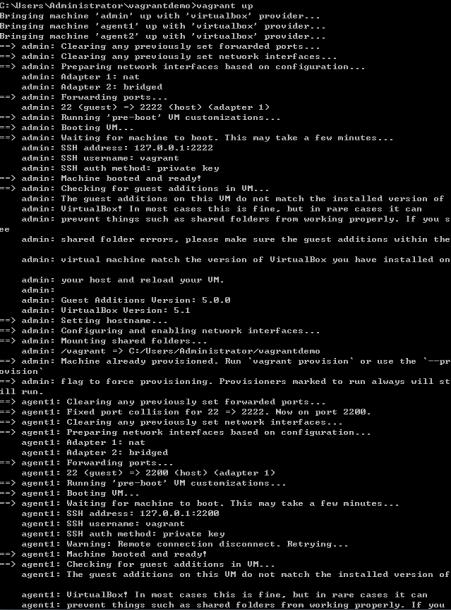
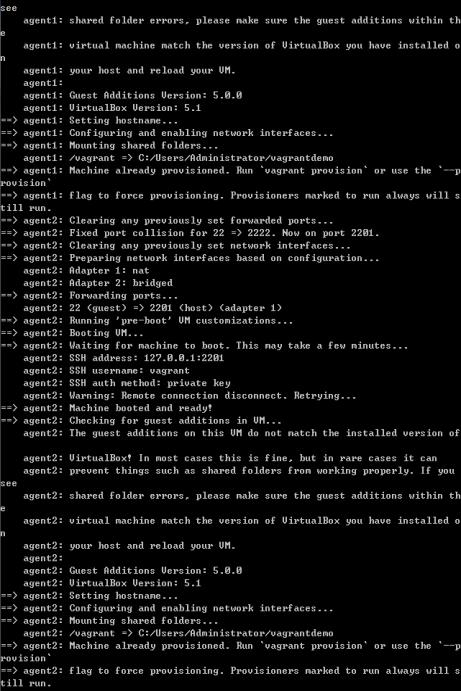
启动后会打开 3 台虚拟机 admin,agent1,agent2。
对应 127.0.0.1 的 2222、2200、2201 端口。
并获得本地 ip 地址。
😅1.6、使用 ssh 登录到虚拟机
windows 默认没有 ssh 命令,可以安装 babun 或 cmder
使用如下命令连接
C:\\Users\\Administrator\\vagrantdemo>vagrant ssh
下面使用xshell连接,初始账号密码都是vagrant
连接 camel-admin
ssh 127.0.0.1 2222
连接后使用 sudo passwd root 修改 root 密码

使用 ip a 查看获取到的局域网 dhcp ip
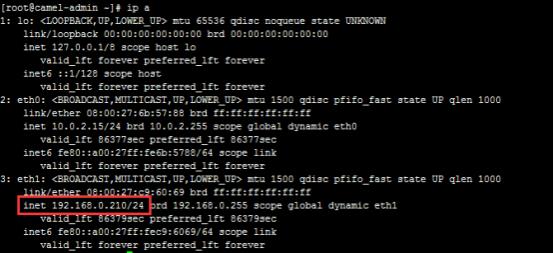
再次登录
ssh 192.168.1.210 连接 admin
连接 agent1
ssh 127.0.0.1 2200

连接agent2
ssh 127.0.0.1 2201

🏇2、camel 环境
admin 端需要安装 camel-admin 和 Dengine
agent 端需要安装 camel-agent 和 Dengine
🤣2.1、admin 端
🍇2.1.1、系统初始化和下载 camel
清除 vagrant 默认防火墙策略
chmod 755 /etc/rc.d/rc.local
echo "/usr/sbin/iptables -F" >> /etc/rc.local
iptables -F
关闭也可以
systemctl stop firewalld
systemctl disable firewalld
依赖包安装
yum install -y vim unzip maven net-tools git gcc gcc-c++ automake autoconf
libtool make ncurses-devel zlib zlib-devel libtermcap-devel libevent-devel readline-devel patch
下载 camel-master.zip 项目地址
nzip camel-master.zip
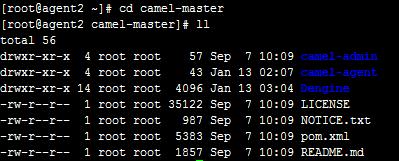
🍈2.1.2、安装 mariadb
yum -y install mariadb mariadb-server
systemctl start mariadb
systemctl enable mariadb
mariadb 初始化
mysql -uroot
MariaDB [(none)]> grant all on *.* to root@localhost identified by '123456';
MariaDB [(none)]> flush privileges;
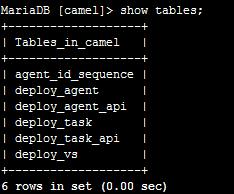
MariaDB [(none)]> create database camel;
MariaDB [(none)]> use camel;
MariaDB [(none)]>
source /root/camel-master/camel-admin/src/main/resources/init-data/create_table.sql
🍉2.1.3、安装 mongodb
下载 mongodb
注意:下载 3.0.7 版本,3.0.7 以上版本有问题最新 3.4.1 启动报错
mongodb 初始化
tar zxvf mongodb-linux-x86_64-rhel70-3.0.7.tgz
mv mongodb-linux-x86_64-rhel70-3.0.7 mongodb
cd mongodb
mkdir db logs

cd bin
vim mongodb.conf
dbpath=/root/mongodb/db
logpath=/root/mongodb/logs/mongodb.log
port=27017
fork=true
nohttpinterface=true

启动 mongodb
/root/mongodb/bin/mongod --bind_ip localhost -f /root/mongodb/bin/mongodb.conf

mongodb 建库
/root/mongodb/bin/mongo
> use camel_runtime
switched to db camel_runtime
> db.movie.insert({"name":"tutorials yiibai"})
WriteResult({ "nInserted" : 1 })
> use camel_nginx_log
switched to db camel_nginx_log
> db.movie.insert({"name":"tutorials yiibai"})
WriteResult({ "nInserted" : 1 })
> use camel_config
switched to db camel_config
> db.movie.insert({"name":"tutorials yiibai"})
WriteResult({ "nInserted" : 1 })
> show dbs
admin 0.000GB
camel_config 0.000GB
camel_nginx_log 0.000GB
camel_runtime 0.000GB
local 0.000GB
> exit

🍊2.1.4、配置 camel-admin 和生成 camel-admin 的 war 包
camel-admin 配置文件修改
grep -r "/data/appdatas/camel/" ./*
./src/main/resources/spring/applicationContext-properties.xml: <value>file:/data/appdatas/camel/jdbc-mysql.properties</value>
./src/main/resources/spring/applicationContext-properties.xml: <value>file:/data/appdatas/camel/mongo.properties</value>
./src/main/resources/spring/applicationContext-properties.xml: <value>file:/data/appdatas/camel/camel.properties</value>

mkdir -p /data/appdatas/camel/
cp /root/camel-master/camel-admin/src/main/resources/init-data/camel.properties /data/appdatas/camel/
vim camel.properties
# threshold of local nginx config check
local.nginx.config.check=true
cp /root/camel-master/camel-admin/src/main/resources/init-data/jdbc-mysql.properties /data/appdatas/camel/
vim /data/appdatas/camel/jdbc-mysql.properties
jdbc.driverClassName=com.mysql.jdbc.Driver
jdbc.username=root
jdbc.password=123456
jdbc.maxPoolSize=50
jdbc.minPoolSize=1
jdbc.initialPoolSize=1
jdbc.idleConnectionTestPeriod=1800
jdbc.maxIdleTime=3600
jdbc.checkoutTimeout=5000
jdbc.url=jdbc:mysql://127.0.0.1:3306/camel?useUnicode=true&characterEncoding=utf8&zeroDateTimeBehavior=convertToNull&noAccessToProcedureBodies=true&socketTimeout=5000&connectTimeout=5000
红色camel为之前mariadb新建的数据库名
cp src/main/resources/init-data/mongo.properties /data/appdatas/camel/
vim /data/appdatas/camel/mongo.properties
mongodb.url=127.0.0.1:27017
mongodb.dbname_config=camel_config
mongodb.dbname_nginx_log=camel_nginx_log
mongodb.dbname_runtime=camel_runtime
isCluster=false
connections-per-host=1800
slave-ok=false
添加 dns
否则后面下载无法解析
echo "nameserver 8.8.8.8" >> /etc/resolv.conf
构建 camel-admin
cd /root/camel-master/camel-admin/
mvn clean compile
时间较长,最后看到 BUILD SUCCESS 构建成功

生成 camel-admin 的 war 包
cd /root/camel-master/camel-admin/
mvn install package -Dmaven.test.skip=true
在 /root/camel-master/camel-admin/target/ 目录下生成 war 包

🍋2.1.5、安装 tomcat
这里使用 tomcat7,jdk 在之前 camel-admin 构建过程中已安装,为 openjdk将之前生成的 camel-admin 的 war 包放到 tomcat 项目目录。
cp camel-admin-1.0.0.war /opt/apache-tomcat-7.0.59/webapps/
🍌2.1.6、安装 Dengine
注意:Dengine 默认安装到 /usr/loca/nginx,安装 Dengine 之前,删除系统中安装在 /usr/loca/nginx 目录的 nginx,其他 nginx 不要安装到 /usr/loca/nginx 目录
cd /root/camel-master/Dengine/
./install_dengine
权限确认,/usr/local/nginx/conf/phoenix-slb/ 权限 777
chmod 777 /usr/local/nginx/conf/phoenix-slb/
访问策略配置
vim /usr/local/nginx/conf/nginx_status.conf
req_status_zone server "$host:$server_addr:$server_port" 10M;
check_shm_size 50M;
req_status server;
server {
  listen 6666;
  server_name aaabbbccc;
  location /status {
    check_status;
    access_log off;
    allow 192.168.0.210;
    # deny all;
  }
  location /degrade{
    upstream_degrade_interface;
    access_log off;
    allow 192.168.0.210;
    # deny all;
  }
  location / {
    return 444;
  }
}
server {
  listen 80 default_server;
  server_name aaabbbccc;
  location /status {
    echo "ok";
    default_type text/plain;
    access_log off;
    allow 192.168.0.210;
    # deny all;
  }
  location /reqstatus {
    req_status_show;
    access_log off;
    allow 192.168.0.210;
    # deny all;
  }
  location / {
    return 444;
  }
  error_page 404 403 =444 @static;
  location @static{
    return 444;
  }
}
🍍2.1.7、启动 Dengine 和 tomcat
启动 Dengine
/usr/local/nginx/sbin/nginx
开机自启动
echo "/usr/local/nginx/sbin/nginx" >> /etc/rc.local
启动 tomcat
cd /opt/apache-tomcat-7.0.59/bin/
./startup.sh
开机自启动
echo "/opt/apache-tomcat-7.0.59/bin/startup.sh" >> /etc/rc.local
🥭2.1.8、访问管理端首页
http://192.168.0.210:8080/camel-admin-1.0.0/

😂2.2、agent 端(agent1/agent2)
🍇2.2.1、系统初始化
清除 vagrant 默认防火墙策略
chmod 755 /etc/rc.d/rc.local
echo "/usr/sbin/iptables -F" >> /etc/rc.local
iptables -F
关闭也可以
systemctl stop firewalld
systemctl disable firewalld
🍈2.2.2、安装依赖包
yum -y install maven git gcc gcc-c++ automake autoconf libtool make ncurses-devel
zlib zlib-devel libtermcap-devel libevent-devel readline-devel patch
🍉2.2.3、安装 JDK
yum search java | grep -i --color JDK
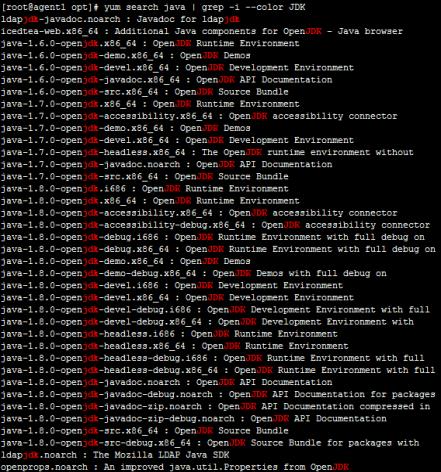
yum install java-1.7.0-openjdk
🍊2.2.4、添加 dns
vim /etc/resolv.conf
nameserver 8.8.8.8
🍋2.2.5、运行 camel-agent
cd /root/camel-master/camel-agent
运行 agent
mvn spring-boot:run > /root/camel-agent.out 2>&1 &
生成 war 包(可选)
mvn clean package
可以将 /root/camel-master/camel-agent/target 目录下生成的 war 包放到 tomcat 工程目录运行

🍌2.2.6、安装 tomcat(可选)
注意:如果已经使用 mvn spring-boot:run 方式启动 agent,跳过此步
这里使用 tomcat7,jdk 为 java-1.7.0-openjdk
将之前生成的 camel-admin 的 war 包放到 tomcat 项目目录
cp /root/camel-master/camel-agent/target/camel-agent-1.0.0.war /opt/apache-tomcat-7.0.59/webapps/
cd /opt/apache-tomcat-7.0.59/bin
./startup.sh
🍍2.2.7、安装 Dengine
注意:Dengine 默认安装到 /usr/loca/nginx,安装 Dengine 之前,删除系统中安装在 /usr/loca/nginx 目录的 nginx,其他 nginx 不要安装到 /usr/loca/nginx 目录。
cd /root/camel-master/Dengine/
./install_dengine
权限确认,/usr/local/nginx/conf/phoenix-slb/ 权限 777
chmod 777 /usr/local/nginx/conf/phoenix-slb/
访问策略配置
vim /usr/local/nginx/conf/nginx_status.conf
req_status_zone server "$host:$server_addr:$server_port" 10M;
check_shm_size 50M;
req_status server;
server {
  listen 6666;
  server_name aaabbbccc;
  location /status {
    check_status;
    access_log off;
    allow 192.168.0.210;
    # deny all;
  }
  location /degrade{
    upstream_degrade_interface;
    access_log off;
    allow 192.168.0.210;
    # deny all;
  }
  location / {
    return 444;
  }
}
server {
  listen 80 default_server;
  server_name aaabbbccc;
  location /status {
    echo "ok";
    default_type text/plain;
    access_log off;
    allow 192.168.0.210;
    # deny all;
  }
  location /reqstatus {
    req_status_show;
    access_log off;
    allow 192.168.0.210;
    # deny all;
  }
  location / {
    return 444;
  }
  error_page 404 403 =444 @static;
  location @static{
    return 444;
  }
}
cd /root/camel-master/Dengine/
./install_dengine
🥭2.2.8、启动 Dengine
启动 Dengine
/usr/local/nginx/sbin/nginx
开机自启动
echo "/usr/local/nginx/sbin/nginx" >> /etc/rc.local
开机自启动 camel-agent
echo " mvn spring-boot:run > /root/camel-agent.out 2>&1 &" >> /etc/rc.local
🤾♀3、camel 使用
😀3.1、创建 nginx 集群

😃3.2、nginx 集群重命名

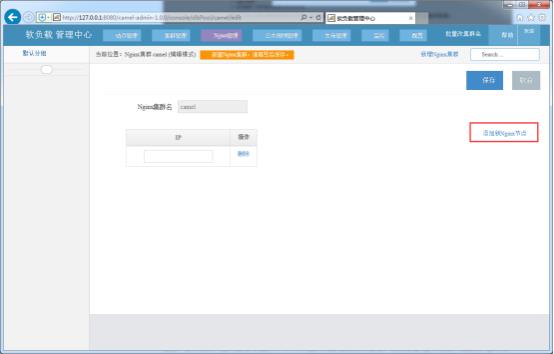
😄3.3、nginx 集群添加节点

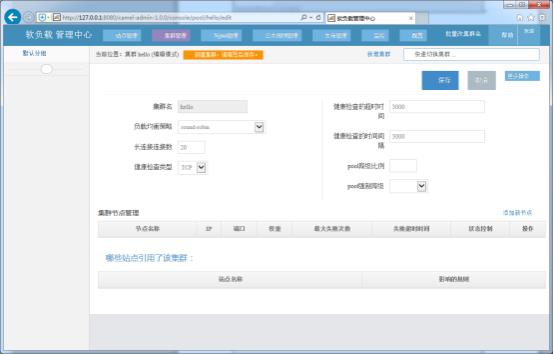
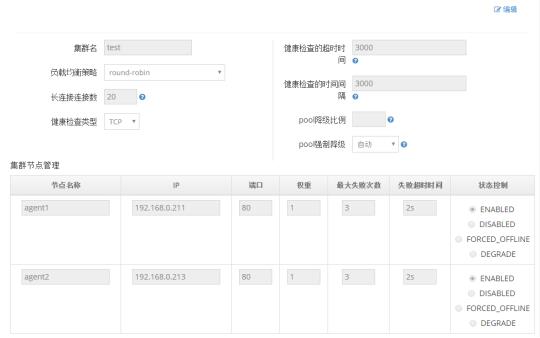
😁3.4、新增集群

😅3.5、集群重命名

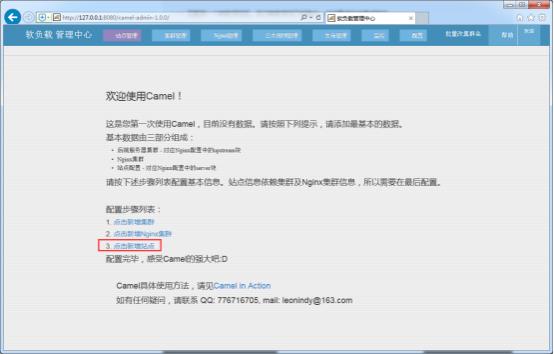
😆3.6、新增站点
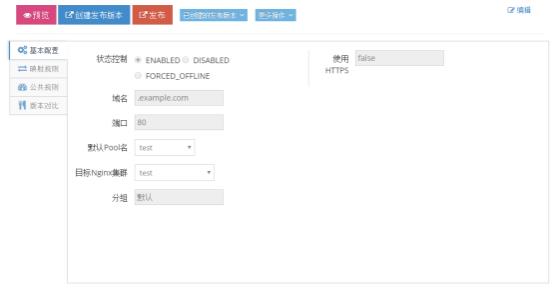
🤣3.7、站点命名

😂3.8、映射规则
编辑


详细

添加新指令


保存

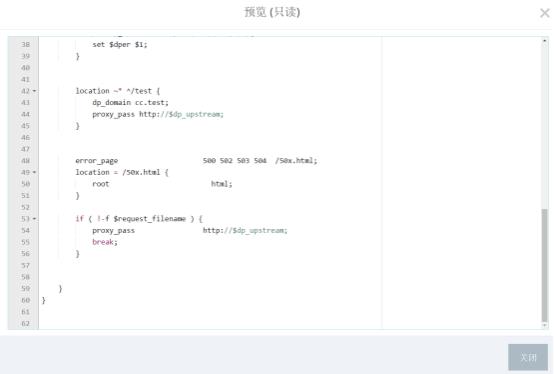
🙂3.9、预览


🙃3.10、创建发布版本


😉3.11、发布
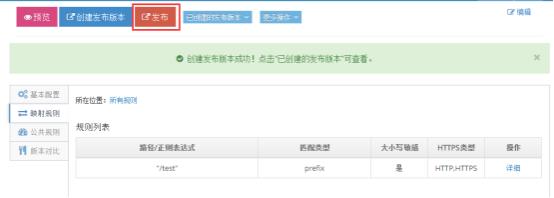
选择发布版本

😊3.12、最终发布页面
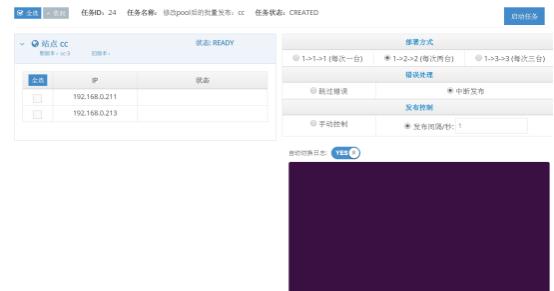
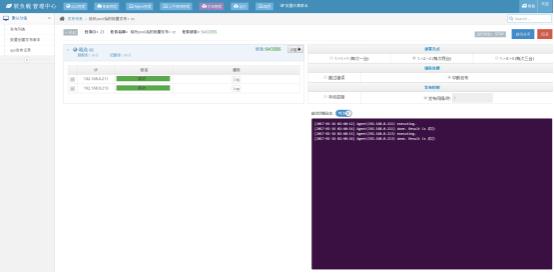
🏳️🌈关注苏州程序大白,持续更新技术分享。谢谢大家支持🏳️🌈

🏳️🌈关注苏州程序大白,持续更新技术分享。谢谢大家支持🏳️🌈

以上是关于☀️手把手教你Camel 环境搭建☀️《❤️记得收藏❤️》的主要内容,如果未能解决你的问题,请参考以下文章
☀️手把手教你用 C# 下载文件的十八般武艺☀️《❤️记得收藏❤️》
☀️苏州程序大白一文从基础手把手教你Python数据可视化大佬☀️《❤️记得收藏❤️》
☀️手把手教你Python+matplotlib模拟锁相放大器的原理以及工作过程☀️《❤️记得收藏❤️》
肝魂一晚上总结:全网最全最细手把手教你PyQt5安装与使用☀️《❤️记得收藏❤️》