IOS-Tom猫小游戏实现
Posted suwu150
tags:
篇首语:本文由小常识网(cha138.com)小编为大家整理,主要介绍了IOS-Tom猫小游戏实现相关的知识,希望对你有一定的参考价值。
在学习了ios知识后,今天我们来实现一个经典的ios小游戏,tom猫小游戏,废话不多说,直接入题。
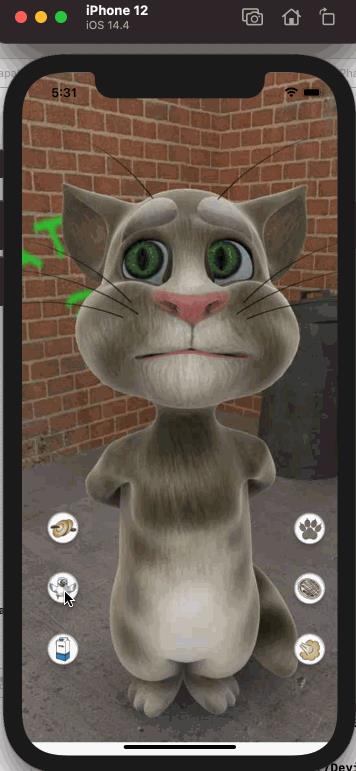
一、效果展示

二、准备工作与知识点
1. 因为该程序是通过图片形成的一系列动画生成的各类效果,因此我们需要准备实现时所需的图片,同时声音效果也是需要准备的,在文章结尾,我会将本次项目使用到的资源贴上来。
2.通过这个项目我们能够学习到oc中一些基础语法的使用,其中使用到了switch结构、按钮连线绑定方法、本地包图片资源获取等知识。
最新的项目代码已经推送到该地址:https://gitee.com/suwu150/tom-cat-play
下面是涉及到的图片资源和音频资源:https://download.csdn.net/download/suwu150/20464032
三、代码开发与分享
3.1 创建项目与目录结构说明
开始一个项目,我们最基本的就是创建项目,因为我们这个是手机app应用程序,那么我们就对应的创建ios应用,具体过程让我手把手来教给你.
首先创建项目,鼠标小手手移动到顶部[File->New->Project…],狠狠的点击下去,就会出现下面这个界面:

点击[Next]按钮,进入下一通道,然后呈现项目信息填写,如下:

填写完之后,就会出现这样的目录结构,说到底,这个结构中,对我们有用的文件也就四项,分别是:
- tomcat_img:存储图片资源和音频信息
- ViewController:实现按钮点击时事件响应
- Main.storyboard:小游戏界面主要布局,图片展示,效果舞台
- Assets.xcassets:按钮资源文件存储

3.2 页面布局、按钮布局、点击触发布局
ios中对于生成布局一般有两种方式,一种是通过代码生成各个子组件,然后再通过特定方法将子组件添加到父级容器中,今天我们采用最简单的方式来实现这个布局,好,那我们就拖拽大法走起。

按照上面步骤,我们点击顶部【+】号,然后按照我们需要放置的位置放入组件,效果如下面形式哈,这个可以看大家各自心情,其中我们用到的组件有:
- Image View:展示初始化界面、展示动画图片
- Button:相应点击效果,展示动作图标,响应点击头部和左右脚时的动作事件
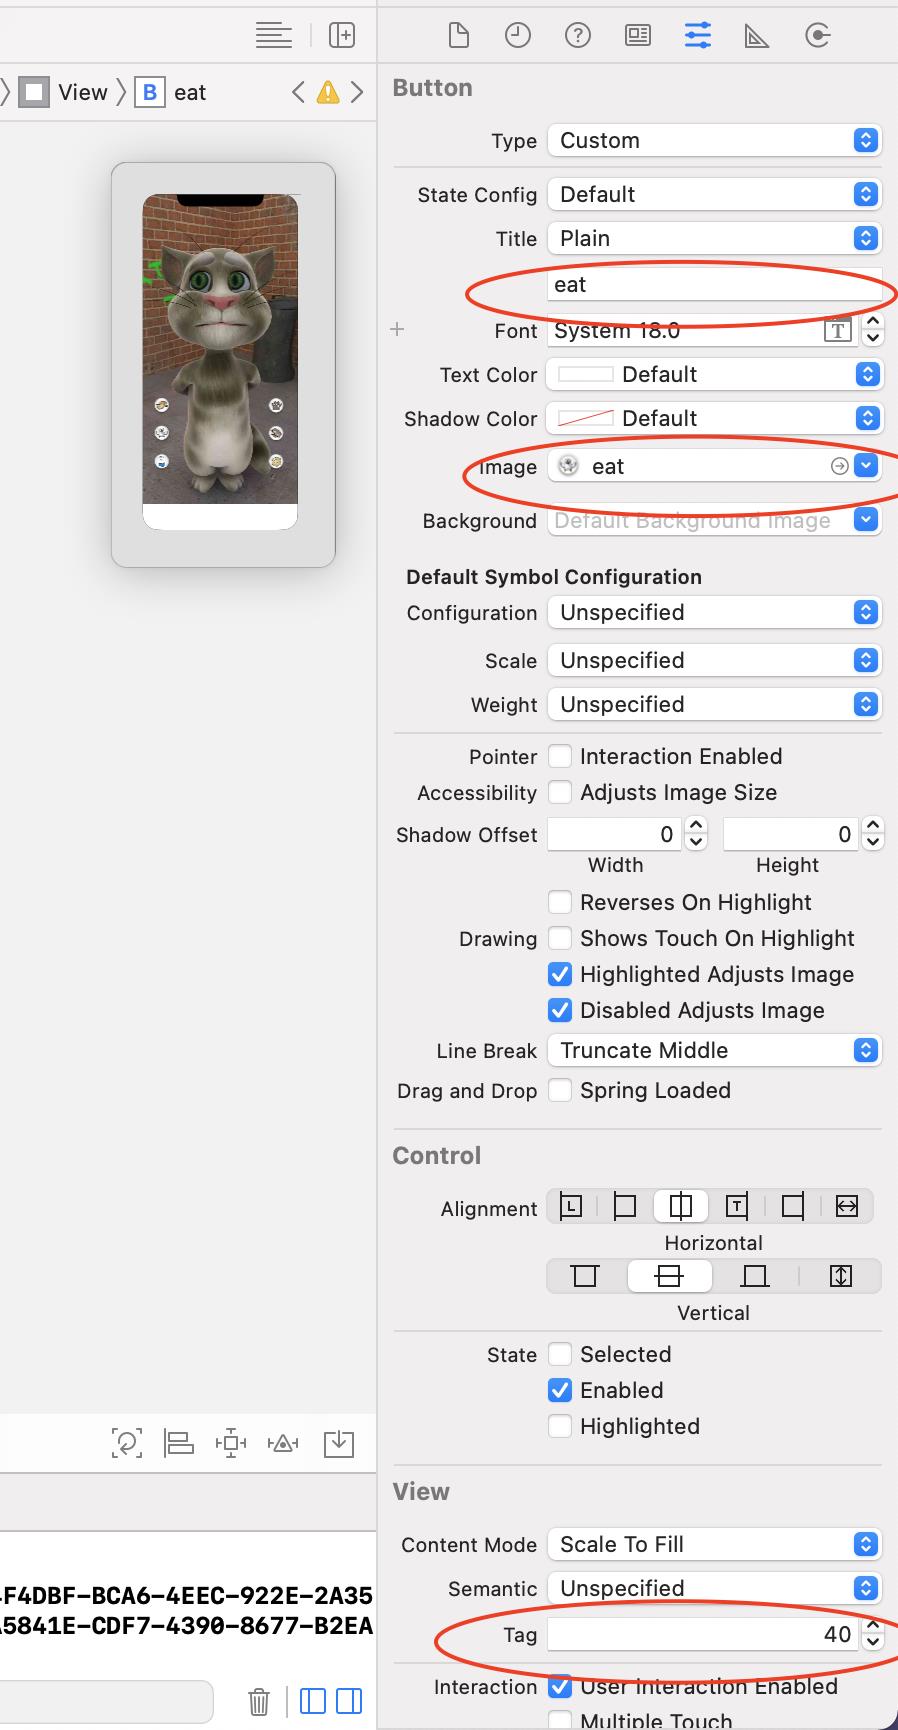
其实最开始我们推拽之后,是不会有这些图片按钮的,需要我们选中我们的按钮进行编辑,当我们选中按钮时,Xcode编辑器右边会有按钮属性,用来提示我们进行修改,下面我们就可以按照我们的效果进行修改,主要是进行更换背景图片

如上,我专门勾选了三个地方需要更改的: - 一是按钮标题,用来识别按钮
- 二是Image属性,用来给按钮设置背景,这里我们就设置了名称为eat的图片
- 三是给按钮设置唯一的编号,这个是在后面用来区分我们点击的是哪一个按钮的
好了,反正你就不停地拖拽鼠标,最后形成下面这个界面就可以了

3.3 点击事件响应与界面联动
对于点击事件响应,就是当我们点击按钮的时候,我们做出哪些响应,在我们这个小游戏里,我们是播放具体的动画,这个具体播放动画的细节,就在我们ViewController.m文件中进行实现,但是这块我们也可以通过拖拽去生成代码,具体操作是按住control按钮,然后拖动按钮到ViewController.m文件中,如下区域内,会自动弹出输入修改信息弹窗,按照我们要求输入doAction名称即可。
@interface ViewController ()
- (IBAction)doAction:(UIButton *)sender;
@end
按照同样方法,对所有按钮进行连接绑定,对Image View组件也同样进行绑定,并将其命名为imgViewCat,最终结果如下代码即可:
@interface ViewController ()

@property (weak, nonatomic) IBOutlet UIImageView *imgViewCat;
- (IBAction)doAction:(UIButton *)sender;
@end
最后我们需要在@implementation ViewController中实现这些绑定,由于我们需要处理的按钮形式类似,我们使用switch进行将他们具体划分,在这里就是用到了3.2节布局时配置的tag值了,通过sender.tag的形式传递给switch进行区分,然后执行不同的操作。
#import "ViewController.h";
#import <AudioToolbox/AudioToolbox.h>

@interface ViewController ()

@property (weak, nonatomic) IBOutlet UIImageView *imgViewCat;
- (IBAction)doAction:(UIButton *)sender;
@end

@implementation ViewController

- (void)viewDidLoad {
    [super viewDidLoad];
    // Do any additional setup after loading the view.
}

- (IBAction)doAction:(UIButton *)sender {
    NSLog(@"%@", @"6666");
    switch (sender.tag) {
        case 10:
            NSLog(@"%@", @"10");
            break;
        case 20:
            NSLog(@"%@", @"20");
            break;

        case 30:
            NSLog(@"%@", @"30");
            break;

        case 40:
            NSLog(@"%@", @"40");
            break;
        case 50:
            NSLog(@"%@", @"50");
            break;

        case 60:
            NSLog(@"%@", @"60");
            break;

        case 70:
            NSLog(@"%@", @"70");
            break;
        case 80:
            NSLog(@"%@", @"80");
            break;
        case 90:
            NSLog(@"%@", @"90");
            break;
        default:
            break;
    }
}

@end
到这里我们可以初步启动应用了,当我们点击个个按钮时,会进行打印出按钮当初配置的tag值。
3.4 动画实现
在完成以上效果的基础上,我们来实现动画播放,仍然是在ViewController.m文件中,我们分别添加定义和实现
// 定义方法
- (void)startAnimation:(int)count playPicName:(NSString *) playPicName soundName:(NSString *) soundName;


// 实现方法
// 其中使用到三个参数,分别是count,playPicName,soundName
- (void)startAnimation:(int)count playPicName:(NSString *) playPicName soundName:(NSString *) soundName  {
    NSLog(@"%@", @"开始动画");
    // 通过isAnimating属性进行判断,当前动画是否正在播放,当正在播放时,阻止其重新开始播放
    if(self.imgViewCat.isAnimating){
        return;
    }
    // 定义数组,用于存储需要播放动画的图片资源
    NSMutableArray *arrayM = [NSMutableArray array];
    for (int i = 0; i <= count; i++) {
    // 按照索引进行格式化图片名称,【@"%@_%02d.jpg"】格式用来格式化名称,同时补齐数字
        NSString *imgName = [NSString stringWithFormat: @"%@_%02d.jpg", playPicName, i];
        // [NSBundle mainBundle]表示安装包所在的地址路径
        // 封装资源图片的路径地址
        NSString *path = [[NSBundle mainBundle] pathForResource:imgName ofType:nil];
        // 按照路径读取图片资源文件
        UIImage *imgCat = [UIImage imageWithContentsOfFile: path];
        NSLog(@"%@_%@_%@", imgCat, path, imgName);
        [arrayM addObject:imgCat];

    }

    self.imgViewCat.animationImages = arrayM;
    // 设置每一帧之间的间隔
    self.imgViewCat.animationDuration = count * 0.04;
    // 设置动画重复次数
    self.imgViewCat.animationRepeatCount = 1;
    // 同步调用音频播放,在后面一步进行实现该方法
    // [self playSoundEffect: soundName];
    // 开始播放动画
    [self.imgViewCat startAnimating];

}
- count: 代表每个动画的帧数,通过参数的形式传递给播放方法
- playPicName:需要播放动画的名称,用于在资源包中查找图片资源
- soundName:用于播放动画时,同步播放音频的名称,播放音频文件
实现完该方法之后,我们需要将其添加到最开始我们设置的switch响应方法中,通过调用startAnimation方法传递不同的参数的形式去实现对应的动画效果。
- (IBAction)doAction:(UIButton *)sender {
    switch (sender.tag) {
        case 10:
            NSLog(@"%@", @"10");
            [self startAnimation: 12 playPicName:@"cymbal" soundName: @"cymbal.m4a"];
            break;
        case 20:
            NSLog(@"%@", @"20");
            [self startAnimation: 27 playPicName:@"fart" soundName: @"fart003_11025.m4a"];
            break;
        case 30:
            NSLog(@"%@", @"30");
            [self startAnimation: 80 playPicName:@"drink" soundName: @"drink.m4a"];
            break;
        case 40:
            NSLog(@"%@", @"40");
            [self startAnimation: 39 playPicName:@"eat" soundName: @"eat.m4a"];
            break;
        case 50:
            NSLog(@"%@", @"50");
            [self startAnimation: 55 playPicName:@"scratch" soundName: @"scratch.m4a"];
            break;
        case 60:
            NSLog(@"%@", @"60");
            [self startAnimation: 23 playPicName:@"pie" soundName: @"pie.m4a"];
            break;
        case 70:
            NSLog(@"%@", @"70");
            [self startAnimation: 80 playPicName:@"knockout" soundName: @"knockout.m4a"];
            break;
        case 80:
            NSLog(@"%@", @"80");
            [self startAnimation: 29 playPicName:@"foot_right" soundName: @"foot_right.m4a"];
            break;
        case 90:
            NSLog(@"%@", @"90");
            [self startAnimation: 29 playPicName:@"foot_left" soundName: @"foot_left.m4a"];
            break;
        default:
            break;
    }
}
3.5 声音播放
在完成以上效果的基础上,我们来实现声音音频的播放,仍然是在ViewController.m文件中,我们分别添加定义和实现
// 定义方法
- (void)playSoundEffect:(NSString *)name;

// 实现方法
/**
 * 播放音效文件
 *
 * @param name 音频文件名称 */
-(void)playSoundEffect:(NSString *)name{
    NSString *audioFile=[[NSBundle mainBundle] pathForResource:name ofType:nil];
    NSURL *fileUrl=[NSURL fileURLWithPath:audioFile];
    //1.获得系统声音ID
    SystemSoundID soundID=0;
    /**
     * inFileUrl: 音频文件url
     * outSystemSoundID:声 id(此函数会将音效文件加入到系统音频服务中并返回一个长整形ID) */
    AudioServicesCreateSystemSoundID((__bridge CFURLRef)(fileUrl), &soundID);
    //如果需要在播放完之后执行某些操作,可以调用如下方法注册一个播放完成回调函数        AudioServicesAddSystemSoundCompletion(soundID, NULL, NULL, soundCompleteCallback, NULL);
    //2.播放音频
    AudioServicesPlaySystemSound(soundID);//播放音效
    AudioServicesPlayAlertSound(soundID);//播放音效并震动
}
- name:用于播放动画时,同步播放音频的名称,播放音频文件
完成该方法后,将其同步添加到动画播放的步骤中,就算大功告成了。
3.6 完整代码
通过上面每一步的具体操作,我们就可以正式运行我们的项目了,起飞吧,当我们点击按钮时,分别出发对应的响应,实现整个动画和音频的播放,下面是整个完整的代码:
#import "ViewController.h";
#import <AudioToolbox/AudioToolbox.h>

@interface ViewController ()

@property (weak, nonatomic) IBOutlet UIImageView *imgViewCat;
- (IBAction)doAction:(UIButton *)sender;
- (void)startAnimation:(int)count playPicName:(NSString *) playPicName soundName:(NSString *) soundName;
- (void)playSoundEffect:(NSString *)name;
@end

@implementation ViewController

- (void)viewDidLoad {
    [super viewDidLoad];
    // Do any additional setup after loading the view.
}

/**
 * 播放音效文件
 *
 * @param name 音频文件名称 */
-(void)playSoundEffect:(NSString *)name{
    NSString *audioFile=[[NSBundle mainBundle] pathForResource:name ofType:nil];
    NSURL *fileUrl=[NSURL fileURLWithPath:audioFile];
    //1.获得系统声音ID
    SystemSoundID soundID=0;
    /**
     * inFileUrl: 音频文件url
     * outSystemSoundID:声 id(此函数会将音效文件加入到系统音频服务中并返回一个长整形ID) */
    AudioServicesCreateSystemSoundID((__bridge CFURLRef)(fileUrl), &soundID);
    //如果需要在播放完之后执行某些操作,可以调用如下方法注册一个播放完成回调函数 AudioServicesAddSystemSoundCompletion(soundID, NULL, NULL, soundCompleteCallback, NULL);
    //2.播放音频
    AudioServicesPlaySystemSound(soundID);//播放音效
    AudioServicesPlayAlertSound(soundID);//播放音效并震动
}
// 实现方法
// 其中使用到三个参数,分别是count,playPicName,soundName
- (void)startAnimation:(int)count playPicName:(NSString *) playPicName soundName:(NSString *) soundName  {
    NSLog(@"%@", @"开始动画");
    // 通过isAnimating属性进行判断,当前动画是否正在播放,当正在播放时,阻止其重新开始播放
    if(self.imgViewCat.isAnimating){
        return;
    }
    // 定义数组,用于存储需要播放动画的图片资源
    NSMutableArray *arrayM = [NSMutableArray array];
    for (int i = 0; i <= count; i++) {
    // 按照索引进行格式化图片名称,【@"%@_%02d.jpg"】格式用来格式化名称,同时补齐数字
        NSString *imgName = [NSString stringWithFormat: @"%@_%02d.jpg", playPicName, i];
        // [NSBundle mainBundle]表示安装包所在的地址路径
        // 封装资源图片的路径地址
        NSString *path = [[NSBundle mainBundle] pathForResource:imgName ofType:nil];
        // 按照路径读取图片资源文件
        UIImage *imgCat = [UIImage imageWithContentsOfFile: path];
        NSLog(@"%@_%@_%@", imgCat, path, imgName);
        [arrayM addObject:imgCat];

    }

    self.imgViewCat.animationImages = arrayM;
    // 设置每一帧之间的间隔
    self.imgViewCat.animationDuration = count * 0.04;
    // 设置动画重复次数
    self.imgViewCat.animationRepeatCount = 1;
    // 同步调用音频播放,在后面一步进行实现该方法
    [self playSoundEffect: soundName];
    // 开始播放动画
    [self.imgViewCat startAnimating];
}

- (IBAction)doAction:(UIButton *)sender {
    switch (sender.tag) {
        case 10:
            NSLog(@"%@", @"10");
            [self startAnimation: 12 playPicName:@"cymbal" soundName: @"cymbal.m4a"];
            break;
        case 20:
            NSLog(@"%@", @"20");
            [self startAnimation: 27 playPicName:@"fart" soundName: @"fart003_11025.m4a"];
            break;
        case 30:
            NSLog(@"%@", @"30");
            [self startAnimation: 80 playPicName:@"drink" soundName: @"drink.m4a"];
            break;
        case 40:
            NSLog(@"%@", @"40");
            [self startAnimation: 39 playPicName:@"eat" soundName: @"eat.m4a"];
            break;
        case 50:
            NSLog(@"%@", @"50");
            [self startAnimation: 55 playPicName:@"scratch" soundName: @"scratch.m4a"];
            break;
        case 60:
            NSLog(@"%@", @"60");
            [self startAnimation: 23 playPicName:@"pie" soundName: @"pie.m4a"];
            break;
        case 70:
            NSLog(@"%@", @"70");
            [self startAnimation: 80 playPicName:@"knockout" soundName: @"knockout.m4a"];
            break;
        case 80:
            NSLog(@"%@", @"80");
            [self startAnimation: 29 playPicName:@"foot_right" soundName: @"foot_right.m4a"];
            break;
        case 90:
            NSLog(@"%@", @"90");
            [self startAnimation: 29 playPicName:@"foot_left" soundName: @"foot_left.m4a"];
            break;
        default:
            break;
    }
}
@end
四、总结
经过上面一系列的操作,已经完成了我们的小游戏了,可以安装到自己的手机上尝尝鲜了,哈哈哈哈。
针对这个小游戏,我们主要是通过拖拽可视化界面的形式布局,然后通过Switch的方案区分具体点击内容,最后通过封装动画播放和声音音频播放完成整个小游戏。
对于以上使用到的各个资源,已经分发到能够下载到的平台,如果在下载时遇到问题,可随时联系。
最新的项目代码已经推送到该地址:https://gitee.com/suwu150/tom-cat-play
下面是涉及到的图片资源和音频资源:https://download.csdn.net/download/suwu150/20464032
接着,我们干了这碗毒鸡汤,各位再会。

以上是关于IOS-Tom猫小游戏实现的主要内容,如果未能解决你的问题,请参考以下文章