TensorFlow实现去噪自编码器(Denoising Autoencoder)
Posted 盼小辉丶
tags:
篇首语:本文由小常识网(cha138.com)小编为大家整理,主要介绍了TensorFlow实现去噪自编码器(Denoising Autoencoder)相关的知识,希望对你有一定的参考价值。
TensorFlow实现去噪自编码器(Denoising Autoencoder)
去噪自编码器(Denoising Autoencoder, DAE)
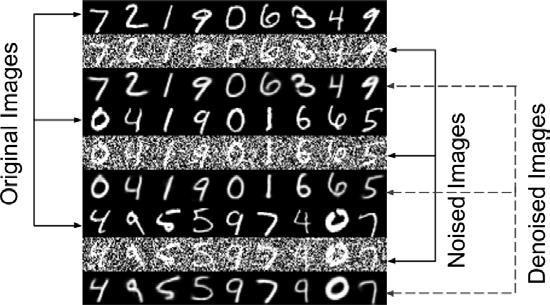
在介绍去噪自编码器 (Denoising Autoencoder, DAE) 之前,首先介绍下DAE的一种使用场景示例,当我们在夜晚拍照时,或者其他黑暗环境时,我们的照片总是被大量的噪点所充斥,严重影响了图像质量,而 DAE 的目的就是用来去除这些图像中的噪声。为了更好的讲解 DAE,使用简单的 MNIST 数据集进行演示,以将我们的重心放在有关 DAE 的知识上。如下图所示,显示了三组 MNIST 数字。每组的顶行是原始图像 (Original Images);中间的行显示 DAE 的输入 (Noised Images),这些输入是被噪声破坏的原始图像,当噪声过多时,我们将很难读懂被破坏的数字;最后一行显示DAE的输出 (Denoised Images)。

Tips:如果对于自编码器还不是很了解的小伙伴,可以参考自编码器模型详解与实现(采用tensorflow2.x实现)。
接下来就让我们实际构建一个 DAE,以消除图像中的噪声。
DAE模型架构
 根据 DAE 的介绍可以将输入定义为:
x
=
x
o
r
i
g
+
n
o
i
s
e
x = x_{orig} + noise
x=xorig+noise
其中
x
o
r
i
g
x_{orig}
xorig 表示被噪声
n
o
i
s
e
noise
noise 破坏的原始 MNIST 图像,编码器的目的是学习潜矢量
z
z
z。DAE的损失函数表示为:
L
(
x
o
r
i
g
,
x
~
)
=
M
S
E
=
1
m
∑
i
=
1
i
=
m
(
x
o
r
i
g
i
−
x
~
i
)
2
\\mathcal L(x_{orig}, \\tilde x)=MSE=\\frac 1 m \\sum_{i=1} ^{i=m}(x_{orig_i}-\\tilde x_i)^2
L(xorig,x~)=MSE=m1i=1∑i=m(xorigi−x~i)2
其中, m m m 是输出的维度,例如在MNIST数据集中, m = w i d t h × h e i g h t × c h a n n e l s = 28 × 28 × 1 = 784 m=width × height×channels=28 × 28 × 1 = 784 m=width×height×channels=28×28×1=784。 x o r i g i x_{orig_i} xorigi 和 x i x_i xi 分别是 x o r i g x_{orig} xorig 和 x ~ \\tilde x x~ 中的元素。
DAE实现
数据预处理
为了实现DAE,首先需要构造训练数据集,输入数据是添加噪声的 MNIST 数字,训练输出数据是原始的干净 MNIST 数字。添加的噪声需要满足高斯分布,均值 μ = 0.5 μ = 0.5 μ=0.5,标准差 σ = 0.5 σ = 0.5 σ=0.5。由于添加随机噪声可能会产生小于0或大于1的无效像素值,因此需要将像素值裁剪为[0.0,1.0]范围内。
import numpy as np
import tensorflow as tf
from tensorflow import keras
from matplotlib import pyplot as plt
from PIL import Image

# 数据加载
(x_train,_),(x_test,_) = keras.datasets.mnist.load_data()

# 数据预处理
image_size = x_train.shape[1]
x_train = np.reshape(x_train,[-1,image_size,image_size,1])
x_test = np.reshape(x_test,[-1,image_size,image_size,1])
x_train = x_train.astype('float32') / 255.
x_test = x_test.astype('float32') / 255.

# 产生高斯分布的噪声
noise = np.random.normal(loc=0.5,scale=0.5,size=x_train.shape)
x_train_noisy = x_train + noise
noise = np.random.normal(loc=0.5,scale=0.5,size=x_test.shape)
x_test_noisy = x_test + noise

# 将像素值裁剪为[0.0,1.0]范围内
x_train_noisy = np.clip(x_train_noisy,0.0,1.0)
x_test_noisy = np.clip(x_test_noisy,0.0,1.0)
模型构建与模型训练
# 超参数
input_shape = (image_size,image_size,1)
batch_size = 32
kernel_size = 3
latent_dim = 16
layer_filters = [32,64]

"""
模型
"""
#编码器
inputs = keras.layers.Input(shape=input_shape,name='encoder_input')
x = inputs
for filters in layer_filters:
    x = keras.layers.Conv2D(filters=filters,
            kernel_size=kernel_size,
            strides=2,
            activation='relu',
            padding='same')(x)
shape = keras.backend.int_shape(x)

x = keras.layers.Flatten()(x)
latent = keras.layers.Dense(latent_dim,name='latent_vector')(x)
encoder = keras.Model(inputs,latent,name='encoder')
encoder.summary()

# 解码器
latent_inputs = keras.layers.Input(shape=(latent_dim,),name='decoder_input')
x = keras.layers.Dense(shape[1]*shape[2]*shape[3])(latent_inputs)
x = keras.layers.Reshape((shape[1],shape[2],shape[3]))(x)
for filters in layer_filters[::-1]:
    x = keras.layers.Conv2DTranspose(filters=filters,
            kernel_size=kernel_size,
            strides=2,
            padding='same',
            activation='relu')(x)
outputs = keras.layers.Conv2DTranspose(filters=1,
        kernel_size=kernel_size,
        padding='same',
        activation='sigmoid',
        name='decoder_output')(x)
decoder = keras.Model(latent_inputs,outputs,name='decoder')
decoder.summary

autoencoder = keras.Model(inputs,decoder(encoder(inputs)),name='autoencoder')
autoencoder.summary()

# 模型编译与训练
autoencoder.compile(loss='mse',optimizer='adam')
autoencoder.fit(x_train_noisy,
        x_train,validation_data=(x_test_noisy,x_test),
        epochs=10,
        batch_size=batch_size)

# 模型测试
x_decoded = autoencoder.predict(x_test_noisy)

rows,cols = 3,9
num = rows * cols
imgs = np.concatenate([x_test[:num],x_test_noisy[:num],x_decoded[:num]])
imgs = imgs.reshape((rows * 3, cols, image_size, image_size))
imgs = np.vstack(np.split(imgs,rows,axis=1))
imgs = imgs.reshape((rows * 3,-1,image_size,image_size))
imgs = np.vstack([np.hstack(i) for i in imgs])
imgs = (imgs * 255).astype(np.uint8)
plt.figure()
plt.axis('off')
plt.imshow(imgs,interpolation='none',cmap='gray')
plt.show()
效果展示

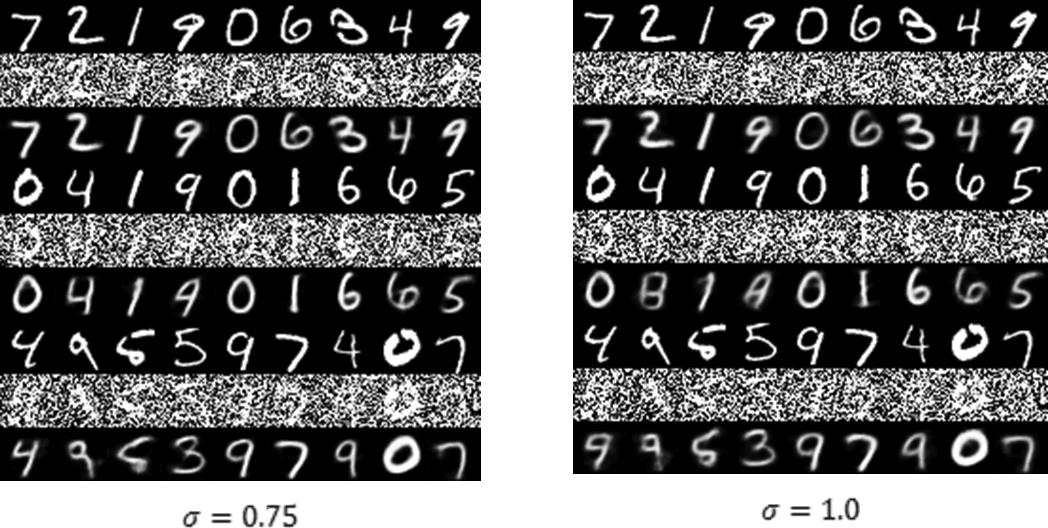
如上图所示,当噪声水平从
σ
=
0.5
σ=0.5
σ=0.5 增加到
σ
=
0.75
σ=0.75
σ=0.75 和
σ
=
1.0
σ=1.0
σ=1.0 时,DAE 具有一定的鲁棒性,可以较好的恢复出原始图像。但是,在
σ
=
1.0
σ=1.0
σ=1.0 时,某些数字,没有被正确地恢复。
以上是关于TensorFlow实现去噪自编码器(Denoising Autoencoder)的主要内容,如果未能解决你的问题,请参考以下文章
TensorFlow实现去噪自编码器及使用—Masking Noise Auto Encoder
TensorFlow实现去噪自编码器及使用—Masking Noise Auto Encoder