SpringBoot基础篇之@Value中哪些你不知道的知识点
Posted 一灰灰Blog
tags:
篇首语:本文由小常识网(cha138.com)小编为大家整理,主要介绍了SpringBoot基础篇之@Value中哪些你不知道的知识点相关的知识,希望对你有一定的参考价值。

看到这个标题,有点夸张了啊,@Value 这个谁不知道啊,不就是绑定配置么,还能有什么特殊的玩法不成?
(如果下面列出的这些问题,已经熟练掌握,那确实没啥往下面看的必要了)
@Value对应的配置不存在,会怎样?- 默认值如何设置
- 配置文件中的列表可以直接映射到列表属性上么?
- 配置参数映射为简单对象的三种配置方式
- 除了配置注入,字面量、SpEL支持是否了解?
- 远程(如db,配置中心,http)配置注入可行否?
接下来,限于篇幅问题,将针对上面提出的问题的前面几条进行说明,最后两个放在下篇
I. 项目环境
先创建一个用于测试的SpringBoot项目,源码在最后贴出,友情提示源码阅读更友好
1. 项目依赖
本项目借助SpringBoot 2.2.1.RELEASE + maven 3.5.3 + IDEA进行开发
2. 配置文件
在配置文件中,加一些用于测试的配置信息
application.yml
auth:
  jwt:
    token: TOKEN.123
    expire: 1622616886456
    whiteList: 4,5,6
    blackList:
      - 100
      - 200
      - 300
    tt: token:tt_token; expire:1622616888888
II. 使用case
1. 基本姿势
通过${}来引入配置参数,当然前提是所在的类被Spring托管,也就是我们常说的bean
如下,一个常见的使用姿势
@Component
public class ConfigProperties {

    @Value("${auth.jwt.token}")
    private String token;

    @Value("${auth.jwt.expire}")
    private Long expire;
}
2. 配置不存在,抛异常
接下来,引入一个配置不存在的注入,在项目启动的时候,会发现抛出异常,导致无法正常启动
/**
 * 不存在,使用默认值
 */
@Value("${auth.jwt.no")
private String no;
抛出的异常属于BeanCreationException, 对应的异常提示 Caused by: java.lang.IllegalArgumentException: Could not resolve placeholder \'auth.jwt.no\' in value "${auth.jwt.no}"

所以为了避免上面的问题,一般来讲,建议设置一个默认值,规则如 ${key:默认值}, 在分号右边的就是默认值,当没有相关配置时,使用默认值初始化
/**
 * 不存在,使用默认值
 */
@Value("${auth.jwt.no}")
private String no;
3. 列表配置
在配置文件中whiteList,对应的value是 4,5,6, 用英文逗号分隔,对于这种格式的参数值,可以直接赋予List<Long>
/**
 * 英文逗号分隔,转列表
 */
@Value("${auth.jwt.whiteList}")
private List<Long> whiteList;
上面这个属于正确的使用姿势,但是下面这个却不行了
/**
 * yml数组,无法转换过来,只能根据 "auth.jwt.blackList[0]", "auth.jwt.blackList[1]" 来取对应的值
 */
@Value("${auth.jwt.blackList:10,11,12}")
private String[] blackList;
虽然我们的配置参数 auth.jwt.blackList是数组,但是就没法映射到上面的blackList (即使换成 List<String> 也是不行的,并不是因为声明为String[]的原因)
我们可以通过查看Evnrionment来看一下配置是怎样的
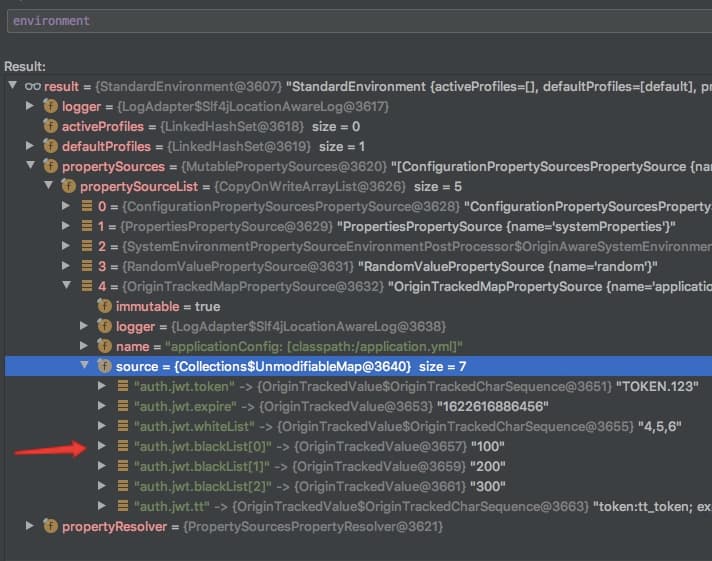
通过auth.jwt.blackList是拿不到配置信息的,只能通过auth.jwt.blackList[0], auth.jwt.blackList[1]来获取
那么问题来了,怎么解决这个呢?
要解决问题,关键就是需要知道@Value的工作原理,这里直接给出关键类 org.springframework.context.support.PropertySourcesPlaceholderConfigurer
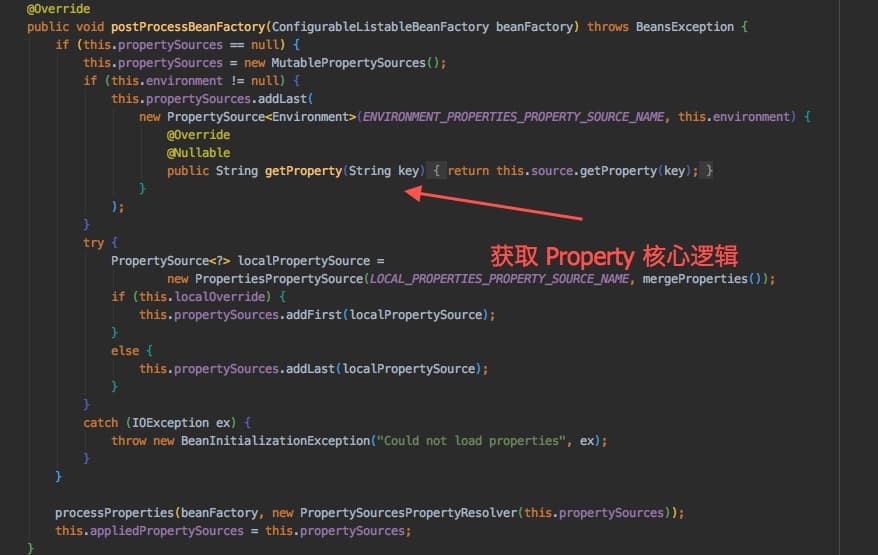
关键点就在上面圈出的地方,找到这里,我们就可以动手开撸,一个比较猥琐的方法,如下
// 使用自定义的bean替代Spring的
@Primary
@Component
public class MyPropertySourcesPlaceHolderConfigure extends PropertySourcesPlaceholderConfigurer {
    @Autowired
    protected Environment environment;

    /**
     * {@code PropertySources} from the given {@link Environment}
     * will be searched when replacing ${...} placeholders.
     *
     * @see #setPropertySources
     * @see #postProcessBeanFactory
     */
    @Override
    public void setEnvironment(Environment environment) {
        super.setEnvironment(environment);
        this.environment = environment;
    }

    @SneakyThrows
    @Override
    protected void processProperties(ConfigurableListableBeanFactory beanFactoryToProcess, ConfigurablePropertyResolver propertyResolver) throws BeansException {
        // 实现一个拓展的PropertySource,支持获取数组格式的配置信息
        Field field = propertyResolver.getClass().getDeclaredField("propertySources");
        boolean access = field.isAccessible();
        field.setAccessible(true);
        MutablePropertySources propertySource = (MutablePropertySources) field.get(propertyResolver);
        field.setAccessible(access);
        PropertySource source = new PropertySource<Environment>(ENVIRONMENT_PROPERTIES_PROPERTY_SOURCE_NAME, this.environment) {
            @Override
            @Nullable
            public String getProperty(String key) {
                // 对数组进行兼容
                String ans = this.source.getProperty(key);
                if (ans != null) {
                    return ans;
                }

                StringBuilder builder = new StringBuilder();
                String prefix = key.contains(":") ? key.substring(key.indexOf(":")) : key;
                int i = 0;
                while (true) {
                    String subKey = prefix + "[" + i + "]";
                    ans = this.source.getProperty(subKey);
                    if (ans == null) {
                        return i == 0 ? null : builder.toString();
                    }

                    if (i > 0) {
                        builder.append(",");
                    }
                    builder.append(ans);
                    ++i;
                }
            }
        };
        propertySource.addLast(source);
        super.processProperties(beanFactoryToProcess, propertyResolver);
    }
}
说明:
- 上面这种实现姿势很不优雅,讲道理应该有更简洁的方式,有请知道的老哥指教一二
4. 配置转实体类
通常,@Value只修饰基本类型,如果我想将配置转换为实体类,可性否?
当然是可行的,而且还有三种支持姿势
PropertyEditorConverterFormatter
接下来针对上面配置的auth.jwt.tt进行转换
auth:
  jwt:
    tt: token:tt_token; expire:1622616888888
映射为Jwt对象
@Data
public class Jwt {
    private String source;
    private String token;
    private Long expire;

    // 实现string转jwt的逻辑
    public static Jwt parse(String text, String source) {
        String[] kvs = StringUtils.split(text, ";");
        Map<String, String> map = new HashMap<>(8);
        for (String kv : kvs) {
            String[] items = StringUtils.split(kv, ":");
            if (items.length != 2) {
                continue;
            }
            map.put(items[0].trim().toLowerCase(), items[1].trim());
        }
        Jwt jwt = new Jwt();
        jwt.setSource(source);
        jwt.setToken(map.get("token"));
        jwt.setExpire(Long.valueOf(map.getOrDefault("expire", "0")));
        return jwt;
    }
}
4.1 PropertyEditor
请注意PropertyEditor是java bean规范中的,主要用于对bean的属性进行编辑而定义的接口,Spring提供了支持;我们希望将String转换为bean属性类型,一般来讲就是一个POJO,对应一个Editor
所以自定义一个 JwtEditor
public class JwtEditor extends PropertyEditorSupport {
    @Override
    public void setAsText(String text) throws IllegalArgumentException {
        setValue(Jwt.parse(text, "JwtEditor"));
    }
}
接下来就需要注册这个Editor
@Configuration
public class AutoConfiguration {
    /**
     * 注册自定义的 propertyEditor
     *
     * @return
     */
    @Bean
    public CustomEditorConfigurer editorConfigurer() {
        CustomEditorConfigurer editorConfigurer = new CustomEditorConfigurer();
        editorConfigurer.setCustomEditors(Collections.singletonMap(Jwt.class, JwtEditor.class));
        return editorConfigurer;
    }
}
说明
- 当上面的
JwtEditor与Jwt对象,在相同的包路径下面的时候,不需要上面的主动注册,Spring会自动注册 (就是这么贴心)
上面这个配置完毕之后,就可以正确的被注入了
/**
 * 借助 PropertyEditor 来实现字符串转对象
 */
@Value("${auth.jwt.tt}")
private Jwt tt;
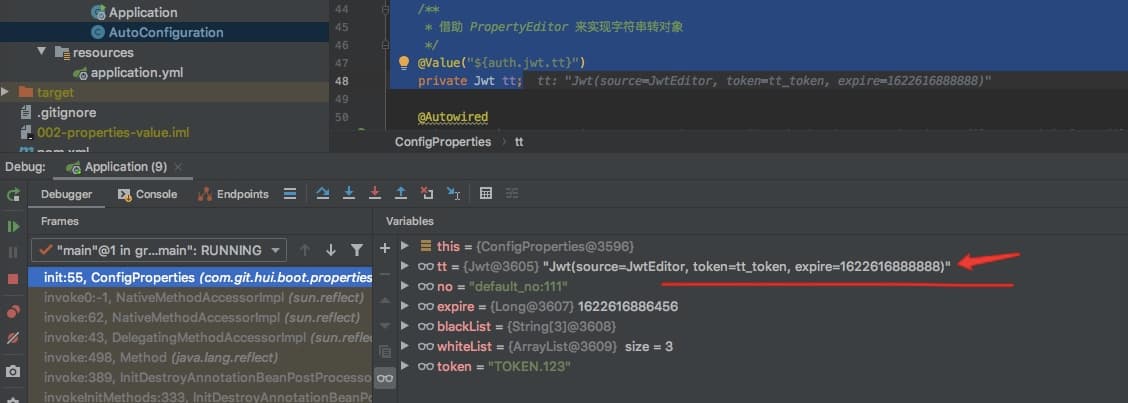
4.2 Converter
Spring的Converter接口也比较常见,至少比上面这个用得多一些,使用姿势也比较简单,实现接口、然后注册即可
public class JwtConverter implements Converter<String, Jwt> {
    @Override
    public Jwt convert(String s) {
        return Jwt.parse(s, "JwtConverter");
    }
}
注册转换类
/**
 * 注册自定义的converter
 *
 * @return
 */
@Bean("conversionService")
public ConversionServiceFactoryBean conversionService() {
    ConversionServiceFactoryBean factoryBean = new ConversionServiceFactoryBean();
    factoryBean.setConverters(Collections.singleton(new JwtConverter()));
    return factoryBean;
}
再次测试,同样可以注入成功
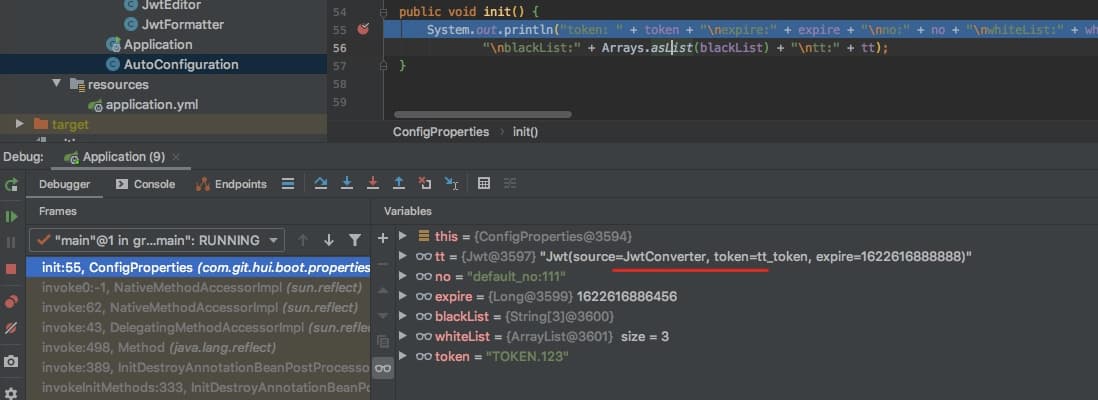
4.3 Formatter
最后再介绍一个Formatter的使用姿势,它更常见于本地化相关的操作
public class JwtFormatter implements Formatter<Jwt> {
    @Override
    public Jwt parse(String text, Locale locale) throws ParseException {
        return Jwt.parse(text, "JwtFormatter");
    }

    @Override
    public String print(Jwt object, Locale locale) {
        return JSONObject.toJSONString(object);
    }
}
同样注册一下(请注意,我们使用注册Formatter时,需要将前面Converter的注册bean给注释掉)
@Bean("conversionService")
public FormattingConversionServiceFactoryBean conversionService2() {
    FormattingConversionServiceFactoryBean factoryBean = new FormattingConversionServiceFactoryBean();
    factoryBean.setConverters(Collections.singleton(new JwtConverter()));
    factoryBean.setFormatters(Collections.singleton(new JwtFormatter()));
    return factoryBean;
}
当Converter与Formatter同时存在时,后者优先级更高
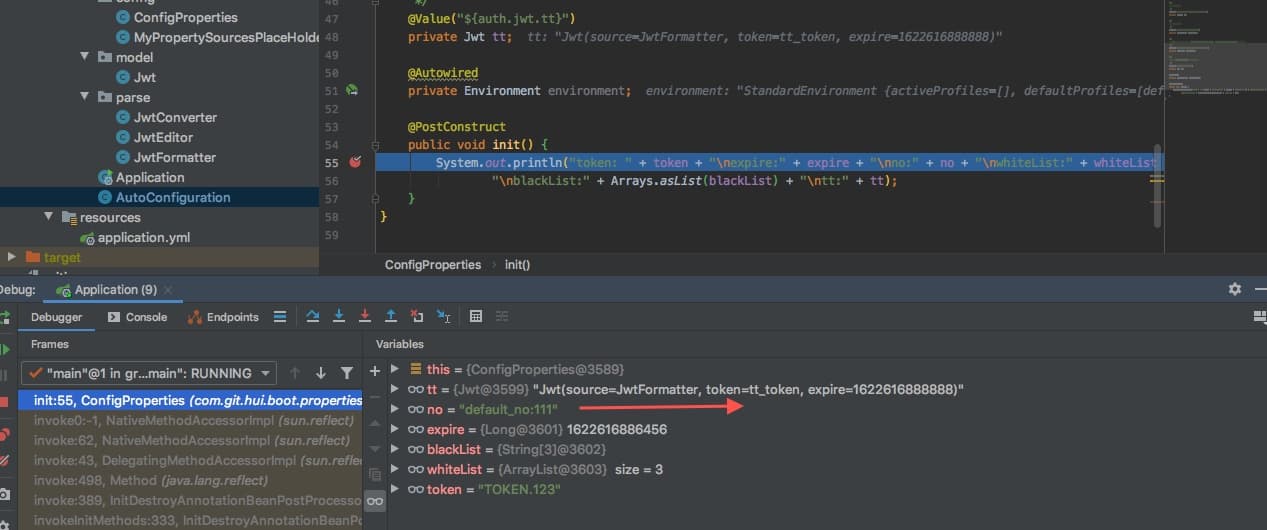
5. 小结
限于篇幅,这里就暂告一段落,针对前面提到的几个问题,做一个简单的归纳小结
@Value声明的配置不存在时,抛异常(项目会起不来)- 通过设置默认值(语法
${xxx:defaultValue})可以解决上面的问题 yaml配置中的数组,无法直接通过@Value绑定到列表/数组上- 配置值为英文逗号分隔的场景,可以直接赋值给列表/数组
- 不支持将配置文件中的值直接转换为非简单对象,如果有需要有三种方式
- 使用
PropertyEditor实现类型转换 - 使用
Converter实现类型转换 (更推荐使用这种方式) - 使用
Formater实现类型转换
- 使用
除了上面的知识点之外,针对最开始提出的问题,给出答案
@Value支持字面量,也支持SpEL表达式- 既然支持SpEL表达式,当然就可以实现我们需求的远程配置注入了
既然已经看到这里了,那么就再提两个问题吧,在SpringCloud微服务中,如果使用了SpringCloud Config,也是可以通过@Value来注入远程配置的,那么这个原理又是怎样的呢?
@Value绑定的配置,如果想实现动态刷新,可行么?如果可以怎么玩?
(顺手不介意的话,关注下微信公众号"一灰灰blog", 下篇博文就给出答案)
III. 不能错过的源码和相关知识点
0. 项目
- 工程:https://github.com/liuyueyi/spring-boot-demo
- 源码: https://github.com/liuyueyi/spring-boot-demo/tree/master/spring-boot/002-properties-value
系列博文,配合阅读效果更好哦
- 【基础系列】实现一个自定义配置加载器(应用篇)
- 【基础系列】SpringBoot配置信息之默认配置
- 【基础系列】SpringBoot配置信息之配置刷新
- 【基础系列】SpringBoot基础篇配置信息之自定义配置指定与配置内引用
- 【基础系列】SpringBoot基础篇配置信息之多环境配置信息
- 【基础系列】SpringBoot基础篇配置信息之如何读取配置信息
1. 一灰灰Blog
尽信书则不如,以上内容,纯属一家之言,因个人能力有限,难免有疏漏和错误之处,如发现bug或者有更好的建议,欢迎批评指正,不吝感激
下面一灰灰的个人博客,记录所有学习和工作中的博文,欢迎大家前去逛逛
- 一灰灰Blog个人博客 https://blog.hhui.top
- 一灰灰Blog-Spring专题博客 http://spring.hhui.top

以上是关于SpringBoot基础篇之@Value中哪些你不知道的知识点的主要内容,如果未能解决你的问题,请参考以下文章
【基础系列】ConfigurationProperties 配置绑定中那些你不知道的事情