图像分割之U-NetU2-Net及其Pytorch代码构建
Posted Hibiki阿杰
tags:
篇首语:本文由小常识网(cha138.com)小编为大家整理,主要介绍了图像分割之U-NetU2-Net及其Pytorch代码构建相关的知识,希望对你有一定的参考价值。
图像分割之U-Net、U2 -Net及其Pytorch代码构建
1、图像分割
图像分割就是把图像分成若干个特定的、具有独特性质的区域并提出感兴趣目标的技术和过程。
做法便是对图片中的每一个像素进行分类。
在自动驾驶、自动抠图、医疗影像等领域有着比较广泛的应用。
图像分割大致可分为以下三类:
- 普通分割:将不同分属不同物体的像素区域分开。比如前景和背景分割开,狗的区域和猫的区域与背景分割开。
- 语义分割:在普通分割的基础上,分类出每一块区域的语义(即这块区域是什么物体)。如把画面中的所有物体都指出他们各自的类别。
- 实例分割:在语义分割的基础上,给每一个物体编号。如这个是该画面中的狗A,那个是画面中的狗B。
| 普通分割 | 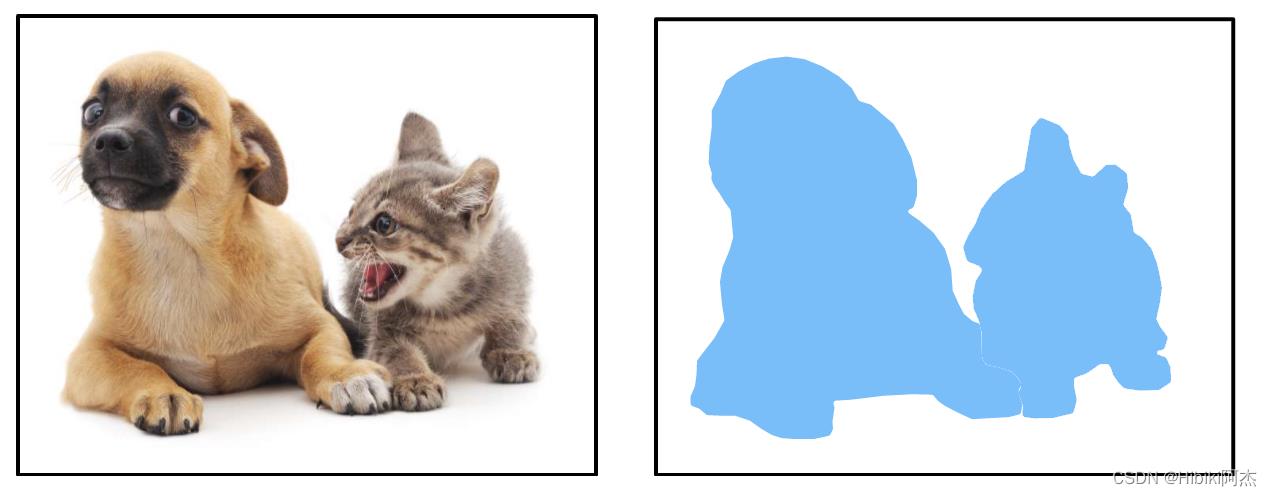 |
|---|---|
| 语义分割 | 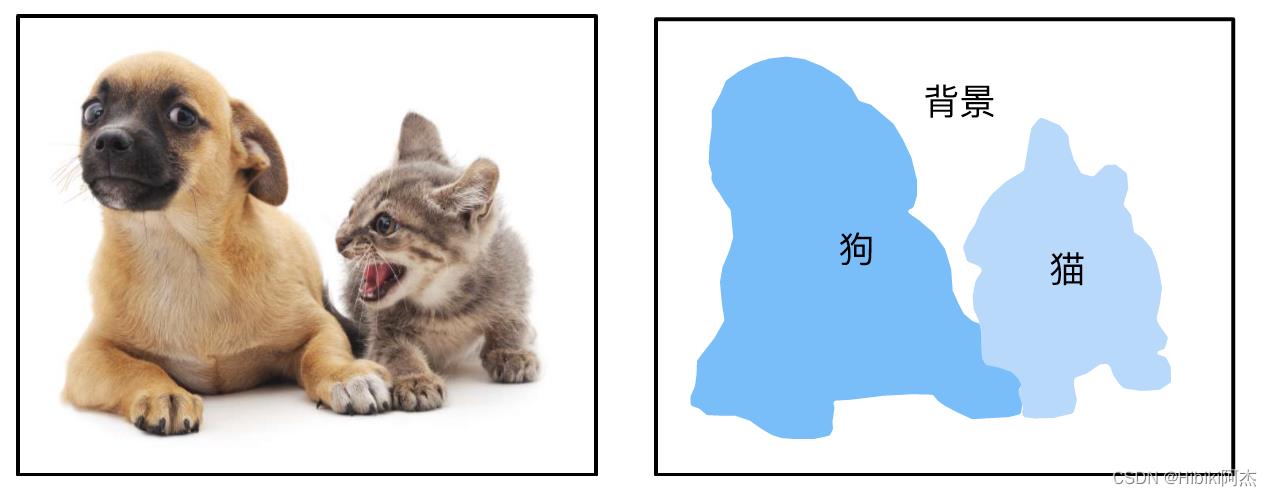 |
| 实例分割 |  |
可以看出,图像分割是由一张图片到另一张图片。因此,神经网络的输入是图片,输出也是同样的图片,Encoder-Decoder的结构是合适的。U-Net、U2 -Net可作为语义分割使用,可以按照生成图像的方式,生成分割图。也可以按通道划分类,每一个通道就是一个类别,使用sigmoid激活。
2、U-Net
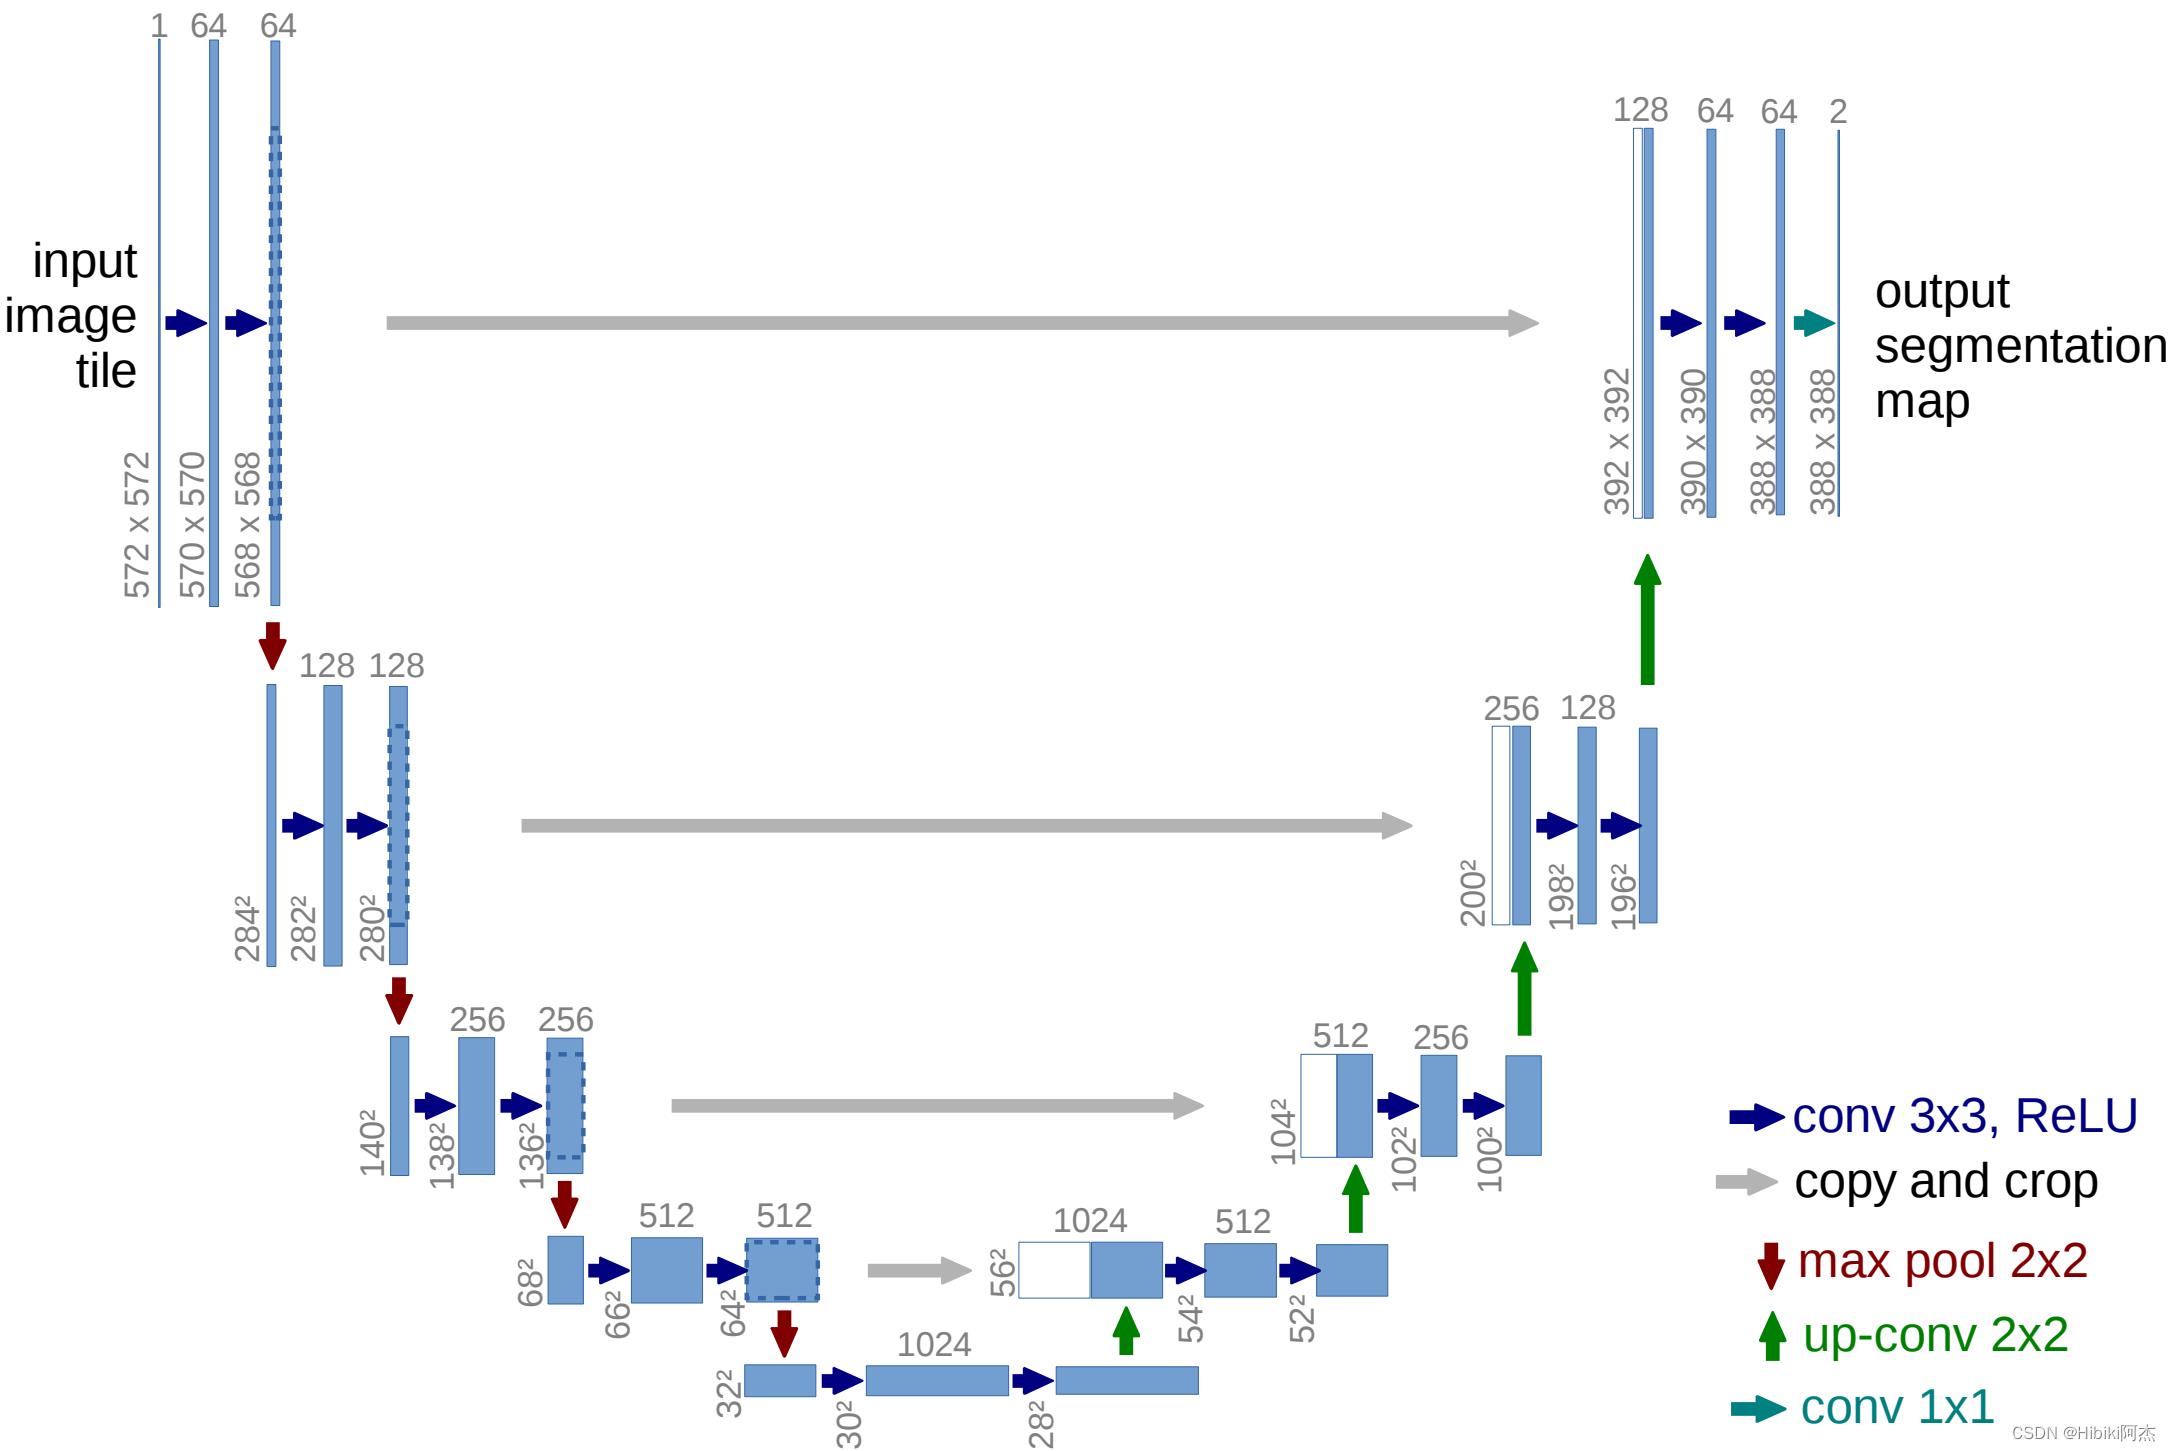
U-Net即使用Encoder-Decoder的结构,首先下采样,然后上采样,中间每一级由残差组成。
则可构建网络的代码如下:

首先是卷积层,可以看出,网络在每一级,均有两层卷积组成。因此构建卷积层如下:
from torch import nn
import torch


class ConvolutionLayer(nn.Module):

    def __init__(self, in_channels, out_channels):
        """
        卷积层
        :param in_channels: 输入通道
        :param out_channels: 输出通道
        """
        super(ConvolutionLayer, self).__init__()
        self.layer = nn.Sequential(
            # 卷积层
            nn.Conv2d(in_channels, out_channels, kernel_size=(3, 3), stride=(1, 1), padding=1, bias=False),
            nn.BatchNorm2d(out_channels),  # BN层
            nn.ReLU(),  # 激活
            nn.Conv2d(out_channels, out_channels, kernel_size=(3, 3), stride=(1, 1), padding=1, bias=False),
            nn.BatchNorm2d(out_channels),
            nn.ReLU(),
        )

    def forward(self, x):
        return self.layer(x)
同时与图示不同的地方在于,使用了Padding,以免图片在卷积中的尺寸缩小。这样,横向的灰色箭头可以直接使用cat进行两个特征图的拼接。
模型图中,红色箭头的max pool 2×2,使用的是池化窗口为2×2的最大值池化。这里的目的是进行下采样,因此可以定义一个下采样如下:
class DownSample(nn.Module):

    def __init__(self,):
        """
        最大池化层构成的下采样,池化窗口为2×2
        """
        super(DownSample, self).__init__()
        self.layer = nn.MaxPool2d(kernel_size=2, stride=2)

    def forward(self, x):
        return self.layer(x)
模型图中,绿色箭头的up-conv 2×2,使用的是反卷积。这里的目的是进行上采样,因此可以定义一个上采样如下:
class UpSample(nn.Module):

    def __init__(self, in_channels):
        """
        反卷积,上采样,通道数将会减半,
        :param in_channels: 输入通道数
        """
        super(UpSample, self).__init__()
        self.layer = nn.Sequential(
            nn.ConvTranspose2d(in_channels, in_channels // 2, kernel_size=(2, 2), stride=(2, 2)),
            nn.LeakyReLU(),
        )

    def forward(self, x):
        return self.layer(x)
首先定义各个网络层:
class UNet(nn.Module):

    def __init__(self, in_channels, out_channels):
        super(UNet, self).__init__()
        self.conv1 = ConvolutionLayer(in_channels, 64)  # 三通道拓展至64通道
        self.down1 = DownSample()  # 下采样至1/2
        self.conv2 = ConvolutionLayer(64, 128)  # 64通道==>128通道
        self.down2 = DownSample()  # 下采样至1/4
        self.conv3 = ConvolutionLayer(128, 256)  # 128通道==>256通道
        self.down3 = DownSample()  # 下采样至1/8
        self.conv4 = ConvolutionLayer(256, 512)  # 256通道==>512通道
        self.down4 = DownSample()  # 下采样至1/16
        self.conv5 = ConvolutionLayer(512, 1024)  # 512通道==>1024通道
        self.up1 = UpSample(1024)  # 上采样至1/8
        self.conv6 = ConvolutionLayer(1024, 512)  # 1024通道==>512通道
        self.up2 = UpSample(512)  # 上采样至1/4
        self.conv7 = ConvolutionLayer(512, 256)  # 512通道==>256通道
        self.up3 = UpSample(256)  # 上采样至1/2
        self.conv8 = ConvolutionLayer(256, 128)  # 256通道==>128通道
        self.up4 = UpSample(128)  # 上采样至1/1
        self.conv9 = ConvolutionLayer(128, 64)  # 128通道==>64通道
        self.predict = nn.Sequential(  # 输出层,由sigmoid函数激活
            nn.Conv2d(64, out_channels, kernel_size=(3,3), stride=(1,1), padding=1),
            nn.Sigmoid()
        )

    def forward(self, image_tensor):
		pass
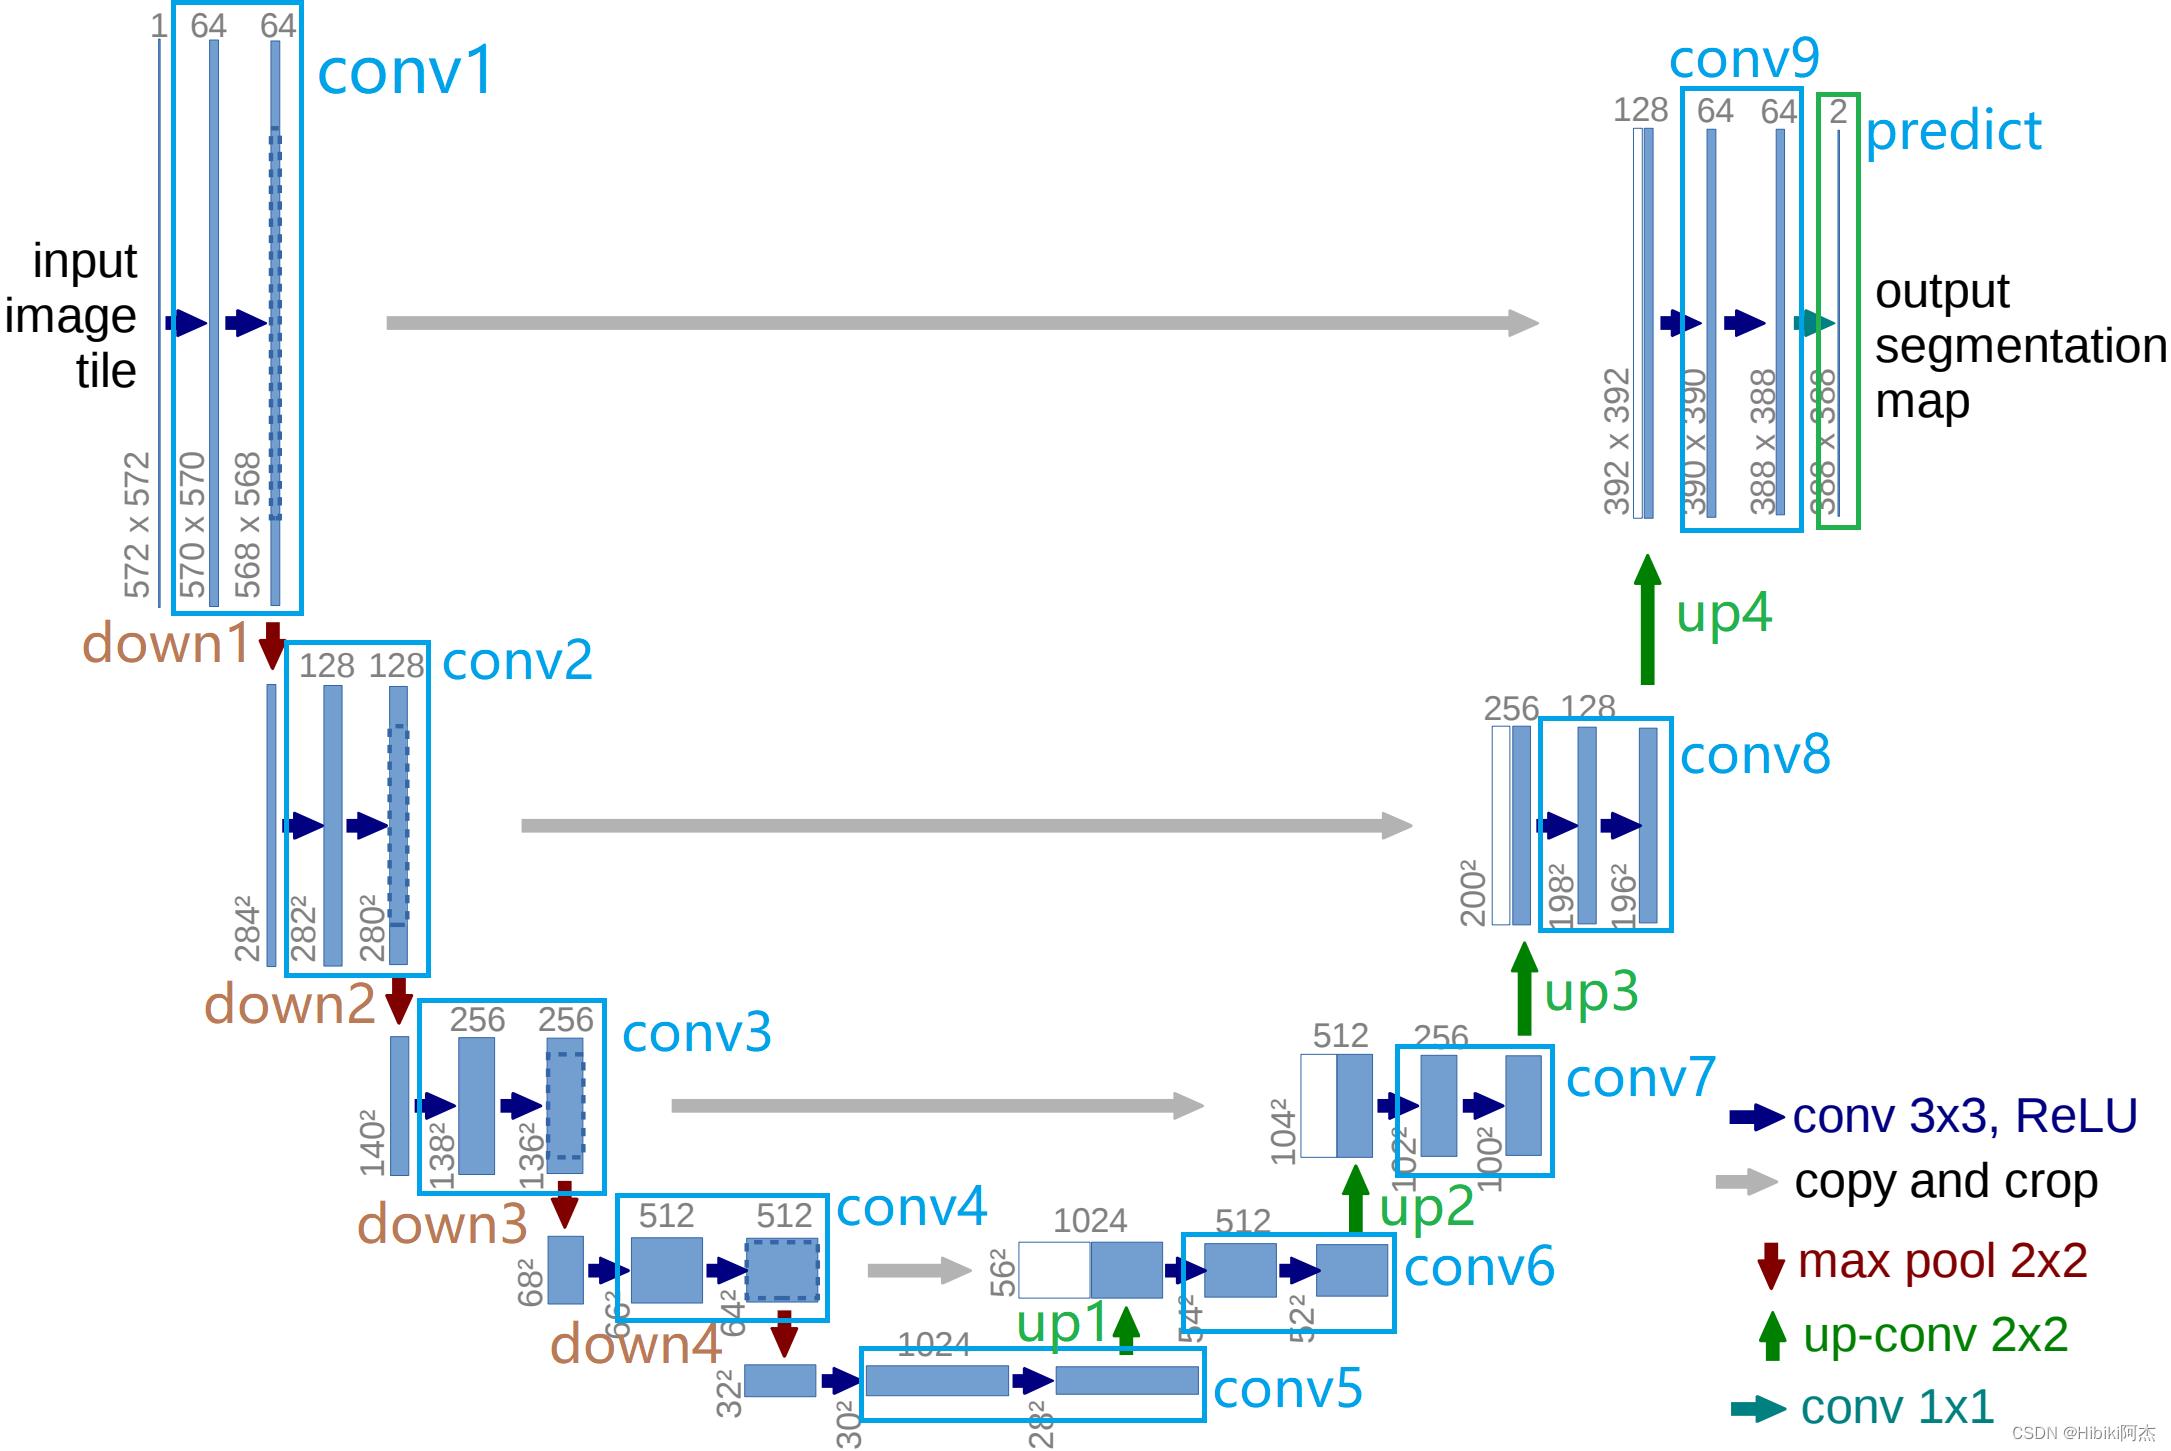
对应于模型图如下:
class UNet(nn.Module):

    def __init__(self, in_channels, out_channels):
        super(UNet, self).__init__()
        """
        ......
        """

    def forward(self, x):
        """下采样"""
        x1 = self.conv1(x)  # ===> 1/1 64
        d1 = self.down1(x1)  # ===> 1/2 64

        x2 = self.conv2(d1)  # ===> 1/2 128
        d2 = self.down2(x2)  # ===> 1/4 128

        x3 = self.conv3(d2)  # ===> 1/4 256
        d3 = self.down3(x3)  # ===> 1/8 256

        x4 = self.conv4(d3)  # ===> 1/8 512
        d4 = self.down4(x4)  # ===> 1/16 512

        x5 = self.conv5(d4)  # ===> 1/16 1024
        """上采样"""
        up1 = self.up1(x5)  # ===> 1/8 512

        x6 = self.conv6(torch.cat((x4, up1), dim=1))  # ===> 1/8 512
        up2 = self.up2(x6  # ===> 1/4 256

        x7 = self.conv7(torch.cat((x3, up2), dim=1))  # ===> 1/4 256
        up3 = self.up3(x7)  # ===> 1/2 128

        x8 = self.conv8(torch.cat((x2, up3), dim=1))  # ===> 1/2 128
        up4 = self.up4(x8)  # ===> 1/1 64

        x9 = self.conv9(torch.cat((x1, up4), dim=1))  # ===> 1/1 64
        mask = self.predict(x9)  # ===> 1/1 out_channels
        return mask
以一张512×512的3通道图片为例,其张量的形状为(1,3,512,512),经过conv1得到x1 (1, 64, 512, 512),下采样至(1, 64, 256, 256);经过conv2得到x2 (1, 128, 256, 256),下采样至(1, 128, 128, 128);经过conv3得到x3 (1, 256, 128, 128),下采样至(1, 256, 64, 64);经过conv4得到x4 (1, 512, 64, 64),下采样至(1, 512, 32, 32);经过conv5得到x5 (1, 1024, 32, 32)。下采样过程完成,开始上采样还原至原始图片大小。
x5经过up1得到up1 (1, 512, 64, 64),同x4 拼接(cat)在一起 组成(1, 1024, 64, 64)的张量,经过conv6得到x6(1, 512, 64, 64);
x6经过up2得到up2 (1, 256, 128, 128),同x3 拼接在一起 组成(1, 512, 128, 128)的张量,经过conv7得到x7(1, 256, 128, 128);
x7经过up3得到up3 (1, 128, 256, 256),同x2 拼接在一起 组成(1, 256, 256, 256)的张量,经过conv8得到x8(1, 128, 256, 256);
x8经过up4得到up4 (1, 64, 512, 512),同x1 拼接在一起 组成(1, 128, 512, 512)的张量,经过conv6得到x9(1, 64, 512, 512);
最后,x9经过预测层predict输出,得到分割图mask。
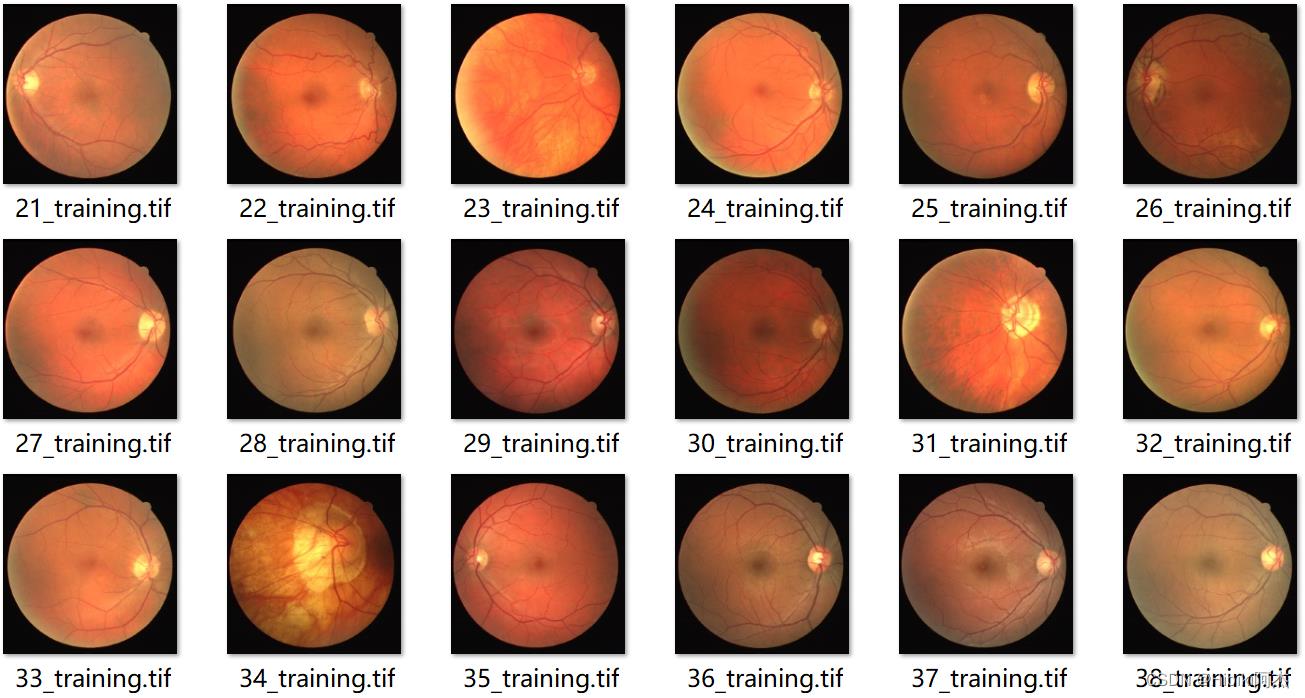
以drive数据集为例训练网络,数据示例如下。
标签如下:
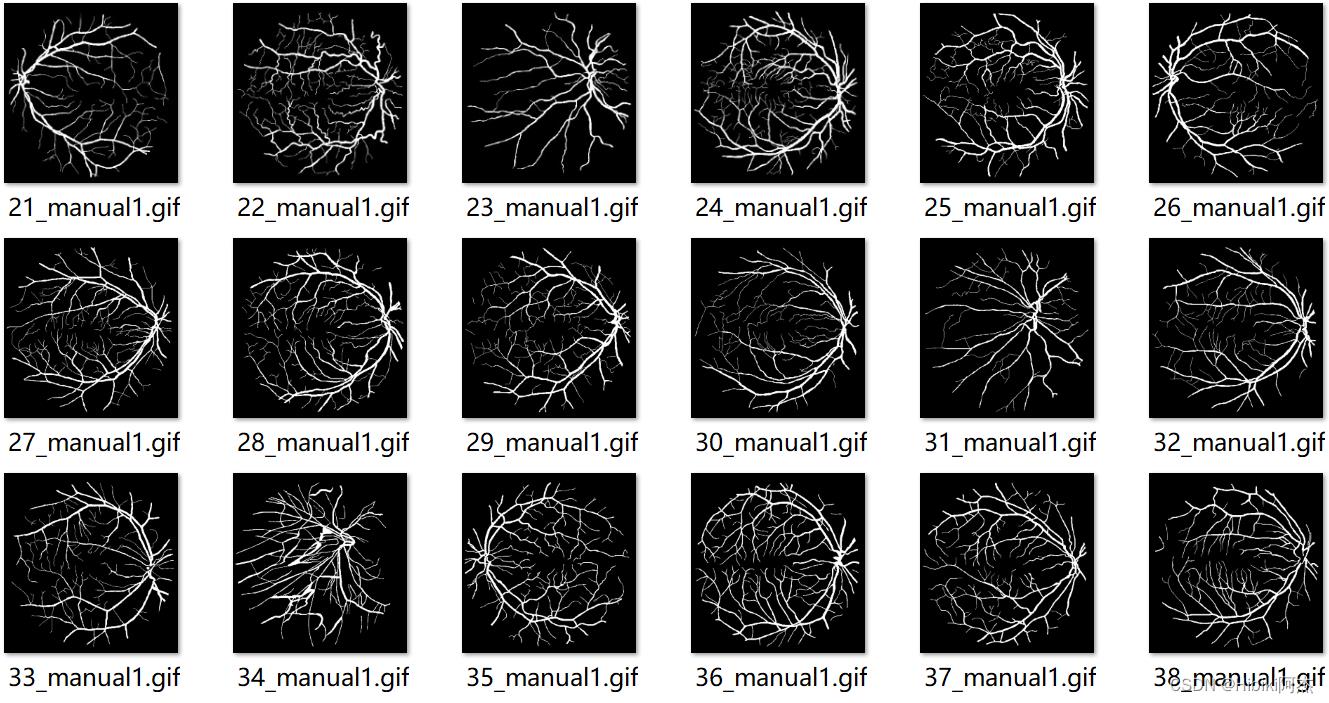
输入数据为3通道的图片,而输出数据为1通道的二值图。一张图片的原始尺寸是565×584
可以在原始图像中随机裁剪256×256大小的图片,进行训练,而在使用时,图像尺寸只要是16的倍数即可。
定义数据加载函数如下:
import torch
import random
import cv2
from torch.utils.data import Dataset


class DriveDataset(Dataset):

    def __init__(self,root='data/training'):
        super(DriveDataset, self).__init__()
        self.dataset = []
        start = 20
        for i in range(1, 21):  # 按照一一对应的原则,加载图像和标签的路径
            image_path = f'root/images/i+start_training.tif'
            label_path = f'root/1st_manual/i + start_manual1.gif'
            self.dataset.append((image_path, label_path))

    def __len__(self):
        return len(self.dataset)

    def __getitem__(self, item):
        image_path, label_path = self.dataset[item]  # 获取图像路径
        image = cv2.imread(image_path)  # 图片
        video = cv2.VideoCapture(label_path)
        _, mask_label = video.read()  # 读取标签掩码图

        image = cv2.cvtColor(image, cv2.COLOR_BGR2RGB)
        mask_label = cv2.cvtColor(mask_label, cv2.COLOR_BGR2GRAY)  # 转换至单通道图

        """随即裁剪256×256的图幅,图片和标签裁剪相同的位置"""
        h, w = mask_label.shape
        w = random.randint(0, w-256)
        h = random.randint(0, h-256)
        image = image[h:h+256, w:w+256]
        mask_label = mask_label[h:h + 256, w:w + 256]

        """转换至tensor"""
        image = torch.from_numpy(image).float().permute(2, 0, 1)/255
        mask_label = torch.from_numpy(mask_label).unsqueeze(0).float()/255
        return image, mask_label
读取相对应的图片和标签,转换为张量,供网络学习。其中,标签的读取使用了OpenCV的视频捕获(VideoCapture)读取首帧完成标签的数据加载。
定义训练器如下:
from torch import nn
import torch
from torch.utils.data import DataLoader
from torchvision.utils import save_image
from u_net import UNet
from dataset import DriveDataset
import os


class Trainer:

    def __init__(self):
        self.device = torch.device('cuda:0' if torch.cuda.is_available() else "cpu")  # 设置设备
        self.net = UNet(3, 1).to(self.device)  # 实例U-Net
        if os.path.exists('unet.pth'):  # 加载权重,如果存在的话
            self.net.load_state_dict(torch.load('unet.pth', map_location='cpu'))
        self.dataset = DriveDataset()  # 实例数据集
        self.data_loader = DataLoader(self.dataset, 3, True, drop_last=True)  # 实例数据加载器
        self.loss_func = nn.BCELoss()  # 实例二值交叉熵
        self.optimizer = torch.optim.Adam(self.net.parameters())  # 实例adam优化器

    def train(self):  # 训练
        for epoch in range(100000):  # 迭代epoch
            for i, (image, target) in enumerate(self.data_loader):
                image = image.to(self.device)
                target = target.to(self.device)

                out = self.net(image)  # 预测
                loss = self.loss_func(out, target)  # 计算损失

                self.optimizer.zero_grad()  # 清空梯度
                loss.backward()  # 反向传播
                self.optimizer.step()  # 优化
                print(epoch, loss.item())

            if epoch % 5 == 0:
                torch.save(self.net.state_dict(),'unet.pth')
                save_image([image[0], target[0].expand(3, 256, 256), out[0].expand(3, 256, 256)], f'epoch.jpg',normalize=True,range=(0,1))
二值交叉熵做损失,adam优化器优化网络。
class Trainer:

   	"""
   	......
   	"""


if __name__ == '__main__':
    trainer = Trainer()
    trainer.train()
训练过程见下图。左边为原图,中间为标签,右边为网络预测值
| epoch | images |
|---|---|
| 0 | 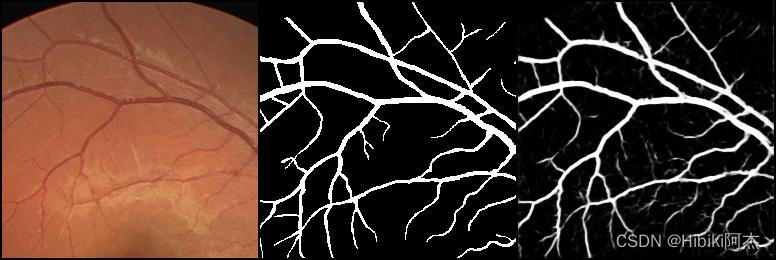 |
| 1 | 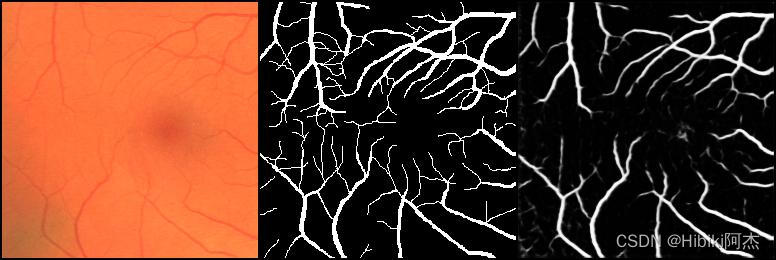 |
| 2 | 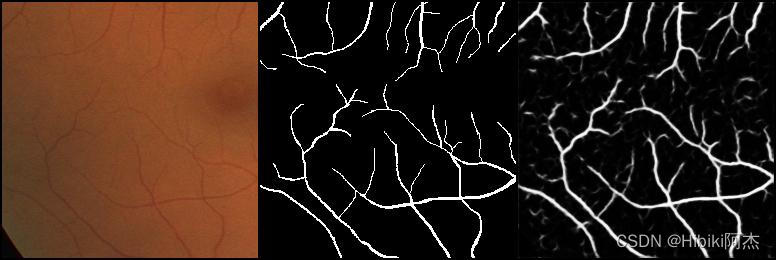 |
完整代码:https://github.com/HibikiJie/UNetAndU2Net
3、U2-Net
而U2-Net,就是U-Net的堆叠,类似于,将U-Net中的conv块,替换成完整的U-Net网络。
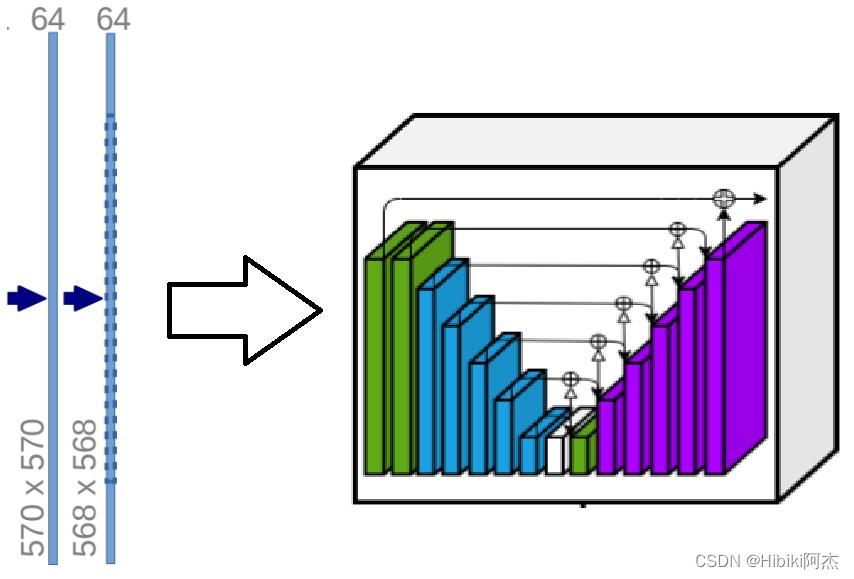
其网络图如下:
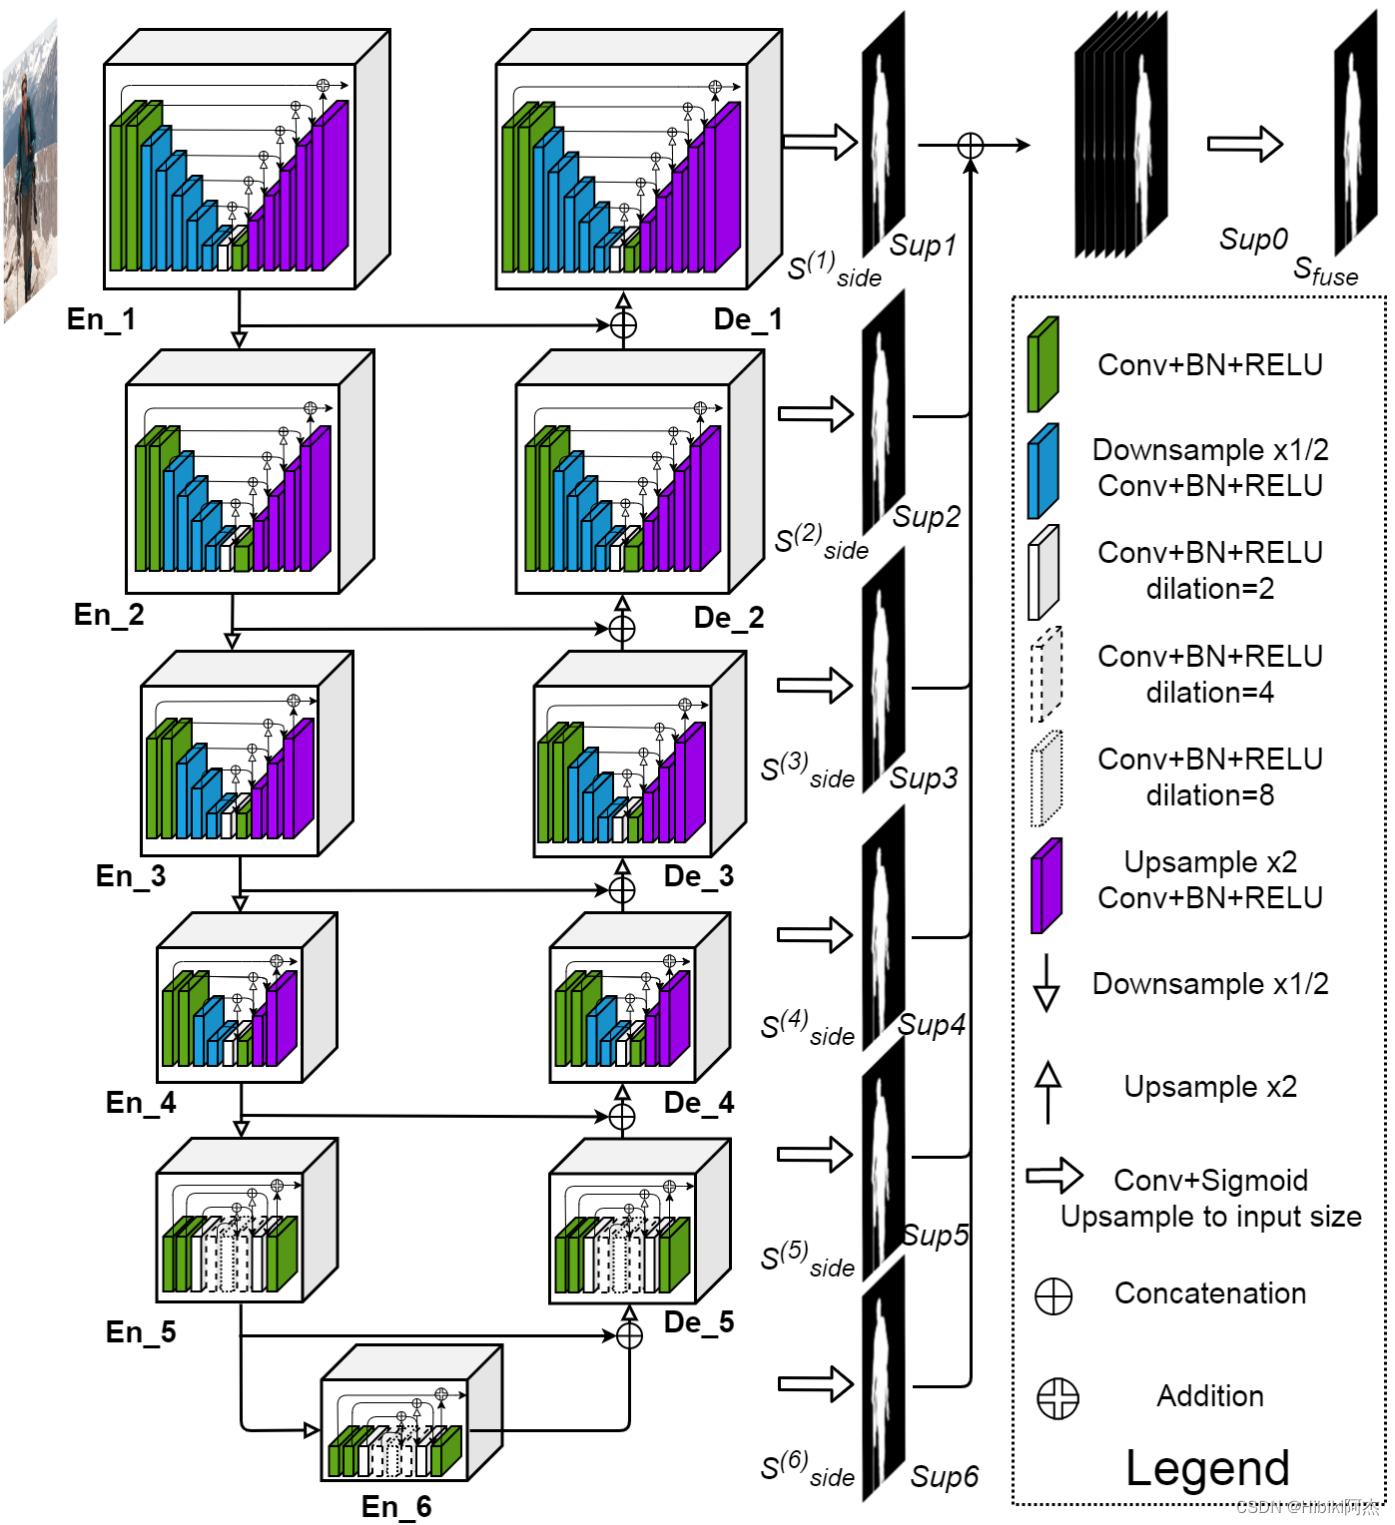
其中EN_1与De_1一致,EN_2与De_2一致,EN_3与De_3一致,EN_4与De_4一致,EN_5、En6和De_5一致。
先分别定义,EN_1、EN_2、EN_3、EN_4、EN_5为UNet1、UNet2、UNet3、UNet4、UNet5.
首先定义UNet1:
注意到,图中的白色的方块示意的,卷积使用到了dilation参数,因此,定义ConvolutionLayer为:
import torch
import torch.nn as nn
import torch.nn.functional as F


class ConvolutionLayer(nn.Module):
    def __init__(self, in_channels, out_channels, dilation=1):
        super(ConvolutionLayer, self).__init__()
        self.layer = nn.Sequential(
            nn.Conv2d(in_channels, out_channels, kernel_size=(3, 3), padding=1 * dilation,
                      dilation=(1 * dilation, 1 * dilation)),  # 卷积
            nn.BatchNorm2d(out_channels),  # BN
            nn.ReLU(inplace=True)  # 激活函数
        )

    def forward(self, x):
        return self.layer(x)
卷积层由Conv、BN、ReLU构成。
上采样使用机器学习算法,由双线性插值法完成上采样:
def upsample_like(src, tar):
    src = F.upsample(src, size=tar.shape[2:], mode='bilinear')
    return src
该方法,将使src上采样至tar相同的尺寸大小。
而下采样同样使用最大池化完成,这里可以使用与U-Net相同的代码。
因此,UNet1:
class UNet1(nn.Module):
def __init__(self, in_channels, mid_channels, out_channels):
super(UNet1, self).__init__()
self.conv0 = ConvolutionLayer(in_channels, out_channels, dilation=1)
self.conv1 = ConvolutionLayer(out_channels, mid_channels, dilation=1)
self.down1 = DownSample()
self.conv2 = ConvolutionLayer(mid_channels, mid_channels, dilation=1)
self.down2 = DownSample()
self.conv3 = ConvolutionLayer(mid_channels, mid_channels, dilation=1)
self.down3 = DownSample()
self.conv4 = ConvolutionLayer(mid_channels, mid_channels, dilation=1)
self.down4 = DownSample()
self.conv5 = ConvolutionLayer(mid_channels, mid_channels, dilation=1)
self.down5 = DownSample()
self.conv6 = ConvolutionLayer(mid_channels, mid_channels, dilation=1)
self.conv7 = ConvolutionLayer(mid_channels, mid_channels, dilation=2)
self.conv8 = ConvolutionLayer(mid_channels * 2, mid_channels, dilation=1)
self.conv9 = ConvolutionLayer(mid_channels * 2, mid_channels, dilation=1)
self.conv10 = ConvolutionLayer(mid_channels * 2, mid_channels, dilation=1)
self.conv11 = ConvolutionLayer(mid_channels * 2, mid_channels, dilation=1)
self.conv12 = ConvolutionLayer(mid_channels * 2, mid_channels, dilation=1)
self.conv13 = ConvolutionLayer(mid_channels 以上是关于图像分割之U-NetU2-Net及其Pytorch代码构建的主要内容,如果未能解决你的问题,请参考以下文章
PyTorch 和Albumentations 在图像分割的应用
Pytorch项目实战之语义分割:U-NetUNet++U2Net
图像分割模型——segmentation_models_pytorch和albumentations 组合实现多类别分割
PyTorch图像分割模型——segmentation_models_pytorch库的使用