Android Framework实战开发-socketpair介绍及它在android系统源码使用分析
Posted Android高级知识分享官
tags:
篇首语:本文由小常识网(cha138.com)小编为大家整理,主要介绍了Android Framework实战开发-socketpair介绍及它在android系统源码使用分析相关的知识,希望对你有一定的参考价值。
csdn在线学习课程,课程咨询答疑和新课信息:QQ交流群:422901085进行课程讨论
android跨进程通信实战视频课程(加群获取优惠)
Android Framework实战开发-socketpair介绍及它在android系统源码使用分析
1.socketpair介绍
在linux下,使用socketpair函数能够创建一对套节字进行进程间通信(IPC)。
函数原形:
#include <sys/types.h>
#include <sys/socket.h>
int socketpair(int domain, int type, int protocol, int sv[2]);
参数1(domain):表示协议族,在Linux下只能为AF_LOCAL或者AF_UNIX。(自从Linux 2.6.27后也支持SOCK_NONBLOCK和SOCK_CLOEXEC)
参数2(type):表示协议,可以是SOCK_STREAM或者SOCK_DGRAM。SOCK_STREAM是基于TCP的,而SOCK_DGRAM是基于UDP的
参数3(protocol):表示类型,只能为0
参数4(sv[2]):套节字柄对,该两个句柄作用相同,均能进行读写双向操作
返回结果: 0为创建成功,-1为创建失败,并且errno来表明特定的错误号,具体错误号如下所述:
EAFNOSUPPORT:本机上不支持指定的address。
EFAULT: 地址sv无法指向有效的进程地址空间内。
EMFILE: 已经达到了系统限制文件描述符,或者该进程使用过量的描述符。
EOPNOTSUPP:指定的协议不支持创建套接字对。
EPROTONOSUPPORT:本机不支持指定的协议。
2、出现背景及与socket对比优势
大家明显原来的socket是一种c/s模型,需要客户端与服务端进行连接,连接还需要知道服务端的ip,unix socket就是对应的unix的路径。连接后当然也完全可以实现服务端和客户端的双向通信,这种情况一般比较适合于很多个客户端对应一个服务的情况。但是如果说本身就只是单独2个进程进行相互通信的需求socketpair这个东西出现就显示更加简单一些,不要有客户端和服务端进行connect过程,也没有服务端的一个ip和unix socket路径的概念,它完全是匿名的,在创建socketpair初就已经确定了对应的2个socket的fd,两端直接与对应fd读写既可以。
3、实战demo代码开发
#include <sys/types.h>
#include <sys/socket.h>
#include <unistd.h>
#include <stdlib.h>
#include <stdio.h>
#define SOCKET_BUFFER_SIZE      (32768U)
int main ()

    int fd[2];
    int bufferSize = SOCKET_BUFFER_SIZE;
    int r = socketpair( AF_UNIX, SOCK_STREAM, 0, fd );
    if ( r < 0 )
        perror( "socketpair()" );
        exit( 1 );

 /*设置socket描述符的选项*/
    setsockopt(fd[0], SOL_SOCKET, SO_SNDBUF, &bufferSize, sizeof(bufferSize));
    setsockopt(fd[0], SOL_SOCKET, SO_RCVBUF, &bufferSize, sizeof(bufferSize));
    setsockopt(fd[1], SOL_SOCKET, SO_SNDBUF, &bufferSize, sizeof(bufferSize));
    setsockopt(fd[1], SOL_SOCKET, SO_RCVBUF, &bufferSize, sizeof(bufferSize));

    if ( fork() )
        /* Parent process: echo client */
        int val = 0;
        close( fd[1] );
        while ( 1 )
            sleep( 1 );
            ++val;
            printf( "parent Sending data: %d\\n", val );
            write( fd[0], &val, sizeof(val) );
            read( fd[0], &val, sizeof(val) );
            printf( "parent Data received: %d\\n", val );


    else
        /* Child process: echo server */
        int val ;
        close( fd[0] );
        while ( 1 )
            read( fd[1], &val, sizeof(val) );
            printf( "son Data received: %d\\n", val );
            ++val;
            write( fd[1], &val, sizeof(val) );
            printf( "son send received: %d\\n", val );
编译: gcc socketpair_2_process.c -o socketpair_2_process
执行打印结果:
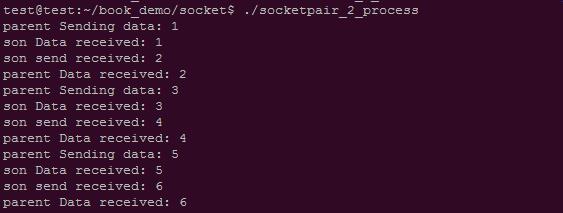
注意: socketpair创建的只适用于父子进程或者线程间通信,不能用于两个进程之间通信。如果要实现两个进程之间的双向通信,则需要将socketpair创建的一个描述符fd发送给另一个进程。
4、android源码中对它的使用(这里我们不对某个模块进行详细分析,只是对使用到的socket相关的代码进行讲解)
首先来了解一下android触摸事件是怎么到我们app的,先看app的ViewRootImpl类:
  public void setView(View view, WindowManager.LayoutParams attrs, View panelParentView)
        synchronized (this)
            if (mView == null)
                。。省略
                if ((mWindowAttributes.inputFeatures
                        & WindowManager.LayoutParams.INPUT_FEATURE_NO_INPUT_CHANNEL) == 0)
                    mInputChannel = new InputChannel();

                。。省略
                    res = mWindowSession.addToDisplay(mWindow, mSeq, mWindowAttributes,
                            getHostVisibility(), mDisplay.getDisplayId(),
                            mAttachInfo.mContentInsets, mAttachInfo.mStableInsets,
                            mAttachInfo.mOutsets, mInputChannel);
                 catch (RemoteException e)
                   。。省略
这里我们省略绝大部分代码,这里可以看出,app层面new InputChannel后然后调用mWindowSession.addToDisplay方法,注意哦这里方法是个跨进程通信方法:

这里可以看出我们传递了一个InputChannel实际上是由服务端来进行修改哦,客户端app这边只是刚开始搞了一个空壳。。,这里就是我们binder的中级部分的知识,是不是学过binder后看起这个代码来就瞬间秒懂
接下来我们看服务端的addToDisplay实现:
   @Override
    public int addToDisplay(IWindow window, int seq, WindowManager.LayoutParams attrs,
            int viewVisibility, int displayId, Rect outContentInsets, Rect outStableInsets,
            Rect outOutsets, InputChannel outInputChannel)
        return mService.addWindow(this, window, seq, attrs, viewVisibility, displayId,
                outContentInsets, outStableInsets, outOutsets, outInputChannel);
这里其实调用是WindowManagerService的addWindow
public int addWindow(Session session, IWindow client, int seq,
            WindowManager.LayoutParams attrs, int viewVisibility, int displayId,
            Rect outContentInsets, Rect outStableInsets, Rect outOutsets,
            InputChannel outInputChannel)
       。。省略
            final WindowState win = new WindowState(this, session, client, token, parentWindow,
                    appOp[0], seq, attrs, viewVisibility, session.mUid,
                    session.mCanAddInternalSystemWindow);


            if  (openInputChannels)
                win.openInputChannel(outInputChannel);

。。省略
        return res;
这里调用的openInputChannel
void openInputChannel(InputChannel outInputChannel)
        if (mInputChannel != null)
            throw new IllegalStateException("Window already has an input channel.");

        String name = getName();
        InputChannel[] inputChannels = InputChannel.openInputChannelPair(name);
        mInputChannel = inputChannels[0];
        mClientChannel = inputChannels[1];
        mInputWindowHandle.inputChannel = inputChannels[0];
        if (outInputChannel != null)
            mClientChannel.transferTo(outInputChannel);
            mClientChannel.dispose();
            mClientChannel = null;
         else 。。省略

        mService.mInputManager.registerInputChannel(mInputChannel, mInputWindowHandle);
这里重点优势调用了InputChannel这个静态方法的openInputChannelPair,最后会调用到native端nativeOpenInputChannelPair:
static jobjectArray android_view_InputChannel_nativeOpenInputChannelPair(JNIEnv* env,
        jclass clazz, jstring nameObj)
。。省略
    status_t result = InputChannel::openInputChannelPair(name, serverChannel, clientChannel);
。。省略
    return channelPair;
这里又调用到了InputChannel::openInputChannelPair,但这个是native的c++代码,openInputChannelPair代码实现如下:
status_t InputChannel::openInputChannelPair(const String8& name,
        sp<InputChannel>& outServerChannel, sp<InputChannel>& outClientChannel)
    int sockets[2];
    if (socketpair(AF_UNIX, SOCK_SEQPACKET, 0, sockets))
        status_t result = -errno;
        ALOGE("channel '%s' ~ Could not create socket pair.  errno=%d",
                name.string(), errno);
        outServerChannel.clear();
        outClientChannel.clear();
        return result;


    int bufferSize = SOCKET_BUFFER_SIZE;
    setsockopt(sockets[0], SOL_SOCKET, SO_SNDBUF, &bufferSize, sizeof(bufferSize));
    setsockopt(sockets[0], SOL_SOCKET, SO_RCVBUF, &bufferSize, sizeof(bufferSize));
    setsockopt(sockets[1], SOL_SOCKET, SO_SNDBUF, &bufferSize, sizeof(bufferSize));
    setsockopt(sockets[1], SOL_SOCKET, SO_RCVBUF, &bufferSize, sizeof(bufferSize));

    String8 serverChannelName = name;
    serverChannelName.append(" (server)");
    outServerChannel = new InputChannel(serverChannelName, sockets[0]);

    String8 clientChannelName = name;
    clientChannelName.append(" (client)");
    outClientChannel = new InputChannel(clientChannelName, sockets[1]);
    return OK;
看到这里大家是不很熟悉??这个不就是socketpair么。。
这里就相当于创建socketpair第一个fd给服务端InputDispather,另一个呢给客户端,当然这里因为给客户端是直接binder跨进程通信的,就是前面开始我们看到的那个addToDisplay方法里面的最后一个参数

那么接下来客户端干了什么呢?
在setView中会创建对应WindowInputEventReceiver:
  if (mInputChannel != null)
              。。省略
                    mInputEventReceiver = new WindowInputEventReceiver(mInputChannel,
                            Looper.myLooper());
这里把我们wms返回的mInputChannel传递给了WindowInputEventReceiver,它的构造方法会调用super的构造:
   public WindowInputEventReceiver(InputChannel inputChannel, Looper looper)
            super(inputChannel, looper);
super对应构造如下:
 public InputEventReceiver(InputChannel inputChannel, Looper looper)
      。。省略
        mInputChannel = inputChannel;
        mMessageQueue = looper.getQueue();
        mReceiverPtr = nativeInit(new WeakReference<InputEventReceiver>(this),
                inputChannel, mMessageQueue);

        mCloseGuard.open("dispose");
这里会jni调用nativeInit:
static jlong nativeInit(JNIEnv* env, jclass clazz, jobject receiverWeak,
        jobject inputChannelObj, jobject messageQueueObj)
  。。省略
    sp<NativeInputEventReceiver> receiver = new NativeInputEventReceiver(env,
            receiverWeak, inputChannel, messageQueue);
    status_t status = receiver->initialize();
。。省略
    return reinterpret_cast<jlong>(receiver.get());
这里构造NativeInputEventReceiver对象,然后调用initialize:
status_t NativeInputEventReceiver::initialize()
    setFdEvents(ALOOPER_EVENT_INPUT);
    return OK;
这里就是调用setFdEvents:
void NativeInputEventReceiver::setFdEvents(int events)
    if (mFdEvents != events)
        mFdEvents = events;
        int fd = mInputConsumer.getChannel()->getFd();
        if (events)
            mMessageQueue->getLooper()->addFd(fd, 0, events, this, NULL);
         else
            mMessageQueue->getLooper()->removeFd(fd);
注意啦,这里获取了InputChannel的socketpair的fd,然后调用Looper的addFd方法:
Looper的addFd实现在system/core目录寻找,它不在framework下面:
./libutils/Looper.cpp:430: return addFd(fd, ident, events, callback ? new SimpleLooperCallback(callback) : NULL, data);
int Looper::addFd(int fd, int ident, int events, const sp<LooperCallback>& callback, void* data)
..省略


    ..省略
        if (requestIndex < 0)
            int epollResult = epoll_ctl(mEpollFd, EPOLL_CTL_ADD, fd, & eventItem);
            ..省略
            mRequests.add(fd, request);
         else
            int epollResult = epoll_ctl(mEpollFd, EPOLL_CTL_MOD, fd, & eventItem);
            if (epollResult < 0)
                if (errno == ENOENT)
      			..省略
                    epollResult = epoll_ctl(mEpollFd, EPOLL_CTL_ADD, fd, & eventItem);
                   ..省略

            mRequests.replaceValueAt(requestIndex, request);

     // release lock
    return 1;
大家是不是看到了,其实Loop本质也是用了epoll来实现的,这里的addFd其实就是epoll的add操作
以上是关于Android Framework实战开发-socketpair介绍及它在android系统源码使用分析的主要内容,如果未能解决你的问题,请参考以下文章
千里马Android Framework实战开发-native程序之间binder通信实战案例分析
千里马Android Framework实战开发-native程序之间binder通信实战案例分析
千里马Android Framework实战开发-native程序之间binder通信实战案例分析
Android Framework实战开发-socketpair介绍及它在android系统源码使用分析