Hooks + TS 搭建一个任务管理系统-- 拖拽功能实现
Posted 小丞同学
tags:
篇首语:本文由小常识网(cha138.com)小编为大家整理,主要介绍了Hooks + TS 搭建一个任务管理系统-- 拖拽功能实现相关的知识,希望对你有一定的参考价值。

📢 大家好,我是小丞同学,一名大二的前端爱好者
📢 这个系列文章是实战 jira 任务管理系统的一个学习总结
📢 非常感谢你的阅读,不对的地方欢迎指正 🙏
📢 愿你忠于自己,热爱生活
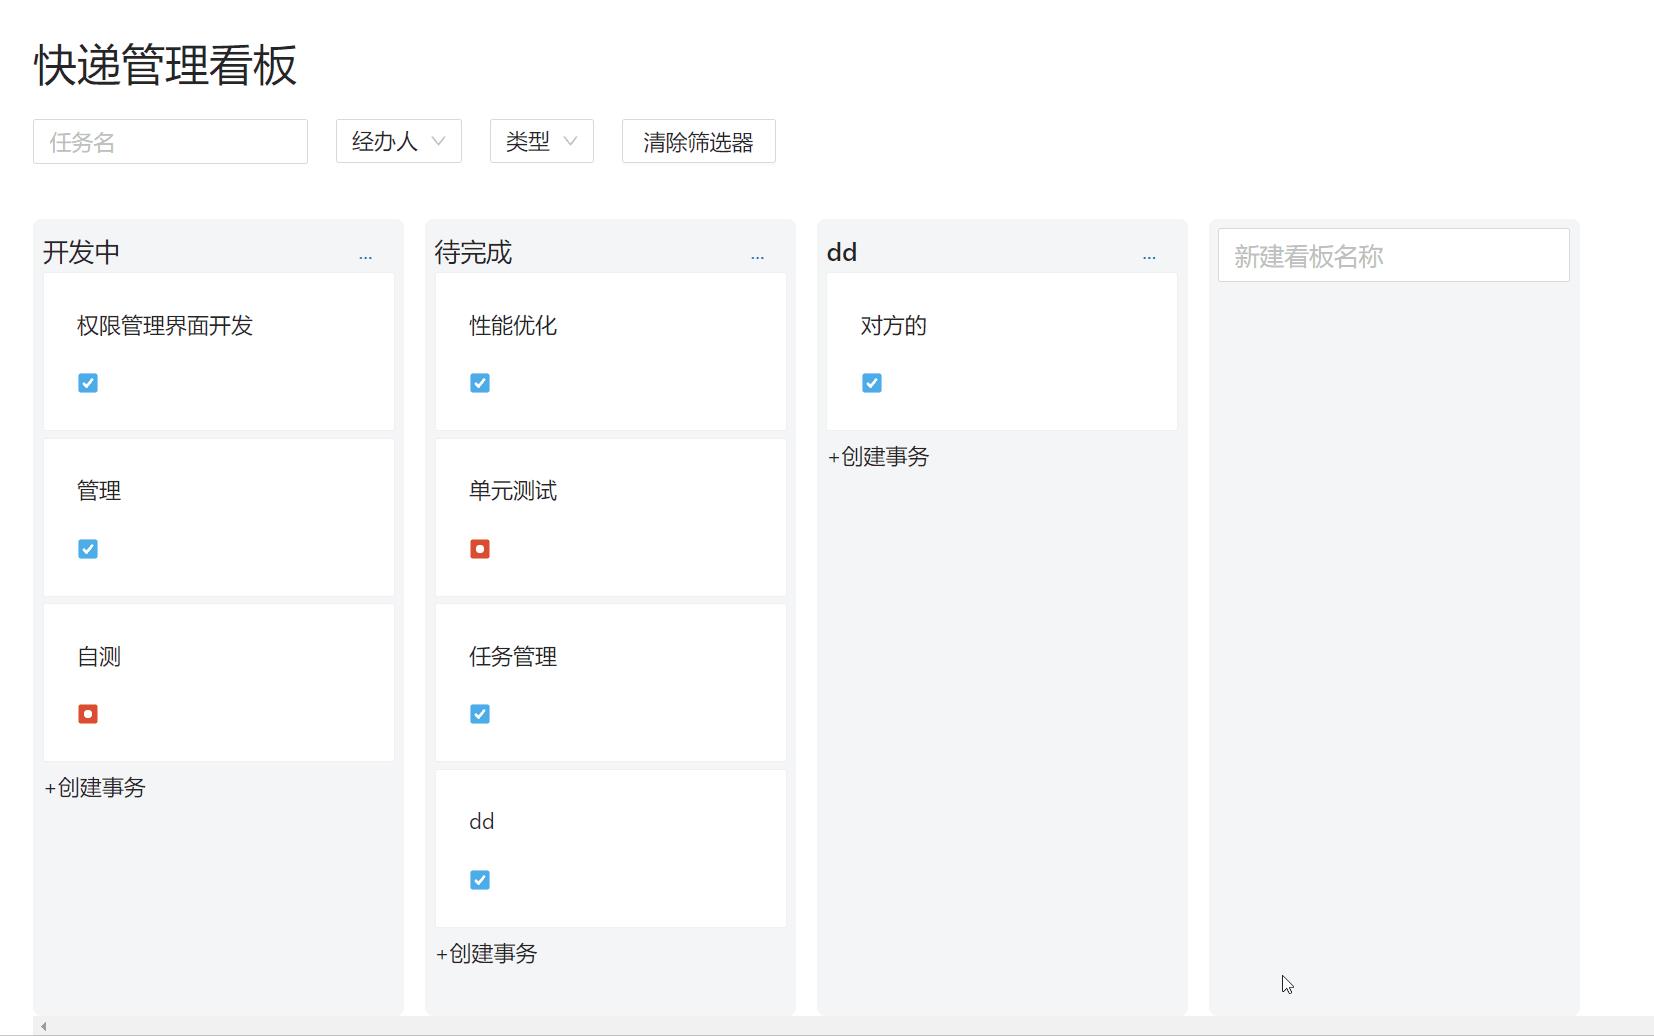
在上一篇文章中,我们写好了任务组页面,就现在来说我们的项目已经基本完成了,所有的 CRUD 操作、路由跳转、页面布局都已经实现了。在这一篇文章中,我们再来优化一下我们的项目,我们给我的看板页面添加一个拖拽功能
这篇内容不是很懂,有点水,弄懂再来改
💡 知识点抢先看
- 给看板添加拖拽功能
- 讲解 html5 中的
drop和drag
一、给看板添加拖拽功能
这一篇文章就只讲一个部分,正如标题所说,添加一个拖拽功能
实现效果像这样

我们实现这个功能采用了一个 react-beautiful-dnd 的库,关于这个库可以查看 : npm官网
关于这个库的使用呢,我们简单的介绍一下,首先我们需要定义一个 Droppable 组件来包裹我们的拖拽的元素,表示这块区域的内容我们能够拖拽,其次需要对放的地方,也就是我们的元素添加一个 Draggable 组件包裹,用来表示这块区域是能够放下的区域
在这里是重写了自带的 Drop 和 Drag 组件
这部分比较难,搞得不是很懂,提几个点吧
- 在这里我们想要抽离出一个
children属性,不使用原生的children属性 - 由于 API 的要求,我们需要预留接收
ref,这里我们采用转发的方式来实现,通过forwardRef的方式来实现
export const DropChild = React.forwardRef<HTMLDivElement, DropChildProps>(( children, ...props , ref) =>
    <div ref=ref ...props>
        children
        /* api要求加的 */
        props.provided?.placeholder
    </div>
)
1. 实现 Drop 组件
// 这个文件相当于重构了 drop 原生组件
// 定义一个类型,不想用 自带的 children ,采用自己的
type DropProps = Omit<DroppableProps, 'children'> &  children: ReactNode
export const Drop = ( children, ...props : DropProps) =>
    return <Droppable ...props>

            (provided =>
                if (React.isValidElement(children))
                    // 给所有的子元素都加上props属性
                    return React.cloneElement(children,
                        ...provided.droppableProps,
                        ref: provided.innerRef,
                        provided
                    )

                return <div />
            )

    </Droppable>
2. 实现 Drag 组件
type DragProps = Omit<DraggableProps, 'children'> &  children: ReactNode
export const Drag = ( children, ...props : DragProps) =>
    return <Draggable ...props>

            provided =>
                if (React.isValidElement(children))
                    return React.cloneElement(children,
                        ...provided.draggableProps,
                        ...provided.dragHandleProps,
                        ref: provided.innerRef
                    )

                return <div />


    </Draggable>
3. 拖拽持久化
写好了两个组件,虽然很难,可以直接 cv 一下这部分的代码。
- 理解起来还是挺可以的,使用
Drop组件包裹拖得位置,用Drag组件包裹放的位置 - 最后我们需要持久化我们的状态,这里采用的是原生组件中自带的
onDragEnd方法来实现
我们在这里需要再实现一个 hook 来实现这个功能,很难
这里我们通过 if 判断它当前是拖的看板还是任务,判断一下是左右还是上下拖拽,通过组件中自带的方法计算出放下的 id 和拿起来的 id 将它插入到这个 kanban 任务中即可
当我们拖拽完成时,会返回
source和destination对象,这里面有我们拖拽的相关信息
如果是 column 的话就是看板之间的拖拽,我们需要调用我们新封装的一个 useReorderKanban 方法进行持久化
如果是 row 则调用任务之间的持久化方法 useRecordTask 方法进行持久化
export const useDragEnd = () =>
    // 先取到看板
    const  data: kanbans  = useKanbans(useKanbanSearchParams())
    const  mutate: reorderKanban  = useReorderKanban(useKanbansQueryKey())
    // 获取task信息
    const  data: allTasks = [] = useTasks(useTasksSearchParams())
    const  mutate: reorderTask  = useReorderTask(useTasksQueryKey())
    return useCallback(( source, destination, type : DropResult) =>
        if (!destination)
            return

        // 看板排序
        if (type === 'COLUMN')
            const fromId = kanbans?.[source.index].id
            const toId = kanbans?.[destination.index].id
            // 如果没变化的时候直接return
            if (!fromId || !toId || fromId === toId)
                return

            // 判断放下的位置在目标的什么方位
            const type = destination.index > source.index ? 'after' : 'before'
            reorderKanban( fromId, referenceId: toId, type )

        if (type === 'ROW')
            // 通过 + 转变为数字
            const fromKanbanId = +source.droppableId
            const toKanbanId = +destination.droppableId
            // 不允许跨版排序
            if (fromKanbanId !== toKanbanId)
                return

            // 获取拖拽的元素
            const fromTask = allTasks.filter(task => task.kanbanId === fromKanbanId)[source.index]
            const toTask = allTasks.filter(task => task.kanbanId === fromKanbanId)[destination.index]
            //
            if (fromTask?.id === toTask?.id)
                return

            reorderTask(
                fromId: fromTask?.id,
                referenceId: toTask?.id,
                fromKanbanId,
                toKanbanId,
                type: fromKanbanId === toKanbanId && destination.index > source.index ? 'after' : 'before'
            )

    , [allTasks, kanbans, reorderKanban, reorderTask])
4. useReorderKanban
通过传入一组数据,包括起始位置,插入位置,在插入位置的前面还是后面,这些数据,进行后台接口的判断,来进行持久化,这里采用的 useMutation 就是前面讲的,使用方法都很熟练了
// 持久化数据接口
export const useReorderKanban = (queryKey:QueryKey) =>
    const client = useHttp()
    return useMutation(
        (params: SortProps) =>
            return client('kanbans/reorder',
                data: params,
                method: "POST"
            )
        ,
        useReorderKanbanConfig(queryKey)
    )
5. 在 HTML5 中新增的 Drop 和 Drag
当我们需要设置某个元素可拖放时,只需要 draggable 设置为 true
<img draggable="true">
当拖放执行时,会发生 ondragstart 和 setData()
执行 ondragstart 会调用一个函数 drag 函数,它规定了被拖拽的数据
function drag(event)

    event.dataTransfer.setData("Text",ev.target.id);
这里的
Text时我们需要添加到drag object中的数据类型
在何处放置被拖动的数据
默认地,无法将数据/元素放置到其他元素中。如果需要设置允许放置,我们必须阻止对元素的默认处理方式。
这要通过调用
ondragover事件的event.preventDefault()方法:
event.preventDefault()
当防止时会发生 drop 事件
function drop(ev)

    ev.preventDefault();
    var data=ev.dataTransfer.getData("Text");
    ev.target.appendChild(document.getElementById(data));
代码解释:
- 调用
preventDefault()来避免浏览器对数据的默认处理(drop事件的默认行为是以链接形式打开) - 通过
dataTransfer.getData("Text")方法获得被拖的数据。该方法将返回在setData()方法中设置为相同类型的任何数据。 - 被拖数据是被拖元素的
id ("drag1") - 把被拖元素追加到放置元素(目标元素)中
(参考于菜鸟教程)
可以亲自试一试:在线演示
📌 总结
- 大概了解了一下如何使用
react-beautiful-dnd - 关于拖拽持久化有了大概的认识
- 了解了 HTML5 中的
drop和drag
最后,可能在很多地方讲诉的不够清晰,请见谅
💌 如果文章有什么错误的地方,或者有什么疑问,欢迎留言,也欢迎私信交流
以上是关于Hooks + TS 搭建一个任务管理系统-- 拖拽功能实现的主要内容,如果未能解决你的问题,请参考以下文章
Hooks + TS 搭建一个任务管理系统-- 拖拽功能实现
Hooks + TS 搭建一个任务管理系统-- 拖拽功能实现
Hooks + TS 搭建一个任务管理系统-- 搜索功能实现
Hooks + TS 搭建一个任务管理系统-- 搜索功能实现