一篇教你通过Seata解决分布式事务问题
Posted
tags:
篇首语:本文由小常识网(cha138.com)小编为大家整理,主要介绍了一篇教你通过Seata解决分布式事务问题相关的知识,希望对你有一定的参考价值。
参考技术ASeata的设计目标其一是对业务无侵入,因此从业务无侵入的2PC方案着手,在传统2PC的基础上演进,并解决2PC方案面临的刚性事务问题。
首先:AT模式是由2PC演变而来,在2PC的基础上增加了数据镜像(undolog表)的功能来实现分布式事务的回滚。
流程:
案例:
1、user业务表
2、执行业务SQL: update user set age = 20 where name = “王明”;
3、Seata会拦截该业务SQL,对该SQL添加前置镜像、后置镜像并将前置、后置镜像得到的数据记录到undolog表中:
前置镜像:业务SQL修改之前的数据;
后置镜像:业务SQL修改之后的数据。
前置镜像的到的数据:
后置镜像得到的数据:
4、如果执行回滚操作,则根据XID读取undolog表中的前置镜像和业务SQL信息,并生成回滚SQL语句执行:
5、如果执行提交,则直接把undolog表中,相关镜像删除即可。
本次实践为seata最新版本为v1.5.1 ,
下载地址 http://seata.io/zh-cn/blog/download.html, 下载下来进行解压,目录结构如下:
进入bin目录直接启动seata ,
seata服务默认端口是8091、客户端端口7091
window下双击运行seata-server.bat
linux下运行seata-server.sh
输出以下信息表示启动成功,默认Seata服务端口8091
Seata服务端支持三种存储模式(store.mode):
新建一个seata数据库实例,然后导入以下SQL,或者导入学习资料中提供的seata.sql。
注意:seata数据库字符集需要是utf8mb4 -- UTF-8 Unicode
可以使用资料中的 nacos-2.4.5.jar 文件,通过java -jar nacos-2.4.5.jar的方式启动nacos服务,启动nacos前需要修改数据源地址。
学习资料中提供了nacos依赖的数据库SQL文件: nacos.sql
资料下载地址: https://pan.baidu.com/s/16YFbXeRpOzNWIO_jhyH0-g?pwd=1bvd
Data ID: seataServer.properties
Group: SEATA_GROUP
添加 seataServer.properties 内容,需要自行修改seata数据库连接。
修改seata-server-1.5.1seataconf application.yml配置文件 ,修改config、registry的type值为nacos
注意:如果使用了Nacos作为配置中心,那么就不需要在该配置文件中配置store,Seata会从Nacos配置中心读取。
进入bin目录启动Seata , Seata服务默认端口是8091、客户端端口7091
window下双击运行seata-server.bat
linux下运行seata-server.sh
注意:
多数据源下Seata分布式事务出现的问题和解决方法
什么是Seata
推荐使用AT模式
Seata官方文档
整体机制
两阶段提交协议的演变:
-
一阶段:业务数据和回滚日志记录在同一个本地事务中提交
(本地数据库先保存,并向undo_log表写入日志),释放本地锁和连接资源。
-
二阶段:
- 提交异步化,非常快速地完成。
- 回滚通过一阶段的回滚日志进行反向补偿(回滚时-读取undo_log表回滚回初始状态)
多数据源遇到的问题
在Seata1.3.0版本中,数据源自动代理和手动代理一定不能混合使用,否则会导致多层代理,从而导致以下问题:
单数据源情况下:导致分支事务提交时,undo_log本身也被代理,即为 undo_log 生成了 undo_log, 假设为undo_log2,此时undo_log将被当作分支事务来处理;分支事务回滚时,因为undo_log2生成的有问题,在undo_log对应的事务分支回滚时会将业务表关联的undo_log也一起删除,从而导致业务表对应的事务分支回滚时发现undo_log不存在,从而又多生成一条状态为1的undo_log。
多数据源和逻辑数据源被代理情况下:除了单数据源情况下会出现的问题,还可能会造成死锁问题。死锁的原因就是针对undo_log的操作,本该在一个事务中执行的selectfor update 和 delete 操作,被分散在多个事务中执行,导致一个事务在执行完select for update后一直不提交,一个事务在执行delete时一直等待锁,直到超时
解决方案
手动代理数据源
@Bean
public DataSource druidDataSource()
    return new DruidDataSource()

@Primary
@Bean("dataSource")
public DataSourceProxy dataSource(DataSource druidDataSource)
    return new DataSourceProxy(druidDataSource);
Seata内部的自动代理实现
针对DataSource创建一个代理类,在代理类里面基于DataSource获取DataSourceProxy(如果没有就创建),然后调用DataSourceProxy的相关方法。核心逻辑在SeataAutoDataSourceProxyCreator类
类图
ProxyConfig (org.springframework.aop.framework)
    ProxyProcessorSupport (org.springframework.aop.framework)
        AbstractAutoProxyCreator (org.springframework.aop.framework.autoproxy)
            SeataAutoDataSourceProxyCreator (io.seata.spring.annotation.datasource)
public class SeataAutoDataSourceProxyCreator extends AbstractAutoProxyCreator
    private static final Logger LOGGER = LoggerFactory.getLogger(SeataAutoDataSourceProxyCreator.class);
    private final String[] excludes;
    private final Advisor advisor = new DefaultIntroductionAdvisor(new SeataAutoDataSourceProxyAdvice());

    public SeataAutoDataSourceProxyCreator(boolean useJdkProxy, String[] excludes)
        this.excludes = excludes;
        setProxyTargetClass(!useJdkProxy);


    @Override
    protected Object[] getAdvicesAndAdvisorsForBean(Class<?> beanClass, String beanName, TargetSource customTargetSource) throws BeansException
        if (LOGGER.isInfoEnabled())
            LOGGER.info("Auto proxy of []", beanName);

        return new Object[]advisor;


    @Override
    protected boolean shouldSkip(Class<?> beanClass, String beanName)
        return SeataProxy.class.isAssignableFrom(beanClass) ||
                DataSourceProxy.class.isAssignableFrom(beanClass) ||
                !DataSource.class.isAssignableFrom(beanClass) ||
                Arrays.asList(excludes).contains(beanClass.getName());


public class SeataAutoDataSourceProxyAdvice implements MethodInterceptor, IntroductionInfo
    @Override
    public Object invoke(MethodInvocation invocation) throws Throwable
        DataSourceProxy dataSourceProxy = DataSourceProxyHolder.get().putDataSource((DataSource) invocation.getThis());
        Method method = invocation.getMethod();
        Object[] args = invocation.getArguments();
        Method m = BeanUtils.findDeclaredMethod(DataSourceProxy.class, method.getName(), method.getParameterTypes());
        if (m != null)
            return m.invoke(dataSourceProxy, args);
         else
            return invocation.proceed();


    @Override
    public Class<?>[] getInterfaces()
        return new Class[]SeataProxy.class;
数据源多层代理(案例)
    @Bean(name = "writeDataSource")
    @ConfigurationProperties(prefix = "spring.datasource.write")
    public DataSource writeDataSource()
        return DruidDataSourceBuilder.create().build();


    @Bean(name = "readDataSource")
    @ConfigurationProperties(prefix = "spring.datasource.read")
    public DataSource readDataSource()
        return DruidDataSourceBuilder.create().build();


    @Bean(name = "writeDataSourceProxy")
    public DataSourceProxy writeDataSourceProxy(@Qualifier("writeDataSource") DataSource dataSource)
        return new DataSourceProxy(dataSource);


    @Bean("readDataSourceProxy")
    public DataSourceProxy readDataSourceProxy(@Qualifier("readDataSource") DataSource dataSource)
        return new DataSourceProxy(dataSource);
- 首先我们在配置类里面注入了两个DataSource,分别为: DruidDataSource和DataSourceProxy,
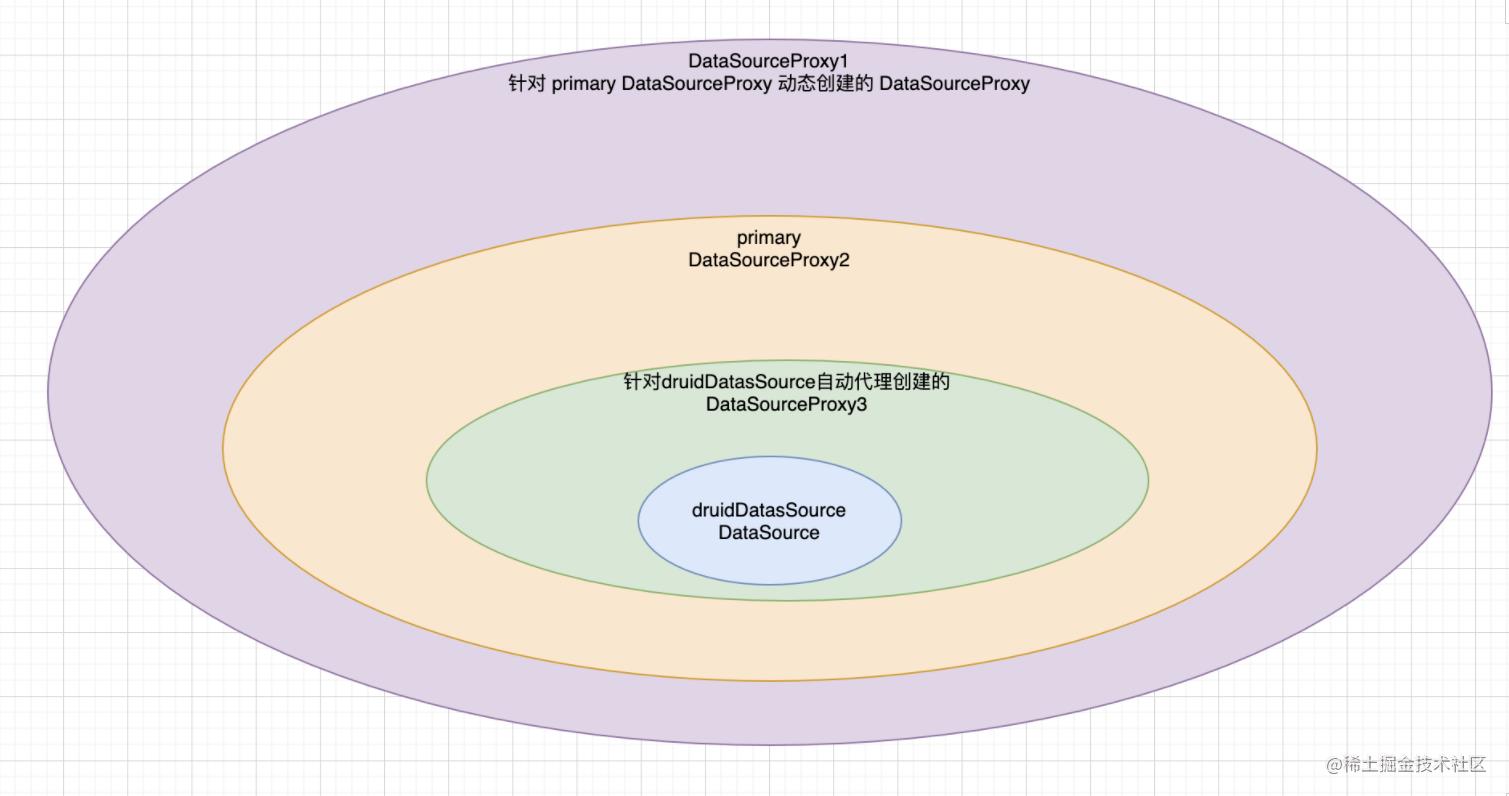
其中DruidDataSource 作为 DataSourceProxy 的 targetDataSource属性,并且DataSourceProxy为使用了@Primary注解声明- 应用默认开启了数据源自动代理,所以在调用DruidDataSource相关方法时,又会为DruidDataSource创建一个对应的数据源代理DataSourceProxy2
当我们在程序中想获取一个Connection时会发生什么?
- 先获取一个DataSource,因为DataSourceProxy为Primary,所以此时拿到的是DataSourceProxy
- 基于DataSource获取一个Connection,即通过DataSourceProxy获取Connection。此时会先调用targetDataSource 即 DruidDataSource 的 getConnection 方法,但因为切面会对DruidDataSource进行拦截,根据步骤2的拦截逻辑可以知道,此时会自动创建一个DataSourceProxy2,然后调用DataSourceProxy2#getConnection,然后再调用DruidDataSource的getConnection方法。最终形成了双层代理, 返回的Connection也是一个双层的ConnectionProxy;
Seata开启动态数据源后,根据上面的代码实例,最终将生成三个代理数据源
1.读写代理数据源两个,主代理数据源
2.根据@Primary指定默认的数据源,默认返回masterSlaveProxy

Seata关于动态数据源的基本类实现
public class DataSourceProxy extends AbstractDataSourceProxy implements Resource
    /**实例化新的数据源代理,参数: targetDataSource–目标数据源 */
    public DataSourceProxy(DataSource targetDataSource)
        this(targetDataSource, DEFAULT_RESOURCE_GROUP_ID);

    /**实例化新的数据源代理
参数: targetDataSource–目标数据源 resourceGroupId–资源组id*/
    public DataSourceProxy(DataSource targetDataSource, String resourceGroupId)
        if (targetDataSource instanceof SeataDataSourceProxy)
            LOGGER.info("Unwrap the target data source, because the type is: ", targetDataSource.getClass().getName());
            targetDataSource = ((SeataDataSourceProxy) targetDataSource).getTargetDataSource();

        this.targetDataSource = targetDataSource;
        init(targetDataSource, resourceGroupId);
DataSourceProxy
初始化数据连接,获得数据连接对象
    private void init(DataSource dataSource, String resourceGroupId)
        this.resourceGroupId = resourceGroupId;
        try (Connection connection = dataSource.getConnection())
            jdbcUrl = connection.getMetaData().getURL();
            dbType = JdbcUtils.getDbType(jdbcUrl);
            if (JdbcConstants.ORACLE.equals(dbType))
                userName = connection.getMetaData().getUserName();

         catch (SQLException e)
            throw new IllegalStateException("can not init dataSource", e);

        DefaultResourceManager.get().registerResource(this);
        if (ENABLE_TABLE_META_CHECKER_ENABLE)
            tableMetaExcutor.scheduleAtFixedRate(() ->
                try (Connection connection = dataSource.getConnection())
                    TableMetaCacheFactory.getTableMetaCache(DataSourceProxy.this.getDbType())
                        .refresh(connection, DataSourceProxy.this.getResourceId());
                 catch (Exception ignore)

            , 0, TABLE_META_CHECKER_INTERVAL, TimeUnit.MILLISECONDS);


        //Set the default branch type to 'AT' in the RootContext.
        RootContext.setDefaultBranchType(this.getBranchType());


    /**
获取普通连接。 返回值: 普通连接 抛出: SQLException–sql异常
     */
    public Connection getPlainConnection() throws SQLException
        return targetDataSource.getConnection();
Seata代理数据源类关系
BaseDataSourceResource (io.seata.rm)
    AbstractDataSourceProxyXA (io.seata.rm.datasource.xa)
        DataSourceProxyXA (io.seata.rm.datasource.xa)
        DataSourceProxyXANative (io.seata.rm.datasource.xa)
AbstractDataSourceProxy (io.seata.rm.datasource)
    DataSourceProxy (io.seata.rm.datasource)
以上是关于一篇教你通过Seata解决分布式事务问题的主要内容,如果未能解决你的问题,请参考以下文章