drbd+corosync+pacemaker构建高可用MySQL集群
Posted
tags:
篇首语:本文由小常识网(cha138.com)小编为大家整理,主要介绍了drbd+corosync+pacemaker构建高可用MySQL集群相关的知识,希望对你有一定的参考价值。
一、drbd简介
drbd全称Distributed Replicated Block Device,为分布式复制块设备,基于软件实现的,不共享任何东西的,通过复制的方式构建镜像模式工作的磁盘,类似于raid1,但不同于raid的是,drbd实现了跨主机镜像块数据。drbd工作原理:由工作于内核层次的drbd,将要写入本地磁盘的数据镜像一份发往本地网卡,由本地网卡发往另一台drbd主机的本地磁盘存储。因此,drbd的两个主机的,磁盘存储一模一样,从而实现分布式复制块设备的实现。drbd进程对磁盘的读写数据操作只在一个主机运行,只有在主drbd主机出现故障时,从drbd主机开始接收用户的数据读写。在集群系统中,drbd可与HA集群的分布式锁管理器一起使用,从而使主从drbd主机都可对数据读写,形成双主drbd。
1、drbd在块级别完成文件复制,工作于内核
2、drbd是跨主机的块设备镜像系统
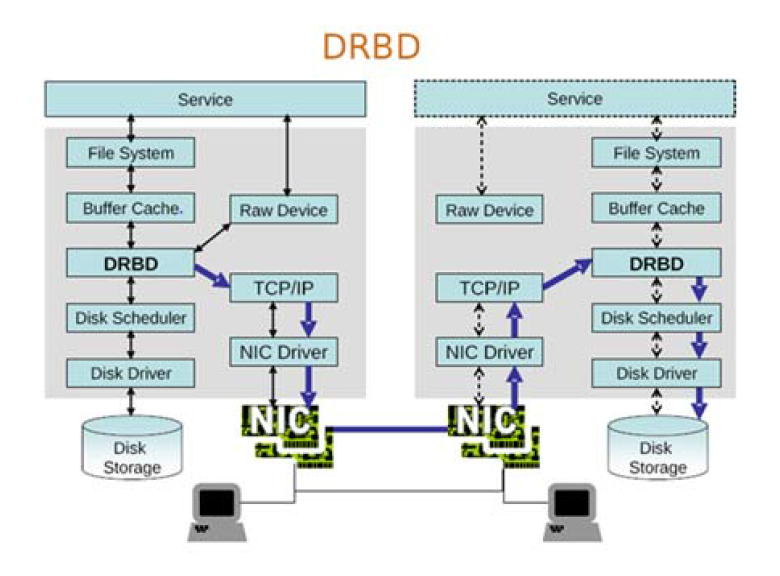
DRBD结构图(引自DRBD官网):
工作流程图分析:service服务,File System是任何进程要读取磁盘,都要向内核发起文件系统级别的调用来实现,文件系统能把数据等存入磁盘。Buffer Cache是service将数据缓存在内存中,并由Disk Scheduler取出调度排序,发往Disk Driver支配Disk Storage存储。而Raw Device则是不经由文件系统调用,直接块级别存储。DRBD则是直接在内核空间的内存与硬盘驱动之间加入一层,将从Buffer Cache提取的数据镜像一份,源数据继续经由Disk Driver支配Disk Storage存储,而镜像的数据经由TCP/IP网络通过本地网卡发往从drbd主机的drbd层交由Disk Driver支配Disk Storage存储。
DRBD的用户空间管理工具,用于管理主从drbd主机。主要使用drbdadm,因其更符合用户的使用习惯。而drbdsetup和drbdmeta为较接近底层的设备,所以使用较少。
DRBD的工作特性:实时,透明,设置数据同步类型
数据同步类型有三种:
A:异步,性能好,可靠性差
B:半同步 性能可靠性折中
C:同步 可靠性好,性能差
DRBD的资源类型:
Resource name:唯一的,只能使用ASCII码定义,不能包含空格字符
DRBD device:
由DRBD管理的块设备文件,
drbd设备:/dev/drbd#
主设备号:147
次设备号:从0开始编号
磁盘配置:各主机上用于组成此drbd设备的磁盘或分区
网络配置:数据同步时的网络通信属性
二、 drbd实现HA的MySQL集群
此前已部署好corosync+pacemaker+crmsh ---> corosync+pacemaker使用crmsh构建高可用集群
1、准备安装drbd(node1,node2)
drbd的rpm在内核版本2.6.33以上才自动加入内核功能,本文的系统版本为CentOS6.7,内核版本为2.6.32-573.el6.x86_64,所以要想使用drbd,只能编译源码,或是使用三方提供的rpm包。
准备epel源
[[email protected] corosync]# rpm -Uvh

安装drbd主程序与内核模块
[[email protected] corosync]# yum install drbd83 kmod-drbd83
2、在两个node节点准备磁盘(node1,node2)
在虚拟机上添加了10G的新硬盘,在centos6.7系统上不关机读取到新硬盘
[[email protected] corosync]# ls /sys/class/scsi_host/
host0  host1  host2
[[email protected] corosync]# echo "- - -" > /sys/class/scsi_host/host0/scan
[[email protected] corosync]# echo "- - -" > /sys/class/scsi_host/host1/scan
[[email protected] corosync]# echo "- - -" > /sys/class/scsi_host/host2/scan
[[email protected] corosync]# fdisk -l | grep /dev/sdb
Disk /dev/sdb: 10.7 GB, 10737418240 bytes
为新硬盘创建分区,但不格式化。
[[email protected] corosync]# fdisk /dev/sdb
Device contains neither a valid DOS partition table, nor Sun, SGI or OSF disklabel
Building a new DOS disklabel with disk identifier 0x35afce5b.
Changes will remain in memory only, until you decide to write them.
After that, of course, the previous content won‘t be recoverable.

Warning: invalid flag 0x0000 of partition table 4 will be corrected by w(rite)

WARNING: DOS-compatible mode is deprecated. It‘s strongly recommended to
         switch off the mode (command ‘c‘) and change display units to
         sectors (command ‘u‘).

Command (m for help): p

Disk /dev/sdb: 10.7 GB, 10737418240 bytes
255 heads, 63 sectors/track, 1305 cylinders
Units = cylinders of 16065 * 512 = 8225280 bytes
Sector size (logical/physical): 512 bytes / 512 bytes
I/O size (minimum/optimal): 512 bytes / 512 bytes
Disk identifier: 0x35afce5b

   Device Boot      Start         End      Blocks   Id  System

Command (m for help): n
Command action
   e   extended
   p   primary partition (1-4)
p
Partition number (1-4): 1
First cylinder (1-1305, default 1):
Using default value 1
Last cylinder, +cylinders or +size{K,M,G} (1-1305, default 1305): +5G

Command (m for help): w
The partition table has been altered!

Calling ioctl() to re-read partition table.
Syncing disks.
通知内核更新分区表
[[email protected] ~]# partx -a /dev/sdb
[[email protected] ~]# partx -a /dev/sdb
3、配置文件
其配置文件为/etc/drbd.conf,其中引用了/etc/drbd.d/global_common.conf和/etc/drbd.d/*.res
/etc/drbd.d/global_common.conf:提供了全局配置,及多个drbd设备相同的配置
/etc/drbd.d/*.res :资源定义
vim /etc/drbd.d/global_common.conf
##global:全局属性,定义drbd自己的工作特性
global {
##收集用户信息
        usage-count no;
        # minor-count dialog-refresh disable-ip-verification
}
##common:通用属性,定义多组drbd设备通用特性
common {
        protocol C;
##处理器,定义集群脑裂的处理方法
        handlers {
                # These are EXAMPLE handlers only.
                # They may have severe implications,
                # like hard resetting the node under certain circumstances.
                # Be careful when chosing your poison.

                # after-resync-target /usr/lib/drbd/unsnapshot-resync-target-lvm.sh;
        }
##节点之间等待开启的时间,超时时间等
        startup {
                # wfc-timeout degr-wfc-timeout outdated-wfc-timeout wait-after-sb
        }
##磁盘相关属性
        disk {
                on-io-error detach;     ##节点故障就拆除
                # on-io-error fencing use-bmbv no-disk-barrier no-disk-flushes
                # no-disk-drain no-md-flushes max-bio-bvecs
        }
##网络相关属性
        net {
                cram-hmac-alg "sha1";            ##定义消息校验时使用的算法
                shared-secret "OPNEZkj3ziyn/QyFGdVK5w";       ##算法加密的密钥
                # sndbuf-size rcvbuf-size timeout connect-int ping-int ping-timeout max-buffers
                # max-epoch-size ko-count allow-two-primaries cram-hmac-alg shared-secret
                # after-sb-0pri after-sb-1pri after-sb-2pri data-integrity-alg no-tcp-cork
        }
##同步类型
        syncer {
                rate 100M;    ##同步速率
                # rate after al-extents use-rle cpu-mask verify-alg csums-alg
        }
}
生成随机数,填入net的shared-secret中
[[email protected] ~]# openssl rand -base64 16
OPNEZkj3ziyn/QyFGdVK5w==
配置资源
[[email protected] drbd.d]# vim mystore.res
resource mystore {
    device   /dev/drbd0;
    disk     /dev/sdb1;
    on node1 {
        address 192.168.0.15:7789;
        meta-disk  internal;
    }
    on node2 {
        address 192.168.0.16:7789;
        meta-disk  internal;
    }
}
将配置文件复制给node2一份
[[email protected] ~]# scp  /etc/drbd.d/* node2:/etc/drbd.d/
global_common.conf                                  100% 1704     1.7KB/s   00:00
mystore.res                                         100%  226     0.2KB/s   00:00
4、在两个节点上初始化已定义的资源并重启服务
node1
[[email protected] ~]# drbdadm create-md mystore
Writing meta data...
initializing activity log
NOT initialized bitmap
New drbd meta data block successfully created.
node2
[[email protected] ~]# drbdadm create-md mystore
Writing meta data...
initializing activity log
NOT initialized bitmap
New drbd meta data block successfully created.
node1和node2同时启动drbd
[[email protected] ~]# service drbd start
[[email protected] ~]# service drbd start
启动服务后两节点都处于Secondary状态,我们要将其中一个节点设置为Primary(仅一个节点执行)
[[email protected] ~]# drbdadm primary --force mystore
或者
[[email protected] ~]# drbdadm -- --overwrite-data-of-peer primary mystore
查看状态信息
[[email protected] ~]# drbd-overview
  0:mystore  SyncSource Primary/Secondary UpToDate/Inconsistent C r-----
	[======>.............] sync‘ed: 39.7% (3096/5128)M
同步完毕,node1为主,node2为从
[[email protected] ~]# drbd-overview
  0:mystore  Connected Primary/Secondary UpToDate/UpToDate C r-----

也可使node1为从,node2为主
[[email protected] ~]# drbdadm secondary mystore
[[email protected] ~]# drbdadm primary --force mystore
5、创建文件系统
所有操作均在node1即Primary节点。
格式化分区
[[email protected] ~]# mke2fs -t ext4 /dev/drbd0
mke2fs 1.41.12 (17-May-2010)
Filesystem label=
OS type: Linux
Block size=4096 (log=2)
Fragment size=4096 (log=2)
Stride=0 blocks, Stripe width=0 blocks
328656 inodes, 1313255 blocks
65662 blocks (5.00%) reserved for the super user
First data block=0
Maximum filesystem blocks=1346371584
41 block groups
32768 blocks per group, 32768 fragments per group
8016 inodes per group
Superblock backups stored on blocks:
	32768, 98304, 163840, 229376, 294912, 819200, 884736

Writing inode tables: done
Creating journal (32768 blocks): done
done
Writing superblocks and filesystem accounting information: done

This filesystem will be automatically checked every 24 mounts or
180 days, whichever comes first.  Use tune2fs -c or -i to override.
挂载并测试drbd
[[email protected] ~]# mount /dev/drbd0 /mnt
[[email protected] ~]# cd /mnt
[[email protected] mnt]# cp /etc/issue ./
[[email protected] mnt]# ls
issue  lost+found
卸载
[[email protected] ~]# umount /mnt
未完待续!
水平有限,如有错误,欢迎指正。
本文出自 “linux启航” 博客,请务必保留此出处http://jiayimeng.blog.51cto.com/10604001/1875979
以上是关于drbd+corosync+pacemaker构建高可用MySQL集群的主要内容,如果未能解决你的问题,请参考以下文章
corosync+pacemaker+crmsh+DRBD实现数据库服务器高可用集群构建
高可用分布式存储(Corosync+Pacemaker+DRBD+MooseFS)
Corosync+Pacemaker+DRBD+NFS高可用实例配置
基于corosync和pacemaker+drbd实现mfs高可用
Corosync+pacemaker+DRBD+mysql(mariadb)实现高可用(ha)的mysql集群(centos7)
