Android 底部(简单,简易)导航栏(Fragment)
Posted 睡觉的云~
tags:
篇首语:本文由小常识网(cha138.com)小编为大家整理,主要介绍了Android 底部(简单,简易)导航栏(Fragment)相关的知识,希望对你有一定的参考价值。
首先编写activity的布局
<?xml version="1.0" encoding="utf-8"?>
<RelativeLayout xmlns:android="http://schemas.android.com/apk/res/android"
    xmlns:app="http://schemas.android.com/apk/res-auto"
    xmlns:tools="http://schemas.android.com/tools"
    android:layout_width="match_parent"
    android:layout_height="match_parent"
    tools:context=".MainActivity">

    <RelativeLayout
        android:id="@+id/tab_rg"
        android:layout_width="match_parent"
        android:layout_height="48dp"
        android:background="@color/white"
        >
        <TextView
            android:id="@+id/txt_topbar"
            android:layout_width="match_parent"
            android:layout_height="match_parent"
            android:layout_centerInParent="true"
            android:gravity="center"
            android:text="message"
            android:textColor="@color/text_gray"
            android:textSize="18dp"/>
        <View
            android:layout_width="match_parent"
            android:layout_height="2px"
            android:layout_alignParentBottom="true"
            android:background="@color/text_gray"/>
    </RelativeLayout>
    <LinearLayout
        android:id="@+id/tab_group"
        android:layout_width="match_parent"
        android:layout_height="56dp"
        android:background="@color/white"
        android:layout_alignParentBottom="true"
        android:orientation="horizontal"
        >
        <TextView
            android:id="@+id/rd_menu_index"
            style="@style/tab_menu_item"
            android:text="index"
            android:textColor="@drawable/tab_text"

            />
        <TextView
            android:id="@+id/rd_menu_Rand"
            style="@style/tab_menu_item"
            android:text="Rand"
            android:textColor="@drawable/tab_text"

            />
    </LinearLayout>

    <View
        android:id="@+id/div_tab_bar"
        android:layout_width="match_parent"
        android:layout_height="2px"
        android:background="@color/text_gray"
        android:layout_above="@id/tab_group"/>
    <FrameLayout
        android:id="@+id/fragment_container"
        android:layout_width="match_parent"
        android:layout_height="match_parent"
        android:layout_above="@id/tab_group"
        android:layout_below="@id/tab_rg"
        android:background="@color/white"/>


</RelativeLayout>
效果:
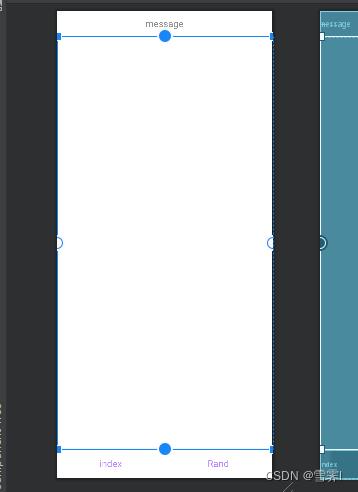
乍一看代码那么多,实际上在这个方法里底部导航并不需要那么多,上面的relativelayout布局实际上对底部导航并没有多大用,底部导航只需要下面的layout布局,然后将其设为水平布局,主要的还是 android:layout_alignParentBottom="true" 这是将layout布局放在父组件的底部,之后在其内部添加textview就可以大概实现上方的效果了,当然样式要好看的话,我们还需要将textview设置权重。
   <style name="tab_menu_item">
        <item name="android:layout_width">wrap_content</item>
        <item name="android:layout_weight">1</item>
        <item name="android:layout_height">match_parent</item>
        <item name="android:button">@null</item>
        <item name="android:gravity">center</item>
        <item name="android:paddingTop">0dp</item>
        <item name="android:drawablePadding">3dp</item>
        <item name="android:textColor">@drawable/tab_text</item>
        <item name="android:textSize">18sp</item>
</style>可能你已经发现了这个layout_weight并没有在textview控件内写,而是写在style下的item里,这个属性可以抽取相同的属性。这个一般写在values包下的themes.xml里,在对应的布局里使用 style = " " 就可以获取到属性了。
创建fragment布局和类
这个布局是用作底部导航导向的页面
fragment布局:
<?xml version="1.0" encoding="utf-8"?>
<LinearLayout xmlns:android="http://schemas.android.com/apk/res/android"
    xmlns:app="http://schemas.android.com/apk/res-auto"
    xmlns:tools="http://schemas.android.com/tools"
    android:layout_width="match_parent"
    android:layout_height="match_parent"
    android:background="@color/white"
    android:orientation="vertical"
    tools:context=".FirstFragment">

    <TextView
        android:id="@+id/txt_content"
        android:layout_width="match_parent"
        android:layout_height="match_parent"
        android:layout_gravity="center"
        android:text="hello"
        android:textColor="@color/text_gray"
        android:textSize="20sp"/>

</LinearLayout>
fragment类:
package com.example.try2;

import androidx.annotation.NonNull;
import androidx.annotation.Nullable;
import androidx.appcompat.app.AppCompatActivity;
import androidx.fragment.app.Fragment;

import android.os.Bundle;
import android.view.LayoutInflater;
import android.view.View;
import android.view.ViewGroup;
import android.widget.TextView;

public class FirstFragment extends Fragment
    private String context;
    private TextView mTextView;

    public FirstFragment(String context)
        this.context = context;


    @Nullable
    @Override
    public View onCreateView(@NonNull LayoutInflater inflater, @Nullable ViewGroup
        container, @Nullable Bundle savedInstanceState)
        View view = inflater.inflate(R.layout.activity_first_fragment, container, false);
        mTextView = (TextView)view.findViewById(R.id.txt_content);
        mTextView.setText(context);
        return view;
先来说明一下onCreateView的每个参数
LayoutInflater:是用来找res/layout/下的xml布局文件,并且实例化。使用的inflate方法和findViewById很像不过后者是找xml布局文件下的具体widget控件(如 Button、TextView等)。
ViewGroup container:表示容器。
Bundle savedInstanceState:保存当前的状态,在活动的生命周期中,只要离开了可见阶段,活动可能就会被进程终止,这种机制能保存当时的状态。
编写activity的类
package com.example.try2;

import static android.media.CamcorderProfile.get;

import androidx.appcompat.app.AppCompatActivity;
import androidx.fragment.app.FragmentManager;
import androidx.fragment.app.FragmentTransaction;
//import android.app.FragmentTransaction;


import android.graphics.drawable.Drawable;
import android.os.Bundle;
import android.view.View;
import android.view.Window;
import android.widget.FrameLayout;
import android.widget.TextView;

public class MainActivity extends AppCompatActivity implements View.OnClickListener

    private TextView topBar;
    private TextView tab_index;
    private TextView tab_Rand;

    private FrameLayout ly_content;

    private FirstFragment f1, f2, f3, f4;
//    private second f2;
    private FragmentManager fragmentManager;


    @Override
    protected void onCreate(Bundle savedInstanceState)
        super.onCreate(savedInstanceState);
        setContentView(R.layout.activity_main);
        bindView();


    private void bindView()
        topBar = (TextView) this.findViewById(R.id.txt_topbar);
        tab_index = (TextView) this.findViewById(R.id.rd_menu_index);
        tab_Rand = (TextView) this.findViewById(R.id.rd_menu_Rand);

        tab_index.setOnClickListener(this);
        tab_Rand.setOnClickListener(this);


    //重置所有文本的选中状态
    public void selected()
        tab_index.setSelected(false);
        tab_Rand.setSelected(false);


    //隐藏Fragment
    public void hideAllFragment(FragmentTransaction transaction)
        if(f1 != null)
            transaction.hide(f1);

        if(f2 != null)
            transaction.hide(f2);

        if(f3 != null)
            transaction.hide(f3);

        if(f4 != null)
            transaction.hide(f4);


    @Override
    public void onClick(View view)
        FragmentTransaction transaction = getSupportFragmentManager().beginTransaction();
        hideAllFragment(transaction);
        switch (view.getId())
            case R.id.rd_menu_index:
                selected();
                tab_index.setSelected(true);
                if(f1 == null)
                    f1 = new FirstFragment("第一个Fragment");
                    transaction.add(R.id.fragment_container, f1);
                 else
                    transaction.show(f1);

                break;
            case R.id.rd_menu_Rand:
                selected();
                tab_Rand.setSelected(true);
                if(f2 == null)
                    f2 = new FirstFragment("第二个Fragment");
                    transaction.add(R.id.fragment_container, f2);
                 else
                    transaction.show(f2);

                break;

        transaction.commit();
效果:
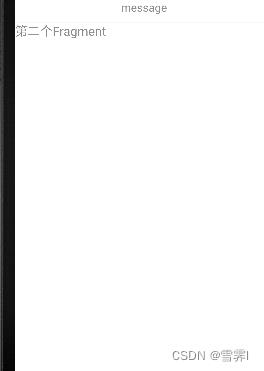

实际上这是同一个类,不过在fragment里添加了构造方法,switch里使用时添加不同的文本,但本质上还是两个页面,毕竟都开辟了空间,如果想要有不同排版的页面,可以像fragment布局和类在写一个相似的,之后在switch里使用就可以了
最后到这里就差不多就结束了,如果还想在导航处添加一些图片可以使用drawableLeft,drawableRight,drawableTop,drawableBottom等属性。
最后感谢各位阅读,如果文章中有错误或者您有什么需要补充,也欢迎您直接留言评论。
Android底部导航栏
Android UI-仿微信底部导航栏布局
Android基础入门教程——5.2.1 Fragment实例精讲——底部导航栏的实现(方法1)
以上是关于Android 底部(简单,简易)导航栏(Fragment)的主要内容,如果未能解决你的问题,请参考以下文章