TokuDB安装
Posted
tags:
篇首语:本文由小常识网(cha138.com)小编为大家整理,主要介绍了TokuDB安装相关的知识,希望对你有一定的参考价值。
一:缘由
监控系统产生的数据相对普通业务数据,具有写入需求占绝对多数,读取相对较少的特点。
之前使用的PMM监控系统,其docker版解决方案,内置的不仅不是其自家的percona分支数据库,而且使用的是较旧的5.5官方分支版本。监控了6个实例的库和主机后。3周后就占用了9GB的空间。
欣慰的是,Percona公司考虑到这个情况,将会自动根据PMM服务器的硬盘可用容量大小自动定期删除备份的历史数据。
对一个DBA而言,需要关注到一个库的历史负载情况,方便同比环比进行硬件扩容规划。最起码要2年的完整数据吧。
二:解决方法,
采用高压缩的TokuDB引擎进行压缩存储历史数据。
TokuDB is a highly scalable, zero-maintenance downtime mysql storage engine that delivers indexing-based query acceleration, improved replication performance, unparalleled compression, and live schema modification. The TokuDB storage engine is a scalable, ACID and MVCC compliant storage engine that provides indexing-based query improvements, offers online schema modifications, and reduces slave lag for both hard disk drives and flash memory.
This storage engine is specifically designed for high performance on write-intensive workloads which is achieved with Fractal Tree indexing.
三:安装步骤
tokudb既可以在官方社区版本的MySQL上启用,也可以在percona分区上启用,考虑到要见识下percona分支版本相对官方版本支持较多的监控特性, 这次使用percona-mysql-server版本
安装前准备
#systemctl
stop firewalld  #停掉系统防火墙
#systemctl mask firewalld  #屏蔽防火墙自启动
#setenforce 0              #关闭SELinux
#sed -i ‘s/Enforcing/Permissive/g‘ /etc/selinux/config  #永久关闭SELinux
#创建percona软件源
#cat>/etc/yum.repos.d/percona-release.repo<<EOF
    [percona-release-x86_64]
        name = Percona-Release
YUM repository - x86_64
        baseurl = http://repo.percona.com/release/7Server/RPMS/x86_64
        enabled = 1
        gpgcheck = 1
        gpgkey = file:///etc/pki/rpm-gpg/RPM-GPG-KEY-Percona

       [percona-release-noarch]
       name = Percona-Release
YUM repository - noarch
       baseurl = http://repo.percona.com/release/7Server/RPMS/noarch
       enabled = 1
       gpgcheck = 1
       gpgkey = file:///etc/pki/rpm-gpg/RPM-GPG-KEY-Percona

       [percona-release-source]
       name = Percona-Release
YUM repository - Source packages
       baseurl = http://repo.percona.com/release/7Server/SRPMS
       enabled = 0
       gpgcheck = 1
       gpgkey = file:///etc/pki/rpm-gpg/RPM-GPG-KEY-Percona
       EOF
创建软件源倒是有个哏,本来Cent7的系统可以直接在网站上下载epel-release.rpm
进行安装。但是FedoraServer26的版本与repo的自判断特性不太兼容。这里我手动将
系统变量判断手动改成了7Server,即与RHCE/Cent7使用同样的源。
3.开始安装
#安装percona分支MySQL,和相关的备份与工具软件
#yum -y install  percona-toolkit percona-xtrabackup
Percona-Server-server-57
#安装依赖库,这也是坑,fedora源中jemalloc是4.5版本,不兼容。需要手动安装4.0版本以下的
大家如果用的CentOS/RHCE应该没问题的。
#yum -y install ftp://rpmfind.net/linux/fedora/linux/releases/23/Everything/x86_64/os/Packages/j/jemalloc-3.6.0-9.fc23.x86_64.rpm
#安装TokuDB引擎插件
#yum -y install Percona-Server-tokudb-57
#启用插件(mysqld进程需要在运行状态)
#ps-admin --enable-tokudb -u root -p
#systemctl restart mysqld
#ps-admin --enable-tokudb -u root -p
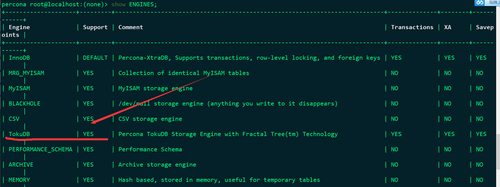
4. 到此为止,安装结束了,大家可以在登入服务器查看
4.5:更改zabbix的建表语句,设置默认引擎为tokuDB,同时更改MySQL默认的引擎
#更改默认引擎:
#在my.cnf中添加
default_storage_engine=TokuDB
并重启mysqld服务
#更改zabbix建表语句,设置默认引擎为tokuDB
#sed -i ‘s/InnoDB/TokuDB/g‘ /usr/share/zabbix-mysql/schema.sql
5.付:若jemalloc版本不对,会出下面错误,大家引以为戒
Checking TokuDB engine plugin status...
INFO: TokuDB engine
plugin is not installed.
Installing TokuDB  engine...
ERROR: Failed to install TokuDB engine plugin. Please check error log.
但是错误日志中没有记录。
尝试通过手动添加的方式安装插件:
mysql>INSTALL PLUGIN tokudb SONAME ‘ha_tokudb.so‘;
ERROR 1126 (HY000):
退出MySQL客户端查看错误代码:
# perror 1126
输出如下
(ER_CANT_OPEN_LIBRARY): Can‘t open shared library ‘%-.192s‘ (errno: %d %-.128s)
就是找不到库文件,回去安装3.6版本的jemalloc
注意:
vim /etc/sysconfig/mysql中应为:
LD_PRELOAD=/usr/lib64/libjemalloc.so.1
THP_SETTING=never
(my.cnf中注释掉basedir=/usr/local/mysql)
本文出自 “漫漫SQL路......” 博客,请务必保留此出处http://l0vesql.blog.51cto.com/4159433/1965912
以上是关于TokuDB安装的主要内容,如果未能解决你的问题,请参考以下文章
Percona5.7 TokuBackup支持TokuDB热备份
Linux下安装percona-server-5.6+tokuDB
