第十 redis&rabbitMQ
Posted ckl893
tags:
篇首语:本文由小常识网(cha138.com)小编为大家整理,主要介绍了第十 redis&rabbitMQ相关的知识,希望对你有一定的参考价值。
一、javascript相关
1.变量说明
name = \'ckl\';  //全局变量
var name = \'ckl\'; //局部变量
变量类型:数字、字符串、数组
var name = \'ckl\';
var age = 29;
console.log(name);
console.log(age)
console.log(typeof name);
console.log(typeof age);
结果:

2.变量类型转换(字符串转数字)
var kk = \'893\';
var mm = \'8.93\';
console.log(parseInt(kk));
console.log(parseFloat(mm));
查看结果:

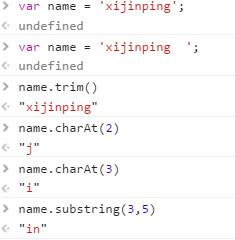
3.String类型变量常用操作
trim() 去除空格
charAt() 返回索引位置字符串
substring() 类似切片
indexOf() 返回字符串的索引位置
length 返回字符串长度

4.数组常用操作
4.1.定义数组


4.2.数组添加
push //追加

unshift //最前面插入

splice(index,0,\'content\') // 指定索引插入

4.3.数组切片

4.4.数组合并

4.5.数组翻转

4.6.数组字符串化

4.7.数组长度

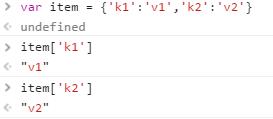
5.定义字典
6.关于JSON
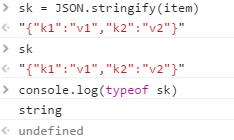
6.1.将数组转成字符串
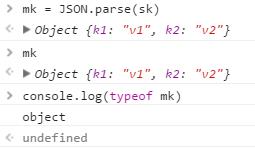
6.2.将字符串反转成数组
7.关于undefined和null
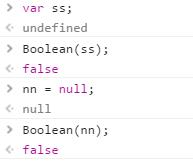
8.关于循环
8.1.数组类型循环
默认循环的是索引值
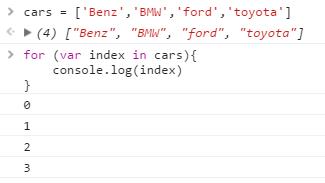
循环索引及值:
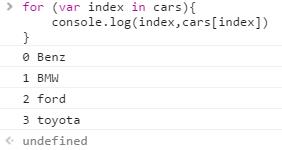
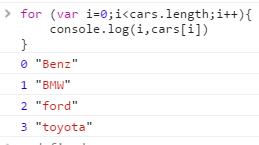
8.2.关于字典的循环
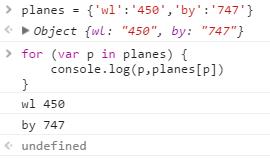
9.while 循环
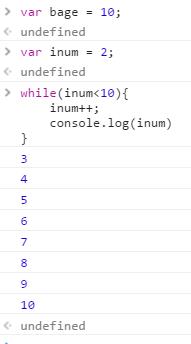
10.if 判断语句

11.switch 循环
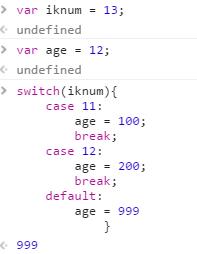
12.try 语句
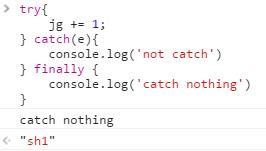
13.关于function
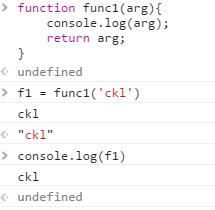
13.1.普通function
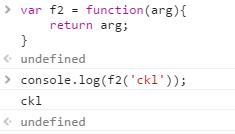
13.2.匿名function
13.3.自执行function

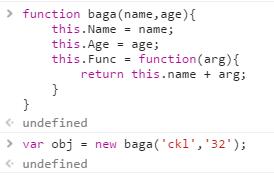
13.4.面向对象

一、redis 操作
1.连接方式
1.1.插入键值对
#!/usr/bin/env python
#-*- coding:utf-8 -*-

import redis

#插入一个键值对
r = redis.Redis(host=\'192.168.161.129\',port=6379,password="60887")
r.set(\'foo\',\'bar\')
print(r.get(\'foo\'))
运行结果:

1.2.连接池
#!/usr/bin/env python
#-*- coding:utf-8 -*-

import redis

#创建一个连接池,避免每次建立、释放连接的开销
pool = redis.ConnectionPool(host=\'192.168.161.129\',port=6379,password="60887")
r = redis.Redis(connection_pool=pool)
r.set(\'name\',\'ckl\')
print(r.get(\'name\'))
运行结果:

2.string 类型
2.1.设置值过期时长
#ex:过期时长
r.set(\'age\',20,ex=10)
print(r.get(\'age\'))
time.sleep(11)
print(r.get(\'age\'))
运行结果:

十秒后失效
2.2.如果值不错在,则赋值
#age 不存在,执行操作
r.set(\'age\',21,nx=True)
print(r.get(\'age\'))
运行结果:

2.3.批量设值
#批量设值
r.mset({\'k1\':\'v1\',\'k2\':\'v2\'})
print(r.mget(\'k1\',\'k2\'))
运行结果:

2.4.为某个键设置一个新的值,但返回旧的值
#设值新值,获取原来的值
print(r.getset(\'k1\',\'md1\'))
print(r.get(\'k1\'))
运行结果:

2.5.相当于切片
#获取返回值的范围
r.set(\'qc\',\'lostAtShangHai\')
print(r.getrange(\'qc\',3,7))
运行结果:

2.6.修改值的部分内容
#修改值的部分内容
r.setrange(\'qc\',3,\'KKK\')
print(r.get(\'qc\'))
#b\'losKKKShangHai\'
运行结果:

2.7.相当于统计UV的方法
#统计UV
r.setbit(\'uv_count\',5,1)
r.setbit(\'uv_count\',8,1)
r.setbit(\'uv_count\',6,1)
r.setbit(\'uv_count\',6,1)
print(r.bitcount(\'uv_count\'))
运行结果:

2.8.统计PV方法
#统计PV,
r.incr(\'pv_count\',3)
r.incr(\'pv_count\',3)
r.incr(\'pv_count\',3)
r.incr(\'pv_count\',3)
print(r.get("pv_count"))
运行结果:

2.9.在值的后面增加内容
#在后面追加内容
r.set(\'wu\',\'kaka\')
print(r.get(\'wu\'))
r.append(\'wu\',\'sasa\')
print(r.get(\'wu\'))
运行结果:

3.hash 类型
3.1.插入单条数据
#插入单条数据
r.hset(\'taihu\',\'wuxi\',\'yuantouzhu\')
print(r.hscan(\'taihu\'))
运行结果:

3.2.获取批量值
#获取批量值
r.hmset(\'hubo\',{\'qinghaihu\':\'qinghai\',\'panyanghu\':\'panyang\'})
print(r.hmget(\'hubo\',\'qinghaihu\',\'panyanghu\'))
运行结果:

3.3.获取所有键值
#获取所有键值
print(r.hgetall(\'hubo\'))
运行结果:

3.4.获取键值对数量
#获取键值对的个数
print(r.hlen(\'hubo\'))
运行结果:

4.list 类型
4.1.插入值,获取所有值
#获取所有的键值
r.lpush(\'diuList\',11,22,44,66)
print(r.lrange(\'diuList\',0,-1))
运行结果:

4.2.插入值
#在值22的前面插入值88
r.linsert(\'diuList\',\'BEFORE\',22,88)
print(r.lrange(\'diuList\',0,-1))
运行结果:

4.3.获取第一个值及获取元素个数
#获取第一个值
print(r.lindex(\'diuList\',0))

#获取元素个数
print(r.llen(\'diuList\'))
运行结果:

5.set 类型
5.1.添加数据
r.sadd(\'SetA\',\'888\')
r.sadd(\'SetA\',\'999\')
r.sadd(\'SetB\',\'444\')
r.sadd(\'SetB\',\'555\')
print(r.sscan(\'SetA\'))
print(r.sscan(\'SetB\'))
运行结果:

5.2.移动值
#将A的888移到B里
r.smove(\'SetA\',\'SetB\',\'888\')
print(r.sscan(\'SetA\'))
print(r.sscan(\'SetB\'))
运行结果:

二、redis发布订阅
2.1.发布订阅类方法
#!/usr/bin/env python
#-*- coding:utf-8 -*-

import redis

class RedisHelper:
    def __init__(self):
        self.__conn = redis.Redis(host=\'192.168.161.129\',port=6379,password="60887")
        self.chan_sub = \'fm101.5\'
        self.chan_pub = \'fm99.6\'

    #发布频道方法
    def public(self,msg):
        self.__conn.publish(self.chan_pub,msg)
        return True

    #订阅频道方法
    def subscribe(self):
        pub = self.__conn.pubsub()
        pub.subscribe(self.chan_sub)
        pub.parse_response()
        return pub
2.2.订阅
#!/usr/bin/env python
#-*- coding:utf-8 -*-

from day10.RedisSub import RedisHelper

obj = RedisHelper()
redis_sub = obj.subscribe()

while True:
    msg = redis_sub.parse_response()
    print(msg)
2.3.发布
#!/usr/bin/env python
#-*- coding:utf-8 -*-

import redis

r = redis.Redis(host=\'192.168.161.129\',port=6379,password="60887")
r.publish(\'fm101.5\',\'who are u?\')
运行多个订阅


开始发布:

查看订阅结果:


二、rabbitMQ
2.1.安装rabbitMQ略过
2.1.1.消息发送接收
生产端示例
#!/usr/bin/env python
# -*- coding: utf-8 -*-

import pika

credentials = pika.PlainCredentials(\'guest\',\'guest\')
connection = pika.BlockingConnection(pika.ConnectionParameters(\'192.168.161.129\',5672,\'/\',credentials))

#定义管道
channel = connection.channel()

#定义queue名称
channel.queue_declare(queue=\'ckl\')

#rabbitMQ 不能直接将消息发送,而需要将消息通过交换器,此处是空,转发给queue
channel.basic_publish(exchange=\'\',
                      routing_key=\'ckl\',
                      body=\'Hello your m kitty\')
print(" [x] Sent \'Hello World!\'")
connection.close()
运行结果:

查看rabbitMQ队列:

2.1.2.客户端示例
#!/usr/bin/env python
# -*- coding: utf-8 -*-
import pika

credentials = pika.PlainCredentials(\'guest\',\'guest\')
connection = pika.BlockingConnection(pika.ConnectionParameters(\'192.168.161.129\',5672,\'/\',credentials))
channel = connection.channel()

#定义队列,如果消费端先启动,队列不存在,就会报错。如果发现队列没有,就自己生成,如果已经存在,就忽略。
channel.queue_declare(queue=\'ckl\')


def callback(ch, method, properties, body):
    print(" [x] Received %r" % body)

channel.basic_consume(callback,
                      queue=\'ckl\',
                      no_ack=True)

print(\' [*] Waiting for messages. To exit press CTRL+C\')
channel.start_consuming()
运行结果:

消息接收后查看队列

2.2.队列持久化及消息持久化
2.2.1.队列持久化
#!/usr/bin/env python
# -*- coding: utf-8 -*-

import pika

credentials = pika.PlainCredentials(\'guest\',\'guest\')
connection = pika.BlockingConnection(pika.ConnectionParameters(\'192.168.161.129\',5672,\'/\',credentials))

#定义管道
channel = connection.channel()

#定义queue名称
channel.queue_declare(queue=\'zld\',durable=True)

#rabbitMQ 不能直接将消息发送,而需要将消息通过交换器,此处是空,转发给queue
channel.basic_publish(exchange=\'\',
                      routing_key=\'zld\',
                      body=\'Hello your m kitty\')
print(" [x] Sent \'Hello World!\'")
connection.close()
红色部分定义持久化
运行生产程序:

运行消费程序:

重启服务器,查看queue持久化:

zld这个queue持久化,消息没有持久化
2.3.定义消息队列持久化
2.3.1.生产程序:
#!/usr/bin/env python
# -*- coding: utf-8 -*-

import pika

credentials = pika.PlainCredentials(\'guest\',\'guest\')
connection = pika.BlockingConnection(pika.ConnectionParameters(\'192.168.161.129\',5672,\'/\',credentials))

#定义管道
channel = connection.channel()

#定义queue名称
channel.queue_declare(queue=\'zld\',durable=True)

#rabbitMQ 不能直接将消息发送,而需要将消息通过交换器,此处是空,转发给queue
channel.basic_publish(exchange=\'\',
                      routing_key=\'zld\',
                      body=\'jintian\',
                      properties = pika.BasicProperties(delivery_mode=2,)
                      )
print(" [x] Sent \'Hello World!\'")
connection.close()
定义消息持久化,红色部分
2.3.2.消费程序
#!/usr/bin/env python
# -*- coding: utf-8 -*-
import pika

credentials = pika.PlainCredentials(\'guest\',\'guest\')
connection = pika.BlockingConnection(pika.ConnectionParameters(\'192.168.161.129\',5672,\'/\',credentials))
channel = connection.channel()

#定义队列,如果消费端先启动,队列不存在,就会报错。如果发现队列没有,就自己生成,如果已经存在,就忽略。
channel.queue_declare(queue=\'ckl\')


def callback(ch, method, properties, body):
    print(" [x] Received %r" % body)
    ch.basic_ack(delivery_tag=method.delivery_tag)

channel.basic_consume(callback,
                      queue=\'zld\',
                      #no_ack=True
                       )

print(\' [*] Waiting for messages. To exit press CTRL+C\')
channel.start_consuming()
定义消息持久化,红色部分
运行生产程序:

运行消费程序:

关闭消费程序,修改生产程序
....
channel.basic_publish(exchange=\'\',
                      routing_key=\'zld\',
                      body=\'life is ...\',
                      properties = pika.BasicProperties(delivery_mode=2,)
                      )
....
运行生产程序:

重启rabbitMQ服务,查看队列:

运行消费程序:

3.rabbitMQ 广播消息,类似发布订阅
之前的例子都基本都是1对1的消息发送和接收,即消息只能发送到指定的queue里,但有些时候你想让你的消息被所有的Queue收到,类似广播的效果,这时候就要用到exchange了
Exchange在定义的时候是有类型的,以决定到底是哪些Queue符合条件,可以接收消息
fanout: 所有bind到此exchange的queue都可以接收消息
direct: 通过routingKey和exchange决定的那个唯一的queue可以接收消息
topic:所有符合routingKey(此时可以是一个表达式)的routingKey所bind的queue可以接收消息
表达式符号说明:#代表一个或多个字符,*代表任何字符
例:#.a会匹配a.a,aa.a,aaa.a等
*.a会匹配a.a,b.a,c.a等
注:使用RoutingKey为#,Exchange Type为topic的时候相当于使用fanout
3.1.发布端程序:
#!/usr/bin/env python
# -*- coding: utf-8 -*-

import pika

credentials = pika.PlainCredentials(\'guest\',\'guest\')
connection = pika.BlockingConnection(pika.ConnectionParameters(\'192.168.161.129\',5672,\'/\',credentials))

channel = connection.channel()

#定义exchange名称及类型,不需要知道queue
channel.exchange_declare(exchange=\'logs\',type=\'fanout\')

message = \'hi,it is me\'
channel.basic_publish(exchange=\'logs\',
                      routing_key=\'\',
                      body = message,
                      )
print(" [x] %s" % message)
connection.close()
3.2.接收端程序
#!/usr/bin/env python
# -*- coding: utf-8 -*-
import pika

credentials = pika.PlainCredentials(\'guest\',\'guest\')
connection = pika.BlockingConnection(pika.ConnectionParameters(\'192.168.161.129\',5672,\'/\',credentials))
channel = connection.channel()

#定义exchange及类型
channel.exchange_declare(exchange=\'logs\',type=\'fanout\')
## 不指定queue名字,rabbit会随机分配一个名字,exclusive=True会在使用此queue的消费者断开后,自动将queue删除
result = channel.queue_declare(exclusive=True)
queue_name = result.method.queue

#绑定exchange及queue
channel.queue_bind(exchange=\'logs\',queue=queue_name)
print(\' [*] Waiting for messages. To exit press CTRL+C\')

def callback(ch, method, properties, body):
    print(" [x] Received %r" % body)

channel.basic_consume(callback,
                      queue=queue_name,
                      no_ack=True
                       )

channel.start_consuming()
运行发布端:

运行多个客户端:


4.有选择性的接收发送消息
服务器程序
#!/usr/bin/env python
# -*- coding: utf-8 -*-

import pika
import sys

credentials = pika.PlainCredentials(\'guest\',\'guest\')
connection = pika.BlockingConnection(pika.ConnectionParameters(\'192.168.161.129\',5672,\'/\',credentials))

channel = connection.channel()

channel.exchange_declare(exchange=\'direct_logs\',type=\'direct\')

serverity = sys.argv[1] if len(sys.argv) > 1 else \'info\'
message = \' \'.join(sys.argv[2:]) or \'honichi\'
channel.basic_publish(exchange=\'direct_logs\',
                      routing_key=serverity,
                      body = message,
                      )
print(" [x] %s : %s " % (serverity,message))
connection.close()
客户端程序:
#!/usr/bin/env python # -*- coding: utf-8 -*- import pika import sys credentials = pika.PlainCredentials(\'guest\',\'guest\') connection = pika.BlockingConnection(pika.ConnectionParameters(\'192.168.161.129\',5672,\'/\',credentials)) channel = connection.channel() channel.exchange_declare(exchange=\'direct_logs\',type=\'direct\') result = channel.queue_declare(exclusive=True) queue_name = result.method.queue severities = sys.argv[1:] if not severities: sys.stderr.write("Usage: %s [info] [warning] [error]\\n" % sys.argv[0]) sys.exit(1) for severity in severities: channel.queue_bind(exchange=\'direct_logs\', queue=queue_name, routing_key=severity) print(\' [*] Waiting for logs. To exit press CTRL+C\') def callback(ch, method, properties, body): p以上是关于第十 redis&rabbitMQ的主要内容,如果未能解决你的问题,请参考以下文章
SpringBoot | 第十二章:RabbitMQ的集成和使用
golang 操作 Redis & Mysql & RabbitMQ
Go语言学习笔记golang 操作 Redis & Mysql & RabbitMQ