音视频开发之旅(67) - 变速不变调之sonic源码分析
Posted 音视频开发之旅
tags:
篇首语:本文由小常识网(cha138.com)小编为大家整理,主要介绍了音视频开发之旅(67) - 变速不变调之sonic源码分析相关的知识,希望对你有一定的参考价值。
目录
- 基音周期、浊音的概念
- Sonic源码分析
- 资料
- 收获
上一篇我们学习了音频变速不变调的原理以及WSOLA波形相似叠加算法进行时域压扩处理。其中在寻找相似帧方面,Sonic采用AMDF(平均幅度差函数法)方法来进行寻找。
一、基音周期、浊音的概念

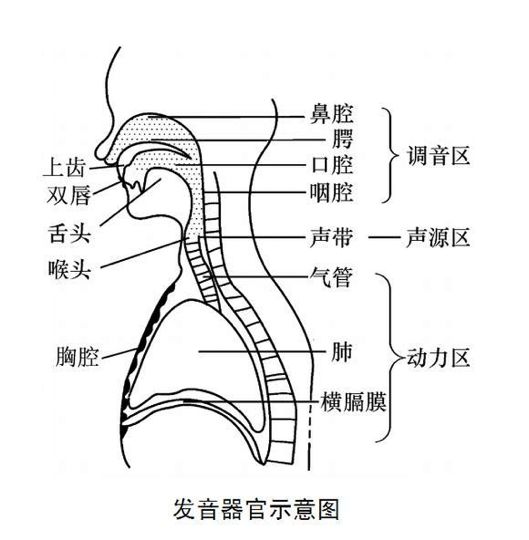
图片来自:[清音or浊音 ]
人体的发音器官可以分为三大部分:动力区 声源区 调音区

1.动力区—— 肺 、横膈膜、气管

肺部呼出的气流是语音的原动力。肺部呼出的气流,通过支气管到达喉头,作用于声带、咽腔、口腔 、鼻腔等发音器官。

2.声源区——喉头、声带

用手摸脖子那里的喉头,声带就位于喉头的后面,

声带是两片富有弹性的带状薄膜,两片声带之间的空隙叫声门。

从肺部呼出的气流通过关闭着的声门时,会引起声带振动而发出声音

如果你把手贴在脖子上喉的部位,发声时,手会感到轻微的震动,这是因为声带在振动。

嗓音的高低、粗细是由声带的松紧程度、呼出的气体多少决定的。

3.调音区————口腔、鼻腔、咽腔

调音区主要是口腔,鼻腔,咽腔三大部分,其中口腔主要包括唇、齿和舌头。(口腔后面是咽腔,咽头上通口腔、鼻腔,下接喉头。)

引用:[清音or浊音](https://zhuanlan.zhihu.com/p/374857199)
浊音的发音过程是:来自肺部的气流冲击声门,造成声门的一张一合,形成一系列准周期的气流脉冲,经过声道(含口腔、鼻腔)的谐振及唇齿的辐射最终形成语音信号。故浊音波形呈现一定的准周期性。
所谓基音周期,就是对这种准周期而言的,它反映了声门相邻两次开闭之间的时间间隔或开闭的频率。
基音周期是语音信号最重要的参数之一,但是基音的提取是比较困难的。
主要体现在
1. 声门激励信号并不是一个完全的周期序列
2. 基音频率大多数情况是在100-200HZ,但是浊音信号往往啃根包含几十个谐波分量,而其基波分量往往不是最强的,造成基音检测时,把谐波当做了基波。
3. 基波周期的变化分为比较大,老年男性50 Hz,儿童和女性500 Hz。
引用:[语音识别 08 基音周期的估算方法](https://zhuanlan.zhihu.com/p/454283094)
基音检测的方法主要有自相关函数法,平均幅度差函数法等。而Sonic的实现采用的就是平均幅度差函数法,这也是sonic 变速不变调最重要的一步。
二、Sonic源码分析
sonic源码地址:https://github.com/waywardgeek/sonic
可以看到它有两份实现Java版本(Sonic.java)和Cpp版本(Sonic.cpp),并且代码量都比较少,作者给出了性能对比,基本上也没什么差别。
而android中大名鼎鼎的Exoplayer的变速不变调的实现就是基于Sonic.java,我们结合Exoplayer的实现来进行分析。
主要有两个类SonicAudioProcessor和Sonic,其中SonicAudioProcessor是对Sonic做了一层封装为了适配Exoplayer的框架。
public final class SonicAudioProcessor
    private float speed;
    private float pitch;

    private Sonic sonic;
    private ByteBuffer buffer;
    private ShortBuffer shortBuffer;
    private ByteBuffer outputBuffer;

    public void setSpeed(float speed)
        if (this.speed != speed)
            this.speed = speed;
            ...
            flush();


   //速度发生变化后,重新初始化Sonic。
   private void flush()
      ...
         sonic = new Sonic(
                    mSampleRate,//输入采样率
                    mChannelCount,//采样通道数
                    speed,//速度
                    pitch,//变调值,默认1.0f
                    mSampleRate//输出采样率,一般不变
                    );

        ...


    //把Mediacodec解码音频后的Frame数据数据在给到AudioTrack.write之前,先给到Sonic进行变速处理
    public void queueInput(ByteBuffer inputBuffer)
        ...
        ShortBuffer shortBuffer = inputBuffer.asShortBuffer();
        ...
        sonic.queueInput(shortBuffer);
        ...


    // 紧接着调用Sonic变速处理后的数据给到AudioTrack进行write
    public ByteBuffer getOutput()
       ...
       int outputSize = sonic.getOutputSize();
        buffer =    ByteBuffer.allocateDirect(outputSize).order(ByteOrder.nativeOrder());
        shortBuffer = buffer.asShortBuffer();
        sonic.getOutput(shortBuffer);
        outputBuffer = buffer;
        ...
        return outputBuffer;
可以看到SonicAudioProcessor就是AudioTrack和Sonic之前的一层封装层。把Mediacodec解码的音频frame数据在给到AudioTrack.write之前,先通过queueInput给到Sonic进行变速处理,然后通过getoutput获取处理后的数据再给到AudioTrack。
下面我们重点看下Sonic的queueInput和getOutput的实现。
public final class Sonic

   private static final int MINIMUM_PITCH = 65;
    private static final int MAXIMUM_PITCH = 400;
    private static final int AMDF_FREQUENCY = 4000;
    private static final int BYTES_PER_SAMPLE = 2;

  public Sonic(
            int inputSampleRateHz, int channelCount, float speed, float pitch, int outputSampleRateHz)
        this.inputSampleRateHz = inputSampleRateHz;
        this.channelCount = channelCount;
        this.speed = speed;
        this.pitch = pitch;
        rate = (float) inputSampleRateHz / outputSampleRateHz;
        minPeriod = inputSampleRateHz / MAXIMUM_PITCH;//最小的基音周期 44100/400
        maxPeriod = inputSampleRateHz / MINIMUM_PITCH;//最大的基音周期 44100/65
        maxRequiredFrameCount = 2 * maxPeriod;//最大的请求帧数 2* 44100/65  根据奈奎斯特采样定律,采样率为周期的2倍
        downSampleBuffer = new short[maxRequiredFrameCount];//下采样的buffer
        inputBuffer = new short[maxRequiredFrameCount * channelCount];
        outputBuffer = new short[maxRequiredFrameCount * channelCount];
        pitchBuffer = new short[maxRequiredFrameCount * channelCount];


    public void queueInput(ShortBuffer buffer)
        ...
        processStreamInput();


    private void processStreamInput()
        ...
        float s = speed / pitch;
        float r = rate * pitch;
        if (s > 1.00001 || s < 0.99999)
            changeSpeed(s);

        ...


    private void changeSpeed(float speed)
        ...
        int frameCount = inputFrameCount;
        int positionFrames = 0;
        do
       //如果有保留的framecount,将inputbuffer 中保存的 positionFrames 个点的数据拷贝到 outputbuffer 中
          if (remainingInputToCopyFrameCount > 0)
                positionFrames += copyInputToOutput(positionFrames);
           else
            //寻找基音周期
             int period = findPitchPeriod(inputBuffer, positionFrames);
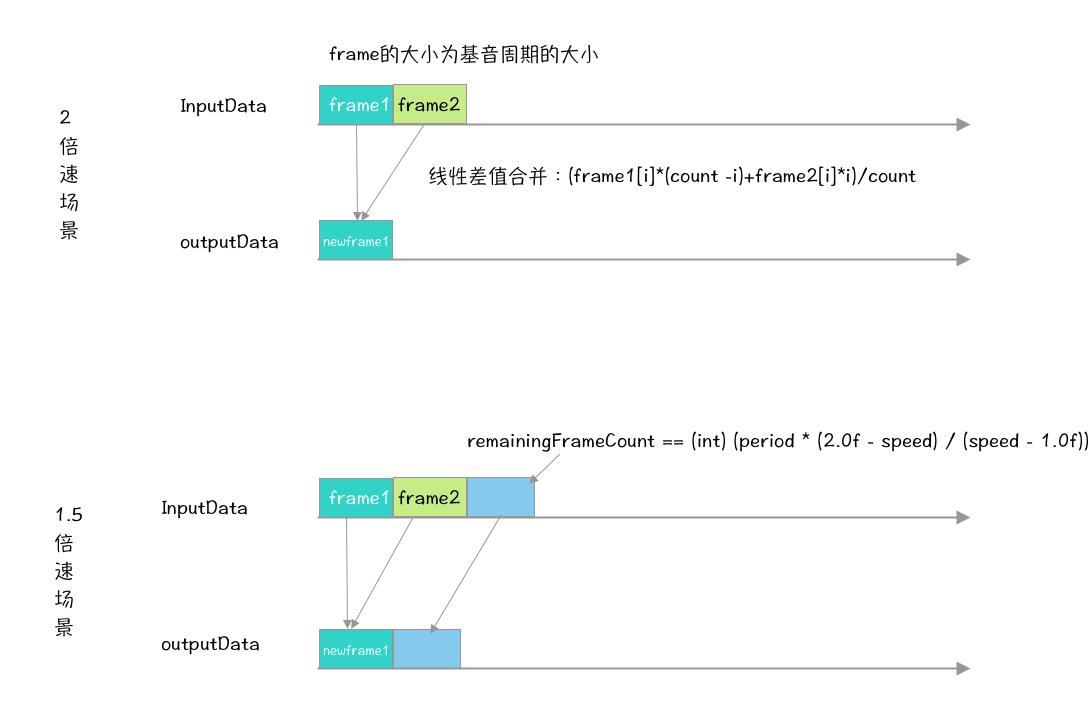
             if (speed > 1.0)
                 //如果倍速 进行跳帧重采样
                 positionFrames += period + skipPitchPeriod(inputBuffer, positionFrames, speed, period);
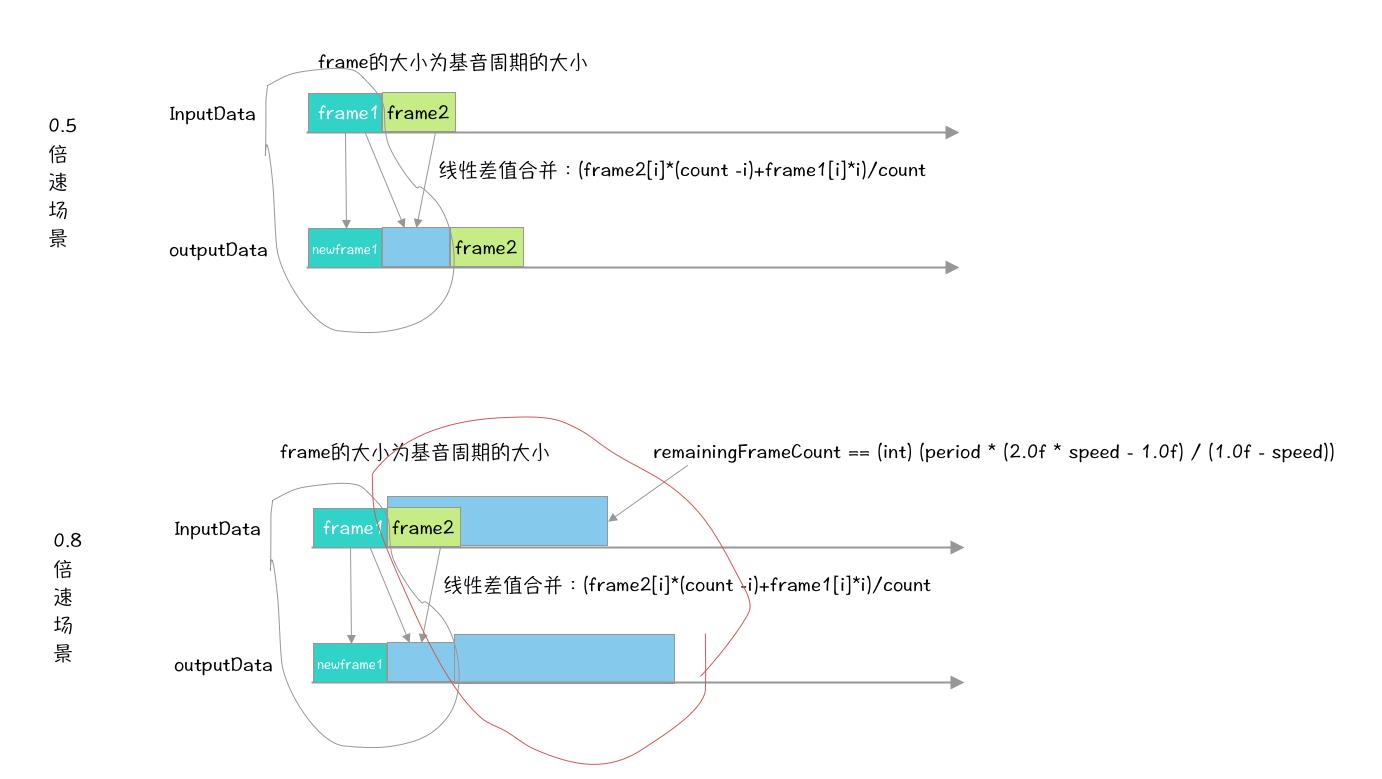
               else
                 //如果慢速,则插入值
                 positionFrames += insertPitchPeriod(inputBuffer, positionFrames, speed, period);

         while (positionFrames + maxRequiredFrameCount <= frameCount);
        removeProcessedInputFrames(positionFrames);


    private int findPitchPeriod(short[] samples, int position)
        //寻找基音周期,这是变速不变调的关键的一步,Sonic采用 AMDF方式寻找
        int period;
        int retPeriod;
        int skip = inputSampleRateHz > AMDF_FREQUENCY ? inputSampleRateHz / AMDF_FREQUENCY : 1;//采样率是否大于AMDF_FREQUENCY(4000),计算下采样时,跳过的采样点数量,这里的结果是5。为了提高效率,进行向下采样到4KHZ,然后用更窄的频率范围再做一次。
        downSampleInput(samples, position, skip);
        period = findPitchPeriodInRange(downSampleBuffer, 0, minPeriod / skip, maxPeriod / skip);
         if (skip != 1)
             period *= skip;
             int minP = period - (skip * 4);
             int maxP = period + (skip * 4);
             if (minP < minPeriod)
                 minP = minPeriod;

             if (maxP > maxPeriod)
                 maxP = maxPeriod;

             downSampleInput(samples, position, 1);
             period = findPitchPeriodInRange(downSampleBuffer, 0, minP, maxP);

        if (previousPeriodBetter(minDiff, maxDiff))
            retPeriod = prevPeriod;
         else
            retPeriod = period;

        prevMinDiff = minDiff;
        prevPeriod = period;
        return retPeriod;


   //寻找基音周期的 最终实现就在这里了
  private int findPitchPeriodInRange(short[] samples, int  position, int minPeriod, int maxPeriod)
        // Find the best frequency match in the range, and given a sample skip multiple. For now, just
        // find the pitch of the first channel.
        int bestPeriod = 0;
        int worstPeriod = 255;
        int minDiff = 1;
        int maxDiff = 0;
        position *= channelCount;
        for (int period = minPeriod; period <= maxPeriod; period++)
            int diff = 0;
            for (int i = 0; i < period; i++)
                short sVal = samples[position + i];
                short pVal = samples[position + period + i];
                diff += Math.abs(sVal - pVal);

            // Note that the highest number of samples we add into diff will be less than 256, since we
            // skip samples. Thus, diff is a 24 bit number, and we can safely multiply by numSamples
            // without overflow.
           if (diff * bestPeriod < minDiff * period)
                minDiff = diff;//计算最小差值
                bestPeriod = period;//对应对最佳基音周期

            if (diff * worstPeriod > maxDiff * period)
                maxDiff = diff;//记录最大的差值
                worstPeriod = period;//记录波形相似周期


        this.minDiff = minDiff / bestPeriod;//最小的差值 除以 最佳的基音周期,求得 采样点的平均最小差值
        this.maxDiff = maxDiff / worstPeriod;//最大差值 除以 波形相似周期,求得采样点的平均最大差值
        return bestPeriod;//返回最佳基音周期


//如果是倍速处理,跳过基音周期信号
private int skipPitchPeriod(short[] samples, int position, float speed, int period)
        // Skip over a pitch period, and copy period/speed samples to the output.
        int newFrameCount;
        if (speed >= 2.0f)
            //大于等于2倍,不保留remainingInputToCopyFrameCount
            newFrameCount = (int) (period / (speed - 1.0f));
         else
            newFrameCount = period;
            //如果配速小于2倍,保留remainingInputToCopyFrameCount,采用线性插值法
            remainingInputToCopyFrameCount = (int) (period * (2.0f - speed) / (speed - 1.0f));

        outputBuffer = ensureSpaceForAdditionalFrames(outputBuffer, outputFrameCount, newFrameCount);
        overlapAdd(
                newFrameCount,
                channelCount,
                outputBuffer,
                outputFrameCount,
                samples,
                position,
                samples,
                position + period);
        outputFrameCount += newFrameCount;
        return newFrameCount;

//如果是慢速(小于1.0)则进行插入基音周期信号
  private int insertPitchPeriod(short[] samples, int position, float speed, int period)
        // Insert a pitch period, and determine how much input to copy directly.
        int newFrameCount;
        if (speed < 0.5f)
            newFrameCount = (int) (period * speed / (1.0f - speed));
         else
            newFrameCount = period;
            remainingInputToCopyFrameCount = (int) (period * (2.0f * speed - 1.0f) / (1.0f - speed));

        outputBuffer =
                ensureSpaceForAdditionalFrames(outputBuffer, outputFrameCount, period + newFrameCount);
        System.arraycopy(
                samples,
                position * channelCount,
                outputBuffer,
                outputFrameCount * channelCount,
                period * channelCount);
        overlapAdd(
                newFrameCount,
                channelCount,
                outputBuffer,
                outputFrameCount + period,
                samples,
                position + period,
                samples,
                position);
        outputFrameCount += period + newFrameCount;
        return newFrameCount;


    //最后进行合帧叠加处理,到输出buffer
    private static void overlapAdd(
            int frameCount,
            int channelCount,
            short[] out,
            int outPosition,
            short[] rampDown,
            int rampDownPosition,
            short[] rampUp,
            int rampUpPosition) //rampUpPosition=rampDownPosition+基音周期值

         for (int i = 0; i < channelCount; i++)
            int o = outPosition * channelCount + i;
            int u = rampUpPosition * channelCount + i;
            int d = rampDownPosition * channelCount + i;
            for (int t = 0; t < frameCount; t++)
                //把起始帧和基音周期帧的帧相加,这里采样线性插值
                out[o] = (short) ((rampDown[d] * (frameCount - t) + rampUp[u] * t) / frameCount);
                o += channelCount;
                d += channelCount;
                u += channelCount;
详细说明见上述代码注释,基本流程总结如下:
- 首先确定一个最大和最小的基音周期范围(和采样率有关系的一个经验值)
- 通过findPitchPeriod找到基音周期大小,为了提高效率,先进行下采样到4KHZ,然后用更窄的频率范围再做一次。寻找基音周期的方法就是:在 range 范围内遍历每个帧与起始帧的 AMDF 值,值最小的帧与起始帧的距离则是基因周期
- 根据倍速还是慢速分别进行跳过部分基音周期信号或者进行插入基音周期信号,
- 进行合帧叠加输出到outputBuffer
调用以及log输出
   sonicAudioProcessor.queueInput(audioData);
   outData = sonicAudioProcessor.getOutput();

     Log.i(TAG, " inputDataLength="+audioData.limit()+ " inputData="+ Arrays.toString(audioData.array()));
     Log.i(TAG, "  outDataLength="+outData.limit()+ " outData="+ Arrays.toString(outData.array()));

--->0.5倍速时
inputDataLength=4096
outDataLength=8096 //--》不是恒定的

--->1.5倍速时
inputDataLength=4096
outDataLength=2844 //--》不是恒定的

--->2倍速时
inputDataLength=4096
outDataLength=2020 //--》不是恒定的
可以看到0.5倍速时,进行了插值处理;大于1倍数时进行了采样。这个的实现是
   do
            //如果有保留的framecount,将inputbuffer 中保存的 positionFrames 个点的数据拷贝到 outputbuffer 中
            if (remainingInputToCopyFrameCount > 0)
                positionFrames += copyInputToOutput(positionFrames);
             else
                //寻找基音周期
                int period = findPitchPeriod(inputBuffer, positionFrames);
                //找到基音周期后,变速的处理,重点时下面的skipPitchPeriod和insertPitchPeriod
                if (speed > 1.0)
                    positionFrames += period + skipPitchPeriod(inputBuffer, positionFrames, speed, period);
                 else
                    positionFrames += insertPitchPeriod(inputBuffer, positionFrames, speed, period);


         while (positionFrames + maxRequiredFrameCount <= frameCount);
skipPitchPeriod的实现用下图说明

insertPitchPeriod 的实现用下图说明

由此可见,变速不变调不是简单的改变采样率,而是首先要找到基音周期,然后根据不同的倍速情况进行分帧、下采样或者插值、合帧以及remainingInputToCopyFrameCount等处理。其中Sonic再寻找基音周期时采用 AMDF方式。
那么soundtouch又是如何实现的呐?我们下一篇来对其进行分析
三、资料
音频变速变调 -sonic 源码分析
语音识别 08 基音周期的估算方法
四、收获
通过本篇的学习
- 了解了人是如何发生的,以及什么是基音周期
- 分析Exoplayer的Sonic变速不变调的实现
- 分析Sonic的通过平均幅度差函数法寻找基音周期的实现
- 分析变速的实现原理
感谢你的阅读
下一篇我们继续通过源码分析另外一种变速不变调的实现:Soundtouch,欢迎关注公众号“音视频开发之旅”,一起学习成长。
欢迎交流
以上是关于音视频开发之旅(67) - 变速不变调之sonic源码分析的主要内容,如果未能解决你的问题,请参考以下文章