Android 开发学习
Posted IT_Holmes
tags:
篇首语:本文由小常识网(cha138.com)小编为大家整理,主要介绍了Android 开发学习相关的知识,希望对你有一定的参考价值。
文章目录
- 1. Fragment 动态添加和管理
- 2. Activity 与 Fragment通信(原生方案 Bundle)
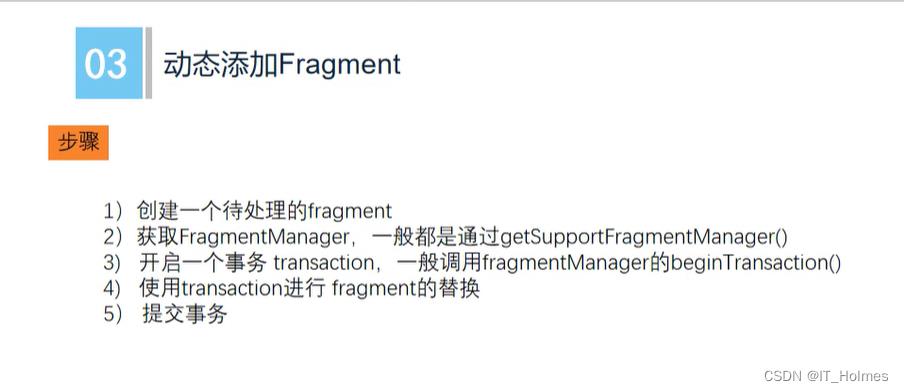
- 3. 动态添加Fragment 5个步骤
- 4. Activity 与 Fragment通信(Java语言中类与类自己通信常用方法:接口)
- 5. Fragment生命周期
- 6. ViewPager2的使用(场景:页面来回切换)
- 7. Fragment 与 ViewPager 联合操作(经常使用!)
- 8. 什么是Activity?
- 9. Activity的创建
- 10. Activity之间的跳转
- 11. Activity的生命周期
1. Fragment 动态添加和管理
其实对于fragment都是通过transaction来操作的!
- 通过transaction调用各种方法来操作fragment。
// fragment事务
FragmentTransaction transaction = fragmentManager.beginTransaction();
// 替换R.id.framelayout  fixme 其实对于fragment都是通过transaction来操作的!
transaction.replace(R.id.framelayout,fragment);
通过addToBackStack方法来实现一个栈的效果,进而达到一个返回键的时候出栈的退回的效果。
activity_main.xml
<?xml version="1.0" encoding="utf-8"?>
<LinearLayout
    tools:context=".MainActivity"
    android:orientation="vertical"
    android:layout_height="match_parent"
    android:layout_width="match_parent"
    xmlns:android="http://schemas.android.com/apk/res/android"
    xmlns:tools="http://schemas.android.com/tools">

    <Button
        android:layout_width="match_parent"
        android:layout_height="wrap_content"
        android:id="@+id/btn"
        android:text="@string/change">

    </Button>

    <Button
        android:layout_width="match_parent"
        android:layout_height="wrap_content"
        android:id="@+id/btn2"
        android:text="@string/replace">

    </Button>

    <FrameLayout
        android:layout_width="match_parent"
        android:layout_height="match_parent"
        android:id="@+id/framelayout"
        android:background="@color/teal_200"
        >

    </FrameLayout>

</LinearLayout>
MainActivity
package com.example.fragmentbase;

import android.os.Bundle;
import android.util.Log;
import android.view.View;
import android.widget.Button;

import androidx.appcompat.app.AppCompatActivity;
import androidx.fragment.app.Fragment;
import androidx.fragment.app.FragmentManager;
import androidx.fragment.app.FragmentTransaction;

import java.util.logging.Logger;

public class MainActivity extends AppCompatActivity implements View.OnClickListener
    @Override
    protected void onCreate(Bundle savedInstanceState)
        super.onCreate(savedInstanceState);
        setContentView(R.layout.activity_main);

        Button button = findViewById(R.id.btn);
        // 让MainActivity实现View.OnClickListener接口,进而直接传入this,就可以直接定义onClick方法。
        button.setOnClickListener(this);

        Button button2 = findViewById(R.id.btn2);
        button2.setOnClickListener(this);


    @Override
    public void onClick(View view)
        // view.getId()获取id值
        switch (view.getId())
            case R.id.btn:
                replaceFragment(new BlankFragment1());
                break;
            case R.id.btn2:
                replaceFragment(new ItemFragment2());
                break;


    // 动态切换fragment
    private void replaceFragment(Fragment fragment)
        // fragment管理器
        FragmentManager fragmentManager = getSupportFragmentManager();
        // fragment事务
        FragmentTransaction transaction = fragmentManager.beginTransaction();
        // 替换R.id.framelayout  fixme 其实对于fragment都是通过transaction来操作的!
        transaction.replace(R.id.framelayout,fragment);
        // 给当前transaction添加一个栈,参数是栈的名字。这样手机点击返回的时候就是根据出栈来折返fragment页面了。
        transaction.addToBackStack(null);
        // 事务提交
        transaction.commit();
BlankFragment1 和 ItemFragment2对象就是创建出来的fragment。
2. Activity 与 Fragment通信(原生方案 Bundle)
通过原生Bundle来进行通信。
MainActivity
// 通过使用bundle来传递值:
Bundle bundle = new Bundle();
bundle.putString("message","hello,world!");
BlankFragment1 bf = new BlankFragment1();
// 给bf对象设置bundle参数
bf.setArguments(bundle);
BlankFragment1
@Override
public void onCreate(Bundle savedInstanceState)
    super.onCreate(savedInstanceState);

    // 这样就可以直接该对象通过getArguments()方法来获取
    Bundle bundle = getArguments();
    String message = bundle.getString("message");
    Log.d(TAG,"onCreate:" + message);
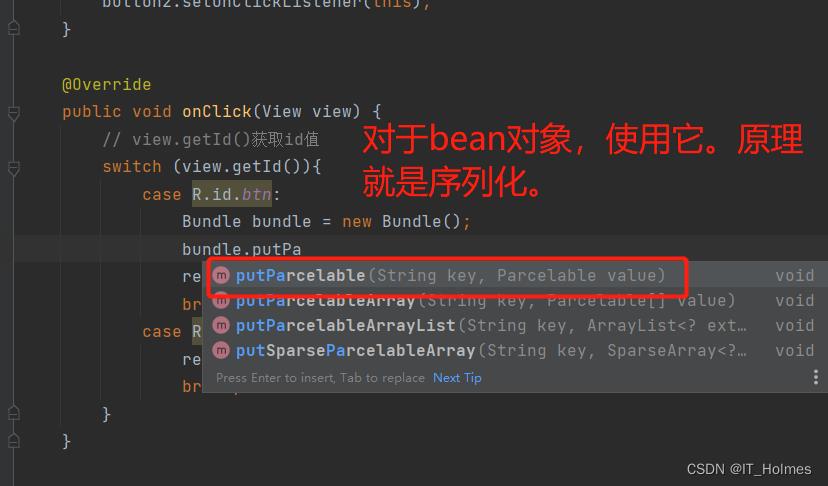
bundle.putParcelable方法的使用:
3. 动态添加Fragment 5个步骤
4. Activity 与 Fragment通信(Java语言中类与类自己通信常用方法:接口)
Java语言中类与类自己通信常用方法:接口。
IFragmentCallback接口:
package com.example.fragmentbase;

public interface IFragmentCallback

    void sendMsgToActivity(String string);

    String getMsgFromActivity(String msg);
BlankFragment1:在里面声明一个对应上面的接口即可。
package com.example.fragmentbase;

import android.os.Bundle;

import androidx.fragment.app.Fragment;

import android.util.Log;
import android.view.LayoutInflater;
import android.view.View;
import android.view.ViewGroup;
import android.widget.Button;
import android.widget.Toast;


public class BlankFragment1 extends Fragment

    private static String TAG = "BlankFragment1";

    private View rootView;

    public BlankFragment1()


    // 直接声明一个对应的接口变量。
    private IFragmentCallback fragmentCallback;

    public void setFragmentCallback(IFragmentCallback callback)
        fragmentCallback = callback;


    @Override
    public void onCreate(Bundle savedInstanceState)
        super.onCreate(savedInstanceState);
        // 这样就可以直接该对象通过getArguments()方法来获取
        Bundle bundle = getArguments();
        String message = bundle.getString("message");
        Log.d(TAG,"onCreate:" + message);


    @Override
    public View onCreateView(LayoutInflater inflater, ViewGroup container,
                             Bundle savedInstanceState)
        if (rootView == null)
            rootView = inflater.inflate(R.layout.fragment_blank1, container, false);

        Button btn3 = rootView.findViewById(R.id.btn_3);
        btn3.setOnClickListener(new View.OnClickListener()
            @Override
            public void onClick(View view)
                String msgFromActivity = fragmentCallback.getMsgFromActivity(null);
                Toast.makeText(BlankFragment1.this.getContext(),msgFromActivity,Toast.LENGTH_SHORT).show();
                fragmentCallback.sendMsgToActivity("hello,I’m from Fragment");

        );
        return rootView;
MainActivity:在里面声明接口对象并进行操作。
- Toast.makeText(MainActivity.this,msg,Toast.LENGTH_SHORT).show();提示框的效果。
package com.example.fragmentbase;

import android.os.Bundle;
import android.util.Log;
import android.view.View;
import android.widget.Button;
import android.widget.Toast;

import androidx.appcompat.app.AppCompatActivity;
import androidx.fragment.app.Fragment;
import androidx.fragment.app.FragmentManager;
import androidx.fragment.app.FragmentTransaction;

import java.util.logging.Logger;

public class MainActivity extends AppCompatActivity implements View.OnClickListener
    @Override
    protected void onCreate(Bundle savedInstanceState)
        super.onCreate(savedInstanceState);
        setContentView(R.layout.activity_main);

        Button button = findViewById(R.id.btn);
        // 让MainActivity实现View.OnClickListener接口,进而直接传入this,就可以直接定义onClick方法。
        button.setOnClickListener(this);

        Button button2 = findViewById(R.id.btn2);
        button2.setOnClickListener(this);


    @Override
    public void onClick(View view)
        // view.getId()获取id值
        switch (view.getId())
            case R.id.btn:
                Bundle bundle = new Bundle();
                bundle.putString("message","hello,world!");
                BlankFragment1 bf = new BlankFragment1();
                // 给bf对象设置bundle参数
                bf.setArguments(bundle);
                bf.setFragmentCallback(new IFragmentCallback()
                    @Override
                    public void sendMsgToActivity(String msg)
                        // 传递一个上下文参数
                        Toast.makeText(MainActivity.this,msg,Toast.LENGTH_SHORT).show();

                    @Override
                    public String getMsgFromActivity(String msg)
                        return "hello,world!!!!!";

                );
                replaceFragment(bf);
                break;
            case R.id.btn2:
                replaceFragment(new ItemFragment2());
                break;


    // 动态切换fragment
    private void replaceFragment(Fragment fragment)
        // fragment管理器
        FragmentManager fragmentManager = getSupportFragmentManager();
        // fragment事务
        FragmentTransaction transaction = fragmentManager.beginTransaction();
        // 替换R.id.framelayout  fixme 其实对于fragment都是通过transaction来操作的!
        transaction.replace(R.id.framelayout,fragment);
        // 给当前transaction添加一个栈,参数是栈的名字。这样手机点击返回的时候就是根据出栈来折返fragment页面了。
        transaction.addToBackStack(null);
        // 事务提交
        transaction.commit();
5. Fragment生命周期
对应生命周期如下:
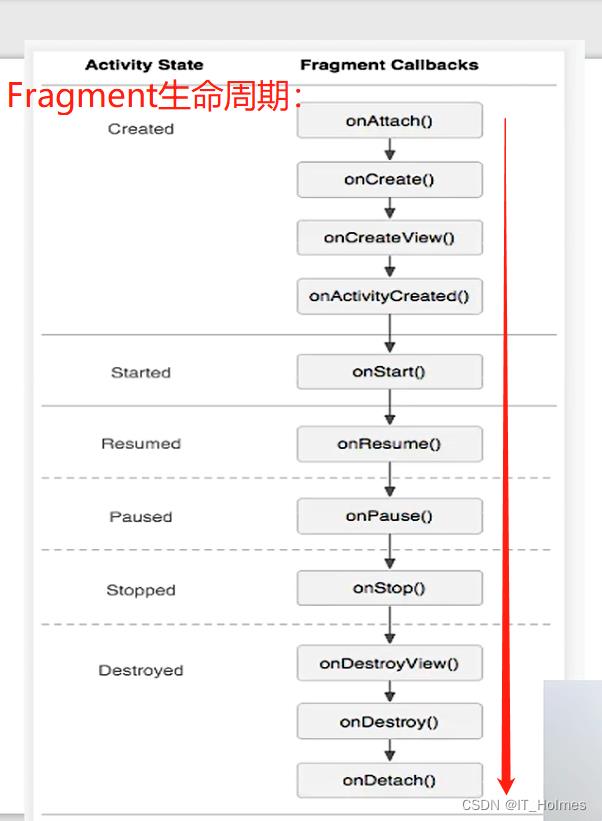
几个生命周期对应的几个操作:
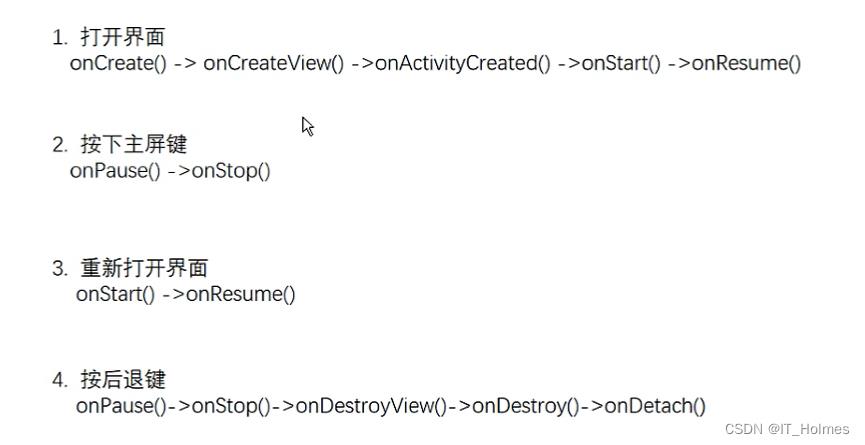
总结:

6. ViewPager2的使用(场景:页面来回切换)
android有两种一个是ViewPager和ViewPager2。推荐使用ViewPager2。
- ViewPager2具有懒加载的功能。
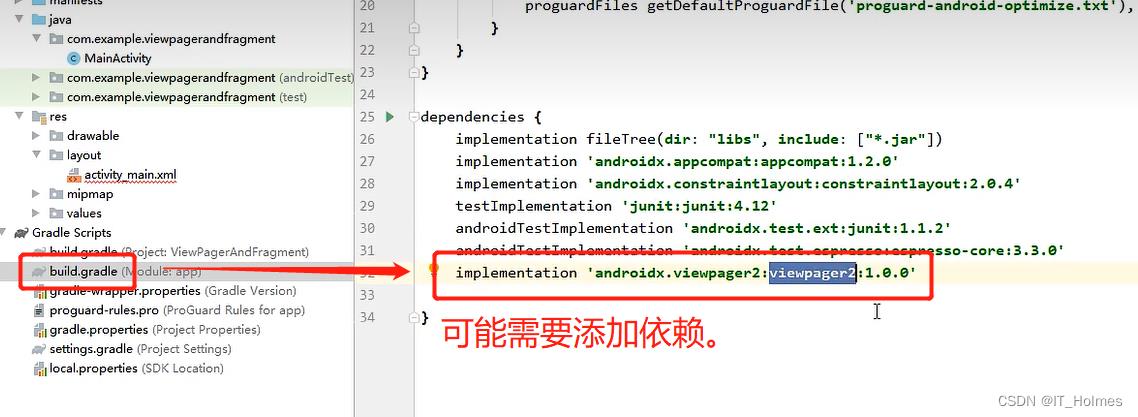
activity_main.xml: 先声明一个ViewPager2
<?xml version="1.0" encoding="utf-8"?>
<LinearLayout
    android:layout_width="match_parent"
    android:layout_height="match_parent"
    xmlns:android="http://schemas.android.com/apk/res/android" >

    <androidx.viewpager2.widget.ViewPager2
        android:layout_width="match_parent"
        android:layout_height="match_parent"
        android:id="@+id/viewPager"
        >
    </androidx.viewpager2.widget.ViewPager2>

</LinearLayout>
MainActivity:
- 配置一个adapter。
package com.example.viewpagerandfragment;

import androidx.appcompat.app.AppCompatActivity;
import androidx.viewpager2.widget.ViewPager2;

import android.os.Bundle;

public class MainActivity extends AppCompatActivity

    @Override
    protected void onCreate(Bundle savedInstanceState)
        super.onCreate(savedInstanceState);
        setContentView(R.layout.activity_main);
        ViewPager2 viewPager2 = findViewById(R.id.viewPager);
        ViewPagerAdapter viewPagerAdapter = new ViewPagerAdapter();
        // 配置viewPager2的adapter
        viewPager2.setAdapter(viewPagerAdapter);
item_pager.xml:配置每一页的控件。
<?xml version="1.0" encoding="utf-8"?>
<RelativeLayout xmlns:android="http://schemas.android.com/apk/res/android"
    android:layout_width="match_parent"
    android:layout_height="match_parent"
    android:id="@+id/container">

    <TextView
        android:layout_width="wrap_content"
        android:layout_height="wrap_content"
        android:layout_centerInParent="true"
        android:textColor="#ff4532"
        android:textSize="32dp"
        android:text="hello"
        android:id="@+id/tvTitle" />

</RelativeLayout>
ViewPagerAdapter:
- 配置holder。
- 配置list<data>的数据。
- 在onCreateViewHolder中,创建并返回hoder对象,并且指定好对应的控件组件(对应上面的item_pager.xml)。
- 在onBindViewHolder中,操作控件的操作。
package com.example.viewpagerandfragment;
import android.view.LayoutInflater;
import android.view.View;
import android.view.ViewGroup;
import android.widget.RelativeLayout;
import android.widget.TextView;
import androidx.annotation.NonNull;
import androidx.recyclerview.widget.RecyclerView;
import java.util.ArrayList;
import java.util.List;
// ViewPagerAdapter.ViewPagerViewHolder 对应 ViewPagerAdapter类中的ViewPagerViewHolder类。
public class ViewPagerAdapter extends RecyclerView.Adapter