分布式存储Ceph在Docker下安装部署
Posted inps
tags:
篇首语:本文由小常识网(cha138.com)小编为大家整理,主要介绍了分布式存储Ceph在Docker下安装部署相关的知识,希望对你有一定的参考价值。
“ 采用Docker容器安装部署测试Ceph”
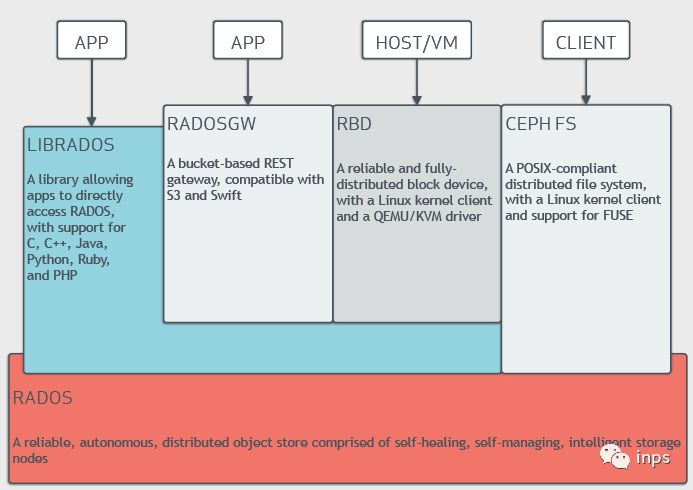
Ceph是为了高性能、可靠性和可扩展性而设计的统一的、分布式文件系统。Linux内核已经支持Ceph, 为了充分利用Linux主机上的存储,Ceph将这些存储统一的管理,然后进行分配使用。Ceph包括了块存储、文件存储和对象存储功能。
01
—
Ceph概述
Ceph存储集群从ceph节点获取数据,节点可以是ceph块存储设备,ceph文件系统和ceph对象存储。在传统的体系结构中,客户端和统一的集中的部件通信,这个集中的部件是这个复杂系统的唯一入口,从而成为了性能和扩展瓶颈,而且会导致单点故障的问题。ceph解决了这个单点故障点,让客户端直接和Ceph OSD Daemons通信,Ceph OSD Daemons在其他的节点上创建对象的副本从而保证了数据的安全和高可用。Ceph还有一个monitor集群来保证高可用。Ceph使用CRUSH算法来消灭集中化。

Ceph支持多语言存取对象,对象包括文件、图片、视频等,支持Java、python、C++、REST等客户端,兼容S3和Swift的API接口,使用客户端可以存取对象数据。
02
—
Ceph安装部署
1). 下载镜像
#docker pull ceph/daemon:latest-luminous
#docker tag ceph/daemon:latest-luminous test.env/library/ceph/daemon:latest-luminous
#docker push test.env/library/ceph/daemon:latest-luminous
2).运行monitor
docker run -d --net=host
-v /etc/ceph:/data/ceph/config
-v /var/lib/ceph/:/data/ceph/data/
-e MON_IP=10.xxx.210.61
-e CEPH_PUBLIC_NETWORK=10.xxx.210.0/24
test.env/library/ceph/daemon:latest-luminous -c /entrypoint.sh mon
将文件拷贝到其他节点, 从61 拷贝到 62, 63
scp -r ./ceph document@10.xxx.210.62:/data
要不然出现cluster id 不一致情况,看到每个都是单独cluster id
docker exec b3cc55582498 ceph -s
3).运行osd
docker run -d --net=host
--privileged=true
--pid=host
--volumes-from=e108158b0724
-v /etc/ceph:/data/ceph/config
-v /var/lib/ceph/:/data/ceph/data/
-v /dev/:/dev/
-e OSD_TYPE=directory
test.env/library/ceph/daemon:latest-luminous osd
修改配置,增加如下内容
vi /data/ceph/config/ceph.conf
osd max object name len = 256
osd max object namespace len = 64
4).运行mgr
docker run -d --net=host
--privileged=true
--volumes-from=95e1d9e3089c
-v /etc/ceph:/data/ceph/config
-v /var/lib/ceph/:/data/ceph/data/
test.env/library/ceph/daemon:latest-luminous mgr
5).运行mds
docker run -d --net=host
--privileged=true
--volumes-from=95e1d9e3089c
-v /etc/ceph:/data/ceph/config
-v /var/lib/ceph/:/data/ceph/data/
-e CEPHFS_CREATE=1
test.env/library/ceph/daemon:latest-luminous mds
6).运行rgw
docker run -d --net=host
--privileged=true
--volumes-from=95e1d9e3089c
-v /etc/ceph:/data/ceph/config
-v /var/lib/ceph/:/data/ceph/data/
test.env/library/ceph/daemon:latest-luminous rgw
7).运行restapi
docker run -d --net=host
--privileged=true
--volumes-from=95e1d9e3089c
-v /etc/ceph:/data/ceph/config
-v /var/lib/ceph/:/data/ceph/data/
test.env/library/ceph/daemon:latest-luminous restapi
03
—
Ceph测试
1).测试文件存储
mkdir -p /mnt/cephfs
密码文件位置
/data/ceph/config/ceph.client.admin.keyring
mount -t ceph 10.xxx.210.61:6789:/ /mnt/cephfs -o name=admin,secret=AQBUwQxbFaL0ABAASlSlbSWlpNVEM8Fg4g0i0g==
2).测试对象存储
新建用户
[root@UNIDOC-CS22 ~]# docker exec 3189e2d84b25 radosgw-admin user create --uid="rgwuser" --display-name="This is first rgw test user"
{
"user_id": "rgwuser",
"display_name": "This is first rgw test user",
"email": "",
"suspended": 0,
"max_buckets": 1000,
"auid": 0,
"subusers": [],
"keys": [
{
"user": "rgwuser",
"access_key": "6LNATPJYK52377SB7GRL",
"secret_key": "7SbpXMJc42AfFeOyBDwufwoevxud03rFn9pJ2XoB"
}
],
"swift_keys": [],
"caps": [],
"op_mask": "read, write, delete",
"default_placement": "",
"placement_tags": [],
"bucket_quota": {
"enabled": false,
"check_on_raw": false,
"max_size": -1,
"max_size_kb": 0,
"max_objects": -1
},
"user_quota": {
"enabled": false,
"check_on_raw": false,
"max_size": -1,
"max_size_kb": 0,
"max_objects": -1
},
"temp_url_keys": [],
"type": "rgw"
}
上传文件
apt install python-boto
vi s3.py
import boto
import boto.s3.connection
access_key = '6LNATPJYK52377SB7GRL'
secret_key = '7SbpXMJc42AfFeOyBDwufwoevxud03rFn9pJ2XoB'
conn = boto.connect_s3(
aws_access_key_id = access_key,
aws_secret_access_key = secret_key,
host = '10.xxx.210.61', port=8080,
is_secure=False,
calling_format = boto.s3.connection.OrdinaryCallingFormat(),
)
bucket = conn.create_bucket('my-first-s3-bucket')
for bucket in conn.get_all_buckets():
print "{name} {created}".format(
name = bucket.name,
created = bucket.creation_date,
)
python s3.py
以上是关于分布式存储Ceph在Docker下安装部署的主要内容,如果未能解决你的问题,请参考以下文章
世界500强是如何解决千亿流量留存问题的,《Ceph分布式存储架构》-使用CentOS 7部署 Ceph分布式存储架构-为他们解决什么问题。