深度解析YoloV3的主干网络和Loss
Posted AI浩
tags:
篇首语:本文由小常识网(cha138.com)小编为大家整理,主要介绍了深度解析YoloV3的主干网络和Loss相关的知识,希望对你有一定的参考价值。
摘要
YoloV3作为物体检测模型中比较常用的模型之一,是广大算法工程师入门物体检测必学的算法之一,所以弄清楚Yolov3的主干网络和Loss很有必要。本文根据网络收集和自己的理解写的,如果有不对的地方,欢迎大家指正。代码推荐keras版本的,这个版本写的非常简单,容易上手。github地址:https://github.com/qqwweee/keras-yolo3
主干网络DarkNet-53

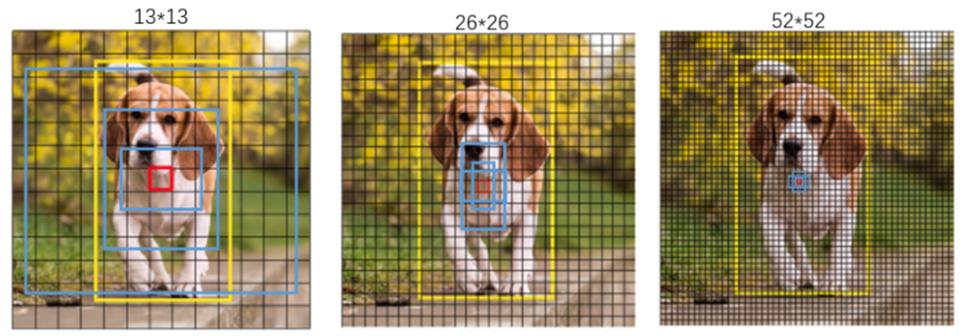
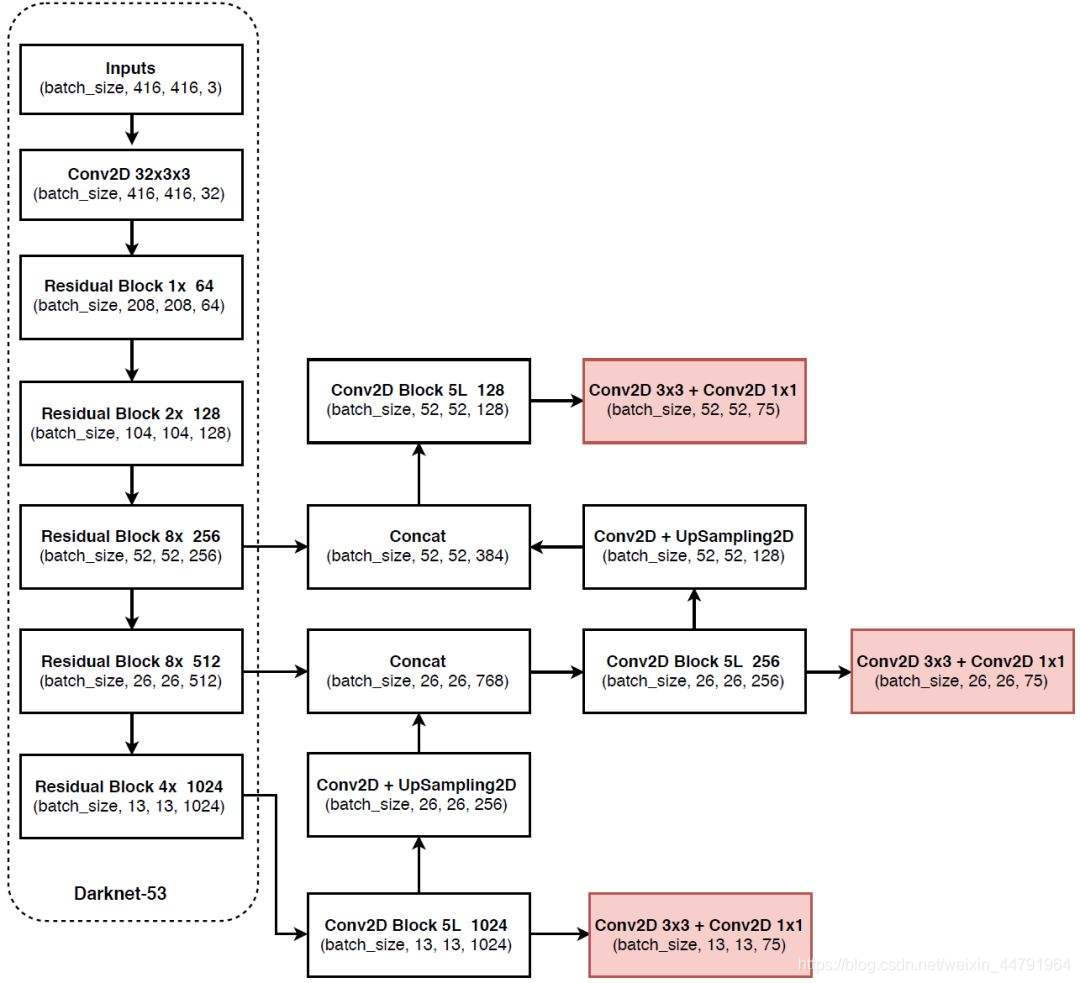
上图是YoloV3的整体网络图,我可以到y1,y2,y3三个输出,y1的大小是13×13×255,y2的大小是26×26×255,y3的大小是52×52×255,13,26,52这三个值好理解,是通过卷积得来的(在这里要注意,DrakNet-53并没有使用池化,它降采样使用的是卷积,将步进设置为2得来的。),那么255是怎么得来的呢?以y1为例,y1的输出为13*13*255,表示整张图被分为13*13个格子,每个格子预测3个框,每个框的预测信息包括:80个类别+1个框的置信度+2个框的位置偏差+2个框的size偏差。输出可以理解为是13*13*(3*(80+1+2+2))。
注:每个格子上的3个预测框是,我们通过聚类得到的9个框,平均分配到y1,y2,y3这三个map上,每个map的格子就是3个预测框了,

下面这张图展示了,图像从输入到输出,每个阶段的大小,三个红色的框是对应y1,y2,y3的输出。

DarkNet-53的主要代码:
def DarknetConv2D(*args, **kwargs):
    """Wrapper to set Darknet parameters for Convolution2D."""
    darknet_conv_kwargs = {'kernel_regularizer': l2(5e-4)}
    darknet_conv_kwargs['padding'] = 'valid' if kwargs.get('strides')==(2,2) else 'same'
    darknet_conv_kwargs.update(kwargs)
    return Conv2D(*args, **darknet_conv_kwargs)

def DarknetConv2D_BN_Leaky(*args, **kwargs):
    """Darknet Convolution2D followed by BatchNormalization and LeakyReLU."""
    no_bias_kwargs = {'use_bias': False}
    no_bias_kwargs.update(kwargs)
    return compose(
        DarknetConv2D(*args, **no_bias_kwargs),
        BatchNormalization(),
        LeakyReLU(alpha=0.1))

def resblock_body(x, num_filters, num_blocks):
    '''A series of resblocks starting with a downsampling Convolution2D'''
    # Darknet uses left and top padding instead of 'same' mode
    x = ZeroPadding2D(((1,0),(1,0)))(x)
    x = DarknetConv2D_BN_Leaky(num_filters, (3,3), strides=(2,2))(x)
    for i in range(num_blocks):
        y = compose(
                DarknetConv2D_BN_Leaky(num_filters//2, (1,1)),
                DarknetConv2D_BN_Leaky(num_filters, (3,3)))(x)
        x = Add()([x,y])
    return x

def darknet_body(x):
    '''Darknent body having 52 Convolution2D layers'''
    x = DarknetConv2D_BN_Leaky(32, (3,3))(x)
    x = resblock_body(x, 64, 1)
    x = resblock_body(x, 128, 2)
    x = resblock_body(x, 256, 8)
    x = resblock_body(x, 512, 8)
    x = resblock_body(x, 1024, 4)
    return x
def make_last_layers(x, num_filters, out_filters):
    '''6 Conv2D_BN_Leaky layers followed by a Conv2D_linear layer'''
    x = compose(
            DarknetConv2D_BN_Leaky(num_filters, (1,1)),
            DarknetConv2D_BN_Leaky(num_filters*2, (3,3)),
            DarknetConv2D_BN_Leaky(num_filters, (1,1)),
            DarknetConv2D_BN_Leaky(num_filters*2, (3,3)),
            DarknetConv2D_BN_Leaky(num_filters, (1,1)))(x)
    y = compose(
            DarknetConv2D_BN_Leaky(num_filters*2, (3,3)),
            DarknetConv2D(out_filters, (1,1)))(x)
    return x, y


def yolo_body(inputs, num_anchors, num_classes):
    """Create YOLO_V3 model CNN body in Keras."""
    darknet = Model(inputs, darknet_body(inputs))
    x, y1 = make_last_layers(darknet.output, 512, num_anchors*(num_classes+5))

    x = compose(
            DarknetConv2D_BN_Leaky(256, (1,1)),
            UpSampling2D(2))(x)
    x = Concatenate()([x,darknet.layers[152].output])
    x, y2 = make_last_layers(x, 256, num_anchors*(num_classes+5))

    x = compose(
            DarknetConv2D_BN_Leaky(128, (1,1)),
            UpSampling2D(2))(x)
    x = Concatenate()([x,darknet.layers[92].output])
    x, y3 = make_last_layers(x, 128, num_anchors*(num_classes+5))

    return Model(inputs, [y1,y2,y3])
在网络的输入和输出,图片大小上很多人也有疑惑,比如测试的时候,我输入的图像是416×416的,那么在测试的时候必须是416×416的吗?
我们继续以y1为例,y1的默认输出为13*13*255,表示整张图被分为13*13个格子,每个格子预测3个框,每个框的预测信息包括:80个类别+1个框的置信度+2个框的位置偏差+2个框的size偏差。输出可以理解为是13*13*(3*(80+1+2+2))。如果我们在测试的时候,输入的图像是4160×4160的呢?那么y1的输出就变成130×130×255了,整张图被划分的格子数按照对应的倍数增加,所以不会发生变化。所以在处理大图像的时候,我可以采用小图训练大图测试的方式做,没有必要让测试的图像大小和训练的图像大小保持一致,但是最好保持等比例resize。
Loss函数以及构建过程
关于Loss函数的理解,我在网上查了查,版本不少,由于作者在写论文的时候,没有详细些Loss,导致很多人认为Yolov3的Loss和以前的版本一致,所以很多文章也是错误的。我参照代码总结对YoloV3的Loss做了一些总结。
我们先看代码里的Loss是如何写的?
def yolo_loss(args, anchors, num_classes, ignore_thresh=.5, print_loss=False):
    '''Return yolo_loss tensor

    Parameters
    ----------
    yolo_outputs: list of tensor, the output of yolo_body or tiny_yolo_body
    y_true: list of array, the output of preprocess_true_boxes
    anchors: array, shape=(N, 2), wh
    num_classes: integer
    ignore_thresh: float, the iou threshold whether to ignore object confidence loss

    Returns
    -------
    loss: tensor, shape=(1,)

    '''
    num_layers = len(anchors)//3 # default setting
    yolo_outputs = args[:num_layers]
    y_true = args[num_layers:]
    anchor_mask = [[6,7,8], [3,4,5], [0,1,2]] if num_layers==3 else [[3,4,5], [1,2,3]]
    input_shape = K.cast(K.shape(yolo_outputs[0])[1:3] * 32, K.dtype(y_true[0]))
    grid_shapes = [K.cast(K.shape(yolo_outputs[l])[1:3], K.dtype(y_true[0])) for l in range(num_layers)]
    loss = 0
    m = K.shape(yolo_outputs[0])[0] # batch size, tensor
    mf = K.cast(m, K.dtype(yolo_outputs[0]))

    for l in range(num_layers):
        object_mask = y_true[l][..., 4:5]
        true_class_probs = y_true[l][..., 5:]

        grid, raw_pred, pred_xy, pred_wh = yolo_head(yolo_outputs[l],
             anchors[anchor_mask[l]], num_classes, input_shape, calc_loss=True)
        pred_box = K.concatenate([pred_xy, pred_wh])

        # Darknet raw box to calculate loss.
        raw_true_xy = y_true[l][..., :2]*grid_shapes[l][::-1] - grid
        raw_true_wh = K.log(y_true[l][..., 2:4] / anchors[anchor_mask[l]] * input_shape[::-1])
        raw_true_wh = K.switch(object_mask, raw_true_wh, K.zeros_like(raw_true_wh)) # avoid log(0)=-inf
        box_loss_scale = 2 - y_true[l][...,2:3]*y_true[l][...,3:4]

        # Find ignore mask, iterate over each of batch.
        ignore_mask = tf.TensorArray(K.dtype(y_true[0]), size=1, dynamic_size=True)
        object_mask_bool = K.cast(object_mask, 'bool')
        def loop_body(b, ignore_mask):
            true_box = tf.boolean_mask(y_true[l][b,...,0:4], object_mask_bool[b,...,0])
            iou = box_iou(pred_box[b], true_box)
            best_iou = K.max(iou, axis=-1)
            ignore_mask = ignore_mask.write(b, K.cast(best_iou<ignore_thresh, K.dtype(true_box)))
            return b+1, ignore_mask
        _, ignore_mask = K.control_flow_ops.while_loop(lambda b,*args: b<m, loop_body, [0, ignore_mask])
        ignore_mask = ignore_mask.stack()
        ignore_mask = K.expand_dims(ignore_mask, -1)

        # K.binary_crossentropy is helpful to avoid exp overflow.
        xy_loss = object_mask * box_loss_scale * K.binary_crossentropy(raw_true_xy, raw_pred[...,0:2], from_logits=True)
        wh_loss = object_mask * box_loss_scale * 0.5 * K.square(raw_true_wh-raw_pred[...,2:4])
        confidence_loss = object_mask * K.binary_crossentropy(object_mask, raw_pred[...,4:5], from_logits=True)+ \\
            (1-object_mask) * K.binary_crossentropy(object_mask, raw_pred[...,4:5], from_logits=True) * ignore_mask
        class_loss = object_mask * K.binary_crossentropy(true_class_probs, raw_pred[...,5:], from_logits=True)

        xy_loss = K.sum(xy_loss) / mf
        wh_loss = K.sum(wh_loss) / mf
        confidence_loss = K.sum(confidence_loss) / mf
        class_loss = K.sum(class_loss) / mf
        loss += xy_loss + wh_loss + confidence_loss + class_loss
        if print_loss:
            loss = tf.Print(loss, [loss, xy_loss, wh_loss, confidence_loss, class_loss, K.sum(ignore_mask)], message='loss: ')
    return loss
从上面的代码中我们可以看出,YoloV3的Loss有4部分组成。
- 中心点 x、y 的调整参数 ——二分类的交叉熵(keras :binary_cross_entropy,pytorch:BCELoss)
- anchor的宽高w、h的调整参数 —— 均方损失函数:MSELoss
- 置信度Conf —— BCELoss
- 类别预测Cls —— BCELoss
计算loss,实际上是y_pre和y_true之间的对比:
y_pre就是一幅图像经过网络之后的3个输出,y_true就是一个真实图像中,将它的真实框的位置以及框内物体的种类,转化成yolo3网络输出后的格式的值,所以y_pre和y_true内容的shape都是
(batch_size,13,13,3,85),(batch_size,26,26,3,85),(batch_size,52,52,3,85)。
y_pre在上面的网络中已经做了说明,下面说一说如何生成y_true,在yolo3中,其使用了一个专门的函数用于处理读取进来的图片的框的真实情况。
def preprocess_true_boxes(true_boxes, input_shape, anchors, num_classes):
    '''Preprocess true boxes to training input format

    Parameters
    ----------
    true_boxes: array, shape=(m, T, 5)
        Absolute x_min, y_min, x_max, y_max, class_id relative to input_shape.
    input_shape: array-like, hw, multiples of 32
    anchors: array, shape=(N, 2), wh
    num_classes: integer

    Returns
    -------
    y_true: list of array, shape like yolo_outputs, xywh are reletive value

    '''
    assert (true_boxes[..., 4]<num_classes).all(), 'class id must be less than num_classes'
    num_layers = len(anchors)//3 # default setting
    anchor_mask = [[6,7,8], [3,4,5], [0,1,2]] if num_layers==3 else [[3,4,5], [1,2,3]]

    true_boxes = np.array(true_boxes, dtype='float32')
    input_shape = np.array(input_shape, dtype='int32')
    boxes_xy = (true_boxes[..., 0:2] + true_boxes[..., 2:4]) // 2
    boxes_wh = true_boxes[..., 2:4] - true_boxes[..., 0:2]
    true_boxes[..., 0:2] = boxes_xy/input_shape[::-1]
    true_boxes[..., 2:4] = boxes_wh/input_shape[::-1]

    m = true_boxes.shape[0]
    grid_shapes = [input_shape//{0:32, 1:16, 2:8}[l] for l in range(num_layers)]
    y_true = [np.zeros((m,grid_shapes[l][0],grid_shapes[l][1],len(anchor_mask[l]),5+num_classes),
        dtype='float32') for l in range(num_layers)]

    # Expand dim to apply broadcasting.
    anchors = np.expand_dims(anchors, 0)
    anchor_maxes = anchors / 2.
    anchor_mins = -anchor_maxes
    valid_mask = boxes_wh[..., 0]>0

    for b in range(m):
        # Discard zero rows.
        wh = boxes_wh[b, valid_mask[b]]
        if len(wh)==0: continue
        # Expand dim to apply broadcasting.
        wh = np.expand_dims(wh, -2)
        box_maxes = wh / 2.
        box_mins = -box_maxes

        intersect_mins = np.maximum(box_mins, anchor_mins)
        intersect_maxes = np.minimum(box_maxes, anchor_maxes)
        intersect_wh = np.maximum(intersect_maxes - intersect_mins, 0.)
        intersect_area = intersect_wh[..., 0] * intersect_wh[..., 1]
        box_area = wh[..., 0] * wh[..., 1]
        anchor_area = anchors[..., 0] * anchors[..., 1]
        iou = intersect_area / (box_area + anchor_area - intersect_area)

        # Find best anchor for each true box
        best_anchor = np.argmax(iou, axis=-1)

        for t, n in enumerate(best_anchor):
            for l in range(num_layers):
                if n in anchor_mask[l]:
                    i = np.floor(true_boxes[b,t,0]*grid_shapes[l][1]).astype('int32')
                    j = np.floor(true_boxes[b,t,1]*grid_shapes[l][0]).astype('int32')
                    k = anchor_mask[l].index(n)
                    c = true_boxes[b,t, 4].astype('int32')
                    y_true[l][b, j, i, k, 0:4] = true_boxes[b,t, 0:4]
                    y_true[l][b, j, i, k, 4] = 1
                    y_true[l][b, j, i, k, 5+c] = 1

    return y_true
其输入为:
true_boxes:shape为(m, T, 5)代表m张图T个框的x_min、y_min、x_max、y_max、class_id。
input_shape:输入的形状,此处为416、416
anchors:代表9个先验框的大小
num_classes:种类的数量。
其实对真实框的处理是将真实框转化成图片中相对网格的xyhw,步骤如下:
1、取框的真实值,获取其框的中心及其宽高,除去input_shape变成比例的模式。
2、建立全为0的y_true,y_true是一个列表,包含三个特征层,shape分别为(m,13,13,3,85),(m,26,26,3,85),(m,52,52,3,85)。
3、对每一张图片处理,将每一张图片中的真实框的wh和先验框的wh对比,计算IOU值,选取其中IOU最高的一个,得到其所属特征层及其网格点的位置,在对应的y_true中将内容进行保存。
得到y_true和y_pre以后就可以计算yolov3的loss,计算过程如下:
1、利用y_true取出该特征层中真实存在目标的点的位置(m,13,13,3,1)及其对应的种类(m,13,13,3,80)。
2、将yolo_outputs的特征层输出进行处理,得到reshape后的预测值y_pre,shape分别为(m,13,13,3,85),(m,26,26,3,85),(m,52,52,3,85)。还有解码后的xy,wh。
3、获取真实框编码后的值,后面用于计算loss
4、对于每一幅图,计算其中所有真实框与预测框的IOU,取出每个网络点中IOU最大的先验框,如果这个最大的IOU都小于ignore_thresh,意味着这个网络点内不存在目标,可以被忽略。
5、计算xy和wh上的loss,其计算的是实际上存在目标的,利用第三步真实框编码后的的结果和未处理的预测结果进行对比得到loss。
6、计算置信度的loss,其有两部分构成,第一部分是实际上存在目标的,预测结果中置信度的值与1对比;第二部分是实际上不存在目标的,在第四步中得到其IOU还较大的预测结果中的值与0对比。
7、计算预测种类的loss,其计算的是实际上存在目标的,预测类与真实类的差距。
其实际上计算的总的loss是三个loss的和,这三个loss分别是:
实际存在的框,编码后的结果与预测值的差距。
实际存在的框,预测结果中置信度的值与1对比;实际不存在的框,在上述步骤中,第四步得到其IOU还较大的预测结果中的值与0对比。
实际存在的框,种类预测结果与实际结果的对比。
参考文章:
【代码阅读】YOLOv3 Loss构建详解_麒麒哈尔的博客-CSDN博客
以上是关于深度解析YoloV3的主干网络和Loss的主要内容,如果未能解决你的问题,请参考以下文章
睿智的目标检测51——Tensorflow2搭建yolo3目标检测平台
从零开始学习YOLOv38. YOLOv3中Loss部分计算
深度学习论文翻译解析:YOLOv3: An Incremental Improvement