鸿蒙HarMonyOS的UI组件学习三之登录页面
Posted 笔触狂放
tags:
篇首语:本文由小常识网(cha138.com)小编为大家整理,主要介绍了鸿蒙HarMonyOS的UI组件学习三之登录页面相关的知识,希望对你有一定的参考价值。
各位正在努力奋斗,努力学习的开发者大家好,最近工作比较忙,没有更新文章,今天分享一个鸿蒙系统的登录页面的效果。
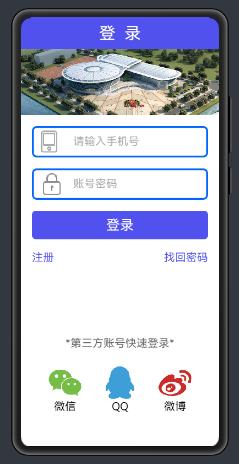
先给大家上效果图,如果感觉本人做的不是很好的,可作为案例参考,完成更好的效果:

有好几个朋友留言说练习太综合性,不利于新手的上手操作,那么我把过程分解开来。
上代码之前,先讲一下该效果需要用到哪些组件。
首先,整体布局的控制都是由DirectionalLayout组件完成,可以称它为线性布局,因为它能控制所有组件进行横向和竖向排列。
最外层使用DirectionalLayout布局,代码如下:
<?xml version="1.0" encoding="utf-8"?>
<DirectionalLayout
    xmlns:ohos="http://schemas.huawei.com/res/ohos"
    ohos:height="match_parent"
    ohos:width="match_parent"
    ohos:orientation="vertical">

    </DirectionalLayout>
ohos:height=“match_parent”:设置布局的高度填充整个屏幕
ohos:width=“match_parent”:设置布局的宽度填充整个屏幕
ohos:orientation=“vertical”:设置布局内部所有组件进行竖向摆放
其次编写标题栏,需要用到Text组件,代码如下:
 <!--标题栏-->
    <Text
        ohos:height="match_content"
        ohos:width="match_parent"
        ohos:background_element="#FF5151EC"
        ohos:padding="10vp"
        ohos:text="登  录"
        ohos:text_alignment="center"
        ohos:text_color="#ffffff"
        ohos:text_size="30vp"/>
ohos:background_element="#FF5151EC"设置标题栏的背景颜色
ohos:padding="10vp"设置文字的内部间距
ohos:text="登 录"添加文字
ohos:text_alignment=“center"设置文字对齐方式为居中对齐
ohos:text_color=”#ffffff"设置文字颜色
ohos:text_size="30vp"设置文字大小
然后,添加广告栏,目前广告栏只放了一张图片,后期会做成轮播图效果,再展示给大家学习:
<Image
        ohos:height="120fp"
        ohos:width="match_parent"
        ohos:image_src="$media:spic"
        ohos:scale_mode="stretch"/>
ohos:image_src="$media:spic"加载图片
ohos:scale_mode="stretch"设置图片平铺占满Image组件的高宽
接下来是文本输入框TextField组件和Image组件的综合使用:
 <DirectionalLayout
        ohos:height="match_content"
        ohos:width="match_parent"
        ohos:weight="2"
        ohos:orientation="vertical">

        <DirectionalLayout
            ohos:height="match_content"
            ohos:width="match_parent"
            ohos:alignment="vertical_center"
            ohos:background_element="$graphic:background_textfield"
            ohos:margin="20fp"
            ohos:orientation="horizontal">

            <Image
                ohos:height="50vp"
                ohos:width="50vp"
                ohos:image_src="$media:lr_ico_phone"
                ohos:left_margin="10vp"
                ohos:scale_mode="stretch"/>

            <TextField
                ohos:id="$+id:tf_user"
                ohos:height="match_content"
                ohos:width="match_parent"
                ohos:hint="请输入手机号"
                ohos:hint_color="#aaaaaa"
                ohos:padding="15vp"
                ohos:text_color="#aaaaaa"
                ohos:text_size="20fp"/>

        </DirectionalLayout>

        <DirectionalLayout
            ohos:height="match_content"
            ohos:width="match_parent"
            ohos:alignment="vertical_center"
            ohos:background_element="$graphic:background_textfield"
            ohos:left_margin="20fp"
            ohos:orientation="horizontal"
            ohos:right_margin="20fp">

            <Image
                ohos:height="50vp"
                ohos:width="50vp"
                ohos:image_src="$media:lr_ico_pass"
                ohos:left_margin="10vp"
                ohos:scale_mode="stretch"/>

            <TextField
                ohos:id="$+id:tf_psd"
                ohos:height="match_content"
                ohos:width="match_parent"
                ohos:hint="账号密码"
                ohos:hint_color="#aaaaaa"
                ohos:padding="15vp"
                ohos:text_color="#aaaaaa"
                ohos:text_size="20fp"/>

        </DirectionalLayout>

        <Button
            ohos:height="match_content"
            ohos:width="match_parent"
            ohos:background_element="$graphic:background_button_login"
            ohos:margin="20fp"
            ohos:padding="10fp"
            ohos:text="登录"
            ohos:text_color="#ffffff"
            ohos:text_size="25fp"
            />

        <DirectionalLayout
            ohos:height="match_content"
            ohos:width="match_parent"
            ohos:left_margin="20fp"
            ohos:orientation="horizontal"
            ohos:right_margin="20fp">

            <Text
                ohos:height="match_content"
                ohos:width="match_content"
                ohos:text="注册"
                ohos:text_alignment="left"
                ohos:text_color="#FF5151EC"
                ohos:text_size="20fp"
                ohos:weight="1"/>

            <Text
                ohos:height="match_content"
                ohos:width="match_content"
                ohos:text="找回密码"
                ohos:text_alignment="right"
                ohos:text_color="#FF5151EC"
                ohos:text_size="20fp"
                ohos:weight="1"/>
        </DirectionalLayout>
    </DirectionalLayout>
ohos:weight="2"设置布局的权重,用于将界面的高度按比例分割划分,这里占整个屏幕剩余高度的两份
ohos:alignment=“vertical_center"设置组件对齐方式为竖直居中
ohos:background_element=”$graphic:background_textfield"设置文本输入框的背景颜色边框
在graphic文件夹下右键新建xml文件,名称为background_textfield,代码如下:
<?xml version="1.0" encoding="utf-8"?>
<shape
    xmlns:ohos="http://schemas.huawei.com/res/ohos"
    ohos:shape="rectangle">
    <corners
        ohos:radius="20"
        />
    <solid
        ohos:color="#FFffff"/>
    <stroke
        ohos:color="#0066FF"
        ohos:width="10"/>
</shape>
ohos:margin="20fp"设置外部间距
ohos:orientation="horizontal"设置内部组件横向摆放
ohos:left_margin=“10vp"设置左边外部间距
ohos:hint=“请输入手机号"设置文本输入框的提示信息
ohos:hint_color=”#aaaaaa"设置提示信息的颜色
ohos:background_element=”$graphic:background_button_login"设置登录按钮的背景颜色
代码如下:
<?xml version="1.0" encoding="utf-8"?>
<shape
    xmlns:ohos="http://schemas.huawei.com/res/ohos"
    ohos:shape="rectangle">
    <corners
        ohos:radius="20"
        />
    <solid
        ohos:color="#FF5151EC"/>
</shape>
ohos:text_alignment="left"设置“注册”进行左对齐
ohos:text_alignment="right"设置“找回密码”进行右对齐
底部效果的代码如下:
<DirectionalLayout
        ohos:height="match_content"
        ohos:width="match_parent"
        ohos:weight="1"
        ohos:orientation="vertical">
        <Text
            ohos:height="match_content"
            ohos:width="match_parent"
            ohos:text_size="20fp"
            ohos:text_alignment="center"
            ohos:text_color="#666"
            ohos:text="*第三方账号快速登录*"/>
        <DirectionalLayout
            ohos:height="match_content"
            ohos:width="match_parent"
            ohos:margin="30fp"
            ohos:alignment="horizontal_center"
            ohos:orientation="horizontal">

            <DirectionalLayout
                ohos:height="match_content"
                ohos:width="match_content"
                ohos:weight="1"
                ohos:alignment="center">
                <Image
                    ohos:height="60fp"
                    ohos:width="60fp"
                    ohos:scale_mode="stretch"
                    ohos:image_src="$media:loadweixin"/>
                <Text
                    ohos:height="match_content"
                    ohos:width="match_content"
                    ohos:text_size="20fp"
                    ohos:text="微信"/>
            </DirectionalLayout>
            <DirectionalLayout
                ohos:height="match_content"
                ohos:width="match_content"
                ohos:weight="1"
                ohos:alignment="center">
                <Image
                    ohos:height="60fp"
                    ohos:width="60fp"
                    ohos:scale_mode="stretch"
                    ohos:image_src="$media:qq"/>
                <Text
                    ohos:height="match_content"
                    ohos:width="match_content"
                    ohos:text_size="20fp"
                    ohos:text="QQ"/>
            </DirectionalLayout>
            <DirectionalLayout
                ohos:height="match_content"
                ohos:width="match_content"
                ohos:weight="1"
                ohos:alignment="center">
                <Image
                    ohos:height="60fp"
                    ohos:width="60fp"
                    ohos:scale_mode="stretch"
                    ohos:image_src="$media:weibo"/>
                <Text
                    ohos:height="match_content"
                    ohos:width="match_content"
                    ohos:text_size="20fp"
                    ohos:text="微博"/>
            </DirectionalLayout>

        </DirectionalLayout>

    </DirectionalLayout>
接下来打开java代码的界面文件,新建界面,我这里命名为:TextFieldAbilitySlice,
在java代码中将刚刚编写的布局文件加载进来,并通过给两个文本框组件的id获得这两个TextField组件的对象,并分别添加上焦点改变事件,当该文本框获得焦点改变事件后,将文本编辑颜色变为红色,失去焦点就变为黑色,并设置输入密码的文本框的文字不进行明文显示。代码如下:
package com.example.hm_phone_java.slice;

import com.example.hm_phone_java.ResourceTable;
import ohos.aafwk.ability.AbilitySlice;
import ohos.aafwk.content.Intent;
import ohos.agp.components.Component;
import ohos.agp.components.InputAttribute;
import ohos.agp.components.TextField;
import ohos.agp.utils.Color;
import ohos.event.notification.NotificationConstant;

public class TextFieldAbilitySlice extends AbilitySlice {

    @Override
    protected void onStart(Intent intent) {
        super.onStart(intent);
        //加载布局
        this.setUIContent(ResourceTable.Layout_ability_textfield);
        //获得输入手机号的文本框组件对象
        TextField tf_user= (TextField) this.findComponentById(ResourceTable.Id_tf_user);
        //获得输入秒的文本框组件对象
        TextField tf_psd= (TextField) this.findComponentById(ResourceTable.Id_tf_psd);
        //设置第一个文本框的焦点改变事件
        tf_user.setFocusChangedListener(new Component.FocusChangedListener() {
            @Override
            public void onFocusChange(Component component, boolean b) {
                if (b){
                //获得焦点,将文本编辑颜色改为红色
                    tf_user.setTextColor(Color.RED);
                }else {
                //失去焦点,变为黑色
                    tf_user.setTextColor(Color.BLACK);
                }
            }
        });
        //给第二个文本框添加焦点改变事件
        tf_psd.setFocusChangedListener(new Component.FocusChangedListener() {
            @Override
            public void onFocusChange(Component component, boolean b) {
                if (b){
                //获得焦点,将文本编辑颜色改为红色
                    tf_psd.setTextColor(Color.RED);
                }else {
                //失去焦点,变为黑色
                    tf_psd.setTextColor(Color.BLACK);
                }
            }
        });
        //设置文本显示为密码类型
        tf_psd.setTextInputType(InputAttribute.PATTERN_PASSWORD);
    }
}
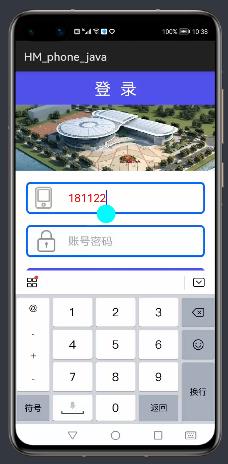
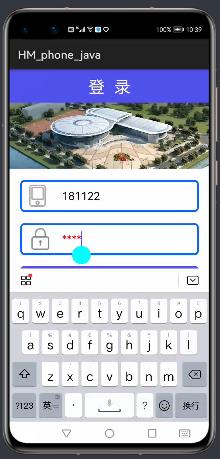
界面效果如下:
第一个文本框获得焦点,正在编辑,

第一个文本框失去焦点,密码框获得焦点,并显示成密码获得焦点。

界面中所所涉及的图片如下,供大家使用:


至此,感谢大家的关注和支持。
一起学习,共同进步!!!
下一篇 【鸿蒙】HarMonyOS的UI组件学习四之自定义选项卡
以上是关于鸿蒙HarMonyOS的UI组件学习三之登录页面的主要内容,如果未能解决你的问题,请参考以下文章
HarmonyOS鸿蒙学习笔记Navigator组件实现页面路由跳转