TensorFlow2 入门指南 | 12 网络容器 tf.keras.Sequential 用法超全整理!
Posted AI 菌
tags:
篇首语:本文由小常识网(cha138.com)小编为大家整理,主要介绍了TensorFlow2 入门指南 | 12 网络容器 tf.keras.Sequential 用法超全整理!相关的知识,希望对你有一定的参考价值。
前言:
本专栏在保证内容完整性的基础上,力求简洁,旨在让初学者能够更快地、高效地入门TensorFlow2 深度学习框架。如果觉得本专栏对您有帮助的话,可以给一个小小的三连,各位的支持将是我创作的最大动力!
系列文章汇总:TensorFlow2 入门指南
Github项目地址:https://github.com/Keyird/TensorFlow2-for-beginner

文章目录
一、Sequential 类介绍
对于常见的网络,需要手动调用每一层的类实例完成前向传播运算,当网络层数变得较深时,这一部分代码显得非常臃肿。可以通过 Keras 提供的网络容器 Sequential 将多个网络层封装成一个大网络模型,只需要调用网络模型的实例一次即可完成数据从第一层到最末层的顺序运算。
二、导入相关库
import tensorflow as tf
from tensorflow import keras
from tensorflow.keras import layers
三、什么时候使用Sequential
Sequential 适合一些简单层的堆叠,并且每一个层只有一个输出和输出张量。
下面是使用 Sequential 搭建网络的一个简单例子:
# Define Sequential model with 3 layers
model = keras.Sequential([
        layers.Dense(2, activation="relu", name="layer1"),
        layers.Dense(3, activation="relu", name="layer2"),
        layers.Dense(4, name="layer3"),
    ])
# Call model on a test input
x = tf.ones((3, 3))
y = model(x)
上面的例子也等同于下面的写法:
# Create 3 layers
layer1 = layers.Dense(2, activation="relu", name="layer1")
layer2 = layers.Dense(3, activation="relu", name="layer2")
layer3 = layers.Dense(4, name="layer3")

# Call layers on a test input
x = tf.ones((3, 3))
y = layer3(layer2(layer1(x)))
不适合使用 Sequential 搭建网络的情形:
- 你的模型是多输入或多输出的
- 模型网络层中的某一层有是多输入或者多输出
- 网络的某些层是共享层
- 非线性拓扑结构的模型(比如残差结构、多分支结构)
可见 Sequential 适合搭建简单的网络模型,不适合搭建结构复杂的网络模型。
四、创建一个 Sequential 网络模型
1、采用 Sequential 创建一个三层的网络模型:
model = keras.Sequential([
        layers.Dense(2, activation="relu"),
        layers.Dense(3, activation="relu"),
        layers.Dense(4),
    ])
2、你也可以通过 add() 方法一步步地创建一个 Sequential 模型:
model = keras.Sequential()
model.add(layers.Dense(2, activation="relu"))
model.add(layers.Dense(3, activation="relu"))
model.add(layers.Dense(4))
你也可以使用pop()取删除网络中的一些层,Sequential 类似于一个层列表的形式:
model.pop()
print(len(model.layers))  # 2
Sequential 的构造函数也会提供一个 name 参数,这对于解释 TensorBoard graphs 是非常有用处的。定义方式如下:
model = keras.Sequential(name="my_sequential")
model.add(layers.Dense(2, activation="relu", name="layer1"))
model.add(layers.Dense(3, activation="relu", name="layer2"))
model.add(layers.Dense(4, name="layer3"))
五、预先指定网络输入shape
一般来说,Keras的所有层都需要知道它们输入的形状,以便能够创建它们的权重。所以当你创建一个像这样的图层时,它最初没有权重:
layer = layers.Dense(3)
layer.weights  # Empty
它在第一次调用一个输入时创建它的权重,因为权重的形状取决于输入的形状:
layer = layers.Dense(3)
x = tf.ones((1, 4))
y = layer(x)
print(layer.weights)  # Now it has weights, of shape (4, 3) and (3,)
输出如下:

六、打印网络层结构
只有预先指定了网络层的输入,并且建立了网络层间的连接关系,才能通过 model.summary() 打印出网络层结构。下面有两种方式通过 Sequential 建立网络层之间的关系:
1、通过 model.add() 逐层建立
model = keras.Sequential()
model.add(keras.Input(shape=(10, )))
model.add(layers.Dense(64, activation="relu"))
model.add(layers.Dense(32, activation="relu"))
model.add(layers.Dense(8, activation="relu"))
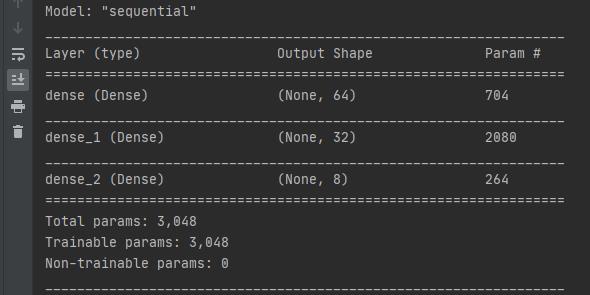
model.summary()
网络层参数打印结果如下:

当然,也可将输入层与第一层一起表示,如下所示,输出结果是一样的:
model.add(layers.Dense(64, activation="relu", input_shape=(10,)))
2、model.build() 建立 layers 间的关系
例如,输入的是28*28大小的图片,输入到网络前需要先将图片reshape成一维向量,再送入网络:
model = keras.Sequential([
    layers.Reshape(target_shape=(28 * 28,), input_shape=(28, 28)),
    layers.Dense(64, activation=tf.nn.relu),
    layers.Dense(32, activation=tf.nn.relu),
    layers.Dense(10)
])
model.build(input_shape=[None, 28*28])
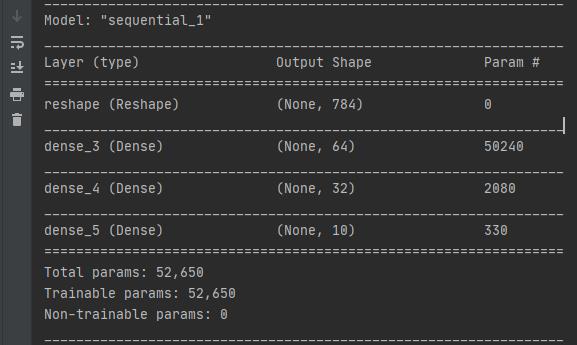
model.summary()
输出网络层结果与参数:

通常,推荐的最佳实践是,如果您知道Sequential模型的输入形状是什么,那么一定要预先指定它
七、add() + summary()
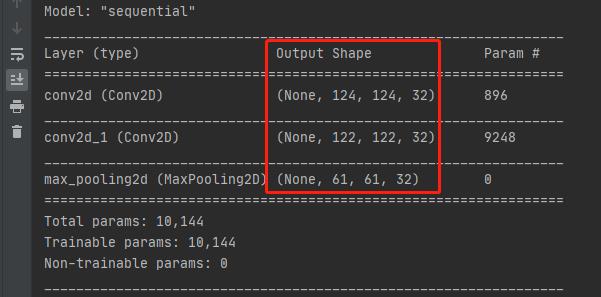
使用 add() + summary() 的方式构建网络,model.summary()可以放在网络层间的任意位置,随时查看任意层输出特征图的shape,从而决定是否需要进一步下采样。比如:
model = keras.Sequential()
model.add(keras.Input(shape=(250, 250, 3)))  # 250x250 RGB images
model.add(layers.Conv2D(32, 3, strides=2, activation="relu"))
model.add(layers.Conv2D(32, 3, activation="relu"))
model.add(layers.MaxPooling2D(2))
model.summary()
打印输出结果如下所示,每一层的输出shape都可以任意查看:

八、特征层提取
1、提取所有特征层的输出特征:
initial_model = keras.Sequential([
        keras.Input(shape=(250, 250, 3)),
        layers.Conv2D(32, 5, strides=2, activation="relu"),
        layers.Conv2D(32, 3, activation="relu"),
        layers.Conv2D(32, 3, activation="relu"),
    ])

# 提取所有层的输出
feature_extractor = keras.Model(
    inputs=initial_model.inputs,
    outputs=[layer.output for layer in initial_model.layers],  # 遍历每一层的输出
)

# Call feature extractor on test input.
x = tf.ones((1, 250, 250, 3))
features = feature_extractor(x)
# 打印第一层出来
print(features[0])
2、提取指定特征层的输出特征:
# 提取某一层(name="my_intermediate_layer")的输出特征
feature_extractor = keras.Model(
    inputs=initial_model.inputs,
    outputs=initial_model.get_layer(name="my_intermediate_layer").output,
)
# Call feature extractor on test input.
x = tf.ones((1, 250, 250, 3))
features = feature_extractor(x)
print(features)
九、基于 Sequential 类的迁移学习
有两种主要的迁移学习方法:
- 第一种情况:你的模型和预训练权重模型的结构完全一致,那么你不要修改网络结构。在迁移学习时,只需要冻住前面若干层权重参数,只训练后面的一些层。
- 第二种情况:预训练模型的输出不满足你的任务要求,但是前面若干特征层仍可以共享,你可以简单的改变或者添加网络层即可。并将前面的层进行冻结,只对修改的层进行训练。
1、第一种情况:结构相同,使用 layer.trainable = False 冻结前面的浅层特征,只训练最后一层。
model = keras.Sequential([
    keras.Input(shape=(784)),
    layers.Dense(32, activation='relu'),
    layers.Dense(32, activation='relu'),
    layers.Dense(32, activation='relu'),
    layers.Dense(10),
])

# Presumably you would want to first load pre-trained weights.
model.load_weights(...)

# Freeze all layers except the last one.
for layer in model.layers[:-1]:
  layer.trainable = False

# Recompile and train (this will only update the weights of the last layer).
model.compile(...)
model.fit(...)
2、第二种情况:对于简单的分类网络而言,只需要在原网络模型之后再增加一个全连接即可。比如你是10分类,那么指定新添加的层的节点数是10即可。
# Load a convolutional base with pre-trained weights
# 直接调用tensorflow.keras.applications库中的Xception模型
base_model = keras.applications.Xception(
    weights='imagenet',
    include_top=False,
    pooling='avg')

# Freeze the base model
base_model.trainable = False

# Use a Sequential model to add a trainable classifier on top
model = keras.Sequential([
    base_model,
    layers.Dense(1000),
])

# Compile & train
model.compile(...)
model.fit(...)
本教程所有代码会逐渐上传github仓库:https://github.com/Keyird/TensorFlow2-for-beginner
如果对你有帮助的话,欢迎star收藏~
最好的关系是互相成就,各位的「三连」就是【AI 菌】创作的最大动力,我们下期见!
以上是关于TensorFlow2 入门指南 | 12 网络容器 tf.keras.Sequential 用法超全整理!的主要内容,如果未能解决你的问题,请参考以下文章
TensorFlow2 入门指南 | 17 搭建多输入多输出卷积神经网络
TensorFlow2 入门指南 | 14 网络模型的装配训练与评估
TensorFlow2 入门指南 | 08 认识与搭建全连接层神经网络
TensorFlow2 入门指南 | 08 认识与搭建全连接层神经网络