一篇文章教你在三维空间中创建流动线条(three.js实战1)
Posted 点燃火柴
tags:
篇首语:本文由小常识网(cha138.com)小编为大家整理,主要介绍了一篇文章教你在三维空间中创建流动线条(three.js实战1)相关的知识,希望对你有一定的参考价值。
一篇文章教你在三维空间中创建流动线条
1.demo效果
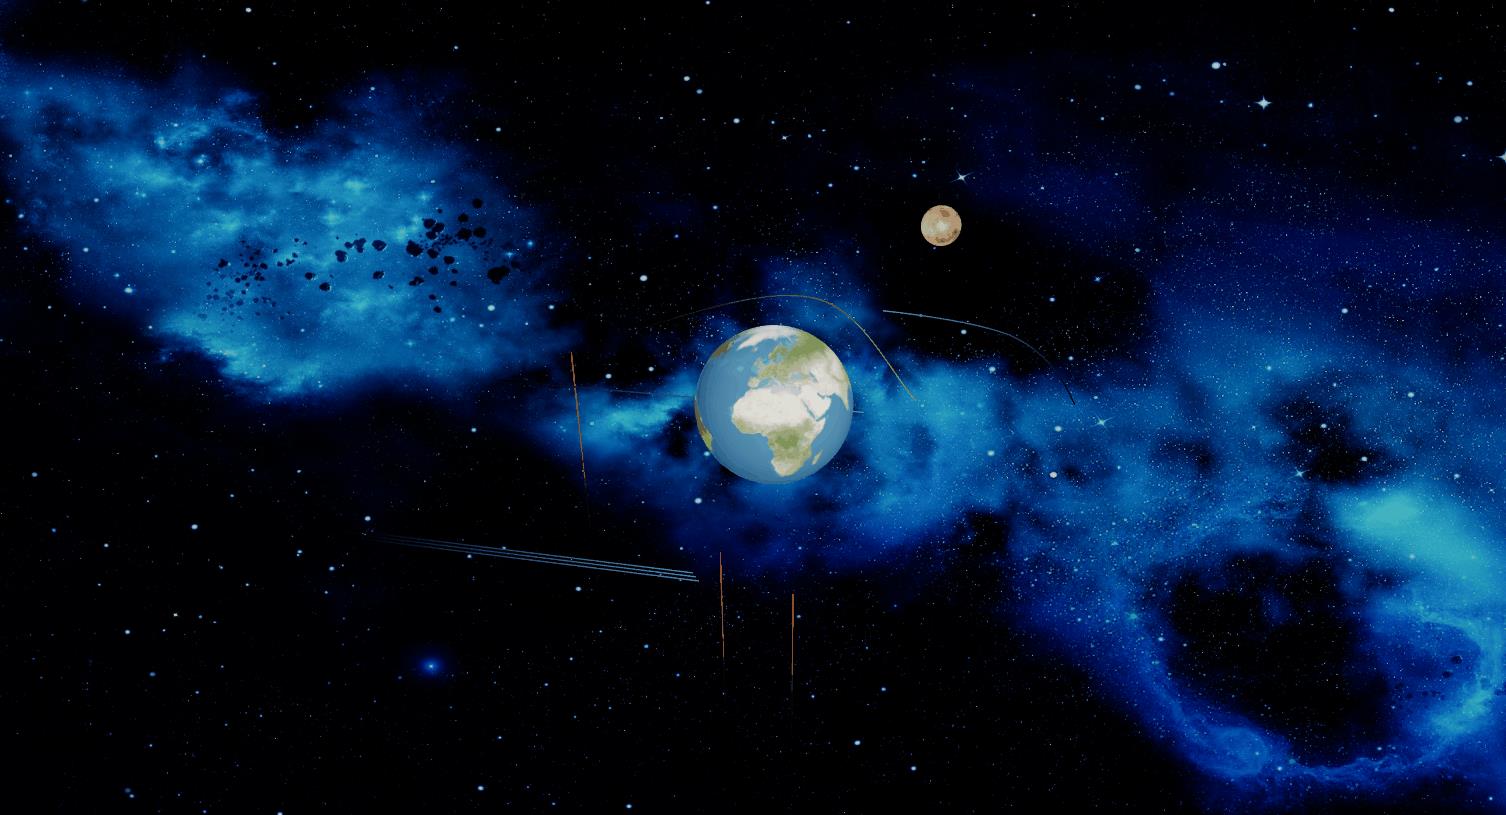
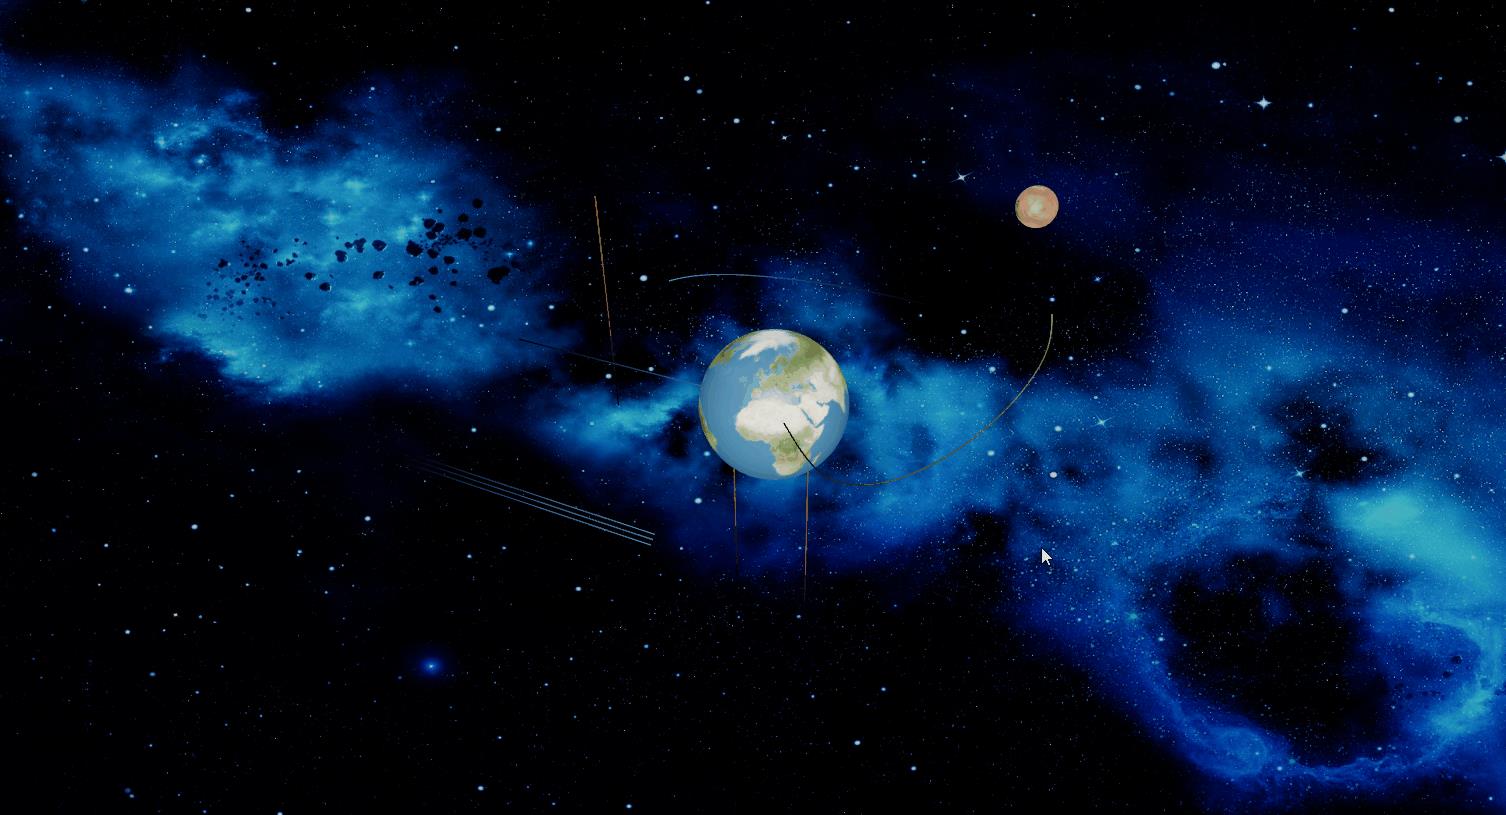
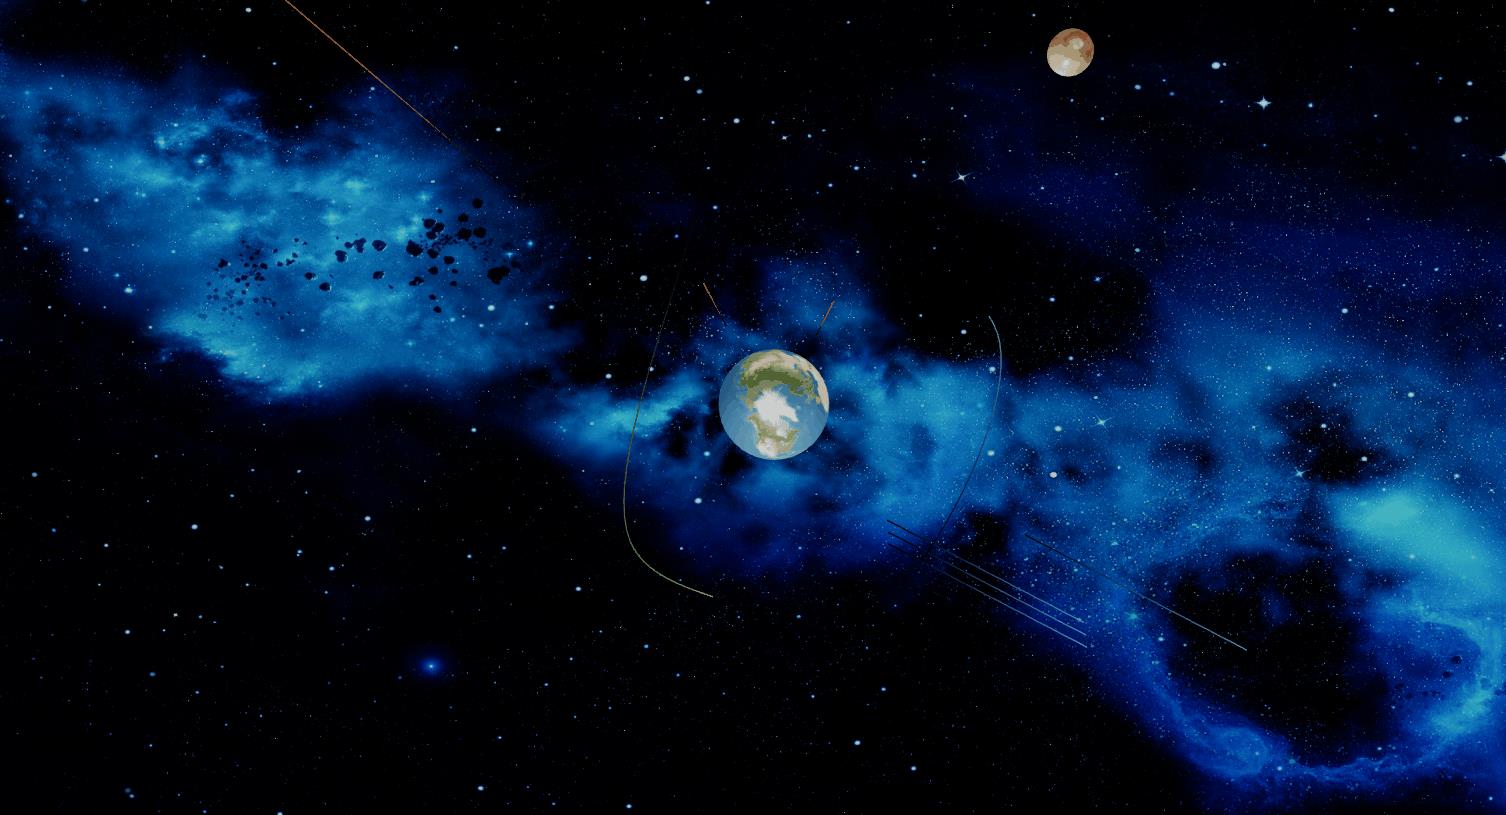
2. 流动线条实现思路
首先定义一条线段流动的的轨迹线,从这条线上均匀的取若干个点,从这些轨迹点中的某一点开始取若干个点,绘制线条,起始点后移,在取相同的点绘制线条,起始点不断后移,不会绘制线条,就得到流动的线条。如果描述的不够清楚请看下图
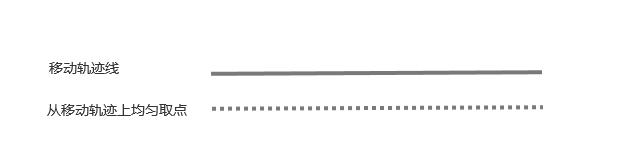
假设流动线的运动轨迹就是上图中的实线,然后从中均匀的取出若干个点,得到上图中第二条由点组成的线
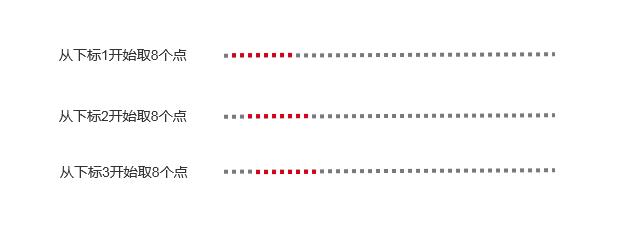
如上图,假设流动的线长度辐射8个点,第一次从下标为1点开始取8个点绘制线(红色点集),第二次从下标为2点开始取8个点绘制线,第二次从下标为3点开始取8个点绘制线,下标不断增加,不断取等长点绘制线,就会得到示例中流动的线条
3. 实现要点
3.1 定义线条运动轨迹
-
创建线条运动轨迹
定义线条运动轨迹可以使用 THREE.CatmullRomCurve3 来创建,示例中设置的默认线条运动轨迹比较简单,是一条沿X轴从-100到100直线。 -
CatmullRomCurve3 使用说明
CatmullRomCurve3用来使用一系列的点创建平滑的三维样条曲线,创建时需要输入四个参数,CatmullRomCurve3( points , closed , curveType , tension )
points – 存放绘制曲线需要的点的数组,数组元素为的Vector3类型,数组中至少需要两个Vector3类型的点
closed – 曲线是否闭合,默认值为false
curveType – 曲线的类型,默认值为centripetal。可选项有centripetal、chordal和catmullrom
tension – 曲线的张力,默认为0.5
示例代码如下
//线条运动路径,默认沿X轴从-100到100
this.linePath = linePath ? linePath : new THREE.CatmullRomCurve3(
  [
    new THREE.Vector3(-100, 0, 0),
    new THREE.Vector3(100, 0, 0)
  ]
)
3.2 绘制流动线所需的其他参数
绘制流动曲线需要不断从轨迹路径中改变起始点取定量点绘制线条,实现过程中会用到一些相关参数,具体示例如下
//线段颜色
this.lineColor = lineColor ? lineColor : {
  r: 0.2,
  g: 0.5,
  b: 0.8
}


//路径上取点的个数
this.pathPointNums = 100;

//路径上取线段的长度
this.lineLength = lineLength ? lineLength : 20;

//开始取点的位置,自增后,取等长线段,模拟移动
this.lineStartIndex = 0

//存放要画线的点
this.linePoits = []

//线移动的速度
this.moveSpeed = moveSpeed ? moveSpeed : 4
3.3 初始化线条
-
在流动轨迹中取点
在这里,通过getPoints()方法在样条曲线上取指定数量的点,该方法是CatmullRomCurve3类继承自Curve类 -
申请缓冲区
使用Float32Array类创建存放顶点信息和颜色信息的缓存 -
设置顶点信息和颜色信息
这里是一个循环,从起始点开始,在运动轨迹点集中取出lineLength定义的个数的点,每一个点的x,y,z分量按顺序压入申请的存放顶点信息的缓存中,同时向存储颜色信息的缓存中压入自定义线条颜色的r,g,b 分量 -
创建BufferGeometry对象
使用BufferGeometry创建几何对象,并将上一步得到的顶点信息和颜色信息关联到这个几何体对象, -
创建线材质
通过LineBasicMaterial类创建线材质,创建的时候将vertexColors属性设置为THREE.VertexColors,表示使用缓存中的颜色绘制 -
创建线条
最后一步就是用上面创建的几何体和材质创建线条网格对象
this.initLine = (() => {

  //在路径上取指定个数的点
  this.pathPoints = this.linePath.getPoints(this.pathPointNums)

  //满足环形路径线流动,多取一个路径上的点收尾相连
  this.pathPoints.push(...this.pathPoints)

  //申请存放顶点信息和颜色信息的缓冲
  var positions = new Float32Array(this.lineLength * 3);
  var colors = new Float32Array(this.lineLength * 3);

  //从指定点开始取等长数量的点,初始化线顶点和颜色
  for (let i = this.lineStartIndex, j = 0; i < this.lineStartIndex + this.lineLength; i++, j++) {

    positions[3 * j] = this.pathPoints[i].x
    positions[3 * j + 1] = this.pathPoints[i].y
    positions[3 * j + 2] = this.pathPoints[i].z

    colors[3 * j] = this.lineColor.r * j / this.lineLength
    colors[3 * j + 1] = this.lineColor.g * j / this.lineLength
    colors[3 * j + 2] = this.lineColor.b * j / this.lineLength
  }

  var material = new THREE.LineBasicMaterial({
    vertexColors: THREE.VertexColors, //使用缓存中的颜色
  });

  var geometry = new THREE.BufferGeometry();

  //给几何体设置顶点和颜色信息
  geometry.setAttribute('position', new THREE.BufferAttribute(positions, 3));
  geometry.setAttribute('color', new THREE.BufferAttribute(colors, 3));
  //geometry.verticesNeedUpdate = true //更新顶点

  this.line = new THREE.Line(geometry, material);

})()
3.4 线条流动实现
- 线条更新
这里是实现线条流动的核心,首先是取点的起始点lineStartIndex自增,接着需要处理一下,线条运动轨迹是不是环形路径。接着就是申请存储顶点和颜色信息的缓存,循环设置顶点和颜色信息,将线条的几何体的顶点和颜色信息更新即可 - 线条动画
使用setInterval函数不断调用线条移动函数lineMoving即可
this.lineMoving = (isCircleLine) => {
  this.lineStartIndex++


  if (isCircleLine) {
    this.lineStartIndex %= this.pathPointNums //环形路径是,路径起点处理
  } else {
    this.lineStartIndex %= (this.pathPointNums - this.lineLength)
  }


  //申请存放顶点信息和颜色信息的缓冲
  var positions = new Float32Array(this.lineLength * 3);
  var colors = new Float32Array(this.lineLength * 3);

  //从指定点开始取等长数量的点,初始化线顶点和颜色
  for (let i = this.lineStartIndex, j = 0; i < this.lineStartIndex + this.lineLength; i++, j++) {
    if (isCircleLine) {
      index = i % this.pathPointNums //兼容环形路径线流动
    } else {
      index = i
    }

    positions[3 * j] = this.pathPoints[index].x
    positions[3 * j + 1] = this.pathPoints[index].y
    positions[3 * j + 2] = this.pathPoints[index].z

    colors[3 * j] = this.lineColor.r * j / this.lineLength
    colors[3 * j + 1] = this.lineColor.g * j / this.lineLength
    colors[3 * j + 2] = this.lineColor.b * j / this.lineLength

  }

  //给几何体设置顶点和颜色信息
  this.line.geometry.setAttribute('position', new THREE.BufferAttribute(positions, 3));
  this.line.geometry.setAttribute('color', new THREE.BufferAttribute(colors, 3));

  this.line.geometry.verticesNeedUpdate = true //更新顶点
}

setInterval(() => {
  this.lineMoving(isCircleLine);
}, 100 / this.moveSpeed);
3.5 环形线条函数封装
以上四步是实现非环形流动线条的封装函数FlowingLine,由于环形流动需要收尾相接,所以重新封装一个函数,实际处理已经在前四步体现
var FlowingCircleLine = function (linePath, lineLength, lineColor, moveSpeed) {
  var circleLine = new FlowingLine(linePath, lineLength, lineColor, moveSpeed, true)
  return circleLine
}
3.6 流动线条函数使用
在demo中创建了以下流动线条,蓝色环形线、浅绿色活跃线、垂直橙色线、沿x轴蓝色线和三条蓝色线,具体实现如下
//创建动态线条
function createLines() {

  //蓝色环形线
  const circleLine = new FlowingCircleLine(new THREE.CatmullRomCurve3(
    [
      new THREE.Vector3(-30, 0, -30),
      new THREE.Vector3(-30, 0, 30),
      new THREE.Vector3(30, 0, 30),
      new THREE.Vector3(30, 0, -30)
    ], true
  ))
  scene.add(circleLine)

  //浅绿色活跃线
  const circleLine1 = new FlowingLine(new THREE.CatmullRomCurve3(
    [
      new THREE.Vector3(-30, 0, -30),
      new THREE.Vector3(-10, 20, 30),
      new THREE.Vector3(10, 25, 30),
      new THREE.Vector3(20, 15, 30),
      new THREE.Vector3(30, 0, -30),
      new THREE.Vector3(18, 3, -80)
    ]
  ), 36, {
    r: 0.4,
    g: 0.8,
    b: 0.2
  }, 3)
  scene.add(circleLine1)


  //垂直橙色线
  const lineParams = {
    linePath: new THREE.CatmullRomCurve3(
      [
        new THREE.Vector3(1, -100, -10),
        new THREE.Vector3(1, 100, -10)
      ]
    ),
    lineLength: 15,
    lineColor: {
      r: 1.0,
      g: 0.3,
      b: 0.1
    },
    moveSpeed: 5
  }
  const Yline = new FlowingLine(lineParams.linePath, lineParams.lineLength, lineParams.lineColor, lineParams
    .moveSpeed)
  scene.add(Yline)

  const Yline1 = Yline.clone()
  Yline1.position.set(-10, 10, 5)
  scene.add(Yline1)

  const Yline2 = Yline.clone()
  Yline2.position.set(-30, 40, 5)
  scene.add(Yline2)

  //沿x轴蓝色线
  const Xline = new FlowingLine()
  scene.add(Xline)
  //三条蓝色线
  for (let i = 0; i < 3; i++) {
    let tmpLine = Xline.clone()
    tmpLine.position.x += i - 20
    tmpLine.position.y += i - 20
    tmpLine.position.z += i * 2 + 10

    scene.add(tmpLine)
    tmpLine = null
  }
}
4. demo代码
4.1 html文件
<!DOCTYPE html>

<html>

<head>
  <title>Example 01 - flowing-lines</title>
  <script type="text/javascript" src="../three/build/three.js"></script>
  <script type="text/javascript" src="../three/examples/js/controls/OrbitControls.js"></script>
  <script type="text/javascript" src="../three/examples/js/libs/stats.min.js"></script>
  <script type="text/javascript" src="./js/FlowingLine.js"></script>

  <style>
    body {
      margin: 0;
      overflow: hidden;
    }
  </style>
</head>

<body>

  <div id="Stats-output"></div>
  <div id="WebGL-output"></div>

  <script type="text/javascript">
    let stats, controls;
    let camera, scene, renderer;
    let earthMesh, marsMesh;

    function initScene() {
      scene = new THREE.Scene();
      //用一张图加载为纹理作为场景背景
      scene.background = new THREE.TextureLoader().load("../assets/textures/starry-deep-outer-space-galaxy.jpg")

    }

    function initCamera() {
      camera = new THREE.PerspectiveCamera(55, window.innerWidth / window.innerHeight, 1, 20000);
      camera.position.set(20, 50, 100);
    }

    function initLight() {
      //添加环境光
      var ambientLight = new THREE.AmbientLight(0xffffff);
      scene.add(ambientLight);

      var spotLight = new THREE.SpotLight(0xffffff);
      spotLight.position.set(25, 30, 50);
      spotLight.castShadow = true;
      scene.add(spotLight);
    }


    function initModel() {
      createEarthMesh();
      createMarshMesh();
      createLines();
    }


    function createMarshMesh() {
      var geom = new THREE.SphereGeometry(4, 40, 40)
      var planetTexture = new THREE.TextureLoader().load("../assets/textures/planets/Mars_2k-050104.png");
      var normalTexture = new THREE.TextureLoader().load("../assets/textures/planets/Mars-normalmap_2k.png");

      var planetMaterial = new THREE.MeshPhongMaterial();
      planetMaterial.normalMap = normalTexture;
      planetMaterial.map = planetTexture;
      // planetMaterial.shininess = 150;

      marsMesh = new THREE.Mesh(geom, planetMaterial);
      marsMesh.position.set(18, 3, -80)
      scene.add(marsMesh)
    }

    function createEarthMesh() {
      var geom = new THREE.SphereGeometry(10, 40, 40)
      var planetTexture = new THREE.TextureLoader().load("../assets/textures/planets/Earth.png");
      var specularTexture = new THREE.TextureLoader().load("../assets/textures/planets/EarthSpec.png");
      var normalTexture = new THREE.TextureLoader().load("../assets/textures/planets/EarthNormal.png");


      var planetMaterial = new THREE.MeshPhongMaterial();
      planetMaterial.specularMap = specularTexture;
      planetMaterial.specular = new THREE.Color(0x4444aa);


      planetMaterial.normalMap = normalTexture;
      planetMaterial.map = planetTexture;
      //               planetMaterial.shininess = 150;

      earthMesh = new THREE.Mesh(geom, planetMaterial);
      scene.add(earthMesh)
    }

    //创建动态线条
    function createLines() {

      //蓝色环形线
      const circleLine = new FlowingCircleLine(new THREE.CatmullRomCurve3(
        [
          new THREE以上是关于一篇文章教你在三维空间中创建流动线条(three.js实战1)的主要内容,如果未能解决你的问题,请参考以下文章