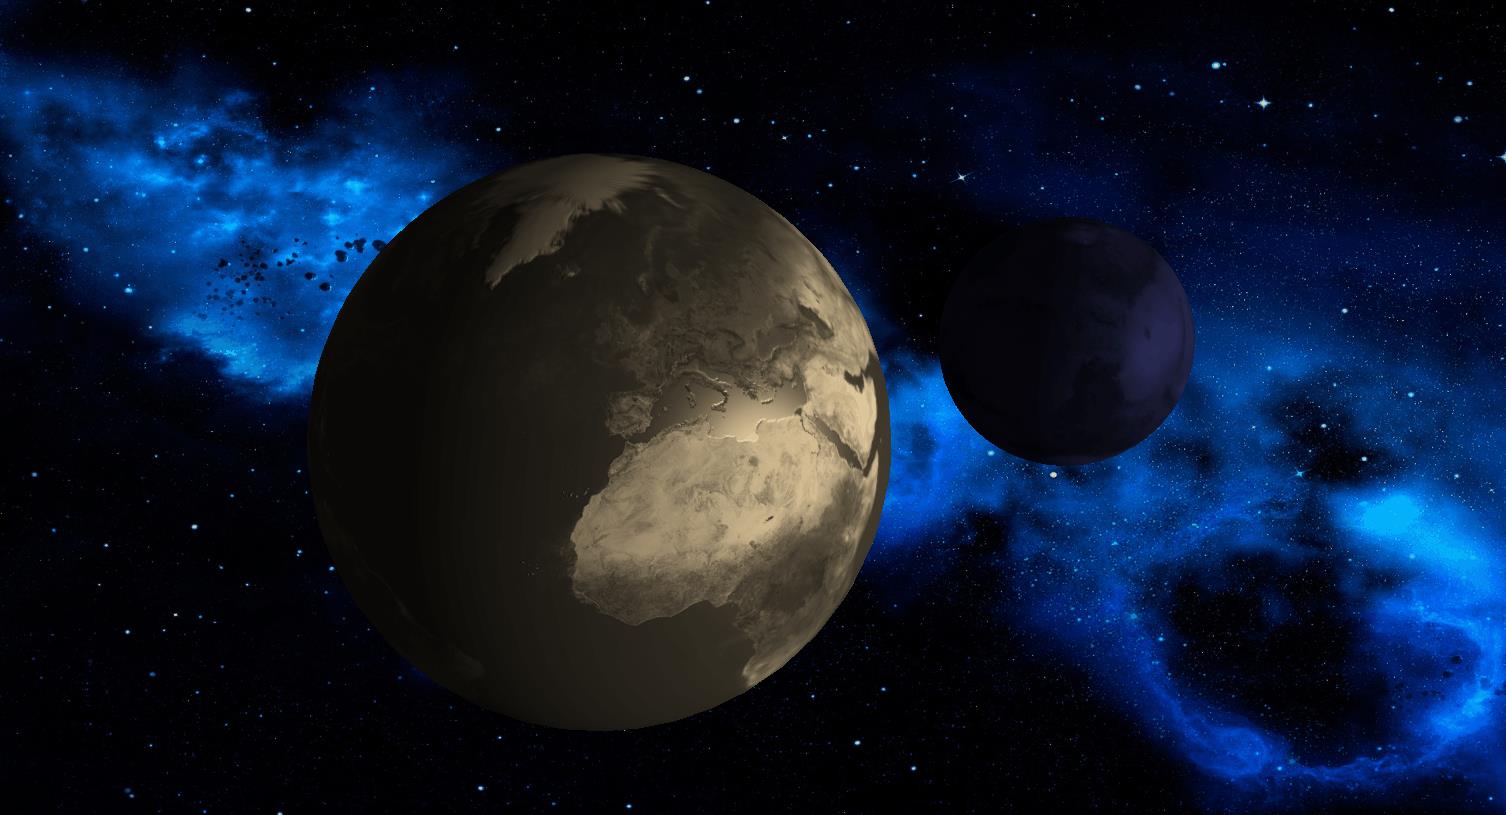
使用vue学习three.js之渲染后期处理-使用MaskPass掩膜通道实现多个场景中地球与火星使用不同后期处理效果,不同场景的物体在同一屏幕展示,星空背景展示
Posted 点燃火柴
tags:
篇首语:本文由小常识网(cha138.com)小编为大家整理,主要介绍了使用vue学习three.js之渲染后期处理-使用MaskPass掩膜通道实现多个场景中地球与火星使用不同后期处理效果,不同场景的物体在同一屏幕展示,星空背景展示相关的知识,希望对你有一定的参考价值。
使用MaskPass掩膜通道实现多个场景中地球与火星使用不同后期处理效果
1.demo效果

如上图,demo中背景、地球和火星使用了不同后期处理通道,最终将不同场景下的物体展示在同一屏幕
2. 重要知识点
2.1 MaskPass通道介绍
MaskPass 通道称为 掩膜通道,用于限定后期处理效果的作用范围,例如这次demo中,希望只对地球使用SepiaShader着色器通道,使地球具有乌贼墨的效果,而其他物体则不受影响,创建MaskPass通道时需要两个参数,场景和相机。这个场景便是限定的范围,后续开启掩膜通道后,之后使用的所有后期处理效果,这回对这个场景中的物体有效果,直到遇到ClearMaskPass,作用范围才会取消。
2.2 MaskPass通道使用注意事项
- 掩膜通道与场景
根据你实际的需要,将需要做相同后期处理的物体放在同一个场景中,可同时创建多个场景,对应的需要创建多个掩膜通道。后续在某个掩膜通道上做后期处理效果就会体现在对应的场景中 - 同一光源不能添加到多个场景
前文提到会创建多个场景,但是不能把一个光源添加到多个场景,需要为每个场景创建自己的光源 - inverse属性
这是一个很有意思的属性,该属性默认是false,如果设置为true,那么掩膜的作用刚好相反,后期处理效果会作用在除自己外的所有场景上
3. 实现要点
3.1 相关文件引入
import { EffectComposer } from 'three/examples/jsm/postprocessing/EffectComposer.js'
import { RenderPass } from 'three/examples/jsm/postprocessing/RenderPass.js'
import { ShaderPass } from 'three/examples/jsm/postprocessing/ShaderPass.js'
import {MaskPass,ClearMaskPass} from 'three/examples/jsm/postprocessing/MaskPass.js'
import { CopyShader } from 'three/examples/jsm/shaders/CopyShader.js'
import { SepiaShader } from 'three/examples/jsm/shaders/SepiaShader.js'
import { ColorifyShader } from 'three/examples/jsm/shaders/ColorifyShader.js'
3.2 创建多个场景
这里需要创建三个场景,一个展示背景的场景,一个展示地球的场景和展示火星的场景
// 创建场景
createScene() {
  this.sceneEarth = new THREE.Scene()
  this.sceneMars = new THREE.Scene()
  this.sceneBG = new THREE.Scene()
}
3.3 不同场景添加光源
上文说到不能把同一个光源添加到多个场景,这里要为地球场景和火星场景创建各自的光源
// 创建光源
createLight() {
  //给地球场景添加光源
  const ambientLight1 = new THREE.AmbientLight(0x181818) // 创建环境光
  this.sceneEarth.add(ambientLight1) // 将环境光添加到场景

  const spotLight1 = new THREE.DirectionalLight(0xffffff)
  spotLight1.position.set(550, 100, 550)
  spotLight1.intensity = 0.6
  this.sceneEarth.add(spotLight1)

  //给火星场景添加光源
  const ambientLight2 = new THREE.AmbientLight(0x181818) // 创建环境光
  this.sceneMars.add(ambientLight2) // 将环境光添加到场景

  const spotLight2 = new THREE.DirectionalLight(0xffffff)
  spotLight2.position.set(550, 100, 550)
  spotLight2.intensity = 0.6
  this.sceneMars.add(spotLight2)
}
3.4 创建效果组合器
这里我们为三个场景创建了三个渲染器通道,之后为地球场景和火星场景创建了MaskPass掩膜通道,同时创建了所要用到的后期处理通道,在向效果组合体添加通道时,需要注意两点
- 给火星做Colorify效果处理时,首先添加火星掩膜通道,然后添加使用Colorify后期处理通道,之后添加ClearMaskPass通道,这样Colorify后期处理效果就只会作用域火星场景,地球场景使用Sepia效果处理也是同样的道理
- 在最后使用CopyShader复制效果通道,是为了将所有场景最终的结果复制到屏幕上,如果不使用该通道则屏幕上什么也不会显示
// 创建效果组合器
createComposer() {
  //创建背景渲染器通道
  const backgroundRenderPass = new RenderPass(this.sceneBG, this.cameraBG)

  //创建地球渲染器通道
  const earthRenderPass = new RenderPass(this.sceneEarth, this.camera)
  earthRenderPass.clear = false // 是否清除前一帧绘图,默认true

  //创建火星渲染器通道
  const marsRenderPass = new RenderPass(this.sceneMars, this.camera)
  marsRenderPass.clear = false // 是否清除前一帧绘图,默认true

  //创建效果复制通道
  const effectCopy = new ShaderPass(CopyShader)
  effectCopy.renderToScreen = true

  //清除掩膜通道
  const clearMask = new ClearMaskPass()

  //创建包含地球的掩膜通道
  const earthMask = new MaskPass(this.sceneEarth, this.camera)

  //创建包含火星的掩膜通道
  const marsMask = new MaskPass(this.sceneMars, this.camera)

  //创建SepiaShader后期处理通道
  const effectSepia = new ShaderPass(SepiaShader)

  //创建ColorifyShader后期处理通道
  const effectColorify = new ShaderPass(ColorifyShader)
  effectColorify.uniforms['color'].value.setRGB(0.5, 0.5, 1)

  this.composer = new EffectComposer(this.renderer)
  this.composer.renderTarget1.stencilBuffer = true
  this.composer.renderTarget2.stencilBuffer = true

  this.composer.addPass(backgroundRenderPass) //添加背景渲染通道
  this.composer.addPass(earthRenderPass) //添加地球渲染通道
  this.composer.addPass(marsRenderPass) //添加火星渲染通道
  this.composer.addPass(marsMask) //添加火星掩膜通道,使后续处理效果只作用于该通道上的物体
  this.composer.addPass(effectColorify) //火星做Colorify效果处理
  this.composer.addPass(clearMask) // 清除火星掩膜通道
  this.composer.addPass(earthMask) //添加地球掩膜通道,使后续处理效果只作用于该通道上的物体
  this.composer.addPass(effectSepia) //地球做Sepia效果处理
  this.composer.addPass(clearMask) // 清除地球掩膜通道
  this.composer.addPass(effectCopy) //添加效果复制通道,将最终的结果复制到屏幕
}
4. demo代码
<template>
  <div id="container" />
</template>

<script>
import * as THREE from 'three'
import { OrbitControls } from 'three/examples/jsm/controls/OrbitControls.js'
import { EffectComposer } from 'three/examples/jsm/postprocessing/EffectComposer.js'
import { RenderPass } from 'three/examples/jsm/postprocessing/RenderPass.js'
import { ShaderPass } from 'three/examples/jsm/postprocessing/ShaderPass.js'
import {
  MaskPass,
  ClearMaskPass
} from 'three/examples/jsm/postprocessing/MaskPass.js'
import { CopyShader } from 'three/examples/jsm/shaders/CopyShader.js'
import { SepiaShader } from 'three/examples/jsm/shaders/SepiaShader.js'
import { ColorifyShader } from 'three/examples/jsm/shaders/ColorifyShader.js'

export default {
  data() {
    return {
      camera: null,
      cameraBG: null,
      sceneEarth: null,
      sceneMars: null,
      sceneBG: null,
      earchMesh: null,
      marsMesh: null,
      renderer: null,
      orbitControls: null,
      clock: null,
      composer: null
    }
  },
  mounted() {
    this.init()
  },
  methods: {
    formatTooltip(val) {
      return val
    },
    // 初始化
    init() {
      this.createScene() // 创建场景
      this.createModels() // 创建模型
      this.createLight() // 创建光源
      this.createCamera() // 创建相机
      this.createRender() // 创建渲染器
      this.createControls() // 创建控件对象
      this.createComposer() // 创建效果组合器
      this.render() // 渲染
    },
    // 创建场景
    createScene() {
      this.sceneEarth = new THREE.Scene()
      this.sceneMars = new THREE.Scene()
      this.sceneBG = new THREE.Scene()
    },

    // 创建模型
    createModels() {
      this.createEarth()
      this.createMars()
      this.createBG()
    },
    createEarth() {
      const publicPath = process.env.BASE_URL
      const planetTexture = new THREE.TextureLoader().load(
        `${publicPath}textures/planets/Earth.png`
      )
      const specularTexture = new THREE.TextureLoader().load(
        `${publicPath}textures/planets/EarthSpec.png`
      )
      const normalTexture = new THREE.TextureLoader().load(
        `${publicPath}textures/planets/EarthNormal.png`
      )

      const planetMaterial = new THREE.MeshPhongMaterial()
      planetMaterial.specularMap = specularTexture
      planetMaterial.specular = new THREE.Color(0x4444aa)
      // planetMaterial.shininess = 2

      planetMaterial.normalMap = normalTexture
      planetMaterial.map = planetTexture
      // planetMaterial.shininess = 150
      const sphereGeom = new THREE.SphereGeometry(16, 40, 40)
      this.earchMesh = new THREE.Mesh(sphereGeom, planetMaterial)
      this.earchMesh.position.x = -10

      this.sceneEarth.add(this.earchMesh)
    },
    createMars() {
      const publicPath = process.env.BASE_URL
      const planetTexture = new THREE.TextureLoader().load(
        `${publicPath}textures/planets/Mars_2k-050104.png`
      )
      const normalTexture = new THREE.TextureLoader().load(
        `${publicPath}textures/planets/Mars-normalmap_2k.png`
      )

      const planetMaterial = new THREE.MeshPhongMaterial()
      planetMaterial.normalMap = normalTexture
      planetMaterial.map = planetTexture

      const sphereGeom = new THREE.SphereGeometry(8, 40, 40)
      this.marsMesh = new THREE.Mesh(sphereGeom, planetMaterial)
      this.marsMesh.position.x = 20

      this.sceneMars.add(this.marsMesh)
    },

    createBG() {
      const publicPath = process.env.BASE_URL
      const materialColor = new THREE.MeshBasicMaterial({
        map: new THREE.TextureLoader().load(
          `${publicPath}textures/starry-deep-outer-space-galaxy.jpg`
        ),
        depthTest: false
      })
      const bgPlane = new THREE.Mesh(
        new THREE.PlaneGeometry(1, 1),
        materialColor
      )
      bgPlane.position.z = -100
      bgPlane.scale.set(window.innerWidth * 2, window.innerHeight * 2, 1)
      this.sceneBG.add(bgPlane)
    },

    // 创建光源
    createLight() {
      //给地球场景添加光源
      const ambientLight1 = new THREE.AmbientLight(0x181818) // 创建环境光
      this.sceneEarth.add(ambientLight1) // 将环境光添加到场景

      const spotLight1 = new THREE.DirectionalLight(0xffffff)
      spotLight1.position.set(550, 100, 550)
      spotLight1.intensity = 0.6
      this.sceneEarth.add(spotLight1)

      //给火星场景添加光源
      const ambientLight2 = new THREE.AmbientLight(0x181818) // 创建环境光
      this.sceneMars.add(ambientLight2) // 将环境光添加到场景

      const spotLight2 = new THREE.DirectionalLight(0xffffff)
      spotLight2.position.set(550, 100, 550)
      spotLight2.intensity = 0.6
      this.sceneMars.add(spotLight2)
    },
    // 创建相机
    createCamera() {
      const element = document.getElementById('container')
      const width = element.clientWidth // 窗口宽度
      const height = element.clientHeight // 窗口高度
      const k = width / height // 窗口宽高比
      // PerspectiveCamera( fov, aspect, near, far )
      this.camera = new THREE.PerspectiveCamera(45, k, 0.1, 1000)
      this.camera.position.set(-15, 30, 40) // 设置相机位置

      this.camera.lookAt(new THREE.Vector3(0, 0, 0)) // 设置相机方向

      //创建输出背景的相机
      this.cameraBG = new THREE.OrthographicCamera(
        -width,
        width,
        height,
        -height,
        -10000,
        10000
      )
      this.cameraBG.position.z = 50
    },
    // 创建渲染器
    createRender() {
      const element = document.getElementById('container')
      this.renderer = new THREE.WebGLRenderer({ antialias: true, alpha: true })
      this.renderer.setSize(element.clientWidth, element.clientHeight) // 设置渲染区域尺寸
      this.renderer.shadowMap.enabled = true // 显示阴影
      // this.renderer.shadowMap.type = THREE.PCFSoftShadowMap
      this.renderer.setClearColor(0x000000, 1) // 设置背景颜色
      element.appendChild(this.renderer.domElement)
    },

    // 创建效果组合器
    createComposer() {
      //创建背景渲染器通道
      const backgroundRenderPass = new RenderPass(this.sceneBG, this.cameraBG)

      //创建地球渲染器通道
      const earthRenderPass = new RenderPass(this.sceneEarth, this.camera)
      earthRenderPass.clear = false // 是否清除前一帧绘图,默认true

      //创建火星渲染器通道
      const marsRenderPass = new RenderPass(this.sceneMars, this.camera)
      marsRenderPass.clear = false // 是否清除前一帧绘图,默认true

      //创建效果复制通道
      const effectCopy = new ShaderPass(CopyShader)
      effectCopy.renderToScreen = true

      //清除掩膜通道
      const clearMask = new ClearMaskPass()

      //创建包含地球的掩膜通道
      const earthMask = new MaskPass(this.sceneEarth, this.camera)

      //创建包含火星的掩膜通道
      const marsMask = new MaskPass(this.sceneMars, this.camera)

      //创建SepiaShader后期处理通道
      const effectSepia = new ShaderPass(SepiaShader)

      //创建ColorifyShader后期处理通道
      const effectColorify = new ShaderPass(ColorifyShader)
      effectColorify.uniforms['color'].value.setRGB(0.5, 0.5, 1)

      this.composer = new EffectComposer(this.renderer)
      this.composer.renderTarget1.stencilBuffer = true
      this.composer.renderTarget2.stencilBuffer = true

      this.composer.addPass(backgroundRenderPass) //添加背景渲染通道
      this.composer以上是关于使用vue学习three.js之渲染后期处理-使用MaskPass掩膜通道实现多个场景中地球与火星使用不同后期处理效果,不同场景的物体在同一屏幕展示,星空背景展示的主要内容,如果未能解决你的问题,请参考以下文章