PC 端网页特效-offset 系列及学习案例
Posted GoldenaArcher
tags:
篇首语:本文由小常识网(cha138.com)小编为大家整理,主要介绍了PC 端网页特效-offset 系列及学习案例相关的知识,希望对你有一定的参考价值。
PC 端网页特效-offset 系列及学习案例
学习地址还是在这里:JavaScript 基础语法-dom-bom-js-es6 新语法-jQuery-数据可视化 echarts 黑马 pink 老师前端入门基础视频教程(500 多集)持续
总归说学完一个是一个,不能继续下次一定了
offset 即 元素偏移量,PC 端的网页特效是一个系列:
- offset
- client
- scroll
- 动画函数封装
不过因为每周学习的进度关系,所以会将 PC 端网页特效做一个系列的笔记。
其学习案例有 3 个:
- 基础的 offset 应用案例,即获得鼠标在盒子中的坐标
- 拖曳窗口
- 仿京东放大镜
offset 概述
offset 即偏移量,使用 offset 系列相关属性可以 动态的 获取该元素的位置(偏移)、大小等,如:
- 元素距离带有定位父元素的位置
- 获取元素自身的大小(宽度高度)
注:返回的数值不带单位
offset 系列常用的属性包括:
-
element.offsetParent返回作为该元素带有定位的父级元素,如果父级元素没有定位,则返回
body注意,
parentNode和offsetParent还是有本质上的区别的:parentNode返回的是直接父级元素,offsetParent返回的是带有定位的父级元素。 -
element.offsetTop返回元素带有定位父元素上方的偏移
-
element.offsetLeft返回元素带有定位父元素左边框的偏移
-
element.offsetWidth返回自身包括
padding, 边框, 内容区的宽度,返回数值不带单位 -
element.offsetHeight返回自身包括
padding, 边框, 内容区的高度,返回数值不带单位
offset 和 style 的区别
| offset | style |
|---|---|
| offset 可以得到任意样式表中的样式值 | style 只能得到行内样式表中的样式值,无法获得内嵌样式 |
| offset 系列获得的数值是没有单位的 | style.width 获得的是带有单位的字符串 |
| offsetWidth 包含 padding+border+width | style.width 获得不包含 padding 和 border 的值 |
| offsetWidth 等属性是只读属性,只能获取不能赋值 | style 属性是可读写属性,style.width 可以获取也可以赋值 |
| 只想要获取元素大小位置的时候,用 offset 更合适 | 要对元素样式进行修改的话,使用 style 更合适 |
offset 学习案例
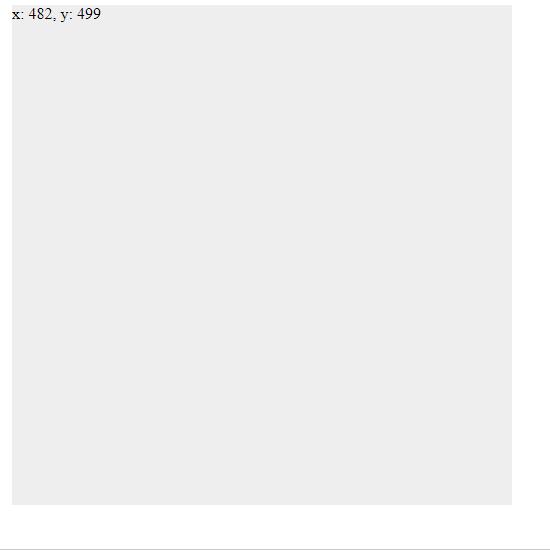
即获得鼠标在盒子中的坐标
效果图:
<!DOCTYPE html>
<html lang="en">
  <head>
    <meta charset="UTF-8" />
    <meta http-equiv="X-UA-Compatible" content="IE=edge" />
    <meta name="viewport" content="width=device-width, initial-scale=1.0" />
    <title>Document</title>
    <style>
      .box {
        width: 500px;
        height: 500px;
        background-color: #eee;
        margin-left: 50px;
      }
    </style>
  </head>
  <body>
    <div class="box"></div>
    <script>
      // 目标:
      // 在盒子中点击,想要获得鼠标距离盒子左右的距离
      // 实现:
      // 1. 获得鼠标在页面中的坐标,e.pageX, e.pageY
      // 2. 获得盒子到页面中的距离, box.offsetLeft, box.offsetTop
      // 3. 两者相减就能够获得鼠标在盒子中的坐标
      const box = document.querySelector(".box");
      box.addEventListener("mousemove", function (e) {
        // console.log(e.pageX, e.pageY);
        // console.log(box.offsetLeft, box.offsetTop);
        const x = e.pageX - this.offsetLeft;
        const y = e.pageY - this.offsetTop;
        box.textContent = `x: ${x}, y: ${y}`;
      });
    </script>
  </body>
</html>
拖曳窗口
这中还有一些 modal 的东西,不过效果图上没有展示出来。
效果图:
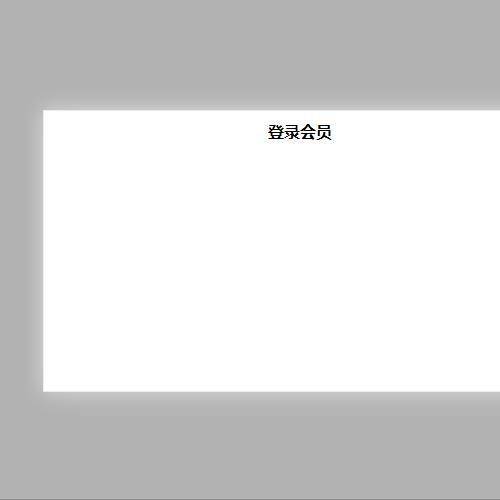
实现是部分完整的——input 里面的东西我没有加进去,主要效果还是页面上的东西。
<!DOCTYPE html>
<html lang="en">
  <head>
    <meta charset="UTF-8" />
    <meta http-equiv="X-UA-Compatible" content="IE=edge" />
    <meta name="viewport" content="width=device-width, initial-scale=1.0" />
    <title>Document</title>
    <style>
      * {
        margin: 0;
        padding: 0;
      }
      .login,
      .modal {
        display: none;
      }
      .login {
        width: 512px;
        height: 280px;
        position: fixed;
        border: #ebebeb solid 1px;
        left: 50%;
        top: 50%;
        background-color: #fff;
        box-shadow: 0 0 20px #ddd;
        z-index: 999;
        transform: translate(-50%, -50%);
        text-align: center;
      }
      .modal {
        position: absolute;
        top: 0;
        left: 0;
        width: 100vw;
        height: 100vh;
        background-color: rgba(0, 0, 0, 0.3);
        z-index: 998;
      }
      .login-content {
        margin: 100px auto;
        text-align: center;
      }
      .login-content h3:hover,
      .closeBtn:hover {
        cursor: pointer;
      }
      .closeBtn {
        position: absolute;
        right: 10px;
        top: 10px;
      }
      .login h4 {
        margin-top: 10px;
      }
      .login h4:hover {
        cursor: move;
      }
    </style>
  </head>
  <body>
    <div class="login-content">
      <h3 id="openLogin">点击弹出登录框</h3>
    </div>
    <div class="login">
      <div class="closeBtn" id="closeBtn">关闭</div>
      <h4 class="loginHeader">登录会员</h4>
    </div>
    <div class="modal"></div>
    <script>
      // 获取元素
      const login = document.querySelector(".login");
      const modal = document.querySelector(".modal");
      const closeBtn = document.querySelector("#closeBtn");
      const openLogin = document.querySelector("#openLogin");
      // 点击显示元素
      openLogin.addEventListener("click", () => {
        modal.style.display = "block";
        login.style.display = "block";
      });
      closeBtn.addEventListener("click", () => {
        modal.style.display = "none";
        login.style.display = "none";
      });
      // 实现拖拽移动功能
      // 1. 鼠标按下获得鼠标在盒子内的坐标
      const loginHeader = document.querySelector(".loginHeader");
      loginHeader.addEventListener("mousedown", function (e) {
        const x = e.pageX - login.offsetLeft;
        const y = e.pageY - login.offsetTop;
        const move = function (e) {
          login.style.left = `${e.pageX - x}px`;
          login.style.top = `${e.pageY - y}px`;
        };
        // 2. 移动鼠标
        document.addEventListener("mousemove", move);
        document.addEventListener("mouseup", function () {
          document.removeEventListener("mousemove", move);
        });
      });
    </script>
  </body>
</html>
仿京东放大镜
其他的部分是在品优购项目里面实现的,这个我还没做,所以没法复用页面。
无奈只好就直接用一个拉一个 div 先做案例吧。代码都是一样的,不知道为什么在自己电脑上好抖……晚点继续研究一下。另外就是代码注释还是不够,这也是个毛病。
实现代码:
<!DOCTYPE html>
<html lang="en">
  <head>
    <meta charset="UTF-8" />
    <meta http-equiv="X-UA-Compatible" content="IE=edge" />
    <meta name="viewport" content="width=device-width, initial-scale=1.0" />
    <title>Document</title>
    <style>
      .magnifying-glass {
        position: absolute;
        left: 100px;
        margin: 50px auto;
        min-height: 300px;
        border: 1px solid #ccc;
      }
      .modal {
        display: block;
        position: absolute;
        top: 0;
        left: 0;
        width: 300px;
        height: 300px;
        background-color: #fede4f;
        opacity: 0.5;
      }
      .modal:hover {
        cursor: move;
      }
      .enlarge-preview-wrapper {
        display: block;
        position: absolute;
        left: 460px;
        top: 0;
        width: 500px;
        height: 500px;
        overflow: hidden;
        border: 1px solid #ccc;
      }
      .enlarge-preview {
        position: absolute;
        top: 0;
        left: 0;
        width: 150%;
        height: auto;
      }
    </style>
  </head>
  <body>
    <div class="magnifying-glass">
      <img
        src="http://img10.360buyimg.com/n1/s450x450_jfs/t1/174266/32/5661/92244/607eb66fEcb90c325/8778d62b01b2c21b.jpg"
        class="preview-img"
      />
      <div class="modal"></div>
      <div class="enlarge-preview-wrapper">
        <img
          class="enlarge-preview"
          src="http://img10.360buyimg.com/n1/s450x450_jfs/t1/174266/32/5661/92244/607eb66fEcb90c325/8778d62b01b2c21b.jpg"
          alt=""
          srcset=""
        />
      </div>
    </div>

    <script>
      const previewImg = document.querySelector(".preview-img");
      const modal = document.querySelector(".modal");
      const enlargeImgWrapper = document.querySelector(
        ".enlarge-preview-wrapper"
      );
      // 案例分析
      // 1. 模块分割
      //      a. 鼠标经过小盒子图片,黄色的遮罩层和大图片盒子要被显示
      previewImg.addEventListener("mouseover", function (e) {
        modal.style.display = "block";
        enlargeImgWrapper.style.display = "block";
      });
      previewImg.addEventListener("mouseout", function (e) {
        modal.style.display = "none";
        enlargeImgWrapper.style.display = "none";
      });
      //      b. 黄色的遮罩层更随鼠标移动
      //          - 把鼠标坐标给遮挡层不合适,因为遮挡层坐标以父元素为准
      //          - 首先获得鼠标在盒子内的坐标
      //          - 获得的值作为遮挡层的 left 和 top
      previewImg.addEventListener("mousemove", function (e) {
        // 1. 先计算鼠标在盒子内的坐标
        const x = e.pageX - this.parentNode.offsetLeft;
        const y = e.pageY - this.parentNode.offsetTop;
        const maxX = this.offsetWidth - modal.offsetWidth;
        const maxY = this.offsetHeight - modal.offsetHeight;
        // 2. 计算最大最小空间
        let modalX = x - modal.offsetWidth / 2;
        modalX = modalX < 0 ? 0 : modalX > maxX ? maxX : modalX;
        let modalY = y - modal.offsetHeight / 2;
        modalY = modalY < 0 ? 0 : modalY > maxY ? maxY : modalY;

        modal.style.left = modalX + "px";
        modal.style.top = modalY + "px";
        //      c. 大图片跟随黄色遮罩层移动
        // 大图片的移动距离 = 遮挡层移动距离 * 大图片最大移动距离 /遮挡层最大移动距离
        const enlargedImg = document.querySelector(".enlarge-preview");
        const modalMax =
          enlargedImg.offsetWidth - enlargeImgWrapper.offsetWidth;
        const enlargedX = (modalX * modalMax) / maxX;
        const enlargedY = (modalY * modalMax) / maxX;
        enlargedImg.style.left = -enlargedX + "px";
        enlargedImg.style.top = -enlargedY + "px";
      });
    </script>
  </body>
</html>
以上是关于PC 端网页特效-offset 系列及学习案例的主要内容,如果未能解决你的问题,请参考以下文章