使用vue学习three.js之加载和使用纹理-使用TextureLoader加载纹理,使用纹理材质创建模型
Posted 点燃火柴
tags:
篇首语:本文由小常识网(cha138.com)小编为大家整理,主要介绍了使用vue学习three.js之加载和使用纹理-使用TextureLoader加载纹理,使用纹理材质创建模型相关的知识,希望对你有一定的参考价值。
使用纹理材质创建模型
- 1.demo效果
- 2. 相关知识点
- 2.1 Texture纹理介绍
- 2.2 Texture纹理属性介绍
- 2.2.1 image(image)
- 2.2.2 mipmaps(array)
- 2.2.3 mapping(number)
- 2.2.4 wrapS(number)
- 2.2.5 wrapT(number)
- 2.2.6 magFilter(number)
- 2.2.7 minFilter(number)
- 2.2.8 anisotropy(number)
- 2.2.9 format(number)
- 2.2.10 type(number)
- 2.2.11 offset(Vector2)
- 2.2.12 repeat (Vector2)
- 2.2.13 rotation (number)
- 2.2.14 center (Vector2)
- 2.2.15 matrixAutoUpdate(boolean)
- 2.2.16 matrix(Matrix3)
- 2.2.17 generateMipmaps( boolean)
- 2.2.18 premultiplyAlpha(boolean)
- 2.2.19 flipY(boolean)
- 2.2.20 unpackAlignment(number)
- 2.2.21 encoding(number)
- 2.2.22 onUpdate(function)
- 2.2.23 needsUpdate(boolean)
- 2.3 加载纹理并创建网格对象
- 3. demo代码
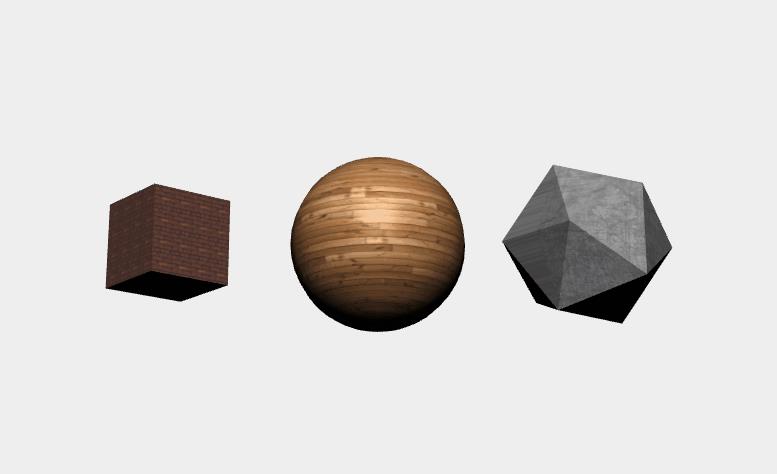
1.demo效果

2. 相关知识点
2.1 Texture纹理介绍
纹理 就是包在几何体上的一层外表皮,就像包在墙面上的贴纸一样
创建纹理 创建纹理一般有两种方式
- 使用 Texture 构造
Texture( image, mapping, wrapS, wrapT, magFilter, minFilter, format, type, anisotropy, encoding ) - 使用纹理加载器加载纹理
var texture = new THREE.TextureLoader().load( “textures/xx.jpg” )
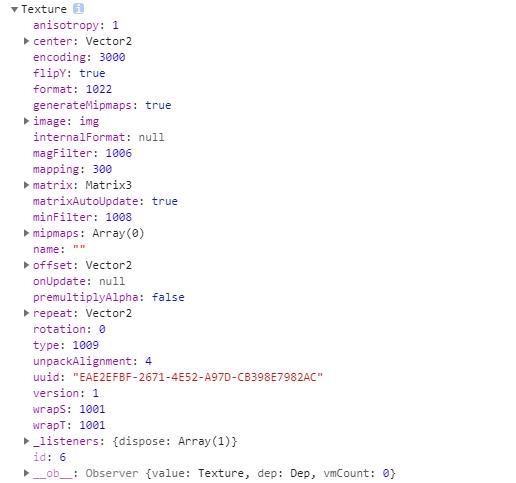
纹理有很多属性,先来看看从控制台输入的纹理对象长什么样

2.2 Texture纹理属性介绍
2.2.1 image(image)
图片对象,通常使用 ImageUtils 或 ImageLoader 类来创建。Image对象可以包括图像 (比如 PNG, JPG, GIF, DDS), 视频 (MP4, OGG/OGV), 或者立方体贴图。
2.2.2 mipmaps(array)
用户给定的mipmap数组,Mipmap数组是预先生成一系列以2为倍数缩小的纹理序列,在采样纹理时根据图形的大小自动选择相近等级的Mipmap进行采样,用来消除远处物体出现的纹理重叠现象
2.2.3 mapping(number)
映射模式,图像将如何应用到物体(对象)上。默认值是THREE.UVMapping对象类型, 即UV坐标将被用于纹理映射。
映射模式可选值
THREE.CubeReflectionMapping:立方体反射映射
THREE.CubeRefractionMapping:立方体折射映射
THREE.EquirectangularReflectionMapping:圆柱反射映射
THREE.EquirectangularRefractionMapping:圆柱折射映射
THREE.SphericalReflectionMapping:球面反射映射
2.2.4 wrapS(number)
纹理在水平方向上纹理包裹方式,在UV映射中对应于U,默认THREE.ClampToEdgeWrapping,表示纹理边缘与网格的边缘贴合。中间部分等比缩放
另外两个可选值为
THREE.RepeatWrapping:重复平铺。
THREE.MirroredRepeatWrapping:重复平铺。每一次重复前先镜像,使用镜像后的生成的纹理重复平铺
2.2.5 wrapT(number)
这个值定义了纹理贴图在垂直方向上将如何包裹,
纹理在垂直方向上纹理包裹方式,在UV映射中对应于V,默认也是THREE.ClampToEdgeWrapping,可选项也与属性wrapS一样
2.2.6 magFilter(number)
放大滤镜 当一个纹素覆盖大于一个像素时,贴图的采样方式。默认值为THREE.LinearFilter, 表示获取四个最接近的纹素,并在他们之间进行双线性插值,返回距离指定的纹理坐标最近的四个纹理元素的加权平均值。 magFilter属性还有另一个选项是THREE.NearestFilter,它将使用与纹理坐标最接近的纹素的值。
2.2.7 minFilter(number)
缩小滤镜 当一个纹素覆盖小于一个像素时,贴图的采样方式。默认值为THREE.LinearMipMapLinearFilter, 表示它将使用mipmapping以及三次线性滤波器采样。
缩小滤镜的可选值
THREE.NearestFilter:返回与指定纹理坐标最接近的纹理元素的值。
THREE.NearestMipMapNearestFilter:选择与被纹理化像素的尺寸最匹配的mipmap,并且与指定纹理坐标最接近的纹理元素的值。
THREE.NearestMipMapLinearFilter:选择与被纹理化像素的尺寸最接近的两个mipmap,从每个mipmap中找出与指定纹理坐标最接近的纹理元素的值。最终将这两个纹理值加权平均。
THREE.LinearFilter:返回距离指定的纹理坐标最近的四个纹理元素的加权平均值
THREE.LinearMipMapNearestFilter:选择与被纹理化像素的尺寸最匹配的mipmap,并在这个mipmap上取与距离指定的纹理坐标最近的四个纹理元素的加权平均值生成纹理值。
THREE.LinearMipMapLinearFilter:选择与被纹理化像素的尺寸最接近的两个mipmap,并以[LinearFilter]为标准来从每个mipmap中生成纹理值。最终的纹理值是这两个值的加权平均
2.2.8 anisotropy(number)
各向异性,最高纹素密度的像素的样本数。 默认情况下,这个值为1,较高的值将会产生比基本的mipmap更清晰的效果,但需要多纹理样本。 可以使用renderer.getMaxAnisotropy() 来查询GPU中各向异性的最大有效值;这个值通常是2的幂。
2.2.9 format(number)
纹理格式,默认值为THREE.RGBAFormat, 使用TextureLoader载入JPG图片时这个值将自动设置为THREE.RGBFormat。
纹理格式的可选值
THREE.AlphaFormat:对应于GL_ALPHA。Alpha 值
THREE.RGBFormat:Red, Green, Blue 三原色值
THREE.RGBAFormat:Red, Green, Blue 和 Alpha 值
THREE.LuminanceFormat:灰度值
THREE.LuminanceAlphaFormat:灰度值和 Alpha 值
THREE.RGBEFormat
2.2.10 type(number)
类型,这个值必须与.format相对应。默认值为THREE.UnsignedByteType, 它将会被用于绝大多数纹理格式
类型的可选值
THREE.UnsignedByteType:无符号8位整形值(1个字节)
THREE.ByteType:带符号8位整形值(1个字节)
THREE.ShortType:带符号16位整形值(2个字节)
THREE.UnsignedShortType:无符号16未整形值(2个字节)
THREE.IntType:带符号32位整形值(4个字节)
THREE.UnsignedIntType:无符号32位整形值(4个字节)
THREE.FloatType:单精度浮点型(4个字节)
THREE.HalfFloatType:半浮点型
2.2.11 offset(Vector2)
纹理偏移量
纹理在单次重复时,从一开始将分别在U、V方向上偏移多少。 这个值的范围通常在0.0之间1.0。 请注意:这一属性是一个非常方便的修改器,仅仅影响纹理对模型上第一组UV的应用。 如果该纹理被用于需要额外的UV集的贴图(例如一些成品材质中的aoMap或lightMap), 这些UV必须被手动调整来实现所期望的偏移。
2.2.12 repeat (Vector2)
重复数量
纹理将在表面上,分别在U、V方向重复多少次。如果这个值在任意方向上设置为大于1, 则对应的Wrap参数应当也被设为THREE.RepeatWrapping或THREE.MirroredRepeatWrapping, 以实现所期望的平铺效果。 请注意:这一属性是一个非常方便的修改器,仅仅影响纹理对模型上第一组UV的应用。 如果该纹理被用于需要额外的UV集的贴图(例如一些成品材质中的aoMap或lightMap), 这些UV必须被手动调整来实现所期望的重复。
2.2.13 rotation (number)
纹理将围绕中心点旋转多少度,单位为弧度(rad)。正值为逆时针方向旋转,默认值为0。
2.2.14 center (Vector2)
旋转中心点,(0.5, 0.5)对应纹理的正中心。默认值为(0,0),即左下角
2.2.15 matrixAutoUpdate(boolean)
是否从纹理的.offset、.repeat、.rotation和.center属性更新纹理的UV变换矩阵(uv-transform .matrix)。 默认值为true。 如果你要直接指定纹理的变换矩阵,请将其设为false。
2.2.16 matrix(Matrix3)
纹理的UV变换矩阵。 当纹理的.matrixAutoUpdate属性为true时, 由渲染器从纹理的.offset、.repeat、.rotation和.center属性中进行更新。 当.matrixAutoUpdate属性为false时,该矩阵可以被手动设置。 默认值为单位矩阵。
2.2.17 generateMipmaps( boolean)
是否为纹理生成mipmap(如果可用)。默认为true。 如果你手动生成mipmap,请将其设为false
2.2.18 premultiplyAlpha(boolean)
默认为false,这是PNG图像的规范。 如果RGB值已被Alpha预乘,请将其设为true
2.2.19 flipY(boolean)
默认为true。翻转图像的Y轴以匹配WebGL纹理坐标空间。
2.2.20 unpackAlignment(number)
默认为4。指定内存中每个像素行起点的对齐要求。 允许的值为1(字节对齐)、2(行对齐到偶数字节)、4(字对齐)和8(行从双字边界开始)
2.2.21 encoding(number)
默认值为THREE.LinearEncoding。
编码的可选值
THREE.LinearEncoding
THREE.sRGBEncoding
THREE.GammaEncoding
THREE.RGBEEncoding
THREE.LogLuvEncoding
THREE.RGBM7Encoding
THREE.RGBM16Encoding
THREE.RGBDEncoding
THREE.BasicDepthPacking
THREE.RGBADepthPacking
请注意,如果在材质被使用之后,纹理贴图中这个值发生了改变, 需要触发Material.needsUpdate,来使得这个值在着色器中实现。
2.2.22 onUpdate(function)
一个回调函数,在纹理被更新后调用。 (例如,当needsUpdate被设为true且纹理被使用。)
2.2.23 needsUpdate(boolean)
将其设置为true,以便在下次使用纹理时触发一次更新。 这对于设置包裹模式尤其重要
2.3 加载纹理并创建网格对象
首先使用TextureLoader加载纹理贴图,然后用它当纹理贴图创建材质,最后使用材质和几何对象创建网格对象,具体代码如下
createMesh(geom, imageFile) {
  const publicPath = process.env.BASE_URL //获取环境变量URL
  const loader = new THREE.TextureLoader() //创建纹理加载器
  const texture = loader.load(`${publicPath}textures/general/` + imageFile) //加载纹理
  const mat = new THREE.MeshPhongMaterial({ map: texture }) // 加载的纹理作为纹理贴图创建材质

  const mesh = new THREE.Mesh(geom, mat)
  return mesh
}
3. demo代码
<template>
  <div id="container" />
</template>

<script>
import * as THREE from 'three'
import { OrbitControls } from 'three/examples/jsm/controls/OrbitControls.js'
export default {
  data() {
    return {
      ratationSpeed: 0.01,
      polyhedron: null,
      sphere: null,
      cube: null,
      camera: null,
      scene: null,
      renderer: null,
      controls: null
    }
  },
  mounted() {
    this.init()
  },
  methods: {
    formatTooltip(val) {
      return val
    },
    // 初始化
    init() {
      this.createScene() // 创建场景
      this.createModels() // 创建模型
      this.createLight() // 创建光源
      this.createCamera() // 创建相机
      this.createRender() // 创建渲染器
      this.createControls() // 创建控件对象
      this.render() // 渲染
    },
    // 创建场景
    createScene() {
      this.scene = new THREE.Scene()
    },

    // 创建模型
    createModels() {
      this.polyhedron = this.createMesh(
        new THREE.IcosahedronGeometry(5, 0),
        'metal-rust.jpg'
      )
      this.polyhedron.position.x = 12
      this.scene.add(this.polyhedron)

      this.sphere = this.createMesh(
        new THREE.SphereGeometry(5, 20, 20),
        'floor-wood.jpg'
      )
      this.scene.add(this.sphere)

      this.cube = this.createMesh(
        new THREE.BoxGeometry(5, 5, 5),
        'brick-wall.jpg'
      )
      this.cube.position.x = -12
      this.scene.add(this.cube)
    },

    createMesh(geom, imageFile) {
      const publicPath = process.env.BASE_URL //获取环境变量URL
      const loader = new THREE.TextureLoader() //创建纹理加载器
      const texture = loader.load(`${publicPath}textures/general/` + imageFile) //加载纹理
      const mat = new THREE.MeshPhongMaterial({ map: texture }) // 加载的纹理作为纹理贴图创建材质

      const mesh = new THREE.Mesh(geom, mat)
      return mesh
    },

    // 创建光源
    createLight() {
      // 环境光
      const ambientLight = new THREE.AmbientLight(0x141414, 0.1) // 创建环境光
      this.scene.add(ambientLight) // 将环境光添加到场景

      const light = new THREE.DirectionalLight() // 创建平行光
      light.position.set(0, 30, 20)
      this.scene.add(light)
    },
    // 创建相机
    createCamera() {
      const element = document.getElementById('container')
      const width = element.clientWidth // 窗口宽度
      const height = element.clientHeight // 窗口高度
      const k = width / height // 窗口宽高比
      // PerspectiveCamera( fov, aspect, near, far )
      this.camera = new THREE.PerspectiveCamera(35, k, 0.1, 1000)

      this.camera.position.set(0, 12, 28) // 设置相机位置

      this.camera.lookAt(new THREE.Vector3(0, 0, 0)) // 设置相机方向
      this.scene.add(this.camera)
    },
    // 创建渲染器
    createRender() {
      const element = document.getElementById('container')
      this.renderer = new THREE.WebGLRenderer({ antialias: true, alpha: true })
      this.renderer.setSize(element.clientWidth, element.clientHeight) // 设置渲染区域尺寸
      // this.renderer.shadowMap.enabled = true // 显示阴影
      // this.renderer.shadowMap.type = THREE.PCFSoftShadowMap
      this.renderer.setClearColor(0xeeeeee, 1) // 设置背景颜色
      element.appendChild(this.renderer.domElement)
    },

    // 更新属性
    updateFun() {
      this.polyhedron.rotation.y = this.ratationSpeed += 0.01
      this.polyhedron.rotation.x = this.ratationSpeed
      this.cube.rotation.y = this.ratationSpeed
      this.cube.rotation.x = this.ratationSpeed
      this.sphere.rotation.y = this.ratationSpeed
      this.sphere.rotation.x = this.ratationSpeed
    },
    render() {
      this.updateFun()
      this.renderer.render(this.scene, this.camera)
      requestAnimationFrame(this.render)
    },
    // 创建控件对象
    createControls() {
      this.controls = new OrbitControls(this.camera, this.renderer.domElement)
    }
  }
}
</script>
<style>
#container {
  position: absolute;
  width: 100%;
  height: 100%;
}
.controls-box {
  position: absolute;
  right: 5px;
  top: 5px;
  width: 300px;
  padding: 10px;
  background-color: #fff;
  border: 1px solid #c3c3c3;
}
.vertice-span {
  line-height: 38px;
  padding: 0 2px 0 10px;
}
</style>
以上是关于使用vue学习three.js之加载和使用纹理-使用TextureLoader加载纹理,使用纹理材质创建模型的主要内容,如果未能解决你的问题,请参考以下文章