Kubernetes 中部署 Maven 私有仓库 Sonatype Nexus3
Posted saynaihe
tags:
篇首语:本文由小常识网(cha138.com)小编为大家整理,主要介绍了Kubernetes 中部署 Maven 私有仓库 Sonatype Nexus3相关的知识,希望对你有一定的参考价值。
背景:
java程序员们想弄一个私有maven仓库,嗯 正常的是用nexus or artfactory? artfactory是两三年前听jfrog的讲座知道的,程序说他原来用的nexus。那就搞一个nexus了。
基础环境参照:https://cloud.tencent.com/developer/article/1806089–kubernetes集群1.20.5版本(当然了进行了小版本升级1.21了,系列笔记中有提)
https://cloud.tencent.com/developer/article/1806896–网关层的代理traefik
https://cloud.tencent.com/developer/article/1806549–存储块腾讯云cbs
all on kubernetes 是个人的原则。就在kubernetes的环境上搭建一个私有maven仓库了。
1. nexus3 on kubernetes
注: 不做特殊说明,工具类软件我都安装在kube-ops namespace命名空间下
1. 创建pv,pvc
嗯 存储用的都是腾讯云的cbs存储
[root@sh-master-01 ~]# kubectl get storageclass
NAME      PROVISIONER                 RECLAIMPOLICY   VOLUMEBINDINGMODE   ALLOWVOLUMEEXPANSION   AGE
cbs-csi   com.tencent.cloud.csi.cbs   Delete          Immediate           false                  70d
cat pvc.yaml
apiVersion: v1
kind: PersistentVolumeClaim
metadata:
  namespace: kube-ops
  name: sonatype-nexus
  labels:
    app: sonatype-nexus

spec:
  accessModes:
  - ReadWriteOnce
  resources:
    requests:
      storage: 50Gi
  storageClassName: cbs-csi
  selector:
    matchLabels:
      app: sonatype-nexus
kubectl apply -f pvc.yaml

嗯 好吧cbs-csi 不支持selector的标签…将就的用吧…腾讯一直讲自己今年的开源项目是最多的,但是如kubernetes-csi-tencentcloud这样的项目,三年了吧 提交了issue也没有关闭呢也没有人回复。所以能用就行了…还是适应它吧…
kubectl delete -f pvc.yaml
cat pvc.yaml
apiVersion: v1
kind: PersistentVolumeClaim
metadata:
  namespace: kube-ops
  name: sonatype-nexus
  labels:
    app: sonatype-nexus

spec:
  accessModes:
  - ReadWriteOnce
  resources:
    requests:
      storage: 50Gi
  storageClassName: cbs-csi
kubectl apply -f pvc.yaml
kubectl describe pvc sonatype-nexus -n kube-ops
kubectl get pvc -n kube-ops

2、部署 Sonatype Nexus3
cat nexus.yaml
apiVersion: v1
kind: Service
metadata:
  name: sonatype-nexus
  labels:
    app: sonatype-nexus
spec:
  type: ClusterIP
  ports:
  - name: sonatype-nexus
    port: 8081
    targetPort: 8081
    protocol: TCP
  selector:
    app: sonatype-nexus
---
apiVersion: apps/v1
kind: Deployment
metadata:
  name: sonatype-nexus
  labels:
    app: sonatype-nexus
spec:
  replicas: 1
  selector:
    matchLabels:
      app: sonatype-nexus
  template:
    metadata:
      labels:
        app: sonatype-nexus
    spec:
      containers:
      - name: sonatype-nexus
        image: sonatype/nexus3:3.30.0
        imagePullPolicy: IfNotPresent
        ports:
        - name: server
          containerPort: 8081
        livenessProbe:          #存活探针
          httpGet:
            path: /
            port: 8081
          initialDelaySeconds: 30
          periodSeconds: 30
          failureThreshold: 6
        readinessProbe:         #就绪探针
          httpGet:
            path: /
            port: 8081
          initialDelaySeconds: 30
          periodSeconds: 30
          failureThreshold: 6
        env:
        - name: INSTALL4J_ADD_VM_PARAMS  #设置分配资源大小,一定要等于或小于resources设置的值
          value: "
                  -Xms1200M
                  -Xmx1200M
                  -XX:MaxDirectMemorySize=2G
                  -XX:+UnlockExperimentalVMOptions
                  -XX:+UseCGroupMemoryLimitForHeap
                 "
        resources:      #资源限制
          limits:
            cpu: 1000m  #推荐设置为4000m以上cpu,由于资源有限,所以都是设置的最小值
            memory: 2048Mi
          requests:
            cpu: 500m
            memory: 1024Mi
        volumeMounts:
        - name: sonatype-nexus-data
          mountPath: /nexus-data
      volumes:
      - name: sonatype-nexus-data
        persistentVolumeClaim:
          claimName: sonatype-nexus     #设置为上面创建的 PVC
[root@sh-master-01 qa]# kubectl get pods -n kube-ops
NAME                              READY   STATUS             RESTARTS   AGE
gitlab-b9d95f784-7h8dt            1/1     Running            0          49d
gitlab-redis-cd56f5cc9-g9gm8      1/1     Running            0          61d
jenkins-0                         2/2     Running            0          49d
postgresql-5bd6b44d45-wzkwr       1/1     Running            1          61d
sonatype-nexus-5d98d78b86-nk75v   0/1     CrashLoopBackOff   6          9m5s
查看报错如下:
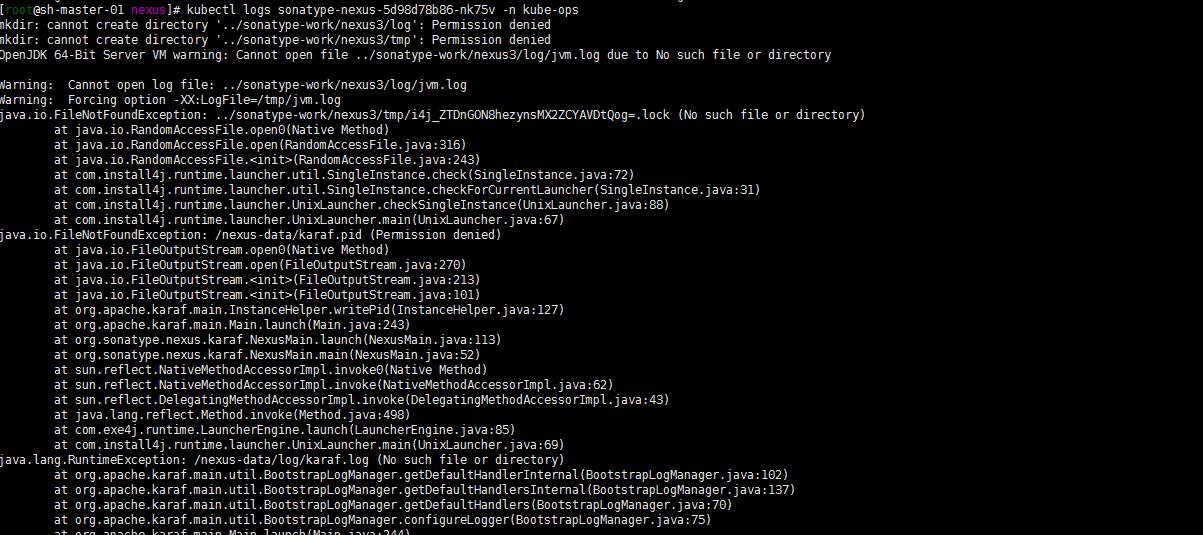
嗯权限不够 咋整…嗯 由于pvc只能挂载单个pod,先执行:
kubectl delete -f nexus.yaml -n kube-ops
然后修改nexus.yaml如下:
cat nexus.yaml
apiVersion: v1
kind: Service
metadata:
  name: sonatype-nexus
  labels:
    app: sonatype-nexus
spec:
  type: ClusterIP
  ports:
  - name: sonatype-nexus
    port: 8081
    targetPort: 8081
    protocol: TCP
  selector:
    app: sonatype-nexus
---
apiVersion: apps/v1
kind: Deployment
metadata:
  name: sonatype-nexus
  labels:
    app: sonatype-nexus
spec:
  replicas: 1
  selector:
    matchLabels:
      app: sonatype-nexus
  template:
    metadata:
      labels:
        app: sonatype-nexus
    spec:
      initContainers:
      - name: init
        image: busybox
        command: ["sh", "-c", "chown -R 200:200 /nexus-data"]
        volumeMounts:
        - name: sonatype-nexus-data
          mountPath: /nexus-data
      containers:
      - name: sonatype-nexus
        image: sonatype/nexus3:3.30.0
        imagePullPolicy: IfNotPresent
        ports:
        - name: server
          containerPort: 8081
        livenessProbe:          #存活探针
          httpGet:
            path: /
            port: 8081
          initialDelaySeconds: 30
          periodSeconds: 30
          failureThreshold: 6
        readinessProbe:         #就绪探针
          httpGet:
            path: /
            port: 8081
          initialDelaySeconds: 30
          periodSeconds: 30
          failureThreshold: 6
        env:
        - name: INSTALL4J_ADD_VM_PARAMS  #设置分配资源大小,一定要等于或小于resources设置的值
          value: "
                  -Xms1200M
                  -Xmx1200M
                  -XX:MaxDirectMemorySize=2G
                  -XX:+UnlockExperimentalVMOptions
                  -XX:+UseCGroupMemoryLimitForHeap
                 "
        resources:      #资源限制
          limits:
            cpu: 1000m  #推荐设置为4000m以上cpu,由于资源有限,所以都是设置的最小值
            memory: 2048Mi
          requests:
            cpu: 500m
            memory: 1024Mi
        volumeMounts:
        - name: sonatype-nexus-data
          mountPath: /nexus-data
      volumes:
      - name: sonatype-nexus-data
        persistentVolumeClaim:
          claimName: sonatype-nexus     #设置为上面创建的 PVC
[root@sh-master-01 nexus]# kubectl apply -f nexus.yaml -n kube-ops
service/sonatype-nexus created
deployment.apps/sonatype-nexus created
[root@sh-master-01 nexus]# kubectl get pods -n kube-ops
NAME                              READY   STATUS     RESTARTS   AGE
gitlab-b9d95f784-7h8dt            1/1     Running    0          49d
gitlab-redis-cd56f5cc9-g9gm8      1/1     Running    0          61d
jenkins-0                         2/2     Running    0          49d
postgresql-5bd6b44d45-wzkwr       1/1     Running    1          61d
sonatype-nexus-79f85cc57c-scb9b   0/1     Init:0/1   0          28s
[root@sh-master-01 nexus]# kubectl get pods -n kube-ops
NAME                              READY   STATUS            RESTARTS   AGE
gitlab-b9d95f784-7h8dt            1/1     Running           0          49d
gitlab-redis-cd56f5cc9-g9gm8      1/1     Running           0          61d
jenkins-0                         2/2     Running           0          49d
postgresql-5bd6b44d45-wzkwr       1/1     Running           1          61d
sonatype-nexus-79f85cc57c-scb9b   0/1     PodInitializing   0          2m
kubectl describe pods sonatype-nexus-79f85cc57c-scb9b -n kube-ops
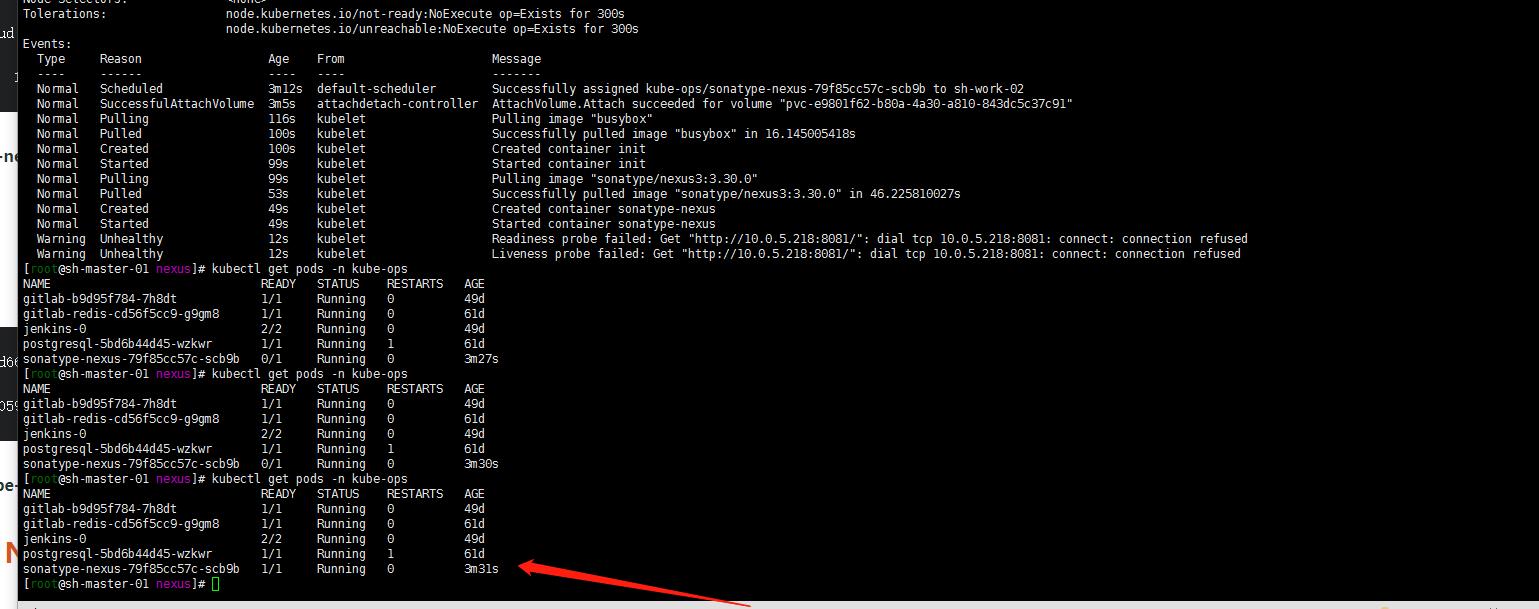
嗯可以running了
然后获取一下用户名 密码:

3. ingress代理对外暴露应用
做一个ingress 代理?
cat ingress.yaml
apiVersion: networking.k8s.io/v1
kind: Ingress
metadata:
  name: nexus-ingress
  namespace: kube-ops
  annotations:
    nginx.ingress.kubernetes.io/rewrite-target: /
    kubernetes.io/ingress.class: traefik
    traefik.ingress.kubernetes.io/router.entrypoints: web
    nginx.ingress.kubernetes.io/ssl-redirect: 'true'

spec:
  rules:
  - host: nexus.sainaihe.com
    http:
      paths:
      - pathType: Prefix
        path: /
        backend:
          service:
            name: sonatype-nexus
            port:
              number: 8081
kubectl apply -f ingress.yaml
4. 浏览器访问 nexus服务,并修改nexus初始密码:

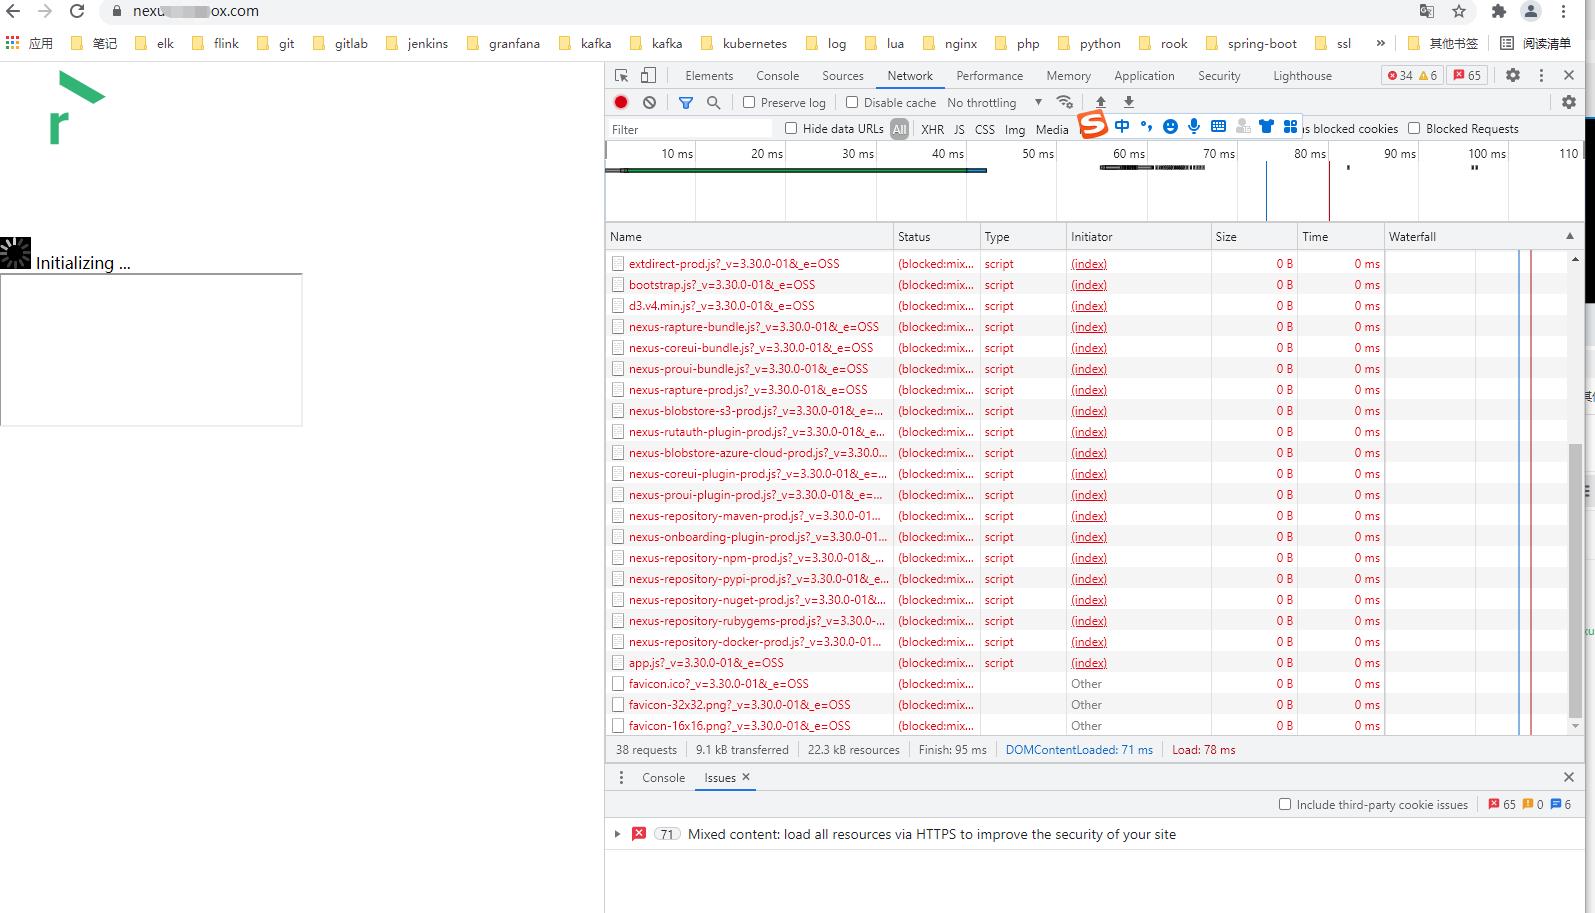
嗯跨域了可咋整? 我的两个主域名都泛域名强制跳转https了,短时间没有想好怎么解决…我就直接用了另外一个单独域名。不强跳可以直接访问了。同理我是不是可以加一个https的单独的设置…有时间了再试一下。先跑通一下nexus的代理应用…
http访问:
如下。第一次是要修改密码的关于初始密码的获取可以参照:1.2中获取初始密码的方式
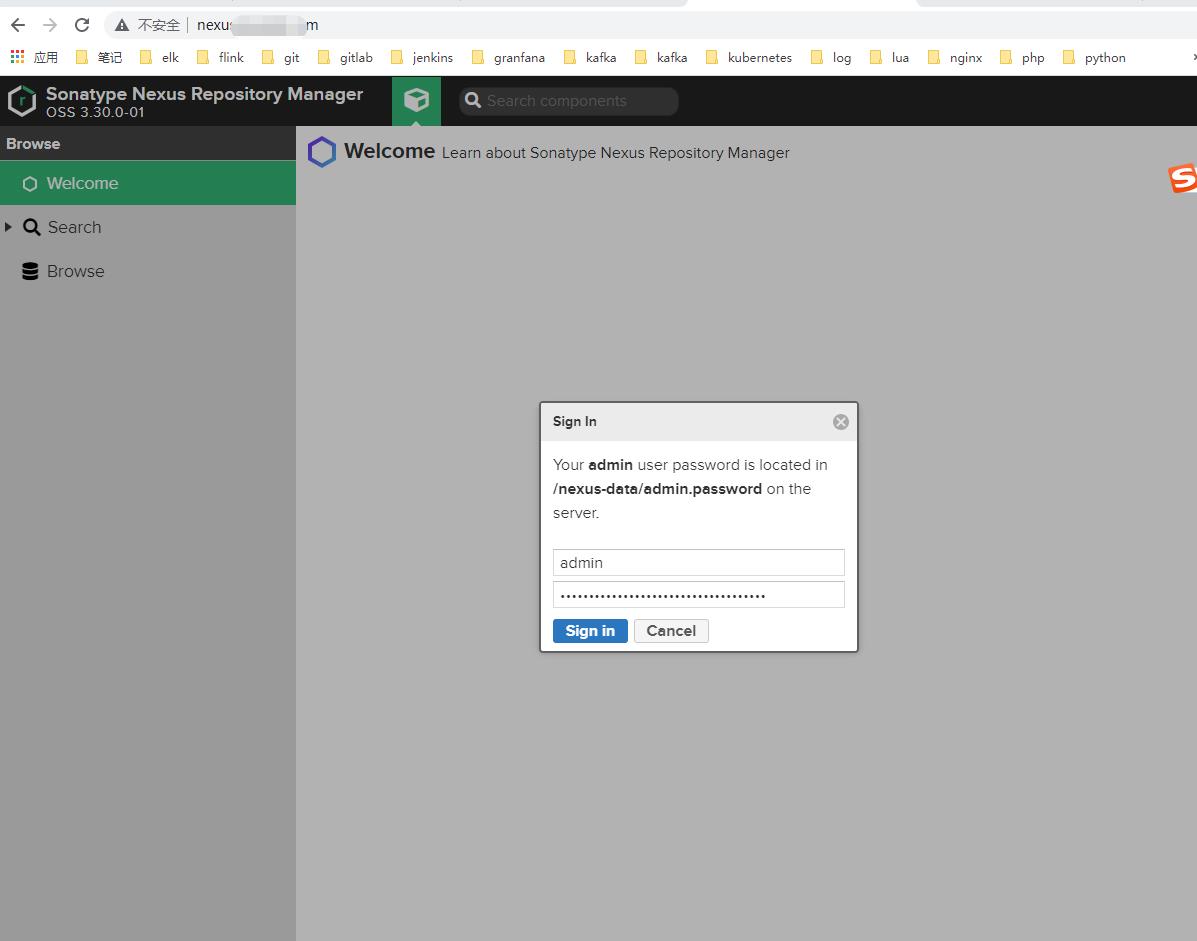
嗯 对了呢 记得关闭匿名访问。anonymous
2. 添加一个aliyun maven代理跑一下
1. 添加一个aliyun maven 代理
打开 Repositories->Create repository->maven2(proxy) 并设置要代理的 Maven 仓库名称与地址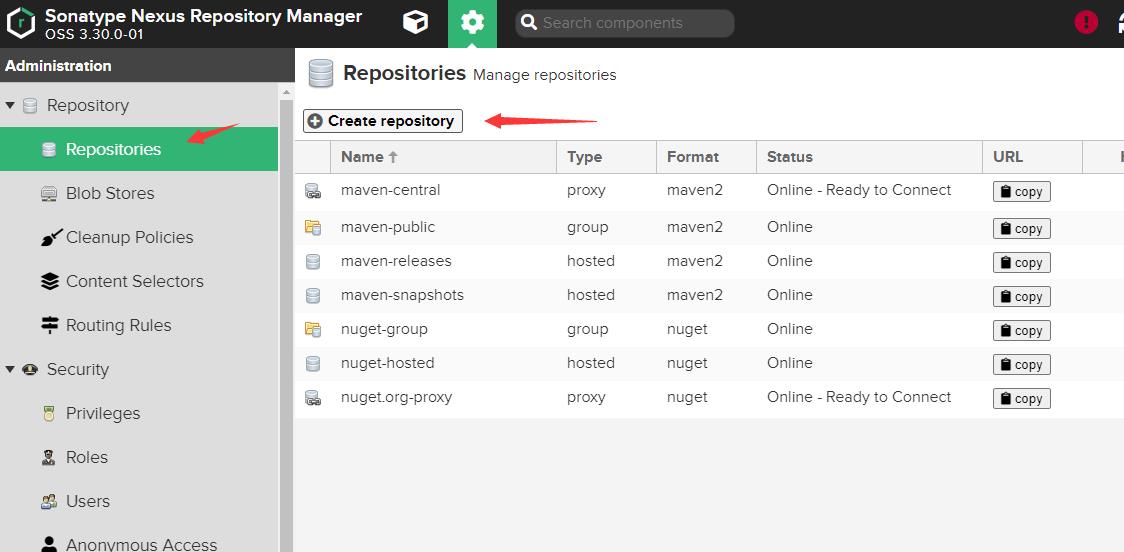
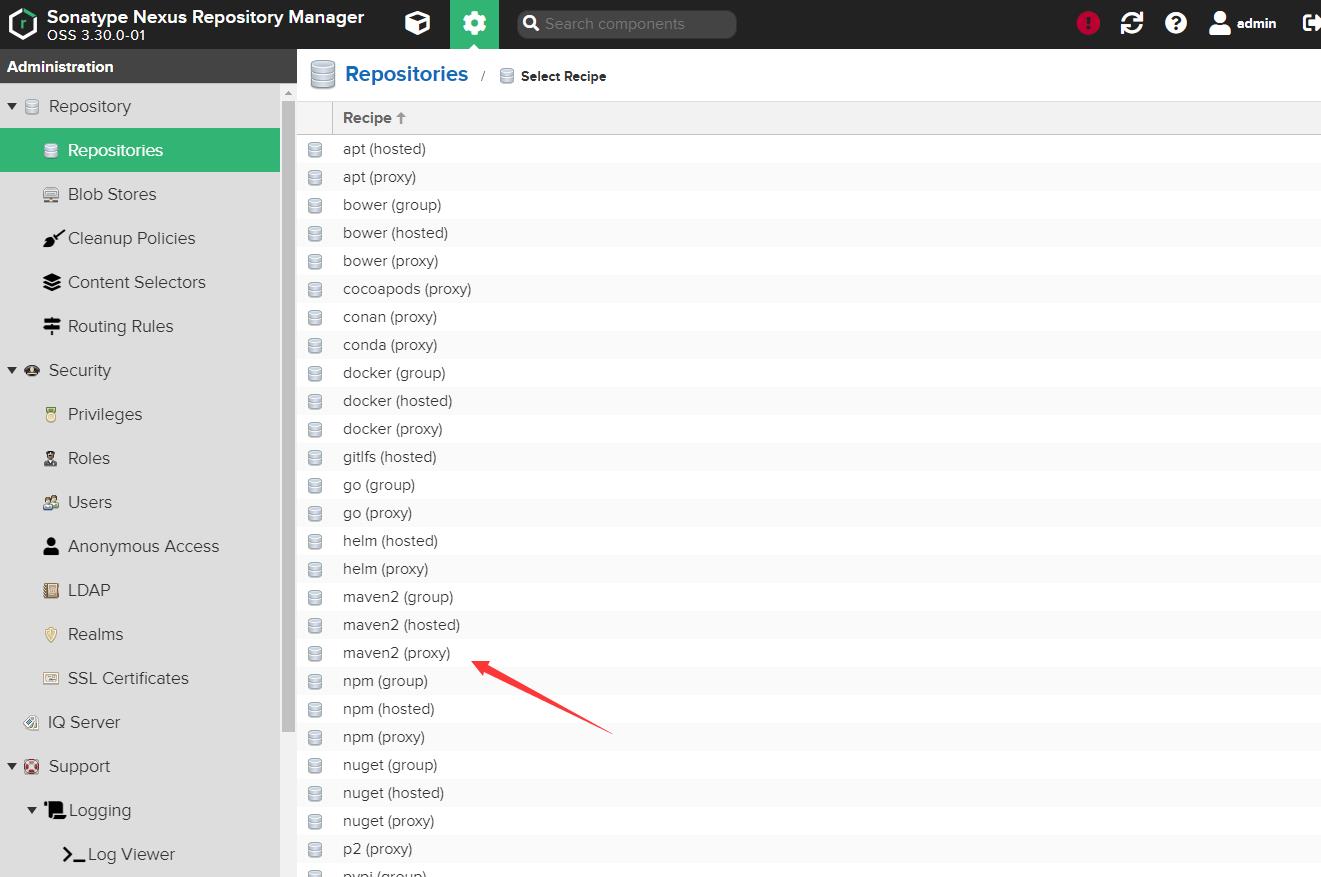
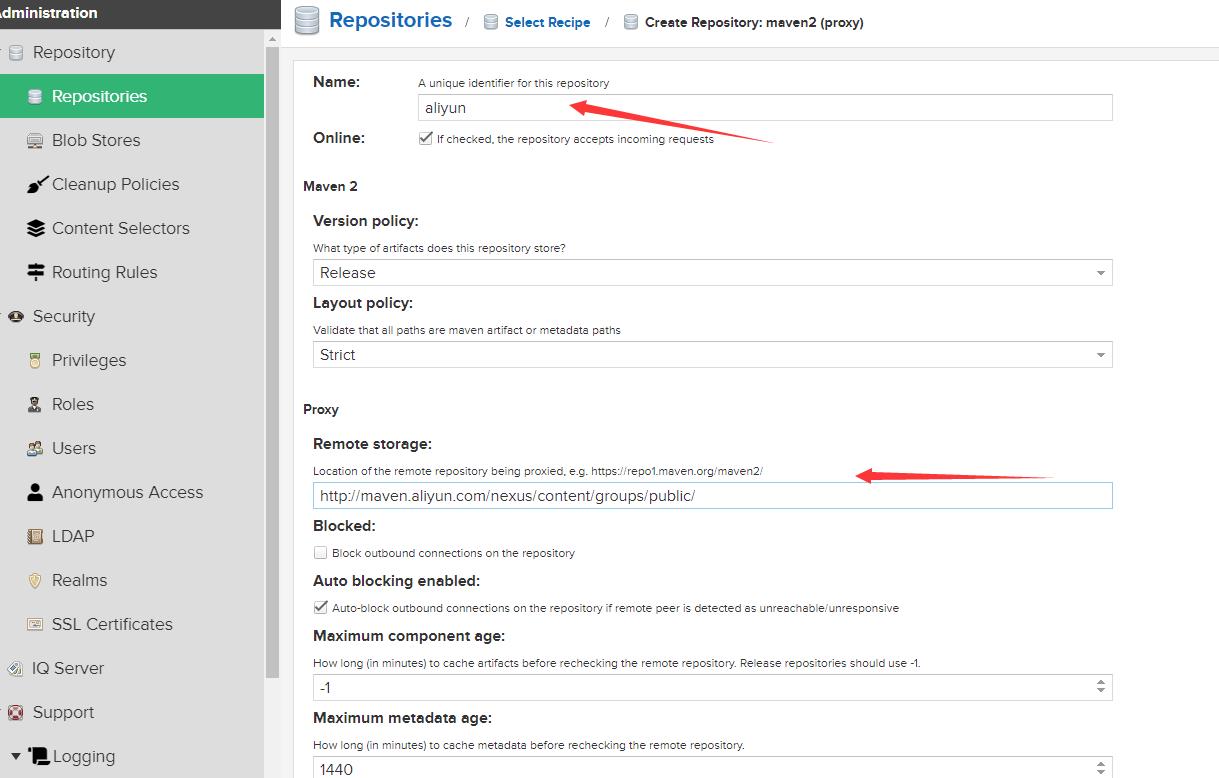
设置“仓库名称”与“仓库地址”。
- aliyun 仓库地址:http://maven.aliyun.com/nexus/content/groups/public/
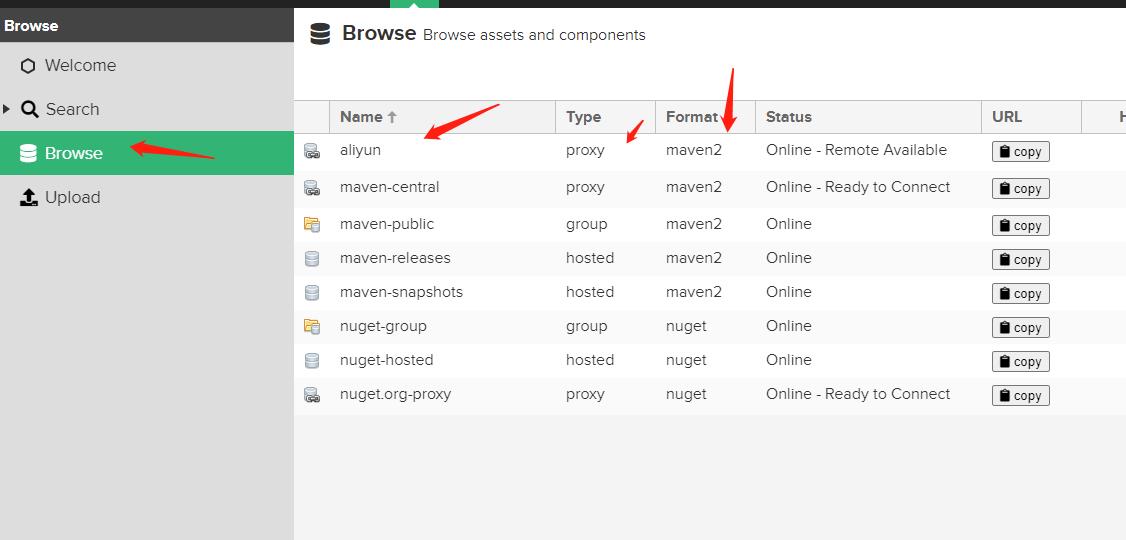
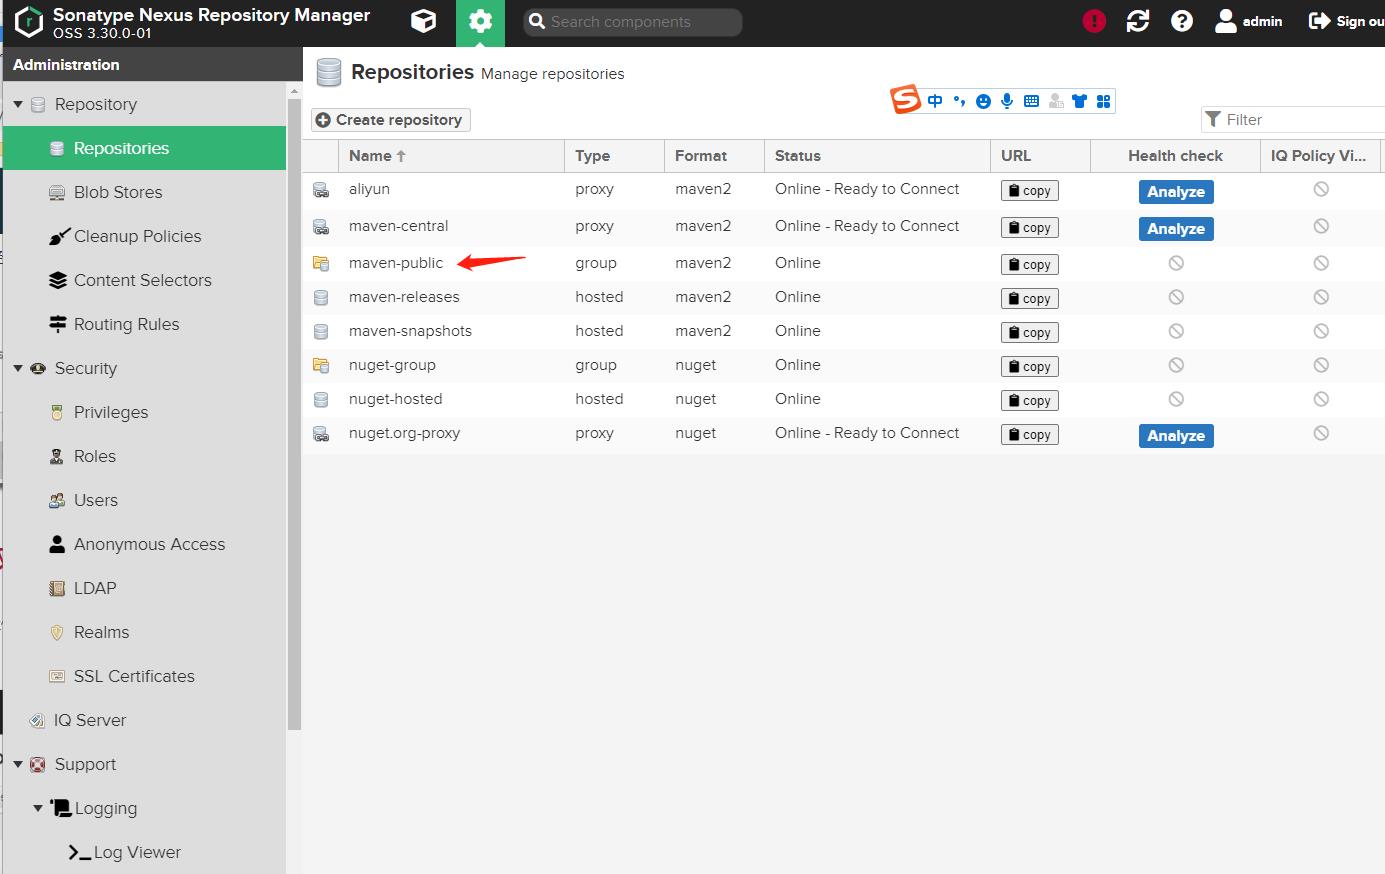
保存上面设置后回到仓库页面,可以看到已经添加了一个新的仓库 aliyun.
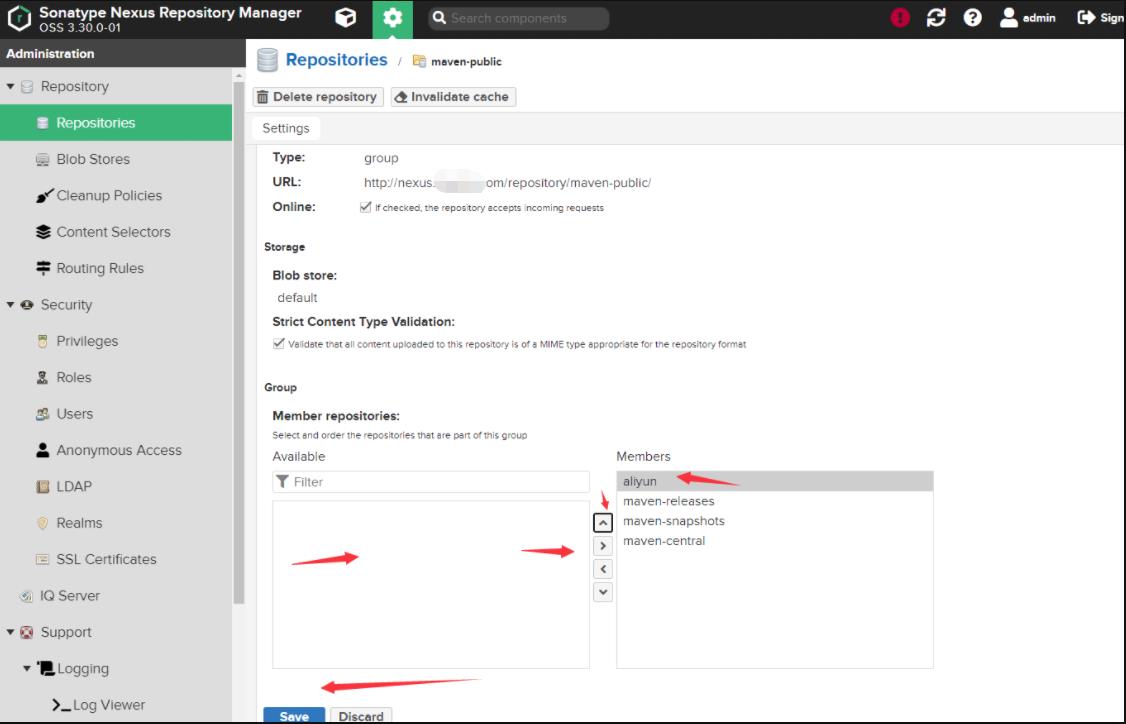
2. 设置aliyun maven优先级
打开 Repositories->maven public 并设置代理仓库优先级置顶
3. 本地maven私服仓库配置
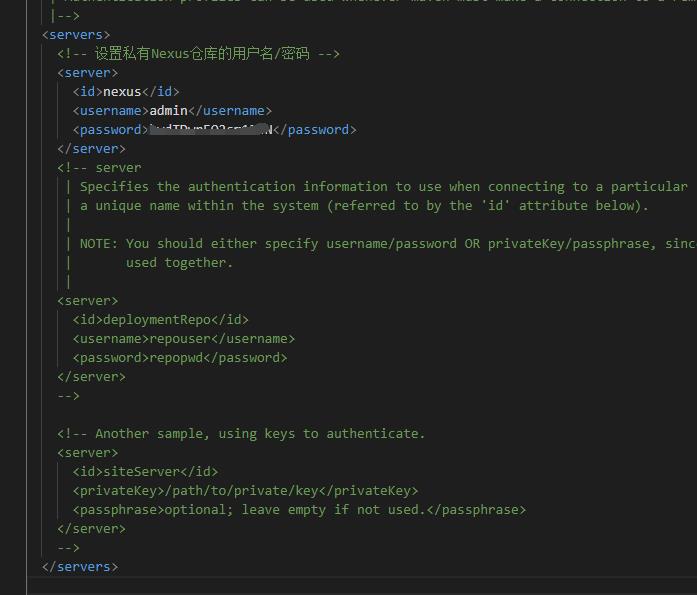
设置 maven 的 Settings.xml 文件,按照下面配置进行设置私服地址和验证的用户名、密码。

3 .创建一个maven项目测试
1. 拉取测试
随手打开一个idea项目添加了一个进行拉取测试

更新maven项目:
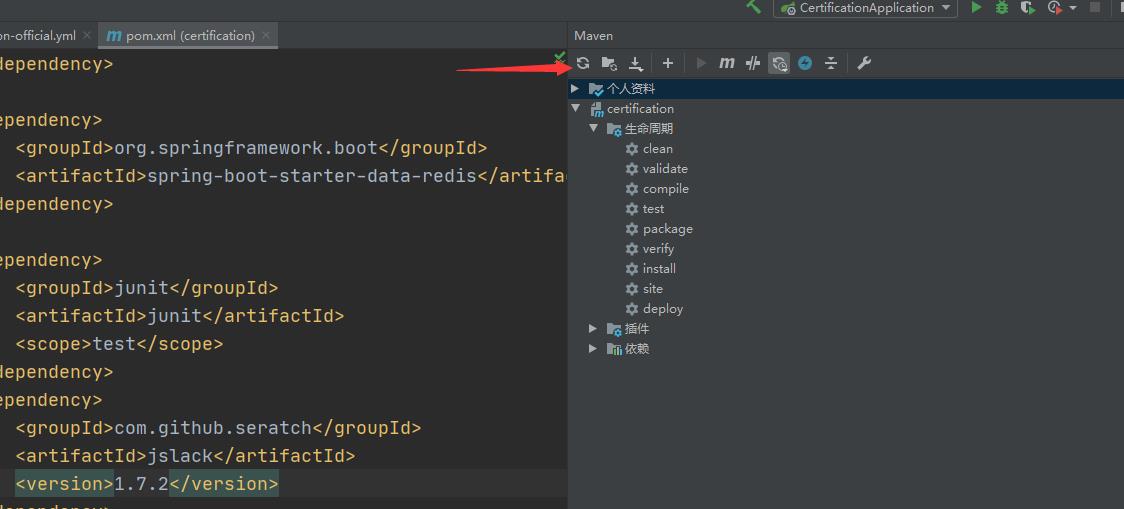
ok如下可以从个人配置的maven代理仓库更新了!

2. 推送设置
我是盗用了下程序的ava maven项目,pom.xml添加如下配置:
<distributionManagement>
    <!-- Maven 上传设置 -->
    <repository>
        <id>nexus</id>   <!-- 保持和Settings.xml中配置的Server ID一致 -->
        <name>releases</name>
        <url>http://http://nexus.xxx.com//repository/maven-releases/</url>  <!-- 推送到Maven仓库的maven-releases下 -->
    </repository>
</distributionManagement>
.当然了仓库自己新建了两个:zhangpeng-releases对应release
zhangpeng-snapshots 对应snapshots

、
mvn deploy打包:

登陆nexus:
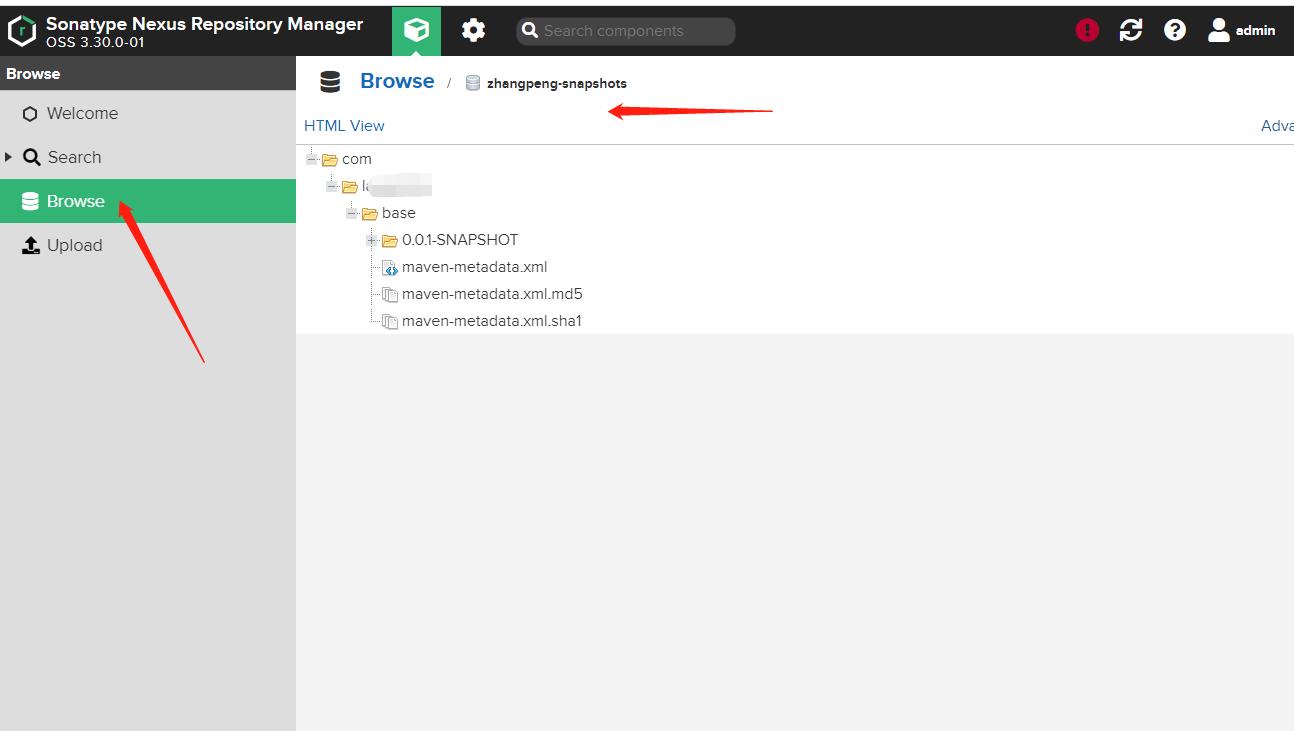
嗯对我来说这就算是成功了…
总结:
1. 腾讯云开源的cbs组件不支持selector。
2. 当pv,pvc需要运行权限时候可以使用initContainers的方式,执行脚本命令。
3. 特别鸣谢豆丁大佬-http://www.mydlq.club/article/26
以上是关于Kubernetes 中部署 Maven 私有仓库 Sonatype Nexus3的主要内容,如果未能解决你的问题,请参考以下文章
构建高效工作环境 | 安装篇:Docker 部署基于 Nexus 3 的本地 Maven 私有仓库
Kubernetes-通过Rancher从Harbor私有仓库拉取镜像
[Harbor] Kubernetes对接Harbor私有镜像仓库 (运行时: containerd)