[Harbor] Kubernetes对接Harbor私有镜像仓库 (运行时: containerd)
Posted Greyplayground
tags:
篇首语:本文由小常识网(cha138.com)小编为大家整理,主要介绍了[Harbor] Kubernetes对接Harbor私有镜像仓库 (运行时: containerd)相关的知识,希望对你有一定的参考价值。
基于HTTPS登陆的Harbor部署请参照上一篇:
https://blog.csdn.net/qq_33868661/article/details/127497333
Harbor的必要设置
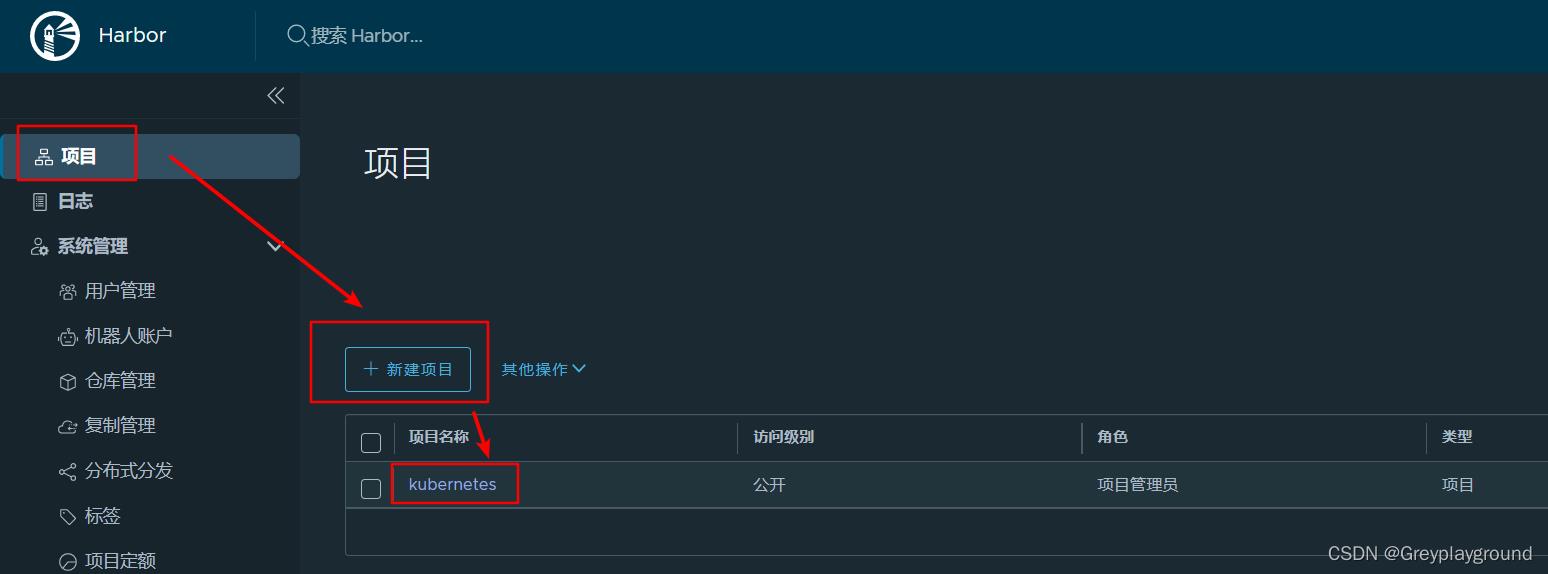
1. 创建项目
创建一个名为kubernetes的项目作为演示

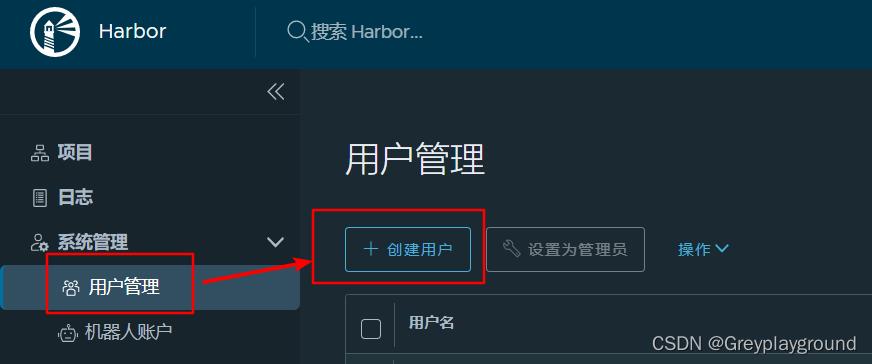
2. 关联用户
创建一个用户 test
密码为 Test@123


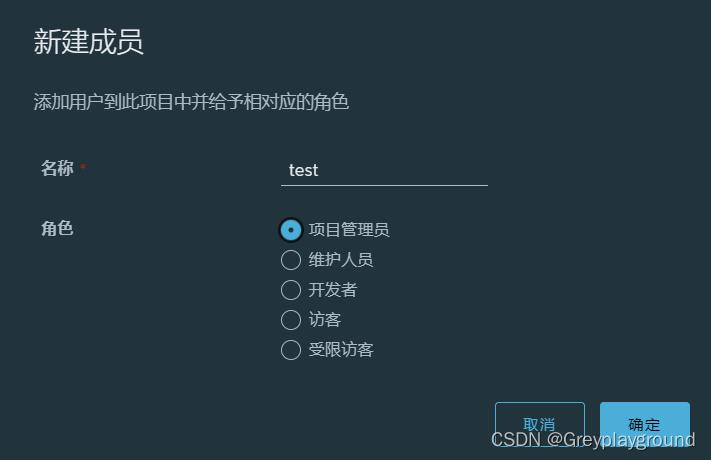
3. 将用户test关联在项目kubernetes上

用户的角色为项目管理员

获取ingress-nginx镜像并导入Harbor私有镜像仓库
1. 获取ingress-nginx配置文件
参考ingress-nginx的官方文档:
https://kubernetes.github.io/ingress-nginx/deploy/
下载ingress-nginx v1.4.0的yaml配置文件,先别急着生成pods
我们先查看下配置文档中都需要哪些image文件
$ wget https://raw.githubusercontent.com/kubernetes/ingress-nginx/controller-v1.4.0/deploy/static/provider/cloud/deploy.yaml
经过检查发现配置文件中提到两个镜像文件
registry.k8s.io/ingress-nginx/controller:v1.4.0@sha256:34ee929b111ffc7aa426ffd409af44da48e5a0eea1eb2207994d9e0c0882d143
registry.k8s.io/ingress-nginx/kube-webhook-certgen:v20220916-gd32f8c343@sha256:39c5b2e3310dc4264d638ad28d9d1d96c4cbb2b2dcfb52368fe4e3c63f61e10f
经过实验发现这两个镜像是无法在国内网络成功拉取的(因为某种众所周知的原因)
这就成为了我搭建私有镜像库的一个重要动机
我们可以在阿里云上租用一个香港的云服务器,然后使用docker pull指令将这两个镜像先拉取到香港的云服务器
root@lxc:~# docker pull registry.k8s.io/ingress-nginx/controller:v1.4.0@sha256:34ee929b111ffc7aa426ffd409af44da48e5a0eea1eb2207994d9e0c0882d143
registry.k8s.io/ingress-nginx/controller@sha256:34ee929b111ffc7aa426ffd409af44da48e5a0eea1eb2207994d9e0c0882d143: Pulling from ingress-nginx/controller
213ec9aee27d: Pull complete
2e0679428050: Pull complete
3bb10086d473: Pull complete
a9e78a589ab3: Pull complete
a101ab4f42d5: Pull complete
4f4fb700ef54: Pull complete
fec3caab2761: Pull complete
01a5c0388c2a: Pull complete
2d340f505205: Pull complete
6f0c0cab58f0: Pull complete
b01cc585238c: Pull complete
186523770588: Pull complete
e42870f1986a: Pull complete
d6192bac8976: Pull complete
Digest: sha256:34ee929b111ffc7aa426ffd409af44da48e5a0eea1eb2207994d9e0c0882d143
Status: Downloaded newer image for registry.k8s.io/ingress-nginx/controller@sha256:34ee929b111ffc7aa426ffd409af44da48e5a0eea1eb2207994d9e0c0882d143
registry.k8s.io/ingress-nginx/controller:v1.4.0@sha256:34ee929b111ffc7aa426ffd409af44da48e5a0eea1eb2207994d9e0c0882d143
root@lxc:~# docker pull registry.k8s.io/ingress-nginx/kube-webhook-certgen:v20220916-gd32f8c343@sha256:39c5b2e3310dc4264d638ad28d9d1d96c4cbb2b2dcfb52368fe4e3c63f61e10f
registry.k8s.io/ingress-nginx/kube-webhook-certgen@sha256:39c5b2e3310dc4264d638ad28d9d1d96c4cbb2b2dcfb52368fe4e3c63f61e10f: Pulling from ingress-nginx/kube-webhook-certgen
1cd0595314a5: Pull complete
12fc225329e5: Pull complete
Digest: sha256:39c5b2e3310dc4264d638ad28d9d1d96c4cbb2b2dcfb52368fe4e3c63f61e10f
Status: Downloaded newer image for registry.k8s.io/ingress-nginx/kube-webhook-certgen@sha256:39c5b2e3310dc4264d638ad28d9d1d96c4cbb2b2dcfb52368fe4e3c63f61e10f
registry.k8s.io/ingress-nginx/kube-webhook-certgen:v20220916-gd32f8c343@sha256:39c5b2e3310dc4264d638ad28d9d1d96c4cbb2b2dcfb52368fe4e3c63f61e10f
两个镜像都已拉取完成
root@lxc:~# docker images
REPOSITORY                                           TAG       IMAGE ID       CREATED       SIZE
registry.k8s.io/ingress-nginx/controller             <none>    d681a4ce3c50   3 weeks ago   264MB
registry.k8s.io/ingress-nginx/kube-webhook-certgen   <none>    520347519a8c   5 weeks ago   46.2MB
2. 给两个镜像都打上tag便于后续操作,我们看到这两个镜像有了v1.4.0的TAG
root@lxc:~# docker tag d681a4ce3c50 ingress-nginx-controller:v1.4.0
root@lxc:~# docker tag 520347519a8c kube-webhook-certgen:v1.4.0
root@lxc:~# docker images
REPOSITORY                                           TAG       IMAGE ID       CREATED       SIZE
ingress-nginx-controller                             v1.4.0    d681a4ce3c50   3 weeks ago   264MB
registry.k8s.io/ingress-nginx/controller             <none>    d681a4ce3c50   3 weeks ago   264MB
kube-webhook-certgen                                 v1.4.0    520347519a8c   5 weeks ago   46.2MB
registry.k8s.io/ingress-nginx/kube-webhook-certgen   <none>    520347519a8c   5 weeks ago   46.2MB
3. 将这两个镜像打包成tar文件保存下来
root@lxc:~# docker save ingress-nginx-controller:v1.4.0 > ingress-nginx-controller-v140.tar
root@lxc:~# docker save kube-webhook-certgen:v1.4.0 > kube-webhook-certgen-v140.tar

root@lxc:~# ll
total 306680
...
-rw-r--r--  1 root root 266473472 Oct 24 22:56 ingress-nginx-controller-v140.tar
-rw-r--r--  1 root root  47527424 Oct 24 22:56 kube-webhook-certgen-v140.tar
...
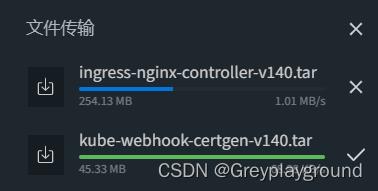
4. 你需要想办法把这两个文件传输到你的Harbor服务器上

镜像打包文件放在本地的Harbor服务器上,然后加载到本地镜像库中
root@harbor:~# docker load < ingress-nginx-controller-v140.tar
Loaded image: ingress-nginx-controller:v1.4.0
root@harbor:~# docker load < kube-webhook-certgen-v140.tar
Loaded image: kube-webhook-certgen:v1.4.0
root@harbor:~# docker images
REPOSITORY                                                    TAG        IMAGE ID       CREATED         SIZE
...
ingress-nginx-controller                                      v1.4.0     d681a4ce3c50   3 weeks ago     264MB
kube-webhook-certgen                                          v1.4.0     520347519a8c   5 weeks ago     46.2MB
...
给这两个新来的镜像打上属于本地Harbor的Tag
root@harbor:~# docker tag ingress-nginx-controller:v1.4.0 harbor.example.com/kubernetes/ingress-nginx-controller:v1.4.0
root@harbor:~# docker tag kube-webhook-certgen:v1.4.0 harbor.example.com/kubernetes/kube-webhook-certgen:v1.4.0
root@harbor:~# docker images
REPOSITORY                                                    TAG        IMAGE ID       CREATED         SIZE
...
ingress-nginx-controller                                      v1.4.0     d681a4ce3c50   3 weeks ago     264MB
harbor.example.com/kubernetes/ingress-nginx-controller        v1.4.0     d681a4ce3c50   3 weeks ago     264MB
kube-webhook-certgen                                          v1.4.0     520347519a8c   5 weeks ago     46.2MB
harbor.example.com/kubernetes/kube-webhook-certgen            v1.4.0     520347519a8c   5 weeks ago     46.2MB
5. 最终我们可以将这两个镜像推送到本地Harbor镜像库,并且可以在Harbor界面中看到这两个镜像,下载次数都为0
root@harbor:~# docker push harbor.example.com/kubernetes/ingress-nginx-controller:v1.4.0
root@harbor:~# docker push harbor.example.com/kubernetes/kube-webhook-certgen:v1.4.0

至此我们已经成功将两个墙外的镜像保存在了我们的私有Harbor镜像库
后续我们引用这两个镜像时,都将使用如下格式的名称
harbor.example.com/kubernetes/ingress-nginx-controller:v1.4.0
harbor.example.com/kubernetes/ingress-nginx-controller:v1.4.0
使用的账户:test/Test@123
修改containerd配置文件
下面将在我的K8S环境中修改运行时配置,以实现拉取Harbor库中的ingress-nginx镜像
在这里我使用了K8S的1.24版本,默认使用containerd作为运行时
1. 首先找到containerd的配置文件,做如下修改
    [plugins."io.containerd.grpc.v1.cri".registry]
      config_path = ""
      [plugins."io.containerd.grpc.v1.cri".registry.auths]
      [plugins."io.containerd.grpc.v1.cri".registry.configs]
        #在下面一行添加harbor.example.com这个FQDN
        [plugins."io.containerd.grpc.v1.cri".registry.configs."harbor.example.com".tls]
          #置为true,跳过tls验证
          insecure_skip_verify = true
        #在下面一行添加harbor.example.com这个FQDN,并配置username和password,这个账户信息在上面一节有提及
        [plugins."io.containerd.grpc.v1.cri".registry.configs."harbor.example.com".auth]
          username = "test"
          password = "Test@123"
      [plugins."io.containerd.grpc.v1.cri".registry.headers]

      [plugins."io.containerd.grpc.v1.cri".registry.mirrors]
        [plugins."io.containerd.grpc.v1.cri".registry.mirrors."docker.io"]
          endpoint = ["https://pqbap4ya.mirror.aliyuncs.com"]
        [plugins."io.containerd.grpc.v1.cri".registry.mirrors."k8s.gcr.io"]
          endpoint = ["https://registry.aliyuncs.com/google_containers"]
        #这里很重要,需要添加镜像加载的源,这个源的endpoint是"https://harbor.example.com"
        [plugins."io.containerd.grpc.v1.cri".registry.mirrors."harbor.example.com"]
          endpoint = ["https://harbor.example.com"]
2. 重启containerd
root@node-1:~# systemctl daemon-reload
root@node-1:~# systemctl restart containerd.service
重要的事情说3遍:
所有运行kubelet的节点都要做修改,然后重启运行时
所有运行kubelet的节点都要做修改,然后重启运行时
所有运行kubelet的节点都要做修改,然后重启运行时
也就是说运行Pod的节点都要能够从本地Harbor拉取镜像
3. 验证是否可以通过crictl指令手动拉取目标镜像
在hosts文件中添加harbor.example.com对应的IP地址,使该域名能够被正确解析
root@node-1:~# cat /etc/hosts
...
222.1.1.24 harbor.example.com
127.0.0.1 localhost
在K8S的kubelet节点上通过crictl指令手动拉取其中一个镜像
root@node-1:~# crictl pull harbor.example.com/kubernetes/ingress-nginx-controller:v1.4.0
Image is up to date for sha256:d681a4ce3c50964d61f8ee81b9845092f1a8fbce05af07edb49cfa09fc6a64f5
在Harbor界面中可以看到controller的镜像下载次数已更新为1次

我们把这个镜像从该K8S节点上删除掉,方便后续拉起Pod的实验
root@node-1:~# crictl rmi harbor.example.com/kubernetes/ingress-nginx-controller:v1.4.0
Deleted: harbor.example.com/kubernetes/ingress-nginx-controller:v1.4.0
拉取Harbor中的私有镜像以启动Pods
运行时配置和Harbor本地镜像都已经准备完毕,下面就可以开始拉取本地镜像并且拉起我们的ingress-nginx v1.4.0了
本文最初下载了ingress-nginx的配置文件,下面对其进行镜像源的配置修改
搜索到相应位置,将image后面的路径修改成如下内容即可。为了实验效果,imagePullPolicy的值修改为Always,即每次拉起Pod都要重新拉取Harbor中的镜像
        ...
        image: harbor.example.com/kubernetes/ingress-nginx-controller:v1.4.0
        imagePullPolicy: Always
        ...
        image: harbor.example.com/kubernetes/kube-webhook-certgen:v1.4.0
        imagePullPolicy: Always
        ...
        image: harbor.example.com/kubernetes/kube-webhook-certgen:v1.4.0
        imagePullPolicy: Always
        ...
拉起ingress-nginx Pods
root@node-1:~# kubectl apply -f deploy.yaml
namespace/ingress-nginx created
serviceaccount/ingress-nginx created
serviceaccount/ingress-nginx-admission created
role.rbac.authorization.k8s.io/ingress-nginx created
role.rbac.authorization.k8s.io/ingress-nginx-admission created
clusterrole.rbac.authorization.k8s.io/ingress-nginx created
clusterrole.rbac.authorization.k8s.io/ingress-nginx-admission created
rolebinding.rbac.authorization.k8s.io/ingress-nginx created
rolebinding.rbac.authorization.k8s.io/ingress-nginx-admission created
clusterrolebinding.rbac.authorization.k8s.io/ingress-nginx created
clusterrolebinding.rbac.authorization.k8s.io/ingress-nginx-admission created
configmap/ingress-nginx-controller created
service/ingress-nginx-controller created
service/ingress-nginx-controller-admission created
deployment.apps/ingress-nginx-controller created
job.batch/ingress-nginx-admission-create created
job.batch/ingress-nginx-admission-patch created
ingressclass.networking.k8s.io/nginx created
validatingwebhookconfiguration.admissionregistration.k8s.io/ingress-nginx-admission created
查看ingress-nginx的容器状态
root@node-1:~# kubectl get pods -A -o wide
NAMESPACE       NAME                                        READY   STATUS      RESTARTS         AGE     IP              NODE     NOMINATED NODE   READINESS GATES
...
ingress-nginx   ingress-nginx-admission-create-j5wwz        0/1     Completed   0                108m    10.200.247.26   node-2   <none>           <none>
ingress-nginx   ingress-nginx-admission-patch-s58h9         0/1     Completed   0                108m    10.200.247.27   node-2   <none>           <none>
ingress-nginx   ingress-nginx-controller-559f6b9fcf-74gvx   1/1     Running     0                84s     10.200.247.28   node-2   <none>           <none>
...
三个ingress-nginx的Pod都运行在了node-2上,因此我们可以到node-2上查询是否有下载到那两个镜像
不过首先我们可能要先安装crictl工具,这里不再赘述
root@node-2:~# crictl images
WARN[0000] image connect using default endpoints: [unix:///var/run/dockershim.sock unix:///run/containerd/containerd.sock unix:///run/crio/crio.sock unix:///var/run/cri-dockerd.sock]. As the default settings are now deprecated, you should set the endpoint instead.
ERRO[0000] unable to determine image API version: rpc error: code = Unavailable desc = connection error: desc = "transport: Error while dialing dial unix /var/run/dockershim.sock: connect: no such file or directory"
IMAGE                                                          TAG                 IMAGE ID            SIZE
docker.io/calico/cni                                           v3.24.1             67fd9ab484510       87.4MB
docker.io/calico/node                                          v3.24.1             75392e3500e36       80.2MB
docker.io/library/busybox                                      1.28                8c811b4aec35f       728kB
docker.io/library/nginx                                        1.22                08a1cbf9c69ed       56.8MB
docker.io/library/nginx                                        1.23                51086ed63d8cb       56.8MB
harbor.example.com/kubernetes/ingress-nginx-controller         v1.4.0              d681a4ce3c509       107MB
harbor.example.com/kubernetes/kube-webhook-certgen             v1.4.0              520347519a8ca       19.7MB
...
以上是关于[Harbor] Kubernetes对接Harbor私有镜像仓库 (运行时: containerd)的主要内容,如果未能解决你的问题,请参考以下文章