Spring 控制反转(IOC)
Posted Mq_sir
tags:
篇首语:本文由小常识网(cha138.com)小编为大家整理,主要介绍了Spring 控制反转(IOC)相关的知识,希望对你有一定的参考价值。
Spring 控制反转(IOC)
IOC概念
- 控制反转,把对象创建和对象间的调用过程,交给Spring进行管理。
- 使用IOC可以降低对象间的耦合度。
- IOC底层原理:XML解析,工厂模式,反射。
上一篇博客已经详细讲解了ioc的概念和理解了。初识Spring
现在我们来讲讲 怎么使用 IOC。
一、Spring配置
详细在代码的注解里。
1、别名
<!--    别名(给id为user取别名),如果取了别名,我们也可以通过别名获取到这个对象-->
    <alias name="user" alias="aaaa"/>
2、bean的配置
Spring Ioc容器的核心就是要玩坏bean!
基本属性:
<!--    id: bean的唯一标识符
        class:对象所对应的全限定名:包名+类型
        name:也是别名,而且name可以起多个别名,也可以用逗号,空格,分号分隔-->
    <bean id="user1" class="mq.pojo.User" name="user2,user3 user4;">
        <constructor-arg name="name" value="maomao"/>
    </bean>
scope属性(重点是singleton和prototype):
一般情况下是使用singleton,但是要整合struts2时则要在ActionBean中使用prototype。而request和session属性基本上是用不到的。
singleton(默认值):单例模式,所谓单例对象,就是在spring容器中只会存在一个的实例
prototype属性:多例原型被标记为多例的对象,每次再获得才会创建并且每次创建都是新的对象
request: web环境下,对象与request生命周期一致,也就是每当请求处理完一次,对象将从spring容器中移除
session:web环境下,对象与session生命周期一致
在下一篇博客会详细讲这个属性。
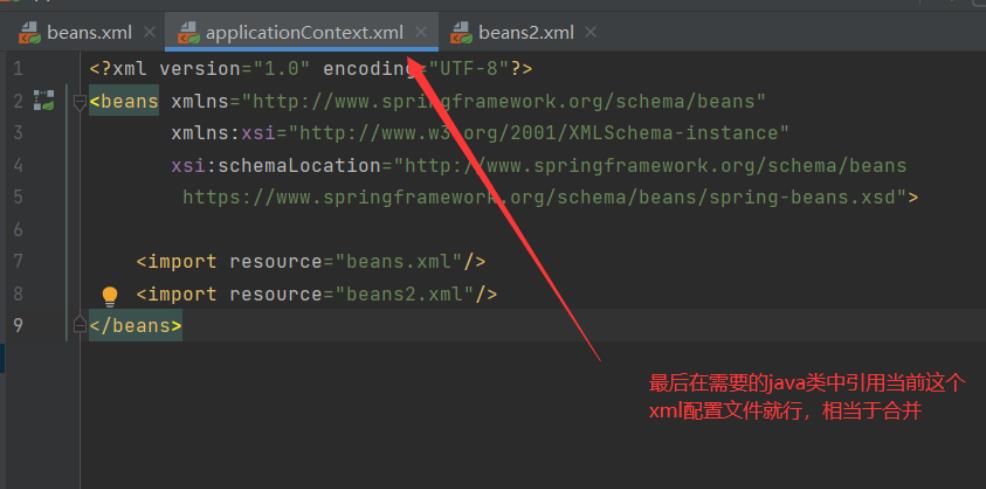
3、import
一般用于团队开发使用,可以将多个配置文件,导入合并成一个

使用的时候使用总配置文件就行
二、Spring IOC容器
SpringIOC的核心为IOC容器,它主要有两种:
BeanFactory:IOC容器的基本实现,是Spring内部的使用接口,不提供开发人员使用。加载配置文件的时候不会去创建对象,在获取对象使用才去创建对象。
ApplictionContext:BeanFactory接口的子接口,提供更多更强大的功能,一般有开发人员使用,加载配置文件时候就会创建对象。
ApplicationContext的实现有四种方式:
FileSystemXmlApplicationContext:加载配置文件的时候采用的是项目的路径。
ClassPathXmlApplicationContext:加载配置文件的时候根据ClassPath位置。(重点)
XmlWebApplicationContext:在Web环境下初始化监听器的时候会加载该类。
AnnotationConfigApplicationContext:根据注解的方式启动Spring 容器。(介绍)
1、依赖注入(DI)
- 依赖:bean对象的创建依赖于容器
- 注入:bean对象中的所有属性,由容器来注入
环境搭建
- 导入Spring相关的jar包
<!-- https://mvnrepository.com/artifact/org.springframework/spring-webmvc -->
<dependency>
    <groupId>org.springframework</groupId>
    <artifactId>spring-webmvc</artifactId>
    <version>5.2.9.RELEASE</version>
</dependency>
- 编写实体类
public class Hello {
    private String name;

    public String getName() {
        return name;
    }

    public void setName(String name) {
        this.name = name;
    }

    @Override
    public String toString() {
        return "Hello{" +
                "name='" + name + '\\'' +
                '}';
    }
}
构造器注入
1.无参构造创建对象(默认)
- 编写beans.xml文件(重点),spring主要就在这个文件里进行一些列的操作
有点类似Mybatis中的Mapper.xml一样,详细的在代码中有注释
<?xml version="1.0" encoding="UTF-8"?>
<beans xmlns="http://www.springframework.org/schema/beans"
       xmlns:xsi="http://www.w3.org/2001/XMLSchema-instance"
       xsi:schemaLocation="http://www.springframework.org/schema/beans
        https://www.springframework.org/schema/beans/spring-beans.xsd">

<!--    使用spring创建对象,在spring中这些都称为Bean
        类型 变量名 = new 类型();
        Hello hello =new Hello();
        bean=对象  new Hello();
        id=变量名    class= new 的对象
        property 相当于给对象中的属性设置一个值
-->
    <bean id="hello" class="mq.pojo.Hello">
 <!--  value :具体的值,基本的数据类型
      ref : 引用spring容器中创建好的对象-->
        <property name="name" value="spring"/>
    </bean>
</beans>
测试类
这里使用ClassPathXmlApplicationContext 加载配置文件,也是最常用的方式。
public class MyTest {

    public static void main(String[] args) {
        //获取spring的上下文对象,拿到spring的容器
        ApplicationContext context = new ClassPathXmlApplicationContext("beans.xml");
        //我们的对象现在都在springspring中管理,我们要使用,直接取
        //getBean:参数就是spring配置文件中bean的id
        Hello hello = (Hello) context.getBean("hello");
        System.out.println(hello.toString());
    }
}
结果:

name=spring,就是我在bean对象的时候给name属性的value值为spring
2.有参构造创建对象
我们需要在实体类中User中添加一个有参构造的方法
public class UserT {
   private String name;
   public UserT(String name) {
       this.name = name;
  }
   public void setName(String name) {
       this.name = name;
  }
   public void show(){
       System.out.println("name="+ name );
  }
}
编写xml配置文件
三种方式都行
-
下标赋值
<!-- 第一种,下标赋值--> <bean id="user" class="mq.pojo.User"> <constructor-arg index="0" value="maomao"/> </bean> -
通过类型来创建
<!--第二种,通过类型创建,不建议使用--> <bean id="user" class="mq.pojo.User"> <constructor-arg type="java.lang.String" value="maomao"/> </bean> -
通过参数名
<!--    第三种,通过参数名-->
    <bean id="user" class="mq.pojo.User">
        <constructor-arg name="name" value="maomao"/>
    </bean>
测试类:
    public static void main(String[] args) {
        //获取spring的上下文对象,拿到spring的容器
        ApplicationContext context = new ClassPathXmlApplicationContext("beans.xml");
        //我们的对象现在都在springspring中管理,我们要使用,直接取
        //getBean:参数就是spring配置文件中bean的id
        User user = (User) context.getBean("user");
        user.show();
    }
结果


小结:
在配置文件加载的时候,容器中管理的对象就已经被初始化了,也就是前面讲Spring配置的时候的单例模式,即对象就被创建了一个。
- User的对象是由Spring创建的
- User对象的属性是由bean的value设置
这个过程就是控制反转:
控制:谁来控制对象的创建,传统应用程序的对象是由程序本身控制创建的,使用Spring后,对象是由Spring IOC容器来创建和管理的.
反转:程序本身不创建对象,而变成被动的接收对象.
依赖注入:就是利用set方法来进行注入的.
IOC是一种编程思想,由主动的编程变成被动的接收.
我们彻底不用再程序中去改动代码了,要实现不同的操作,只需要在xml配置文件中进行修改,所谓的loC就是:对象由Spring来创建,管理,装配!
Set方式注入(重点)
要求被注入的属性 , 必须有set方法 , set方法的方法名由set + 属性首字母大写 ,这个例子由几乎所有属性的注入方式,有String、map、list、set、Properties、String[]、实体类(Bean的注入)对象等,如果是刚开始学的,请耐心看完beans.xml里的配置
实体类:
Address 类
public class Address {
    private String address;

    public String getAddress() {
        return address;
    }
    public void setAddress(String address) {
        this.address = address;
    }
    @Override
    public String toString() {
        return "Address{" +
                "address='" + address + '\\'' +
                '}';
    }
}
Student 类
public class Student {
    private String name;
    private Address address;
    private String[] books;
    private List<String> hobbys;
    private Map<String,String> card;
    private Set<String> games;
    private String wife;
    private Properties info;
    @Override
    public String toString() {
        return "Student{" +
                "name='" + name + '\\'' +
                ", address=" + address.toString() +
                ", books=" + Arrays.toString(books) +'\\n'+
                ", hobbys=" + hobbys +
                ", card=" + card +
                ", games=" + games +
                ", wife='" + wife + '\\n' +
                ", info=" + info +
                '}';
    }
    public String getName() {
        return name;
    }
    public void setName(String name) {
        this.name = name;
    }
    public Address getAddress() {
        return address;
    }
    public void setAddress(Address address) {
        this.address = address;
    }
    public String[] getBooks() {
        return books;
    }
    public void setBooks(String[] books) {
        this.books = books;
    }
    public List<String> getHobbys() {
        return hobbys;
    }
    public void setHobbys(List<String> hobbys) {
        this.hobbys = hobbys;
    }
    public Map<String, String> getCard() {
        return card;
    }
    public void setCard(Map<String, String> card) {
        this.card = card;
    }
    public Set<String> getGames() {
        return games;
    }
    public void setGames(Set<String> games) {
        this.games = games;
    }
    public String getWife() {
        return wife;
    }
    public void setWife(String wife) {
        this.wife = wife;
    }
    public Properties getInfo() {
        return info;
    }
    public void setInfo(Properties info) {
        this.info = info;
    }
}
编写beans.xml
<?xml version="1.0" encoding="UTF-8"?>
<beans xmlns="http://www.springframework.org/schema/beans"
       xmlns:xsi="http://www.w3.org/2001/XMLSchema-instance"
       xmlns:context="http://www.springframework.org/schema/context"
       xsi:schemaLocation="http://www.springframework.org/schema/beans
        https://www.springframework.org/schema/beans/spring-beans.xsd http://www.springframework.org/schema/context https://www.springframework.org/schema/context/spring-context.xsd">

    <bean id="address" class="com.mq.pojo.Address">
        <property name="address" value="长沙"/>
    </bean>

    <bean id="student" class="com.mq.pojo.Student">
<!--  第一种:普通值注入,value-->
        <property name="name" value="小毛"/>
<!--        第二种:Bean注入,ref-->
        <property name="address" ref="address"/>
<!--        数组注入-->
        <property name="books">
            <array>
                <value>java教程</value>
                <value>数据结构</value>
                <value>C语言</value>
                <value>go语言</value>
            </array>
        </property>
<!--        List注入-->
        <property name="hobbys">
            <list>
                <value>听歌</value>
                <value>上网</value>
                <value>玩游戏</value>
                <value>打篮球</value>
            </list>
        </property>
<!--        Map注入-->
        <property name="card">
            <map>
                <entry key="银行卡" value="123456"/>
                <entry key="银行卡2" value="123456"/>
            </map>
        </property>
<!--        Set注入-->
        <property name="games">
            <set>
                <value>LOL</value>
                <value>CF</value>
                <value>王者荣耀</value>
            </set>
        </property>
<!--        null值注入-->
        <property name="wife">
            <null></null>
        </property>
        <property name="info">
            <props>
                <prop key="学号">20</prop>
                <prop key="性别">男</prop>
                <prop key="国籍">中国</prop>
            </props>
        </property>
    </bean>
</beans>
测试类
    public static void main(String[] args) {
        ClassPathXmlApplicationContext context = new ClassPathXmlApplicationContext("beans.xml");

        Student student = (Student) context.getBean("student");
        System.out.println(student.getName());
    }
结果:

拓展方式的注入
主要有p 命名空间的注入 和 c命名空间注入
实体类
public class User {
    private String name;
    private int age;

    public User() {
    }

    public User(String name, int age) {
        this.name = name;
        this.age = age;
    }

    public String getName() {
        return name;
    }

    public void setName(String name) {
        this.name = name;
    }

    public int getAge() {
        return age;
    }

    public void setAge(int age) {
        this.age = age;
    }

    @Override
    public String toString() {
        return "User{" +
                "name='" + name + '\\'' +
                ", age=" + age +
                '}';
    }
}
<!-- p 命名空间的注入,可以直接注入属性的值:property-->
<bean id="user" Spring核心(ioc控制反转)