django基础 -- Ajax
Posted TNTsc
tags:
篇首语:本文由小常识网(cha138.com)小编为大家整理,主要介绍了django基础 -- Ajax相关的知识,希望对你有一定的参考价值。
一.ajax 的特点
1.异步交互:客户端发出一个请求后,需要等待服务器响应结束后,
才能发出第二个请求
2.局部刷新:给用户的感受是在不知不觉中完成请求和响应过程.
二.ajax 模板示例 ($.ajax({}) )

1.urls.py文件中
from django.conf.urls import url
from django.contrib import admin

from app01 import views    #引入views.py 文件

urlpatterns = [
    # url(r\'^admin/\', admin.site.urls),
    url(r\'^login/\', views.login,name=\'login\'),
    url(r\'^home/\', views.home,name=\'home\'),


]
2.views.py 文件中
from django.shortcuts import render,HttpResponse,redirect  #响应模块
from django.http import JsonResponse      #django自带的 json加工模块
from app01 import models        #数据库加工模块
from django.urls import reverse    # 反向解析模块
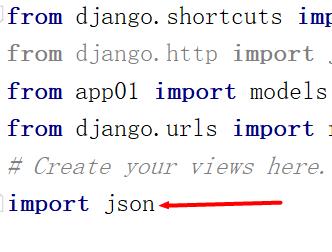
import json               #引入  json 模块
# Create your views here.


def home(request):
    return  render(request,\'home.html\')

def login(request):
    if request.method == \'GET\':    #  get请求 响应方式
        return render(request,\'login.html\')
    else:
        a = {\'status\': None, \'home_url\': None}   #一个开始的状态
        username = request.POST.get(\'user\')
        pwd = request.POST.get(\'password\')
        ret=models.name_pwd.objects.filter(name=username,password=pwd)
                    #与数据库中的信息进行对比
        if ret:          # 数据库中是否存在数据
            a[\'status\'] = True        #更改状态
            a[\'home_url\'] = reverse(\'home\')
            a_json = json.dumps(a)      转换成 json 格式的字符串
            return HttpResponse(a_json)
        else:
            a_json = json.dumps(a)
            return HttpResponse(a_json)
3.在 .html 中
{% load static %}      #引入静态文件的路径
<!DOCTYPE html>
<html lang="zh-CN">
<head>
    <meta charset="utf-8">
    <meta http-equiv="X-UA-Compatible" content="IE=edge">
    <meta name="viewport" content="width=device-width,      initial-scale=1">
    <title>Title</title>
</head>
<body>

{% csrf_token %}        #post 提交方式必须加的验证方式
<input type="text" class="d2">
<input type="password" class="d3">
<button class="d1">登录</button>
<span class="msg" style="color: red"></span>    #预留添加字符串的地方

</body>
<script src="{% static \'js/jquery.js\' %}"></script>  #引入  js

<script>
    $(\'.d1\').click(function () {        # 绑定点击事件
        var name = $(".d2").val();
        var pwd = $(\'.d3\').val();
        var csrf_token = $(\'input[name=csrfmiddlewaretoken]\').val();

        $.ajax({              #绑定 ajax 格式
            url:"{% url \'login\' %}",    # 提交的路径
            type:\'post\',
            data:{\'user\':name,\'password\':pwd ,\'csrfmiddlewaretoken\':csrf_token},
                                  # 给后端的数据
            success:function (content) {    获得响应数据 (content是参数)
                ret= JSON.parse(content);      #将json格式的字符串 变为 前端格式的字符串
                if (ret .status){
                    $(\'.msg\').text(\'成功啦!\');      #向预留的地方添加字符串
                    location.href = ret.home_url    跳转到相应路径
                }
                else {
                    $(\'.msg\').text(\'失败了,检查一下自己输入的内容\');
                }
            }
        })
    })
</script>
</html>
4.通过 json 转换格式的 三种方式
① 引入 json模块
1). 在后端文件 views.py中
2)将python类型的数据转换成 json 类型的数据
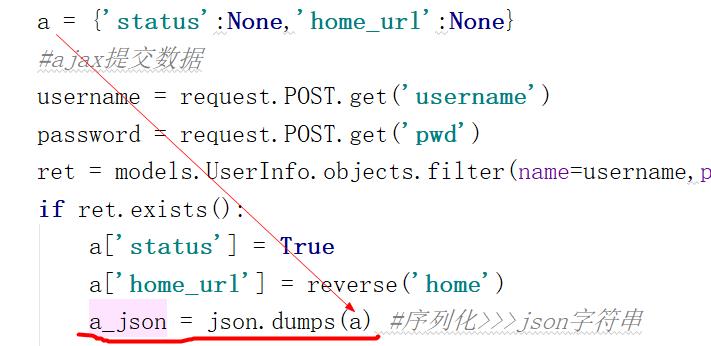
3).在前端文件 .html 中 将 json类型的数据转换成前端js类型

② 引入 django 自带的 json处理模块
1)在 views.py 文件中 引入模块

2).

3).在前端.html 文件中直接调用

③ 响应信息是 加消息头
1) 在 后端views.py文件中

2).在前端.html 文件中, 直接调用传过去的数据

三.请求头 (content_type)
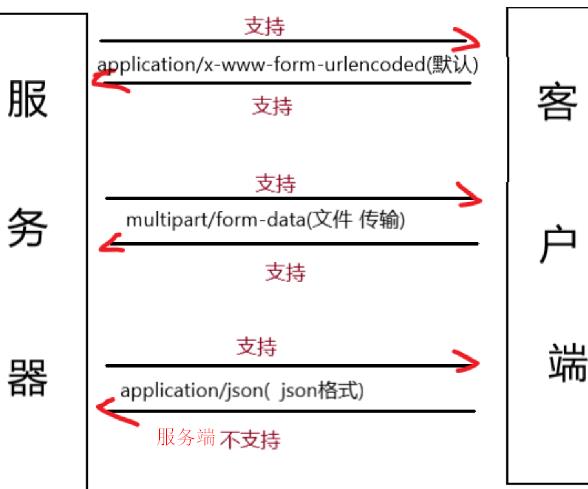
1. application/x-www-form-urlencoded (默认)
请求信息用 "&" 连接
   这应该是最常见的 POST 提交数据的方式了。浏览器的原生 <form> 表单,如果不设置 enctype 属性,

那么最终就会以 默认格式application/x-www-form-urlencoded 方式提交数据,ajax默认也是这个。
POST http://www.example.com HTTP/1.1
Content-Type: application/x-www-form-urlencoded;charset=utf-8

user=yuan&age=22   #这就是上面这种contenttype规定的数据格式,后端对应这个格式来解析获取数据,

不管是get方法还是post方法,都是这样拼接数据,大家公认的一种数据格式,但是如果你contenttype

指定的是urlencoded类型,但是post请求体里面的数据是下面那种json的格式,那么就出错了,

服务端没法解开数据。
2.multipart/form-data (传输文件)
将文件分成一段一段的传输
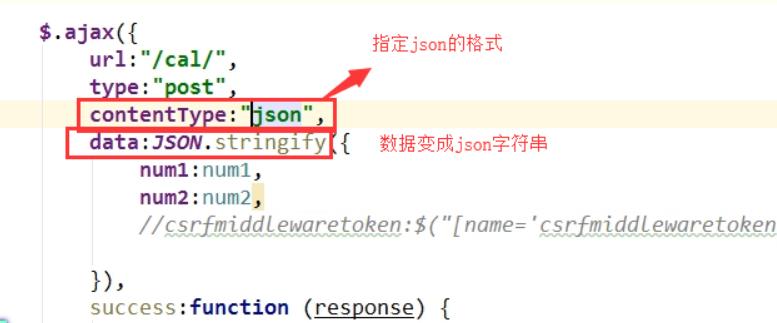
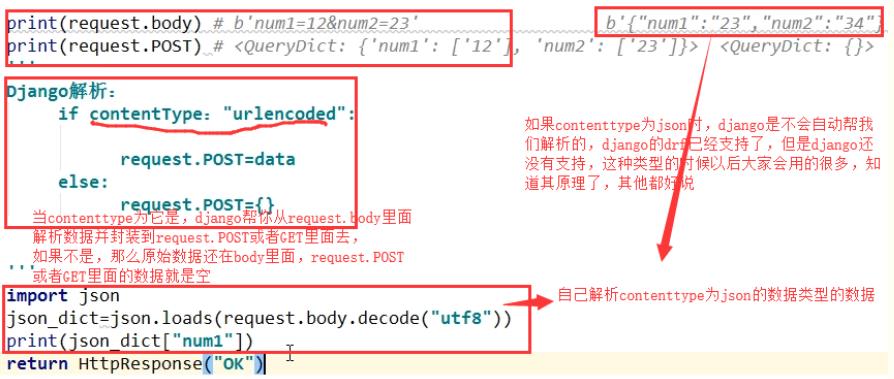
3. application/json (json格式)
①请求信息与响应信息
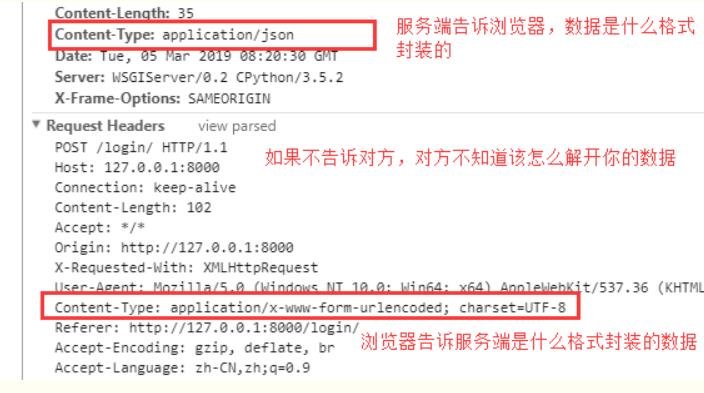
②服务端指定为json 格式
③
四. 文件上传
1.基于表单的文件上传
①在 .html 文件中
{% load static %}     #导入静态文件路径
<!DOCTYPE html>
<html lang="zh-CN">
<head>
    <meta charset="utf-8">
    <meta http-equiv="X-UA-Compatible" content="IE=edge">
    <meta name="viewport" content="width=device-width,      initial-scale=1">
    <title>Title</title>
    <link rel="stylesheet" href="{% static \'bootstrap-3.3.7-dist/css/bootstrap.min.css\' %}">
                              #导入bootstrap
</head>
<body>
<div class="container">
    <div class="row">
        <div class="col-md-6 col-md-offset-3">
            <form class="form-horizontal" method="post" action="{% url \'upload\' %}"
enctype="multipart/form-data">     #插入发送文件的 请求头
              {% csrf_token %}        #POST请求的验证
              <div class="form-group">
                <label for="inputEmail3" class="col-sm-2 control-label">用户名</label>
                <div class="col-sm-10">
                  <input type="text" class="form-control" id="inputEmail3"
placeholder="用户名" name="username">
                </div>
              </div>
              <div class="form-group">
                <label for="inputPassword3" class="col-sm-2 control-label">头像</label>
                <div class="col-sm-10">
                  <input type="file" id="inputPassword3" placeholder="文件" name="file_obj">
                </div>
              </div>
               <div class="form-group">
                <div class="col-sm-offset-2 col-sm-10">
                  <button type="submit" class="btn btn-default">提交</button>
                </div>
              </div>
            </form>
        </div>
    </div>
</div>

</body>
</html>
②在view.py文件中
from django.shortcuts import render,HttpResponse
import os
from 文件上传 import settings    #导入 setting.py 文件中的路径

def upload(request):
    if request.method == \'GET\':
     return render(request,\'upload.html\')

    else:
        username = request.POST.get(\'username\')
        file_obj = request.FILES.get(\'file_obj\')    #获取文件
        file_name = file_obj.name            #获取文件名
        path = os.path.join(settings.BASE_DIR, \'statics\', \'img\', file_name) #拼接保存路径
        with open(path,\'wb\')as f:            #要保存到的文件位置
            #for i in file_obj:              #读取上传的文件
                #f.write(i)                #写入新文件
        for chunk in file_obj.chunks():     #常使用的读取方式,数据大小可控
          f.write(chunk)


        return HttpResponse(\'ok\')
2.基于 Ajax 的上传文件
① view.py 文件中获取方法 相同
② 在 前端.html 文件中
{% load static %}
<!DOCTYPE html>
<html lang="zh-CN">
<head>
    <meta charset="utf-8">
    <meta http-equiv="X-UA-Compatible" content="IE=edge">
    <meta name="viewport" content="width=device-width,      initial-scale=1">
    <title>Title</title>
    <link rel="stylesheet" href="{% static \'bootstrap-3.3.7-dist/css/bootstrap.min.css\' %}">
</head>
<body>
<div class="container">
    <div class="row">
        <div class="col-md-6 col-md-offset-3">
            {% csrf_token %}
            <div>
                用户名:
                <input type="text" name =\'username\'>
            </div>
            <div>
                <input type="file" name="file_obj">
            </div>

            <button id="sub">提交</button>

        </div>
    </div>
</div>

</body>
<script src="{% static \'js/jquery.js\' %}"></script>
<script src="{% static \'js/jquery.cookie.js\' %}"></script>
<script>
    $("#sub").click(function () {
        var name = $("input[name=username]").val();
        var file = $(\'input[type=file]\')[0].files[0]; #获取上传的文件
        var csrf = $(\'input[name=csrfmiddlewaretoken]\').val();
       var formdata = new FormData();   #上传文件时需要的类型
       formdata.append(\'username\',name);  #将请求的数据加入新类型中
       formdata.append(\'file_obj\',file);
       formdata.append(\'csrfmiddlewaretoken\',csrf);
        $.ajax({
            url:\'{% url \'upload\' %}\',
            type:\'post\',
            data:formdata,
            processData: false ,    // 不处理数据(必写)
          contentType: false,     // 不设置内容类型(必写)
            success:function (response) {

            }
        })
    })

</script>
</html>
五. Ajax请求设置csrf_token
1.通过获取隐藏的input标签中的csrfmiddlewaretoken值,
放置在data中发送。
$.ajax({
  url: "/cookie_ajax/",
  type: "POST",
  data: {
    "username": "chao",
    "password": 123456,
    "csrfmiddlewaretoken": $("[name = \'csrfmiddlewaretoken\']").val()
      // 使用jQuery取出csrfmiddlewaretoken的值,拼接到data中
  },
  success: function (data) {
    console.log(data);
  }
})
2.
$.ajaxSetup({
    data: {csrfmiddlewaretoken: \'{{ csrf_token }}\' },
});
3.通过获取返回的cookie中的字符串 放置在请求头中发送。
(在发送 json格式的时候只能通过这种方式)
注意:需要引入一个jquery.cookie.js插件。
<script src="{% static \'js/jquery.cookie.js\' %}"></script>

$.ajax({

headers:{"X-CSRFToken":$.cookie(\'csrftoken\')},
 #其实在ajax里面还有一个参数是headers,自定制请求头,可以将csrf_token加在这里,
我们发contenttype类型数据的时候,csrf_token就可以这样加

})
$.ajax({
  url: "/cookie_ajax/",
  type: "POST",
  headers: {"X-CSRFToken": $.cookie(\'csrftoken\')},  // 从Cookie取csrftoken,并设置到请求头中
  data: {"username": "chao", "password": 123456},
  success: function (data) {
    console.log(data);
  }
})
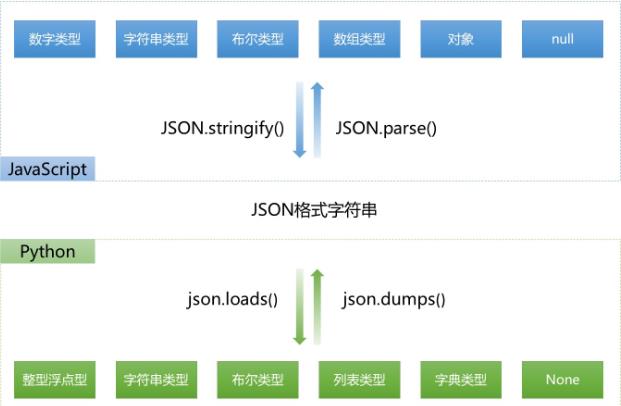
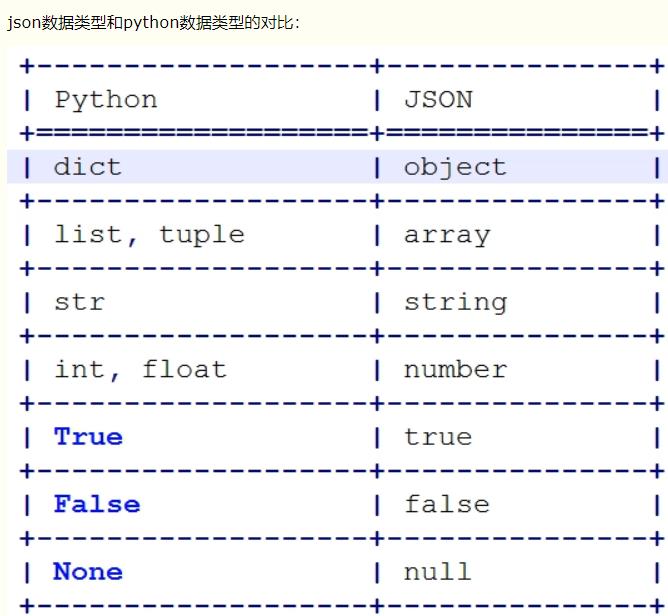
六. json
七. sweetAlert 插件
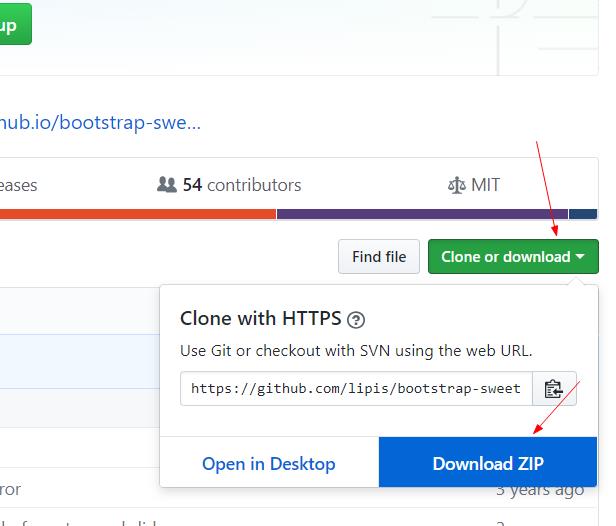
1.插件下载 点击
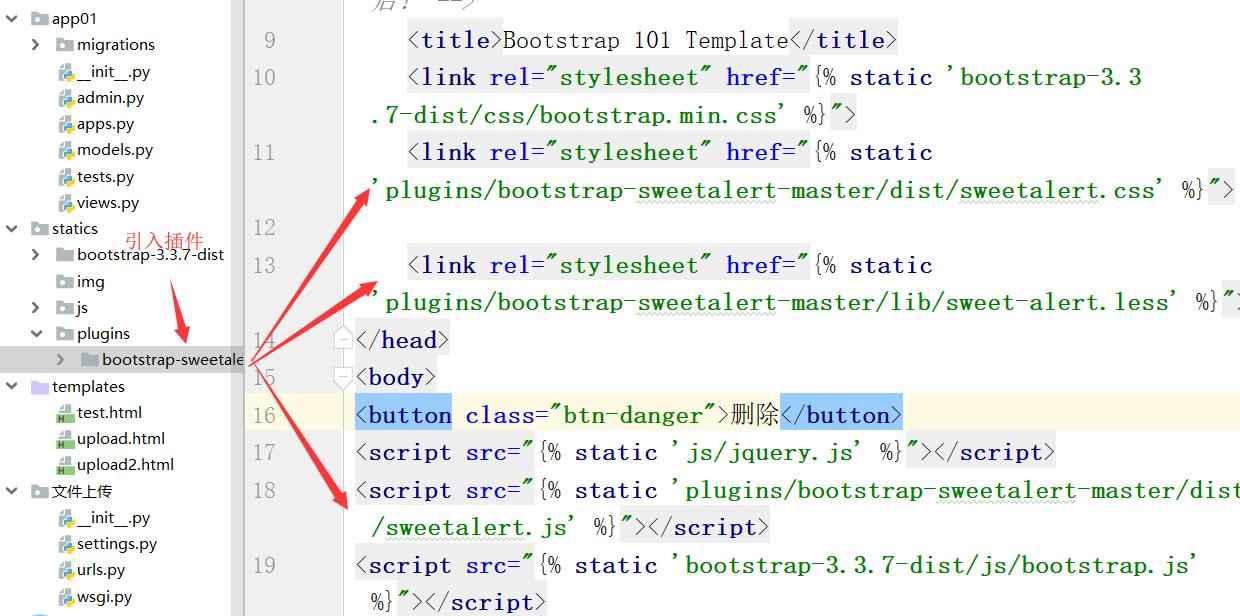
2.引入插件
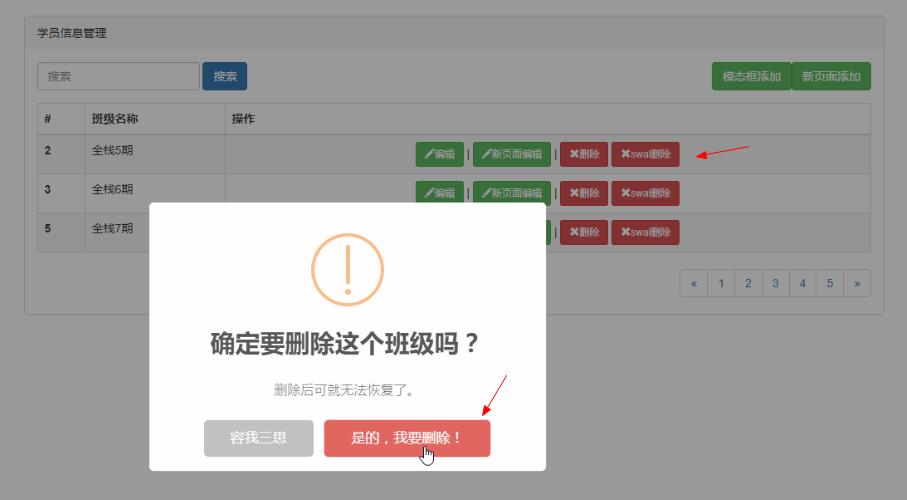
3.示例:
{% load static %}
<!DOCTYPE html>
<html lang="zh-CN">
<head>
    <meta charset="utf-8">
    <meta http-equiv="X-UA-Compatible" content="IE=edge">
    <meta name="viewport" content="width=device-width, initial-scale=1">
    <!-- 上述3个meta标签*必须*放在最前面,任何其他内容都*必须*跟随其后! -->
    <title>Bootstrap 101 Template</title>
    <link rel="stylesheet" href="{% static \'bootstrap-3.3.7-dist/css
/bootstrap.min.css\' %}">
    <link rel="stylesheet" href="{% static \'plugins/bootstrap-sweetalert-master
/dist/sweetalert.css\' %}">

    <link rel="stylesheet" href="{% static \'plugins/bootstrap-sweetalert-master/
lib/sweet-alert.less\' %}">
</head>
<body>
<button class="btn-danger">删除</button>
<script src="{% static \'js/jquery.js\' %}"></script>
<script src="{% static \'plugins/bootstrap-sweetalert-master/dist
/sweetalert.js\' %}"></script>
<script src="{% static \'bootstrap-3.3.7-dist/js/bootstrap.js\' %}"></script>

<script>
    $(".btn-danger").on("click", function () {
      swal({
        title: "你确定要删除吗?",
        text: "删除可就找不回来了哦!",
        type: "warning",
        showCancelButton: true,
        confirmButtonClass: "btn-danger",
        confirmButtonText: "删除",
        cancelButtonText: "取消",
        closeOnConfirm: false
        },
        function () {
          var deleteId = $(this).parent().parent().attr("data_id");
          $.ajax({
            url: "/delete_book/",
            type: "post",
            data: {"id": deleteId},
            success: function (data) {
              if (data.status === 1) {
                swal("删除成功!", "你可以准备跑路了!", "success");
              } else {
                swal("删除失败", "你可以再尝试一下!", "error")
              }
            }
          })
        });
    })
</script>
</body>
</html>
八. 对json序列化日期时间 的插件
import json
from datetime import datetime
from datetime import date

#对含有日期格式数据的json数据进行转换
class JsonCustomEncoder(json.JSONEncoder):
    def default(self, field):
        if isinstance(field,datetime):
            return field.strftime(\'%Y-%m-%d %H:%M:%S\')
        elif isinstance(field,date):
            return field.strftime(\'%Y-%m-%d\')
        else:
            return json.JSONEncoder.default(self,field)


d1 = datetime.now()

dd = json.dumps(d1,cls=JsonCustomEncoder)
print(dd)
补充:
1.在 setting.py 文件中设置上 以下代码
可显示操作数据库时执行的mysql 语句
LOGGING = { \'version\': 1, \'disable_existing_loggers\': False, \'handlers\': { \'console\':{ \'level\':\'DEBUG\', \'class\':\'logging.StreamHandler\', }, }, \'python Django Ajax基础