Python +Appium 实现app自动化测试
Posted ChinaDragonDreamer
tags:
篇首语:本文由小常识网(cha138.com)小编为大家整理,主要介绍了Python +Appium 实现app自动化测试相关的知识,希望对你有一定的参考价值。
Python +Appium 实现app自动化测试
一、Appium简介
Appium是一款开源工具,用于自动化ios、android和Windows桌面平台上的本地、移动web和混合应用程序。原生应用是指那些使用iOS、Android或Windows sdk编写的应用。移动网页应用是通过移动浏览器访问的网页应用(appum支持iOS和Chrome上的Safari或Android上的内置“浏览器”应用)。混合应用程序有一个“webview”的包装,这是一个允许与web内容交互的原生控件。像Apache Cordova这样的项目可以很容易地使用web技术构建应用程序,然后将这些技术捆绑到原生包装中,创建一个混合应用程序。
重要的是,Appium是“跨平台”的:它允许您使用相同的API在多个平台(iOS、Android、Windows)上编写测试。这使得代码可以在iOS、Android和Windows测试套件之间重用。
二、环境所需资源
三、环境搭建教程
Appium-Server-GUI 配置Android SDK 和 Java JDK 路径

Appium-Inspector环境配置
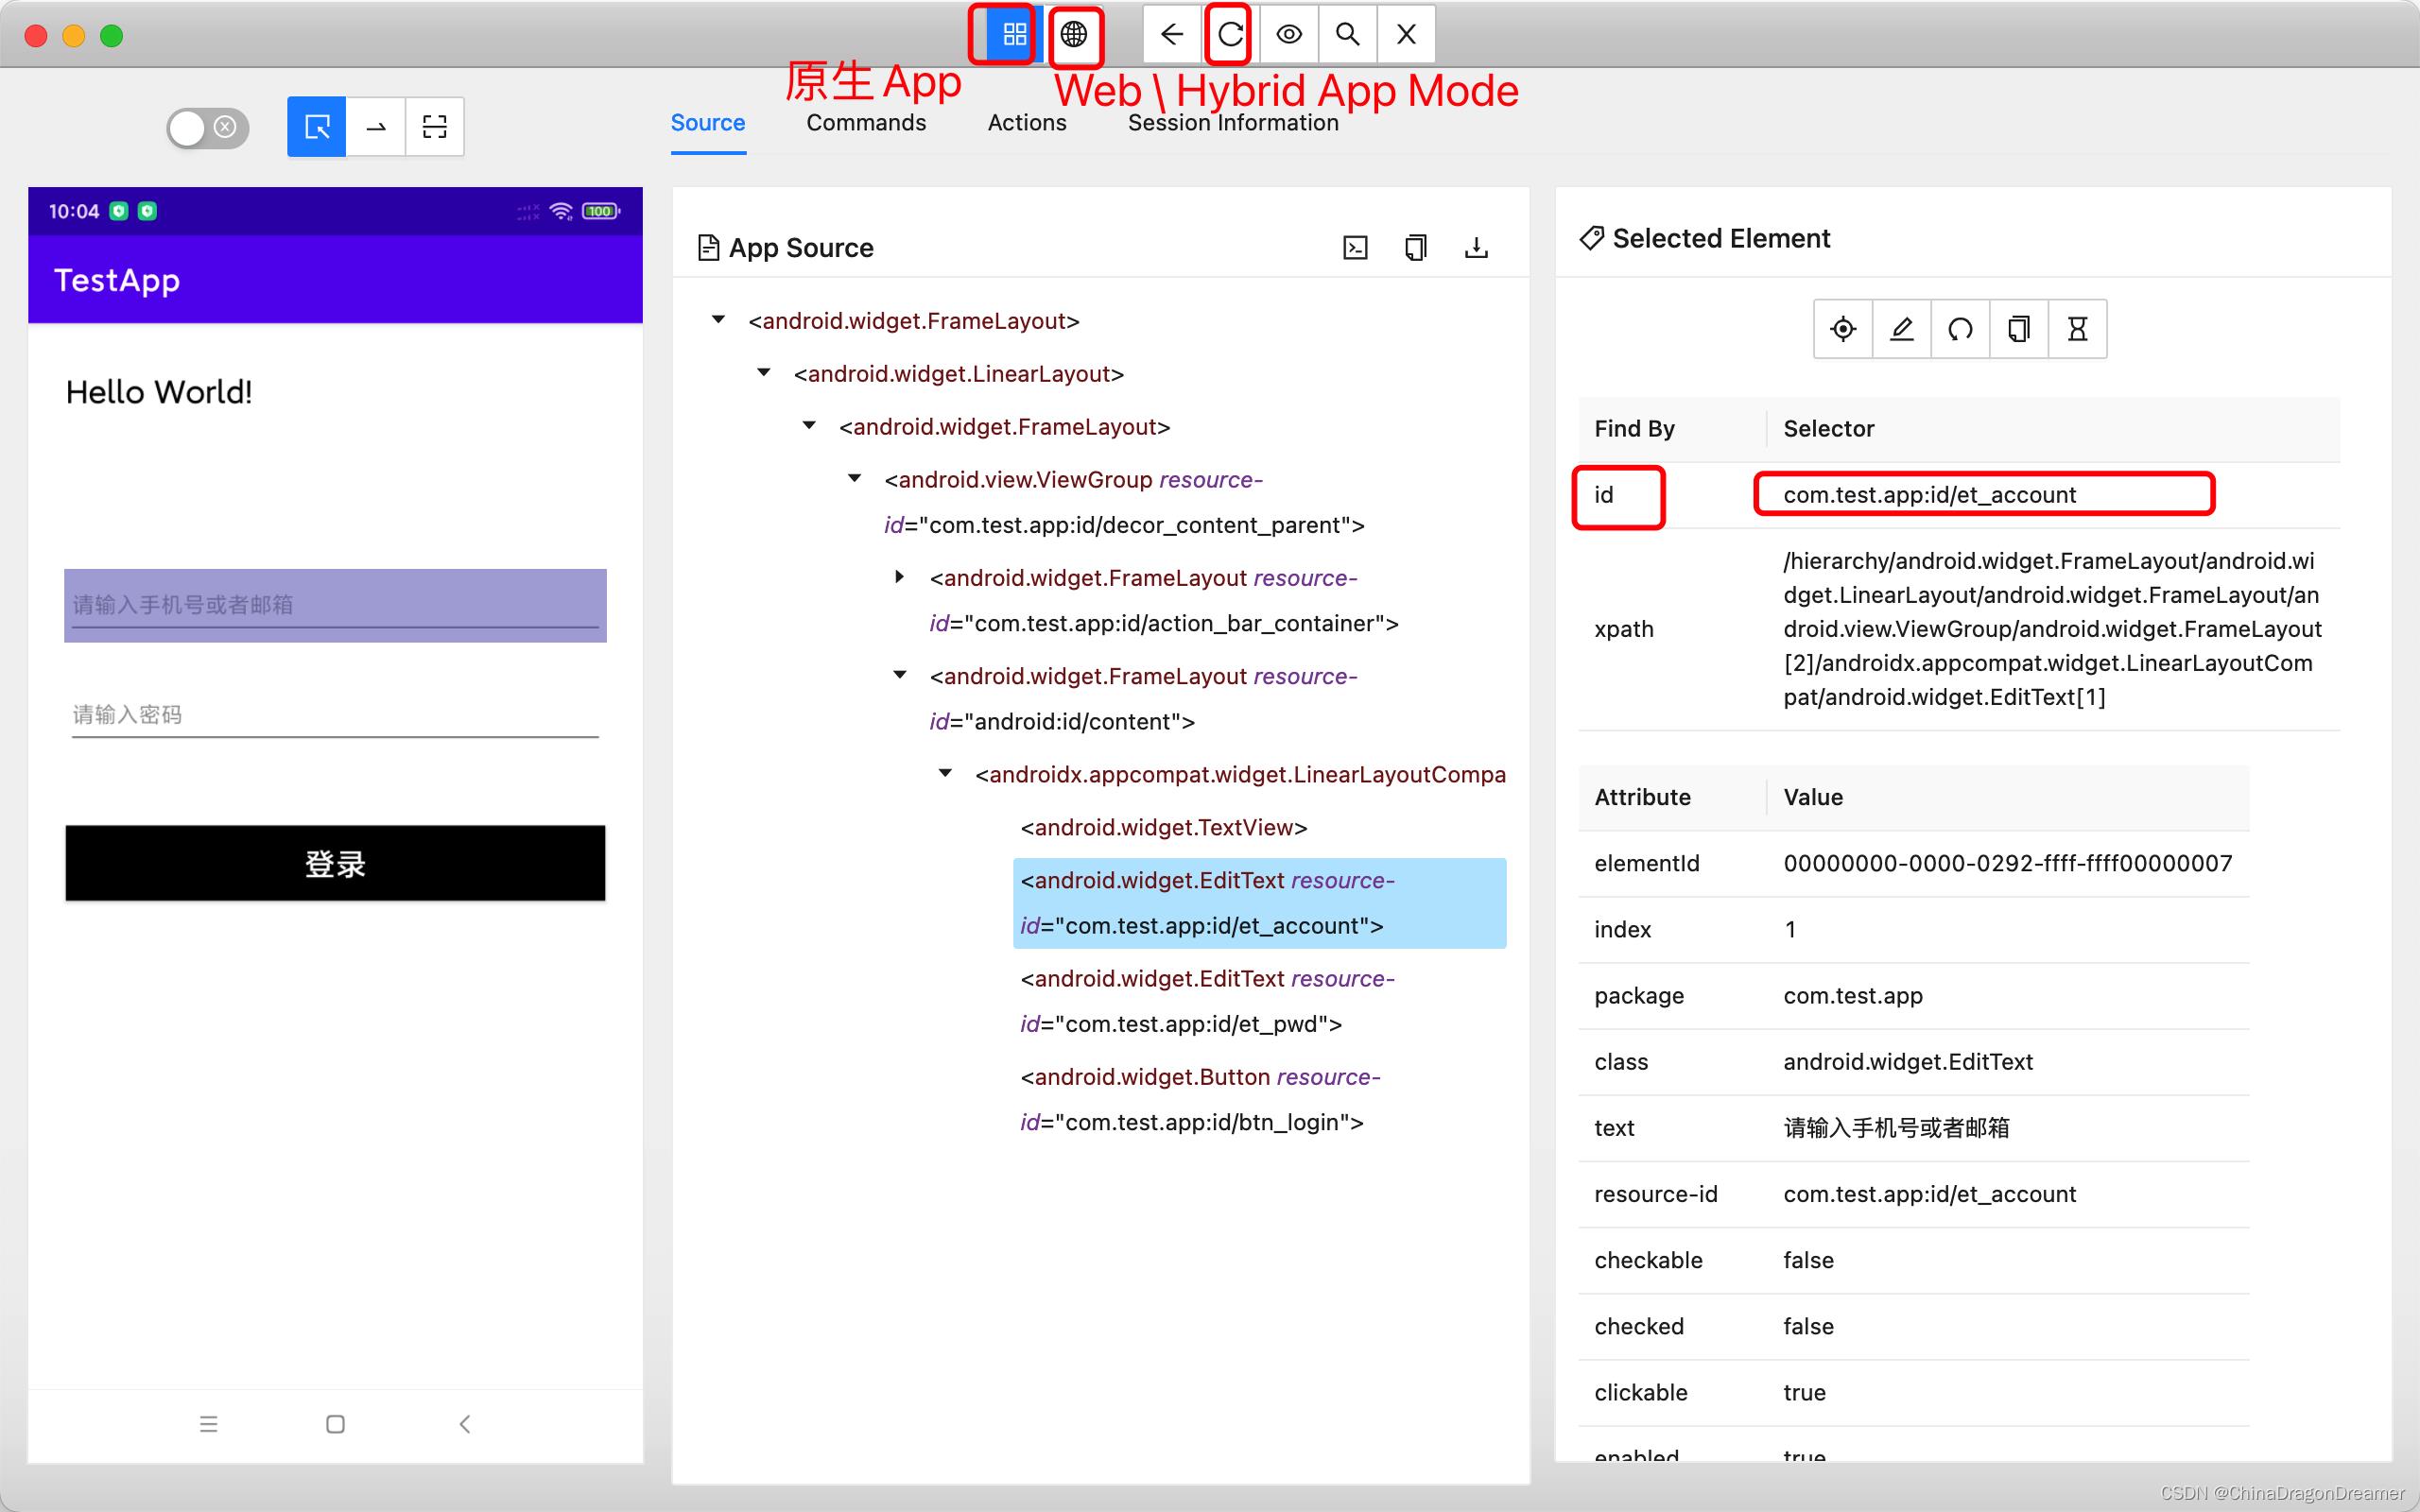
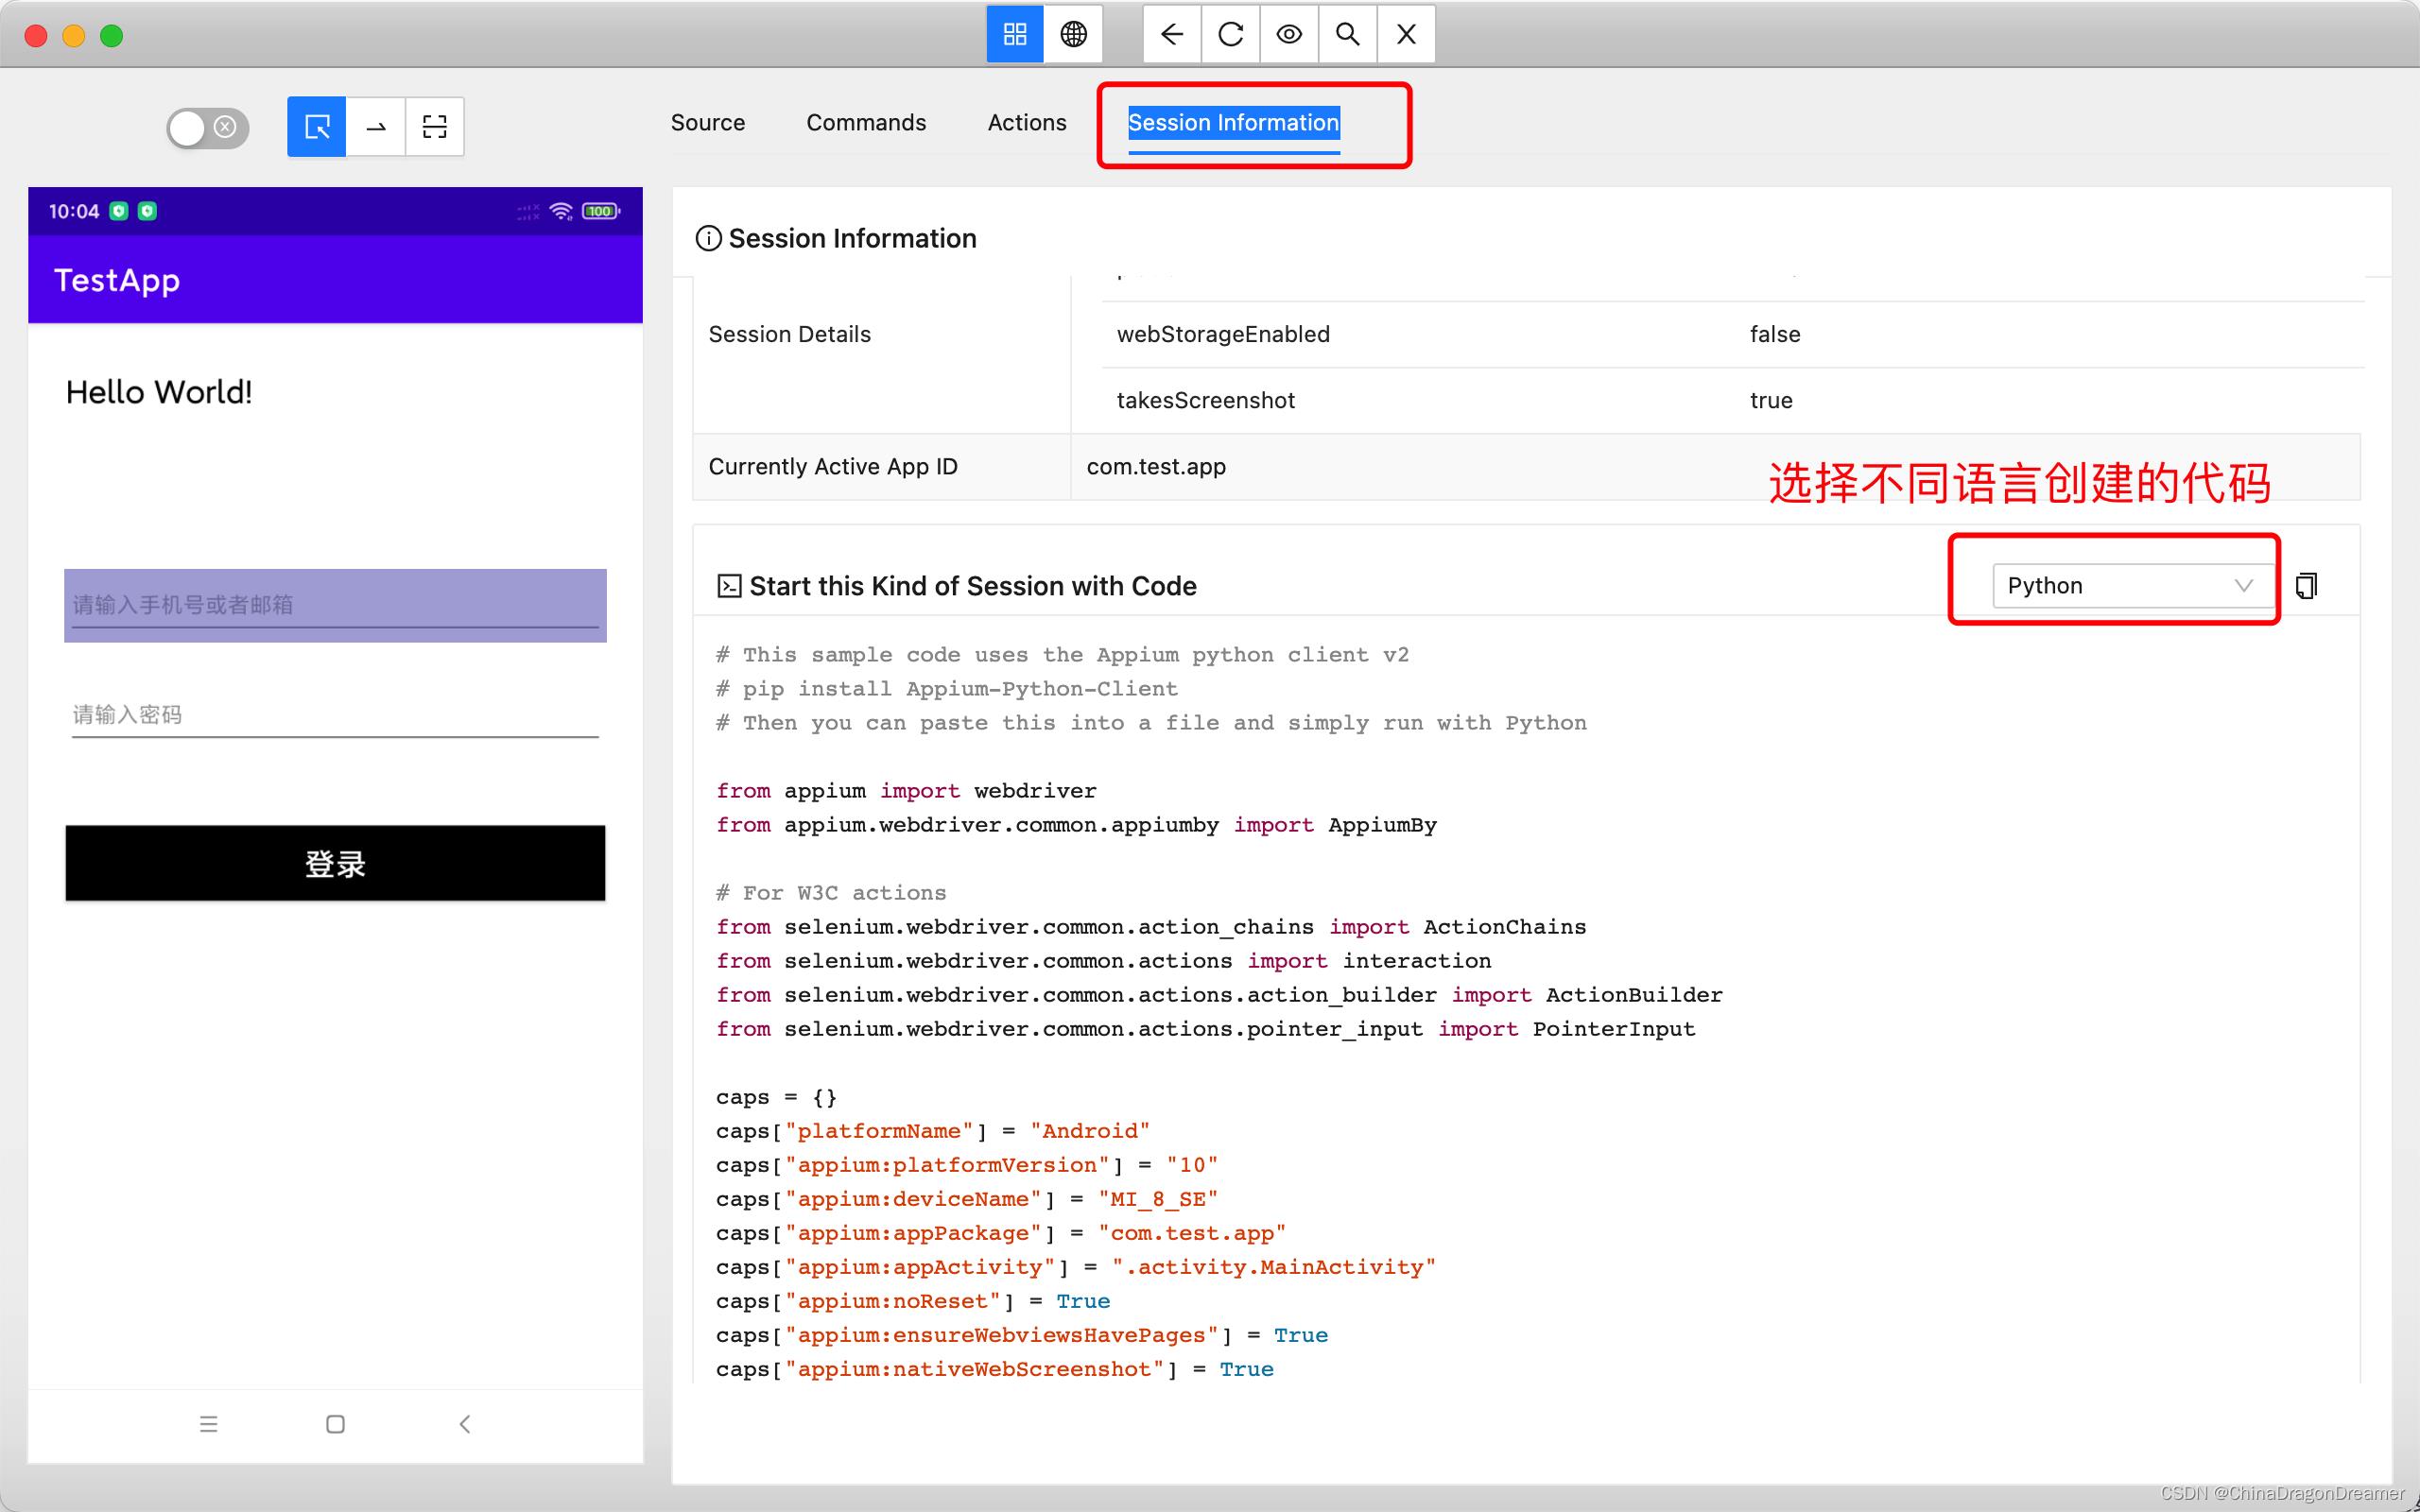
Appium-Inspector运行Start Session 界面介绍
四、注意事项
一、Apium-Server-Gui
环境变量配置:
1. Android SDK安装目录;
2. Java JDK安装目录;
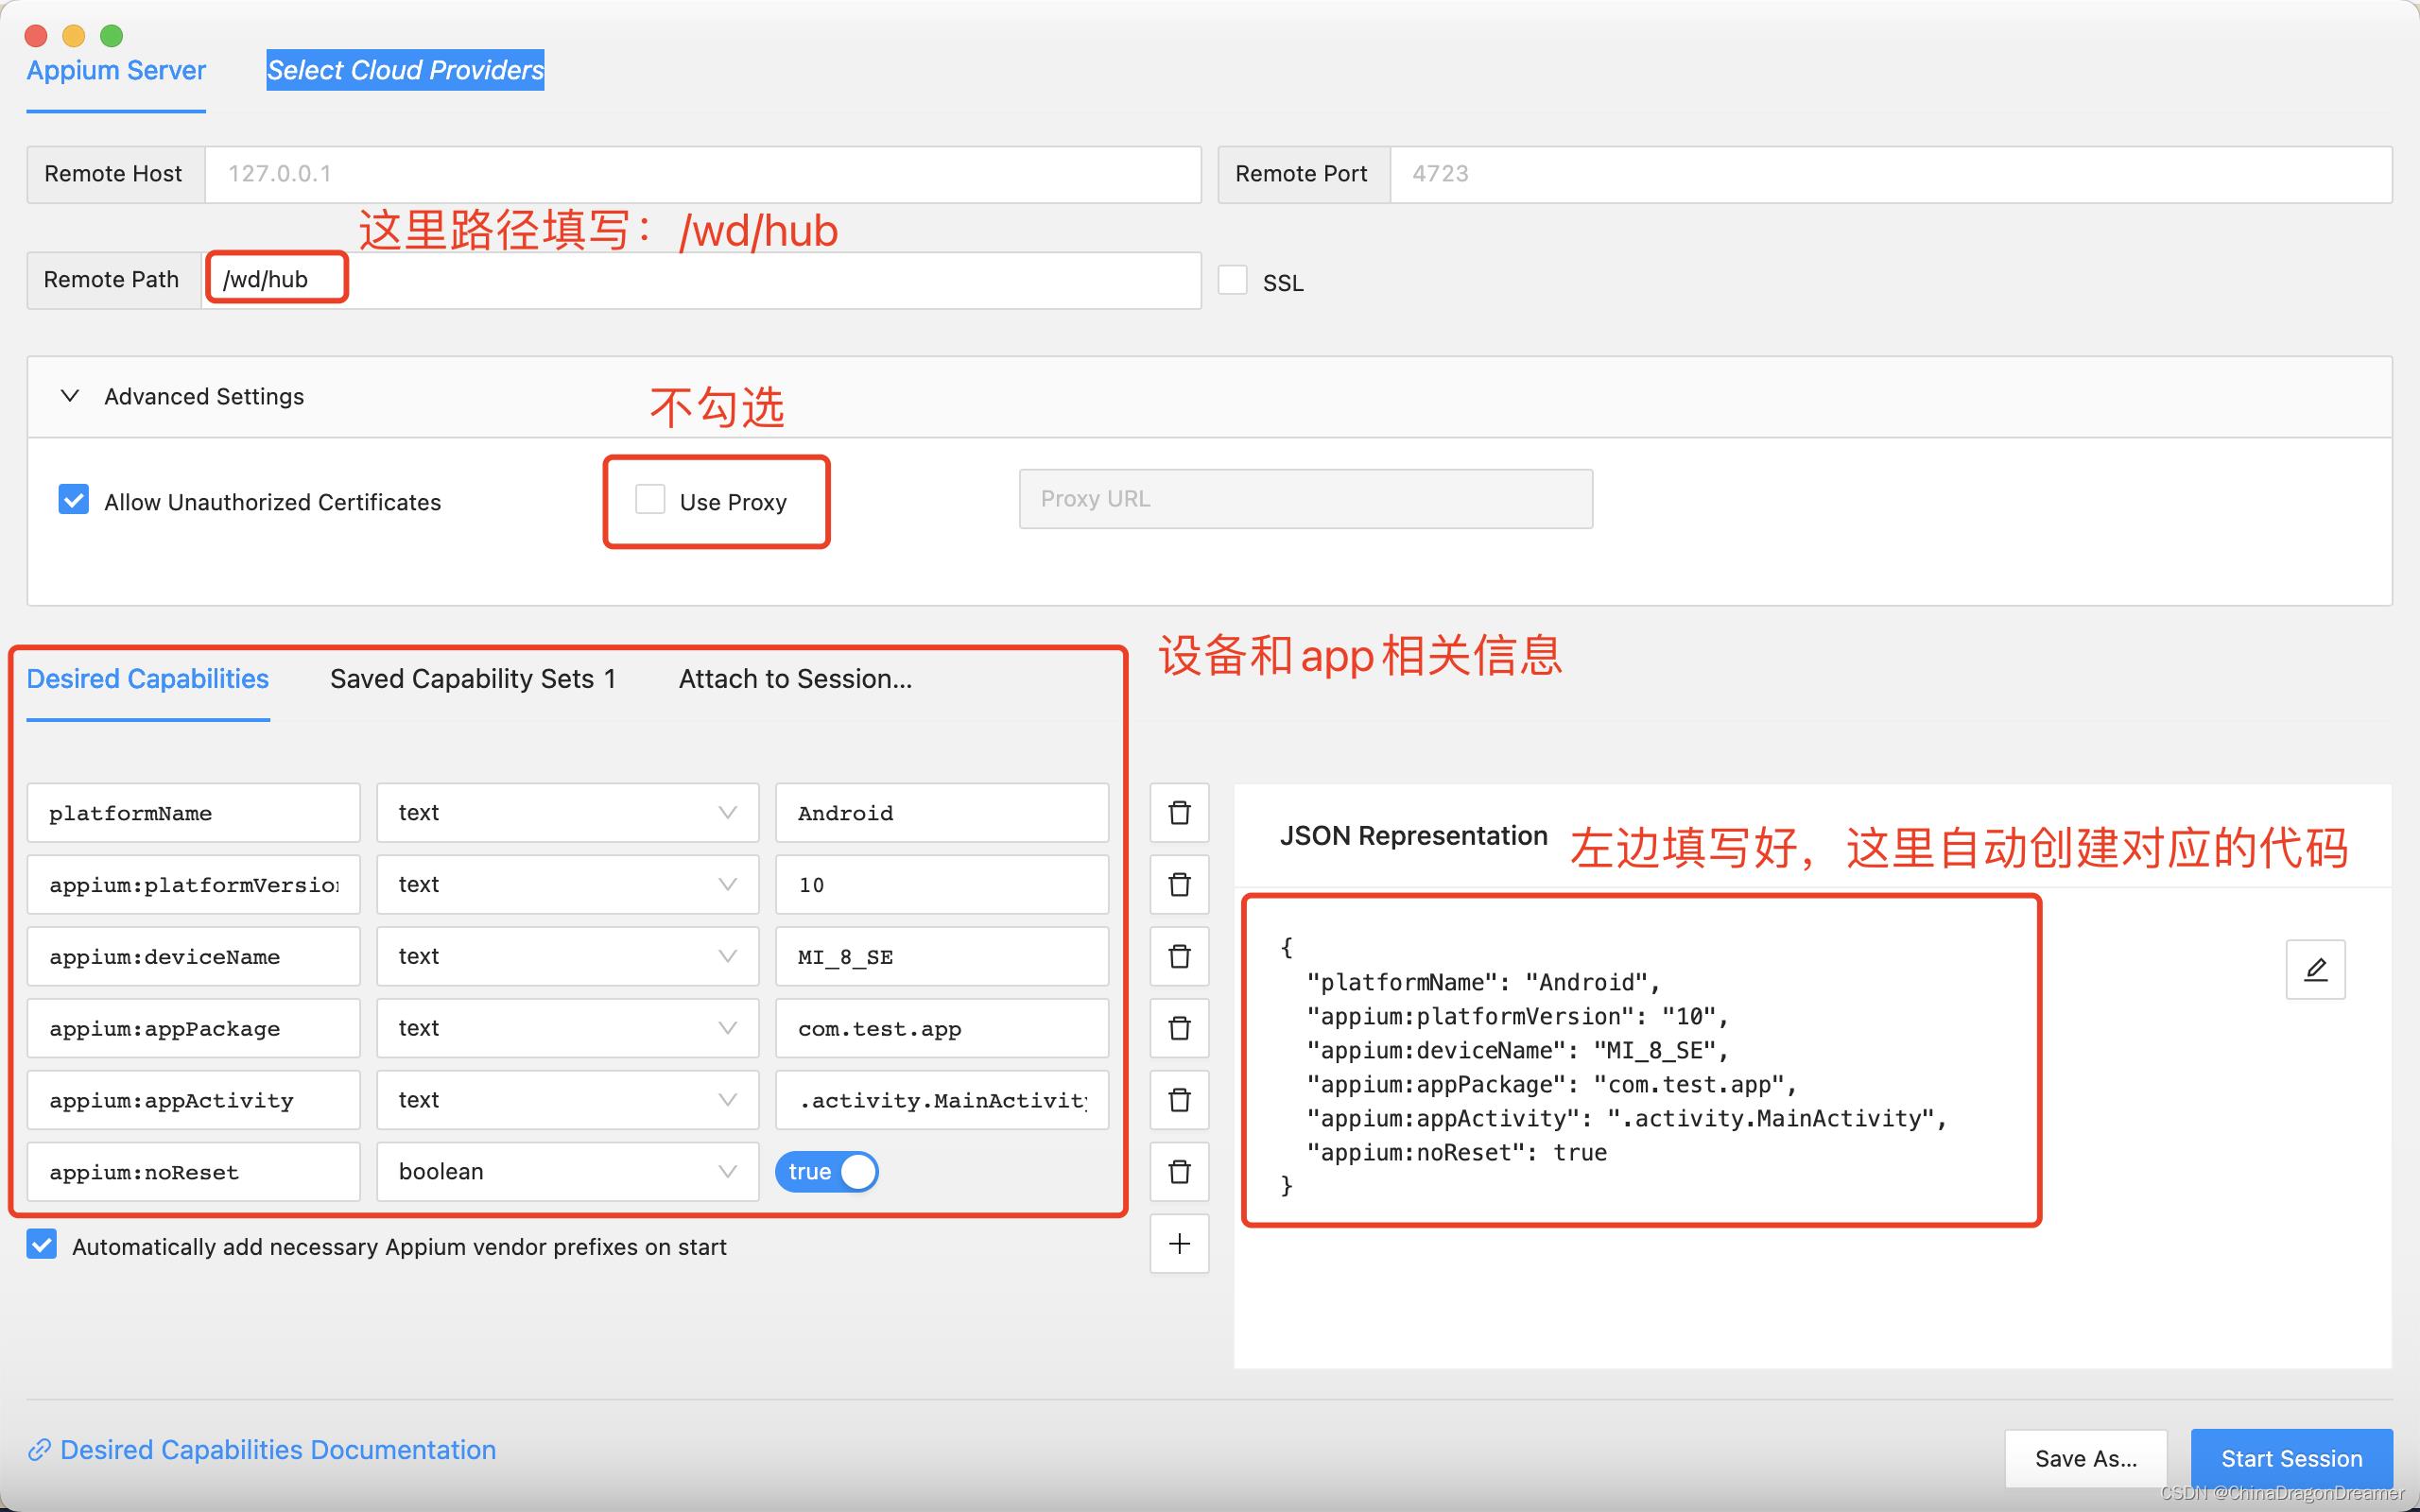
二、Appium-Inspector
1. 远程路径(Remote Path):/wd/hub
2. 高级设置(Advanced Settings):勾选 Allow Unauthorized Certificates,不勾选 Use Proxy
三、手机设置进入开发者选项(开发者模式)
1. 开发USB调试
2. 打开USB调试(安全设置)
四、手机安装AppiumSettings
1. 如果手机是第一次连接appium,会提示下载一个软件【Appium Settings】,正常下载安装即可
五、adb 命令
1. adb devices -l	查看已链接的设备
2. adb shell getprop ro.build.version.release	查看Android内核版本号
3. adb shell dumpsys activity | findstr “mResume” 查看手机屏幕当前应用页面Activity名称已经包名 (window)
4. adb shell dumpsys window | grep mCurrent	查看手机屏幕当前应用页面Activity名称已经包名(mac)
六、python代码
# 新建一个py文件,例如:mi_8se_testapp.py,将下面代码复制粘贴到py文件
import time

from appium import webdriver
# appium 报错 需要安装 Appium-Python-Client;webdriver 报错需要安装 Appium Python Client: WebDriver module
#安装方式 在报错的提示地方点击 install

from appium.webdriver.common.appiumby import AppiumBy

# For W3C actions
from selenium.webdriver.common.action_chains import ActionChains
from selenium.webdriver.common.actions import interaction
from selenium.webdriver.common.actions.action_builder import ActionBuilder
from selenium.webdriver.common.actions.pointer_input import PointerInput

caps =
caps["platformName"] = "Android"
caps["appium:platformVersion"] = "10"
caps["appium:deviceName"] = "MI_8_SE"
caps["appium:appPackage"] = "com.app.appnewframe"
caps["appium:appActivity"] = ".activity.LoginActivity"
caps["appium:noReset"] = True
caps["appium:ensureWebviewsHavePages"] = True
caps["appium:nativeWebScreenshot"] = True
caps["appium:newCommandTimeout"] = 3600
caps["appium:connectHardwareKeyboard"] = True
# driver = webdriver.Remote("http://127.0.0.1:4723/wd/hub", caps)

# 或者用下面的配置参数
desired_caps =
    'platformName': 'Android',
    'platformVersion': '10',
    'deviceName': 'MI_8_SE',
    'appPackage': 'com.test.app',
    'appActivity': '.activity.MainActivity',
    'noReset': True


driver = webdriver.Remote("http://127.0.0.1:4723/wd/hub", desired_caps)
#点击Remote 查看源码,其中 command_executor: str = 'http://127.0.0.1:4444/wd/hub'

driver.find_element(by=AppiumBy.ID, value="et_account").set_text("test@admin.com")
driver.find_element(by=AppiumBy.ID, value="et_pwd").set_text("test 123456")
driver.find_element(by=AppiumBy.ID, value="btn_login").click()


# find_element(by=AppiumBy.ID, value="et_account") , 点击 find_element方法查看源码,by=AppiumBy.ID,value是元素的 id名称
# 搜索完后调用driver.quit()会直接退出app
# input('**********')
# 10秒钟之后退出程序
time.sleep(10)
#搜索完后不会退出app
# driver.quit()
7、TestApp代码
build.gradle代码
plugins
    id 'com.android.application'
    id 'org.jetbrains.kotlin.android'


android
    compileSdk 31

    defaultConfig
        applicationId "com.test.app"
        minSdk 23
        targetSdk 31
        versionCode 1
        versionName "1.0"

        testInstrumentationRunner "androidx.test.runner.AndroidJUnitRunner"

    // 签名文件别名testapp, 123456,123456

    buildTypes
        release
            minifyEnabled false
            proguardFiles getDefaultProguardFile('proguard-android-optimize.txt'), 'proguard-rules.pro'


    compileOptions
        sourceCompatibility JavaVersion.VERSION_11
        targetCompatibility JavaVersion.VERSION_11

    kotlinOptions
        jvmTarget = '11'


dependencies

    implementation 'androidx.core:core-ktx:1.7.0'
    implementation 'androidx.lifecycle:lifecycle-runtime-ktx:2.2.0'
    implementation 'androidx.lifecycle:lifecycle-viewmodel-ktx:2.2.0'
    implementation 'androidx.appcompat:appcompat:1.3.0'
    implementation 'com.google.android.material:material:1.4.0'
    implementation 'androidx.constraintlayout:constraintlayout:2.0.4'
    implementation 'org.jetbrains.kotlinx:kotlinx-coroutines-core:1.6.0'
    testImplementation 'junit:junit:4.13.2'
    androidTestImplementation 'androidx.test.ext:junit:1.1.3'
    androidTestImplementation 'androidx.test.espresso:espresso-core:3.4.0'
activity_main.xml布局代码
<?xml version="1.0" encoding="utf-8"?>
<androidx.appcompat.widget.LinearLayoutCompat xmlns:android="http://schemas.android.com/apk/res/android"
    xmlns:app="http://schemas.android.com/apk/res-auto"
    xmlns:tools="http://schemas.android.com/tools"
    android:layout_width="match_parent"
    android:layout_height="match_parent"
    android:orientation="vertical"
    tools:context=".activity.MainActivity">

    <androidx.appcompat.widget.AppCompatTextView
        android:layout_width="match_parent"
        android:layout_height="wrap_content"
        android:layout_marginLeft="24dp"
        android:layout_marginTop="30dp"
        android:text="Hello World!"
        android:textColor="@color/black"
        android:textSize="20sp" />

    <androidx.appcompat.widget.AppCompatEditText
        android:id="@+id/et_account"
        android:layout_width="match_parent"
        android:layout_height="46dp"
        android:layout_marginLeft="24dp"
        android:layout_marginTop="100dp"
        android:layout_marginRight="24dp"
        android:hint="请输入手机号或者邮箱"
        android:textColor="@color/black"
        android:textSize="14sp" />

    <androidx.appcompat.widget.AppCompatEditText
        android:id="@+id/et_pwd"
        android:layout_width="match_parent"
        android:layout_height="46dp"
        android:layout_margin="24dp"
        android:hint="请输入6 ~ 20 位密码"
        android:maxLength="20"
        android:inputType="textPassword"
        android:textColor="@color/black"
        android:textSize="14sp" />

    <androidx.appcompat.widget.AppCompatButton
        android:id="@+id/btn_login"
        android:layout_width="match_parent"
        android:layout_height="wrap_content"
        android:layout_margin="24dp"
        android:background="@color/black"
        android:gravity="center"
        android:text="登录"
        android:textColor="@color/white"
        android:textSize="20sp" />


</androidx.appcompat.widget.LinearLayoutCompat>
MainActivity.kt代码
package com.test.app.activity

import android.os.Bundle
import android.text.TextUtils
import android.view.Gravity
import android.widget.Toast
import androidx.appcompat.app.AppCompatActivity
import androidx.appcompat.widget.AppCompatButton
import androidx.appcompat.widget.AppCompatEditText
import com.test.app.R
import kotlinx.coroutines.*

class MainActivity : AppCompatActivity()
    private lateinit var et_account: AppCompatEditText
    private lateinit var et_pwd: AppCompatEditText
    private lateinit var btn_login: AppCompatButton
    private val mainScope = MainScope()
    private var mToast: Toast? = null
    override fun onCreate(savedInstanceState: Bundle?)
        super.onCreate(savedInstanceState)
        setContentView(R.layout.activity_main)
        initView()
        initEvent()


    private fun initView()
        et_account = findViewById(R.id.et_account)
        et_pwd = findViewById(R.id.et_pwd)
        btn_login = findViewById(R.id.btn_login)


    private fun initEvent()
        btn_login.setOnClickListener
            login()


    private fun login()

        val account = et_account.text.toString()
        if (account.isNullOrBlank())
            show("请输入手机号或者邮箱")
            return

        val pwd = et_pwd.text.toString()

        if (pwd.isNullOrBlank())
            show("请输入密码")
            return


        if (pwd.length < 5)
            show("输入密码长度不能小于5位")
            return


        mainScope.launch
            show("登录中...")
            withContext(Dispatchers.IO)
                //模拟网络请求耗时操作
                delay(2000)


            if ("test@admin.com".equals(account) && "123456".equals(pwd))
                show("登录成功")
             else
                show("登录失败")


    fun show(text: CharSequence?)
        if (TextUtils.isEmpty(text)) return
        mToast?.let
            it.cancel()
            mToast = null

        mToast = Toast.makeText(this, "", Toast.LENGTH_SHORT)
        mToast?.apply
            setText(text)
            setGravity(Gravity.CENTER, 0, 0)
            show()


    override fun onDestroy()
        mainScope.cancel()
        super.onDestroy()
8、自动化测试效果图
参考文章
Appium基于Python APP自动化测试框架 -- PO
关于对自动化测试框架PO的认识详见之前我写的博客:http://www.cnblogs.com/hanxiaobei/p/6755329.html
本篇主要是说appium自动化测试如何有PO的设计思想来实现。
PO模型的目录结构:

其中,main.py为框架的主入口,test_creat.py调用creat_page.py,creat_page.py调用base_page.py。
PO代码示例:
main.py
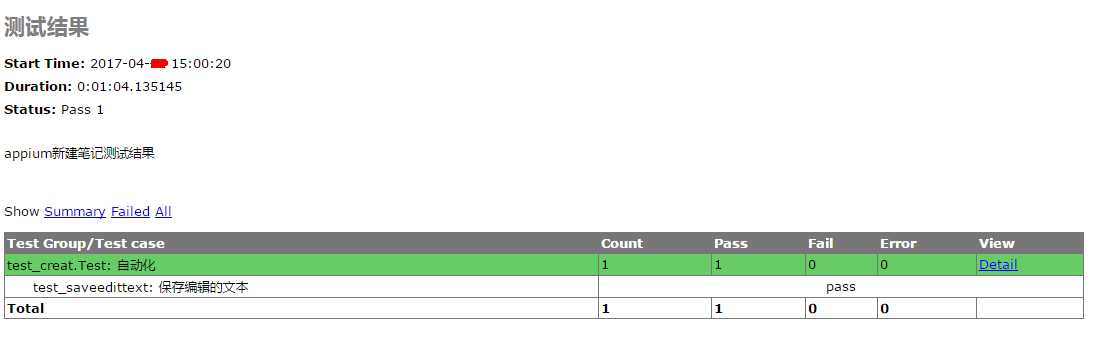
 1 import unittest
 2 import HTMLTestRunner
 3
 4 #相对路径
 5 testcase_path = ".\\\\testcase"
 6 report_path = ".\\\\report\\\\appium_report.html"
 7 def creat_suite():
 8     uit = unittest.TestSuite()
 9     discover = unittest.defaultTestLoader.discover(testcase_path,pattern="test_*.py")
10     for test_suite in discover:
11         # print(test_suite)
12         for test_case in test_suite:
13             uit.addTest(test_case)
14     return uit
15
16 suite = creat_suite()
17 fp = open(report_path,"wb")
18 runner = HTMLTestRunner.HTMLTestRunner(stream=fp,title="测试结果",description="appium新建笔记测试结果")
19 runner.run(suite)
20 fp.close()
test_creat.py
 1 from appium import webdriver
 2 import unittest
 3 from appiumframework.PO.creat_page import CreatPage
 4 import time
 5
 6 class Test(unittest.TestCase):
 7     """自动化"""
 8     def setUp(self):
 9         desired_caps = {
10             ‘platformName‘: ‘Android‘,
11             ‘deviceName‘: ‘Android Emulator‘,#可有可无
12             ‘platformVersion‘: ‘5.0‘,
13             # apk包名
14             ‘appPackage‘: ‘com.smartisan.notes‘,
15             # apk的launcherActivity
16             ‘appActivity‘: ‘com.smartisan.notes.NewNotesActivity‘,
17             #如果存在activity之间的切换可以用这个
18             # ‘appWaitActivity‘:‘.MainActivity‘,
19             ‘unicodeKeyboard‘: True,
20             #隐藏手机中的软键盘
21             ‘resetKeyboard‘: True
22             }
23         self.driver = webdriver.Remote(‘http://127.0.0.1:4723/wd/hub‘,desired_caps)
24         time.sleep(5)
25         self.verificationErrors = "今天天气不错在家学习!"
26
27     def tearDown(self):
28         time.sleep(10)
29         self.driver.quit()
30
31     def test_saveedittext(self):
32         """保存编辑的文本"""
33         sp = CreatPage(self.driver)
34         sp.add_button_link()
35         sp.run_case("今天天气不错在家学习!")
36         #断言:实际结果,预期结果,错误信息
37         self.assertEqual(sp.get_finish_button_text(),self.verificationErrors,msg="验证失败!")
creat_page.py
 1 from appiumframework.PO import base_page
 2 import time
 3
 4 class CreatPage(base_page.Action):
 5     add_button_loc = ("com.smartisan.notes:id/add_button")
 6     edittext_loc = ("com.smartisan.notes:id/list_rtf_view")
 7     finish_button_loc = ("com.smartisan.notes:id/send_finish_button")
 8
 9     def add_button_link(self):
10         self.find_element(self.add_button_loc).click()
11         time.sleep(3)           #等待3秒,等待登录弹窗加载完成
12
13     def run_case(self,value):
14         self.find_element(self.edittext_loc).send_keys(value)
15         time.sleep(5)
16         self.find_element(self.finish_button_loc).click()
17         time.sleep(2)
18
19     def get_finish_button_text(self):
20         return self.find_element(self.edittext_loc).text
base_page.py
 1 class Action(object):
 2     #初始化
 3     def __init__(self,se_driver):
 4         self.driver = se_driver
 5
 6     #重写元素定位的方法
 7     def find_element(self,loc):
 8         try:
 9             return self.driver.find_element_by_id(loc)
10         except Exception as e:
11             print("未找到%s"%(self,loc))
测试报告截图:
以上是关于Python +Appium 实现app自动化测试的主要内容,如果未能解决你的问题,请参考以下文章